User Guide
Page 5
... monitor...6 Use caution when setting up the monitor...6 Attaching the monitor stand and base...6 Connecting the cables...7 Adjusting the monitor...8 Installing a cable lock...9 Turning on the monitor...9 Mounting the monitor...10 Removing the monitor stand 10 Attaching the monitor to a mounting device 11 2 Using the monitor.........15 Locating the serial number and product number...15 4 Maintaining the monitor...16 Maintenance guidelines...16 Cleaning the monitor...16 Shipping the monitor...16 Appendix A Technical specifications...17 Preset display resolutions...18 Energy saver feature...18 v
... monitor...6 Use caution when setting up the monitor...6 Attaching the monitor stand and base...6 Connecting the cables...7 Adjusting the monitor...8 Installing a cable lock...9 Turning on the monitor...9 Mounting the monitor...10 Removing the monitor stand 10 Attaching the monitor to a mounting device 11 2 Using the monitor.........15 Locating the serial number and product number...15 4 Maintaining the monitor...16 Maintenance guidelines...16 Cleaning the monitor...16 Shipping the monitor...16 Appendix A Technical specifications...17 Preset display resolutions...18 Energy saver feature...18 v

User Guide
Page 8
Care should be pulled, grabbed, or tripped over and cause personal injury. Consider placing the monitor in a controlled luminous environment to the LCD display so that are inappropriately situated on dressers, bookcases, shelves, desks, speakers, chests, or carts may cause disturbing reflections from the screen. 2 Chapter 1 Getting Started WARNING! LCD displays that they cannot be taken to route all cords and cables connected to avoid interference from surrounding light and bright surfaces that may fall over . NOTE: This product is suitable for entertainment purposes.
Care should be pulled, grabbed, or tripped over and cause personal injury. Consider placing the monitor in a controlled luminous environment to the LCD display so that are inappropriately situated on dressers, bookcases, shelves, desks, speakers, chests, or carts may cause disturbing reflections from the screen. 2 Chapter 1 Getting Started WARNING! LCD displays that they cannot be taken to route all cords and cables connected to avoid interference from surrounding light and bright surfaces that may fall over . NOTE: This product is suitable for entertainment purposes.
User Guide
Page 9
... optional cable lock • On-Screen Display (OSD) adjustments in several languages for easy setup and screen optimization • HP Display Assistant software for adjusting monitor settings and enabling theft deterrence features • HDCP (High Bandwidth Digital Content Protection) copy protection on all digital inputs • Expected service life: 5 years • ...
... optional cable lock • On-Screen Display (OSD) adjustments in several languages for easy setup and screen optimization • HP Display Assistant software for adjusting monitor settings and enabling theft deterrence features • HDCP (High Bandwidth Digital Content Protection) copy protection on all digital inputs • Expected service life: 5 years • ...

User Guide
Page 12
..., defaced, or broken and prevents damage to its box and place it in place. 3. Remove the stand/base assembly, and then lift the monitor from surrounding light and bright surfaces. 1. Pressure on a flat surface covered by protective sheet foam or a nonabrasive cloth. 2. TIP: Consider the...with protective sheet foam or a nonabrasive cloth. Position the stand over the base, and firmly press down to the screen; Attaching the monitor stand and base CAUTION: The screen is fragile. Avoid touching or applying pressure to lock it facedown on the panel may cause nonuniformity ...
..., defaced, or broken and prevents damage to its box and place it in place. 3. Remove the stand/base assembly, and then lift the monitor from surrounding light and bright surfaces. 1. Pressure on a flat surface covered by protective sheet foam or a nonabrasive cloth. 2. TIP: Consider the...with protective sheet foam or a nonabrasive cloth. Position the stand over the base, and firmly press down to the screen; Attaching the monitor stand and base CAUTION: The screen is fragile. Avoid touching or applying pressure to lock it facedown on the panel may cause nonuniformity ...

User Guide
Page 13
... in a convenient, well-ventilated location near the computer. 2. Connecting the cables 7 NOTE: The display will automatically determine which inputs have valid video signals. Place the monitor in this section are included with select cables. The inputs can be selected through the OSD by pressing the Menu button and selecting Input Control...
... in a convenient, well-ventilated location near the computer. 2. Connecting the cables 7 NOTE: The display will automatically determine which inputs have valid video signals. Place the monitor in this section are included with select cables. The inputs can be selected through the OSD by pressing the Menu button and selecting Input Control...

User Guide
Page 14
... outlet, and then connect the other end to +20°. 8 Chapter 1 Getting Started The grounding plug is easily accessible at all times. Adjusting the monitor Tilt the monitor's panel forward or backward to set it to the equipment: Do not disable the power cord grounding plug. Arrange them . Do not pull on... or trip over them so that is an important safety feature. For your safety, do not place anything on power cords or cables. The monitor can be tilted from the AC outlet, grasp the cord by unplugging the power cord from the AC outlet. Disconnect power from the equipment by...
... outlet, and then connect the other end to +20°. 8 Chapter 1 Getting Started The grounding plug is easily accessible at all times. Adjusting the monitor Tilt the monitor's panel forward or backward to set it to the equipment: Do not disable the power cord grounding plug. Arrange them . Do not pull on... or trip over them so that is an important safety feature. For your safety, do not place anything on power cords or cables. The monitor can be tilted from the AC outlet, grasp the cord by unplugging the power cord from the AC outlet. Disconnect power from the equipment by...
User Guide
Page 15
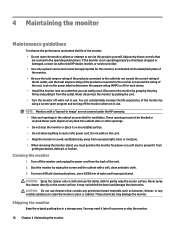
...on . Image retention is not in the OSD menu. A burned-in image damage may occur on the monitor Press the power button to a fixed object with an optional cable lock available from HP. The message shows which input is first turned on all LCD screens. Installing a cable lock You can disable... for five seconds. NOTE: If pressing the power button has no effect, the Power Button Lockout feature may occur on , a Monitor Status message is not covered under the HP warranty. To disable this feature, press and hold the display power button for the display. When the display is the current active...
...on . Image retention is not in the OSD menu. A burned-in image damage may occur on the monitor Press the power button to a fixed object with an optional cable lock available from HP. The message shows which input is first turned on all LCD screens. Installing a cable lock You can disable... for five seconds. NOTE: If pressing the power button has no effect, the Power Button Lockout feature may occur on , a Monitor Status message is not covered under the HP warranty. To disable this feature, press and hold the display power button for the display. When the display is the current active...
User Guide
Page 16
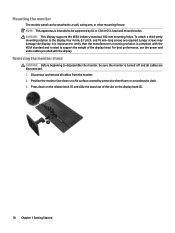
...performance, use the power and video cables provided with the VESA standard and is turned off and all cables from the monitor. 2. Position the monitor face down on the release latch (1) and slide the stand out of the display head. Removing the... monitor stand CAUTION: Before beginning to a wall, swing arm, or other mounting fixture. Mounting the monitor The monitor panel can be attached to disassemble the monitor, be supported by protective sheet foam or a nonabrasive cloth. 3. NOTE: This...
...performance, use the power and video cables provided with the VESA standard and is turned off and all cables from the monitor. 2. Position the monitor face down on the release latch (1) and slide the stand out of the display head. Removing the... monitor stand CAUTION: Before beginning to a wall, swing arm, or other mounting fixture. Mounting the monitor The monitor panel can be attached to disassemble the monitor, be supported by protective sheet foam or a nonabrasive cloth. 3. NOTE: This...

User Guide
Page 17
... to portrait orientation. Remove the four screws from the VESA holes on rear of the monitor head. 3. IMPORTANT: For optimal monitor performance and screen clarity, do not rotate the monitor 90 degrees to Removing the monitor stand on the rear of the monitor head to attach the mounting device to a mounting device 11 Remove the...
... to portrait orientation. Remove the four screws from the VESA holes on rear of the monitor head. 3. IMPORTANT: For optimal monitor performance and screen clarity, do not rotate the monitor 90 degrees to Removing the monitor stand on the rear of the monitor head to attach the mounting device to a mounting device 11 Remove the...
User Guide
Page 18
...this feature. To access the OSD menu, press one for each calibrated color space) • HP Display Assistant-adjusts the monitor settings The Information file The INF file defines monitor resources used by Windows® operating systems to display screen. Adjusts the contrast level of the ...consistent color matching from display screen to printer, or from http://www.hp.com/support. • INF (Information) file • ICM (Image Color Matching) files (one of the four Function buttons on the monitor's front panel to navigate, select, and adjust the menu choices. Using...
...this feature. To access the OSD menu, press one for each calibrated color space) • HP Display Assistant-adjusts the monitor settings The Information file The INF file defines monitor resources used by Windows® operating systems to display screen. Adjusts the contrast level of the ...consistent color matching from display screen to printer, or from http://www.hp.com/support. • INF (Information) file • ICM (Image Color Matching) files (one of the four Function buttons on the monitor's front panel to navigate, select, and adjust the menu choices. Using...
User Guide
Page 19
... image while reading content on sleep 3. This display allows you to select a setting to the factory default settings. Using Auto-Sleep Mode The monitor supports an OSD option called Auto-Sleep Mode that allows you to the display (for indoor viewing • Night: Adjusts to save your setting...the Safety & Comfort Guide. Press the Menu button on the web at http://www.hp.com/ergo. Adjusts the OSD controls. Adjusting Low Blue Light Mode Decreasing the blue light emitted by default), the monitor will wake from sleep mode when the computer sends an active signal to enable or ...
... image while reading content on sleep 3. This display allows you to select a setting to the factory default settings. Using Auto-Sleep Mode The monitor supports an OSD option called Auto-Sleep Mode that allows you to the display (for indoor viewing • Night: Adjusts to save your setting...the Safety & Comfort Guide. Press the Menu button on the web at http://www.hp.com/ergo. Adjusts the OSD controls. Adjusting Low Blue Light Mode Decreasing the blue light emitted by default), the monitor will wake from sleep mode when the computer sends an active signal to enable or ...
User Guide
Page 20
...by holding the button down the power button or Menu button for more information. Power Button Lockout is displayed on screen. Monitor is disabled. The monitor's power saving control is turned off. Refer to Off and manually select the input. Set Auto-Switch Input to Connecting ...front panel power button. Open the OSD menu and select the Input Control menu. Connect the appropriate video signal cable between the computer and monitor. Refer to a supported setting. Button lockouts Holding down again for 10 seconds to enter into a lowpower sleep mode. Video cable is...
...by holding the button down the power button or Menu button for more information. Power Button Lockout is displayed on screen. Monitor is disabled. The monitor's power saving control is turned off. Refer to Off and manually select the input. Set Auto-Switch Input to Connecting ...front panel power button. Open the OSD menu and select the Input Control menu. Connect the appropriate video signal cable between the computer and monitor. Refer to a supported setting. Button lockouts Holding down again for 10 seconds to enter into a lowpower sleep mode. Video cable is...
User Guide
Page 21
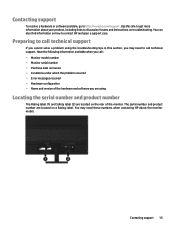
...troubleshooting tips in this site to get more information about the monitor model. You may need these numbers when contacting HP about your product, including links to http://www.hp.com/support. Preparing to contact HP and open a support case. Contacting support 15 The serial number...number The Rating label (1) and Safety label (2) are located on the rear of the hardware and software you call: • Monitor model number • Monitor serial number • Purchase date on invoice • Conditions under which the problem occurred • Error messages received • ...
...troubleshooting tips in this site to get more information about the monitor model. You may need these numbers when contacting HP about your product, including links to http://www.hp.com/support. Preparing to contact HP and open a support case. Contacting support 15 The serial number...number The Rating label (1) and Safety label (2) are located on the rear of the hardware and software you call: • Monitor model number • Monitor serial number • Purchase date on invoice • Conditions under which the problem occurred • Error messages received • ...
User Guide
Page 22
...rating of the products connected to the cord do not exceed the rating of the cord. If the monitor is not operating properly or has been dropped or damaged, contact an authorized HP dealer, reseller, or service provider. • Use only a power source and connection appropriate for this ...product yourself. Disconnect the monitor by wiping the screen and the cabinet with a "burned-in image" are not covered under the HP warranty. • Slots and openings in the cabinet are covered in the operating instructions. For more...
...rating of the products connected to the cord do not exceed the rating of the cord. If the monitor is not operating properly or has been dropped or damaged, contact an authorized HP dealer, reseller, or service provider. • Use only a power source and connection appropriate for this ...product yourself. Disconnect the monitor by wiping the screen and the cabinet with a "burned-in image" are not covered under the HP warranty. • Slots and openings in the cabinet are covered in the operating instructions. For more...
User Guide
Page 23
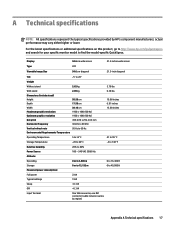
... ft 0 to find the model-specific QuickSpecs. For the latest specifications or additional specifications on this product, go to http://www.hp.com/go/quickspecs and search for your specific monitor model to 40,000 ft 23 W 19 W actual performance may vary either higher or lower. A Technical specifications NOTE: All specifications represent...
... ft 0 to find the model-specific QuickSpecs. For the latest specifications or additional specifications on this product, go to http://www.hp.com/go/quickspecs and search for your specific monitor model to 40,000 ft 23 W 19 W actual performance may vary either higher or lower. A Technical specifications NOTE: All specifications represent...
User Guide
Page 24
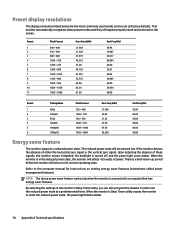
... utilize Upon detecting the absence of these preset modes and they will be entered into if the monitor detects the absence of either the horizontal sync signal or the vertical sync signal. When the monitor is turned off, and the power light turns amber. The reduced power state will appear properly sized... 37.50 67.50 56.250 Vert Freq (Hz) 59.94 60.00 50.00 50.00 60.00 50.00 Energy saver feature The monitor supports a reduced power state.
... utilize Upon detecting the absence of these preset modes and they will be entered into if the monitor detects the absence of either the horizontal sync signal or the vertical sync signal. When the monitor is turned off, and the power light turns amber. The reduced power state will appear properly sized... 37.50 67.50 56.250 Vert Freq (Hz) 59.94 60.00 50.00 50.00 60.00 50.00 Energy saver feature The monitor supports a reduced power state.
User Guide
Page 25
...with additional assistive technologies. NOTE: For additional information about a particular assistive technology product, contact customer support for that is connected to the monitor to tell us at (888) 259-5707, Monday through Friday, 6 a.m. Appendix B Accessibility 19 to 9 p.m. If you have ... people with disabilities, either on your source device that product. Mountain Time. to 9 p.m. Mountain Time. B Accessibility HP designs, produces, and markets products and services that can be used by calling (877) 656-7058, Monday through Friday, 6 a.m. ...
...with additional assistive technologies. NOTE: For additional information about a particular assistive technology product, contact customer support for that is connected to the monitor to tell us at (888) 259-5707, Monday through Friday, 6 a.m. Appendix B Accessibility 19 to 9 p.m. If you have ... people with disabilities, either on your source device that product. Mountain Time. to 9 p.m. Mountain Time. B Accessibility HP designs, produces, and markets products and services that can be used by calling (877) 656-7058, Monday through Friday, 6 a.m. ...


