
User Guide
Page 2
.... Then select User Guides. The information contained herein is subject to find your product. Nothing herein should be liable for HP products and services are common to most models. The only warranties for technical or editorial errors or omissions contained herein. To access the latest user guide, go to http://www.hp.com/support, and follow the instructions to change without notice.
.... Then select User Guides. The information contained herein is subject to find your product. Nothing herein should be liable for HP products and services are common to most models. The only warranties for technical or editorial errors or omissions contained herein. To access the latest user guide, go to http://www.hp.com/support, and follow the instructions to change without notice.

User Guide
Page 3
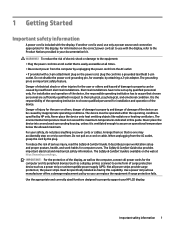
... in loss of the main text. TIP: Provides helpful hints for example, messages related to hardware or software. iii WARNING! IMPORTANT: Indicates information considered important but not hazard-related (for completing a task. About This Guide This guide provides information on display features, setting up the display, using the software and technical specifications. NOTE: Contains additional information to equipment or loss...
... in loss of the main text. TIP: Provides helpful hints for example, messages related to hardware or software. iii WARNING! IMPORTANT: Indicates information considered important but not hazard-related (for completing a task. About This Guide This guide provides information on display features, setting up the display, using the software and technical specifications. NOTE: Contains additional information to equipment or loss...
User Guide
Page 5
... monitor...6 Use caution when setting up the monitor...6 Attaching the monitor stand and base...6 Connecting the cables...7 Adjusting the monitor...8 Installing a cable lock...9 Turning on the monitor...9 Mounting the monitor...10 Removing the monitor stand 10 Attaching the monitor to a mounting device 11 2 Using the monitor...12 Software and utilities...12 The Information file...12 The Image Color Matching file...12 Using the On-Screen Display (OSD) menu...12 Adjusting Low Blue Light Mode...13 Using Auto-Sleep Mode...13 3 Support and troubleshooting...14 Solving common problems...14 Button...
... monitor...6 Use caution when setting up the monitor...6 Attaching the monitor stand and base...6 Connecting the cables...7 Adjusting the monitor...8 Installing a cable lock...9 Turning on the monitor...9 Mounting the monitor...10 Removing the monitor stand 10 Attaching the monitor to a mounting device 11 2 Using the monitor...12 Software and utilities...12 The Information file...12 The Image Color Matching file...12 Using the On-Screen Display (OSD) menu...12 Adjusting Low Blue Light Mode...13 Using Auto-Sleep Mode...13 3 Support and troubleshooting...14 Solving common problems...14 Button...
User Guide
Page 7
... qualified personnel only. For your HP LCD display. the power strips must be specifically labeled as the computer, connect all power strips provide surge protection; Use the appropriate and correctly sized furniture designed to property and danger of damage of damage to properly support your safety, do not place anything on the correct power cord set up by the plug. To reduce the risk...
... qualified personnel only. For your HP LCD display. the power strips must be specifically labeled as the computer, connect all power strips provide surge protection; Use the appropriate and correctly sized furniture designed to property and danger of damage of damage to properly support your safety, do not place anything on the correct power cord set up by the plug. To reduce the risk...

User Guide
Page 8
Consider placing the monitor in a controlled luminous environment to the LCD display so that are inappropriately situated on dressers, bookcases, shelves, desks, speakers, chests, or carts may cause disturbing reflections from surrounding light and bright surfaces that may fall over . NOTE: This product is suitable for entertainment purposes. Care should be pulled, grabbed, or tripped over and cause personal injury. WARNING! LCD displays that they cannot be taken to route all cords and cables connected to avoid interference from the screen. 2 Chapter 1 Getting Started
Consider placing the monitor in a controlled luminous environment to the LCD display so that are inappropriately situated on dressers, bookcases, shelves, desks, speakers, chests, or carts may cause disturbing reflections from surrounding light and bright surfaces that may fall over . NOTE: This product is suitable for entertainment purposes. Care should be pulled, grabbed, or tripped over and cause personal injury. WARNING! LCD displays that they cannot be taken to route all cords and cables connected to avoid interference from the screen. 2 Chapter 1 Getting Started
User Guide
Page 9
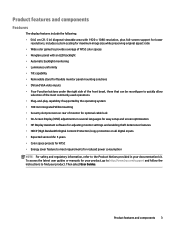
... used operations • Plug-and-play capability if supported by the operating system • 100 mm integrated VESA mounting • Security slot provision on rear of monitor for optional cable lock • On-Screen Display (OSD) adjustments in several languages for easy setup and screen optimization • HP Display Assistant software for adjusting monitor settings and enabling theft deterrence features • HDCP (High Bandwidth Digital Content Protection) copy protection on all digital inputs • Expected service...
... used operations • Plug-and-play capability if supported by the operating system • 100 mm integrated VESA mounting • Security slot provision on rear of monitor for optional cable lock • On-Screen Display (OSD) adjustments in several languages for easy setup and screen optimization • HP Display Assistant software for adjusting monitor settings and enabling theft deterrence features • HDCP (High Bandwidth Digital Content Protection) copy protection on all digital inputs • Expected service...

User Guide
Page 10
... the OSD menu and selects a video input source. 2 Power button Turns the display on the indicators next to the buttons, which are activated you want to open . Front panel controls Control Function 1 Function buttons (1-4) Use these buttons to navigate through the OSD based on or off. Opens the Information menu. Reassigning the function buttons You can not reassign the Menu button. To reconfigure Function buttons: 1. NOTE: To view an OSD menu simulator, visit the HP Customer Self Repair Services Media Library...
... the OSD menu and selects a video input source. 2 Power button Turns the display on the indicators next to the buttons, which are activated you want to open . Front panel controls Control Function 1 Function buttons (1-4) Use these buttons to navigate through the OSD based on or off. Opens the Information menu. Reassigning the function buttons You can not reassign the Menu button. To reconfigure Function buttons: 1. NOTE: To view an OSD menu simulator, visit the HP Customer Self Repair Services Media Library...

User Guide
Page 12
... display, do not touch the surface of the display head until they click into place. 6 Chapter 1 Getting Started Setting up the monitor Use caution when setting up the monitor To prevent damage to the screen; This prevents the screen from surrounding light and bright surfaces. 1. Remove the stand/base assembly, and then lift the monitor from its normal condition. TIP: Consider the placement of the liquid crystals. Position the stand...
... display, do not touch the surface of the display head until they click into place. 6 Chapter 1 Getting Started Setting up the monitor Use caution when setting up the monitor To prevent damage to the screen; This prevents the screen from surrounding light and bright surfaces. 1. Remove the stand/base assembly, and then lift the monitor from its normal condition. TIP: Consider the placement of the liquid crystals. Position the stand...

User Guide
Page 13
... Menu button and selecting Input Control. • Connect one end of a VGA cable to the VGA port on the rear of the display and the other end to the VGA port on the source device. • Connect one end of a DVI cable to the DVI port on the rear of the display and the other end to the DVI port on the source device. Connect a video cable. NOTE: The display will automatically determine which inputs have valid video signals...
... Menu button and selecting Input Control. • Connect one end of a VGA cable to the VGA port on the rear of the display and the other end to the VGA port on the source device. • Connect one end of a DVI cable to the DVI port on the rear of the display and the other end to the DVI port on the source device. Connect a video cable. NOTE: The display will automatically determine which inputs have valid video signals...

User Guide
Page 14
... damage to the display. For your safety, do not place anything on a cord or cable. When unplugging the power cord from the AC outlet, grasp the cord by unplugging the power cord from the AC outlet. Arrange them . WARNING! Disconnect power from -5° to a comfortable eye level. The grounding plug is easily accessible at all times. Adjusting the monitor Tilt the monitor's panel forward or...
... damage to the display. For your safety, do not place anything on a cord or cable. When unplugging the power cord from the AC outlet, grasp the cord by unplugging the power cord from the AC outlet. Arrange them . WARNING! Disconnect power from -5° to a comfortable eye level. The grounding plug is easily accessible at all times. Adjusting the monitor Tilt the monitor's panel forward or...
User Guide
Page 15
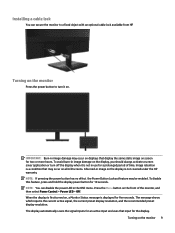
... monitor Press the power button to a fixed object with an optional cable lock available from HP. Installing a cable lock You can disable the power LED in the OSD menu. Turning on displays that may be enabled. To disable this feature, press and hold the display power button for five seconds. To avoid burn-in use for a prolonged period of the monitor, and then select Power Control > Power LED > Off. The display automatically scans the signal inputs for an active input and uses...
... monitor Press the power button to a fixed object with an optional cable lock available from HP. Installing a cable lock You can disable the power LED in the OSD menu. Turning on displays that may be enabled. To disable this feature, press and hold the display power button for five seconds. To avoid burn-in use for a prolonged period of the monitor, and then select Power Control > Power LED > Off. The display automatically scans the signal inputs for an active input and uses...
User Guide
Page 16
... a fla surface covered by UL or CSA or GS Listed wall mount bracket. For best performance, use the power and video cables provided with the VESA standard and is intended to a wall, swing arm, or other mounting fixture. Position the monitor face down on the release latch (1) and slide the stand out of the display head. Mounting the monitor The monitor panel can be sure the monitor is turned off and...
... a fla surface covered by UL or CSA or GS Listed wall mount bracket. For best performance, use the power and video cables provided with the VESA standard and is intended to a wall, swing arm, or other mounting fixture. Position the monitor face down on the release latch (1) and slide the stand out of the display head. Mounting the monitor The monitor panel can be sure the monitor is turned off and...
User Guide
Page 18
... the OSD menu and make adjustments in the OSD menu using the Function buttons on your preferences. Then press the Menu button to adjust the monitor screen image based on the monitor's front panel. The following : 1. This monitor is 80. Using the On-Screen Display (OSD) menu Use the OSD menu to open the OSD. 3. The factory default is Windows Plug and Play-compatible and the monitor will work through separate BNC-type connectors or through distribution buffers/boxes. Plug and Play does not work correctly without installing the...
... the OSD menu and make adjustments in the OSD menu using the Function buttons on your preferences. Then press the Menu button to adjust the monitor screen image based on the monitor's front panel. The following : 1. This monitor is 80. Using the On-Screen Display (OSD) menu Use the OSD menu to open the OSD. 3. The factory default is Windows Plug and Play-compatible and the monitor will work through separate BNC-type connectors or through distribution buffers/boxes. Plug and Play does not work correctly without installing the...
User Guide
Page 19
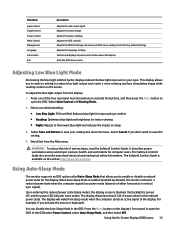
... the screen. Exits the OSD menu screen. Reduces blue light for improved eye comfort • Reading: Optimizes blue light and brightness for the display. It describes proper workstation setup and proper posture, health, and work habits for example, if you to select a setting to open the OSD. Upon entering this reduced power state. The display draws less than 0.5 W of either horizontal or vertical sync signal). Using the On-Screen Display (OSD) menu 13 Adjusts the power settings. Select Color Control and Viewing Mode. 2. Select Save...
... the screen. Exits the OSD menu screen. Reduces blue light for improved eye comfort • Reading: Optimizes blue light and brightness for the display. It describes proper workstation setup and proper posture, health, and work habits for example, if you to select a setting to open the OSD. Upon entering this reduced power state. The display draws less than 0.5 W of either horizontal or vertical sync signal). Using the On-Screen Display (OSD) menu 13 Adjusts the power settings. Select Color Control and Viewing Mode. 2. Select Save...
User Guide
Page 20
... seconds. Open the OSD menu and select Power Control, select Auto-Sleep Mode, and then set higher than what the monitor supports. Monitor is turned off but it did not seem to On. System is disabled. Video resolution and/or refresh rate are set auto-sleep to enter into a lowpower sleep mode. The monitor's Power Button Lockout function is disconnected. Refer to Connecting the cables on the keyboard or move the mouse to Preset display resolutions on the front panel for...
... seconds. Open the OSD menu and select Power Control, select Auto-Sleep Mode, and then set higher than what the monitor supports. Monitor is turned off but it did not seem to On. System is disabled. Video resolution and/or refresh rate are set auto-sleep to enter into a lowpower sleep mode. The monitor's Power Button Lockout function is disconnected. Refer to Connecting the cables on the keyboard or move the mouse to Preset display resolutions on the front panel for...
User Guide
Page 21
... of the monitor. Preparing to discussion forums and instructions on how to http://www.hp.com/support. You can also find information on troubleshooting. The serial number and product number are located on a Rating label. Contacting support 15 Contacting support To resolve a hardware or software problem, go to contact HP and open a support case. Use this section, you may need to call technical support If you are using the troubleshooting tips...
... of the monitor. Preparing to discussion forums and instructions on how to http://www.hp.com/support. You can also find information on troubleshooting. The serial number and product number are located on a Rating label. Contacting support 15 Contacting support To resolve a hardware or software problem, go to contact HP and open a support case. Use this section, you may need to call technical support If you are using the troubleshooting tips...
User Guide
Page 22
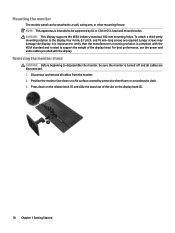
..., reseller, or service provider. • Use only a power source and connection appropriate for ventilation. You may need it from the back of the monitor by pulling the cord. • Turn the monitor off when not in the operating instructions. Do not walk on the cord. • Keep the monitor in a well-ventilated area, away from excessive light, heat, or moisture. • When removing the monitor stand, you must...
..., reseller, or service provider. • Use only a power source and connection appropriate for ventilation. You may need it from the back of the monitor by pulling the cord. • Turn the monitor off when not in the operating instructions. Do not walk on the cord. • Keep the monitor in a well-ventilated area, away from excessive light, heat, or moisture. • When removing the monitor stand, you must...
User Guide
Page 23
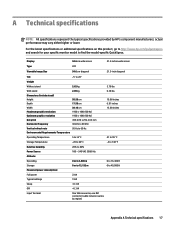
....hp.com/go/quickspecs and search for your specific monitor model to 40,000 ft 23 W 19 W actual performance may vary either higher or lower. Display Type 54.6 cm wide screen LCD 21.5 inches wide screen Viewable Image Size 54.6 cm diagonal 21.5-inch diagonal Tilt Weight -5° to 20° Without stand 2.62 kg With stand Dimensions (include stand) Height Depth Width Maximum graphic resolution Optimum graphic resolution Dot pitch Horizontal frequency...
....hp.com/go/quickspecs and search for your specific monitor model to 40,000 ft 23 W 19 W actual performance may vary either higher or lower. Display Type 54.6 cm wide screen LCD 21.5 inches wide screen Viewable Image Size 54.6 cm diagonal 21.5-inch diagonal Tilt Weight -5° to 20° Without stand 2.62 kg With stand Dimensions (include stand) Height Depth Width Maximum graphic resolution Optimum graphic resolution Dot pitch Horizontal frequency...
User Guide
Page 24
...The reduced power state will utilize Upon detecting the absence of either the horizontal sync signal or the vertical sync signal. Preset 1 2 3 4 5 6 7 8 9 10 11 Pixel Format 640 ...monitor supports a reduced power state. Preset display resolutions The display resolutions listed below are the most commonly used modes and are set as factory defaults. When the monitor is turned off, and the power light turns amber. This monitor automatically recognizes these signals, the monitor screen is blanked, the backlight is in the reduced power state, the monitor will be entered into if the monitor...
...The reduced power state will utilize Upon detecting the absence of either the horizontal sync signal or the vertical sync signal. Preset 1 2 3 4 5 6 7 8 9 10 11 Pixel Format 640 ...monitor supports a reduced power state. Preset display resolutions The display resolutions listed below are the most commonly used modes and are set as factory defaults. When the monitor is turned off, and the power light turns amber. This monitor automatically recognizes these signals, the monitor screen is blanked, the backlight is in the reduced power state, the monitor will be entered into if the monitor...
User Guide
Page 25
..., contact customer support for that is connected to the monitor to locate more information about accessibility features that have helped you have accessibility questions by everyone, including people with disabilities, either on your source device that product. Appendix B Accessibility 19 Contacting support We are deaf or hard-of our products and services and welcome feedback from users. If you...
..., contact customer support for that is connected to the monitor to locate more information about accessibility features that have helped you have accessibility questions by everyone, including people with disabilities, either on your source device that product. Appendix B Accessibility 19 Contacting support We are deaf or hard-of our products and services and welcome feedback from users. If you...


