ProtectTools (Select Models Only) - Windows Vista
Page 76
...changing 30 setting 28 biometric readers 47 BIOS administrator card password changing 10 definition 3 BIOS administrator password 3 BIOS Configuration for HP ProtectTools Automatic DriveLock 40 boot options 35 HP ProtectTools settings, managing 38 Java Card power-on authentication 38 password ...options, setting 42 power-on authentication 39 power-on authentication on Windows restart 42 power-on password,...
...changing 30 setting 28 biometric readers 47 BIOS administrator card password changing 10 definition 3 BIOS administrator password 3 BIOS Configuration for HP ProtectTools Automatic DriveLock 40 boot options 35 HP ProtectTools settings, managing 38 Java Card power-on authentication 38 password ...options, setting 42 power-on authentication 39 power-on authentication on Windows restart 42 power-on password,...
ProtectTools (Select Models Only) - Windows Vista
Page 78
...power-on 41 setting setup 41 smart card administrator 9 smart card administrator, changing 10 smart card user, setting and changing 11 storing administrator or user card 12 Windows logon 49 personal secure drive (PSD) 29 power-on authentication enabling and disabling ...54 modifying application properties 55 removing applications 55 smart card recovery file password definition 3 Smart Card Security for HP ProtectTools administrator password 9 administrator password, changing 10 administrator password, definition 3 backing up and restoring 14 backup, creating 16 BIOS security mode 8 BIOS security...
...power-on 41 setting setup 41 smart card administrator 9 smart card administrator, changing 10 smart card user, setting and changing 11 storing administrator or user card 12 Windows logon 49 personal secure drive (PSD) 29 power-on authentication enabling and disabling ...54 modifying application properties 55 removing applications 55 smart card recovery file password definition 3 Smart Card Security for HP ProtectTools administrator password 9 administrator password, changing 10 administrator password, definition 3 backing up and restoring 14 backup, creating 16 BIOS security mode 8 BIOS security...
Software Update, Backup and Recovery - Windows Vista
Page 14
... burner, a copy of the entire hard drive image can choose whether you create. 10 Chapter 3 Recovery ENWW NOTE Before using HP Backup and Recovery Manager, try repairing the system by running Windows System Restore. The recovery discs are used to start up your computer and to &#...9679; Create recovery discs (highly recommended). 3 Recovery HP Backup and Recovery Manager analyzes the hard drive and creates a dedicated hard drive recovery ...
... burner, a copy of the entire hard drive image can choose whether you create. 10 Chapter 3 Recovery ENWW NOTE Before using HP Backup and Recovery Manager, try repairing the system by running Windows System Restore. The recovery discs are used to start up your computer and to &#...9679; Create recovery discs (highly recommended). 3 Recovery HP Backup and Recovery Manager analyzes the hard drive and creates a dedicated hard drive recovery ...

Modem and Local Area Networks
Page 10
...7. Select OK > OK. On the upper menu in the left panel of the Network and Internet Connections window, click Phone and Modem Options. 3. If you continue to receive the "No Dial Tone" error message... after clearing the Wait for Dial Tone Before Dialing check box: 1. In the Phone and Modem Options window, click the Modems tab. 9. Select Start > All Programs > Accessories > Communications. 2. Select your current modem location... Country/Region selection for your modem, and then click Properties. 10. Select Start > Control Panel > Network and Internet Connections. 2.
...7. Select OK > OK. On the upper menu in the left panel of the Network and Internet Connections window, click Phone and Modem Options. 3. If you continue to receive the "No Dial Tone" error message... after clearing the Wait for Dial Tone Before Dialing check box: 1. In the Phone and Modem Options window, click the Modems tab. 9. Select Start > All Programs > Accessories > Communications. 2. Select your current modem location... Country/Region selection for your modem, and then click Properties. 10. Select Start > Control Panel > Network and Internet Connections. 2.
Notebook Tour
Page 24
...HP Smart AC Adapter 1-17 humidity specifications 2-1 I Info Center button 1-13 infrared port 1-9 J jacks audio-in (microphone) 1-11 audio-out (headphone) 1-11 RJ-11 (modem) 1-10 RJ-45 (network) 1-10 S-Video-out 1-10 Java Cards 1-11 K keys fn 1-7 function 1-7 Windows applications 1-7 Windows... 1-15 microphone jack 1-11 modem jack 1-10 MultiMediaCard 1-11 mute button 1-6 N network jack 1-10 num lock light 1-3 O operating environment specifications 2-1 P PC Card slot 1-11 pointing stick buttons 1-4 pointing stick location 1-4 power connector 1-10 power light 1-3 power switch 1-13 presentation ...
...HP Smart AC Adapter 1-17 humidity specifications 2-1 I Info Center button 1-13 infrared port 1-9 J jacks audio-in (microphone) 1-11 audio-out (headphone) 1-11 RJ-11 (modem) 1-10 RJ-45 (network) 1-10 S-Video-out 1-10 Java Cards 1-11 K keys fn 1-7 function 1-7 Windows applications 1-7 Windows... 1-15 microphone jack 1-11 modem jack 1-10 MultiMediaCard 1-11 mute button 1-6 N network jack 1-10 num lock light 1-3 O operating environment specifications 2-1 P PC Card slot 1-11 pointing stick buttons 1-4 pointing stick location 1-4 power connector 1-10 power light 1-3 power switch 1-13 presentation ...
Notebook Tour
Page 25
... PC Card 1-11 smart card reader 1-11 smart cards 1-11 speaker 1-13 specifications operating environment 2-1 rated input power 2-2 standby, exiting 1-13 S-Video-out jack 1-10 T temperature specifications 2-1 TouchPad buttons 1-4 TouchPad location 1-4 TouchPad scroll zone 1-5 traveling with computer, environmental specifications 2-2 U USB port 1-11, 1-12 V vents 1-12, 1-14 volume controls 1-6 mute light 1-2 W Windows applications key 1-7 Windows...
... PC Card 1-11 smart card reader 1-11 smart cards 1-11 speaker 1-13 specifications operating environment 2-1 rated input power 2-2 standby, exiting 1-13 S-Video-out jack 1-10 T temperature specifications 2-1 TouchPad buttons 1-4 TouchPad location 1-4 TouchPad scroll zone 1-5 traveling with computer, environmental specifications 2-2 U USB port 1-11, 1-12 V vents 1-12, 1-14 volume controls 1-6 mute light 1-2 W Windows applications key 1-7 Windows...
Notebook Tour - Windows Vista
Page 24
...HP Smart AC Adapter 1-17 humidity specifications 2-1 I Info Center button 1-13 infrared port 1-9 J jacks audio-in (microphone) 1-11 audio-out (headphone) 1-11 RJ-11 (modem) 1-10 RJ-45 (network) 1-10 S-Video-out 1-10 Java Cards 1-11 K keys fn 1-7 function 1-7 Windows applications 1-7 Windows... 1-15 microphone jack 1-11 modem jack 1-10 MultiMediaCard 1-11 mute button 1-6 N network jack 1-10 num lock light 1-3 O operating environment specifications 2-1 P PC Card slot 1-11 pointing stick buttons 1-4 pointing stick location 1-4 power connector 1-10 power light 1-3 power switch 1-13 presentation ...
...HP Smart AC Adapter 1-17 humidity specifications 2-1 I Info Center button 1-13 infrared port 1-9 J jacks audio-in (microphone) 1-11 audio-out (headphone) 1-11 RJ-11 (modem) 1-10 RJ-45 (network) 1-10 S-Video-out 1-10 Java Cards 1-11 K keys fn 1-7 function 1-7 Windows applications 1-7 Windows... 1-15 microphone jack 1-11 modem jack 1-10 MultiMediaCard 1-11 mute button 1-6 N network jack 1-10 num lock light 1-3 O operating environment specifications 2-1 P PC Card slot 1-11 pointing stick buttons 1-4 pointing stick location 1-4 power connector 1-10 power light 1-3 power switch 1-13 presentation ...
Notebook Tour - Windows Vista
Page 25
S security cable slot 1-12 slots Digital Media 1-11 PC Card 1-11 smart card reader 1-11 smart cards 1-11 speaker 1-13 specifications operating environment 2-1 rated input power 2-2 S-Video-out jack 1-10 T temperature specifications 2-1 TouchPad buttons 1-4 TouchPad location 1-4 TouchPad scroll zone 1-5 traveling with computer, environmental specifications 2-2 U USB port 1-11, 1-12 V vents 1-12, 1-14 volume controls 1-6 mute light 1-2 W Windows applications key 1-7 Windows logo key 1-7 wireless antennae 1-16 wireless button 1-12 wireless light 1-3 Notebook Tour Index Index-3
S security cable slot 1-12 slots Digital Media 1-11 PC Card 1-11 smart card reader 1-11 smart cards 1-11 speaker 1-13 specifications operating environment 2-1 rated input power 2-2 S-Video-out jack 1-10 T temperature specifications 2-1 TouchPad buttons 1-4 TouchPad location 1-4 TouchPad scroll zone 1-5 traveling with computer, environmental specifications 2-2 U USB port 1-11, 1-12 V vents 1-12, 1-14 volume controls 1-6 mute light 1-2 W Windows applications key 1-7 Windows logo key 1-7 wireless antennae 1-16 wireless button 1-12 wireless light 1-3 Notebook Tour Index Index-3
Pointing Devices and Keyboard
Page 18
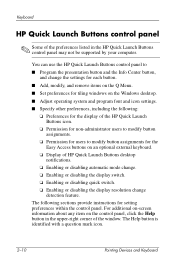
...panel ✎ Some of the preferences listed in the upper-right corner of the window. For additional on-screen information about any item on an optional external keyboard. ❏ Display of the HP Quick Launch Buttons icon. ❏ Permission for non-administrator users to modify button ...the following sections provide instructions for the Easy Access buttons on the control panel, click the Help button in the HP Quick Launch Buttons control panel may not be supported by your computer. The Help button is identified with a question mark icon. 2-10 Pointing Devices and Keyboard
...panel ✎ Some of the preferences listed in the upper-right corner of the window. For additional on-screen information about any item on an optional external keyboard. ❏ Display of the HP Quick Launch Buttons icon. ❏ Permission for non-administrator users to modify button ...the following sections provide instructions for the Easy Access buttons on the control panel, click the Help button in the HP Quick Launch Buttons control panel may not be supported by your computer. The Help button is identified with a question mark icon. 2-10 Pointing Devices and Keyboard
Pointing Devices and Keyboard
Page 41
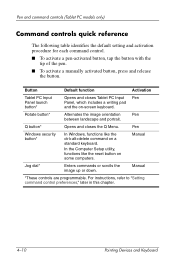
...Windows security button* In Windows, functions like the reset button on a standard keyboard. For instructions, refer to "Setting command control preferences," later in this chapter. 4-10 Pointing Devices and Keyboard Button Default function Activation Tablet PC Input Panel launch button* Opens and closes Tablet PC.... Manual *These controls are programmable. Q button* Opens and closes the Q Menu. Pen and command controls (Tablet PC models only) Command controls quick reference The following table identifies the default setting and activation procedure for each command control...
...Windows security button* In Windows, functions like the reset button on a standard keyboard. For instructions, refer to "Setting command control preferences," later in this chapter. 4-10 Pointing Devices and Keyboard Button Default function Activation Tablet PC Input Panel launch button* Opens and closes Tablet PC.... Manual *These controls are programmable. Q button* Opens and closes the Q Menu. Pen and command controls (Tablet PC models only) Command controls quick reference The following table identifies the default setting and activation procedure for each command control...

Pointing Devices and Keyboard
Page 48
... 1-3 pen 4-2 presentation mode 2-8 Q 4-11 reset 4-12 right pointing stick 1-3 right TouchPad 1-3 rotate 4-11 Tablet PC Input Panel launch 4-11 Windows Security 4-12 Windows security 4-9 See also jog dial C command controls identified 4-8 procedures 4-11 quick reference 4-10 Computer Setup utility resetting the tablet PC 4-12 controls, command 4-8 ctrl+alt+delete command 4-12 D dial, jog 4-13 disabling internal keypad...
... 1-3 pen 4-2 presentation mode 2-8 Q 4-11 reset 4-12 right pointing stick 1-3 right TouchPad 1-3 rotate 4-11 Tablet PC Input Panel launch 4-11 Windows Security 4-12 Windows security 4-9 See also jog dial C command controls identified 4-8 procedures 4-11 quick reference 4-10 Computer Setup utility resetting the tablet PC 4-12 controls, command 4-8 ctrl+alt+delete command 4-12 D dial, jog 4-13 disabling internal keypad...
Pointing Devices and Keyboard - Windows Vista
Page 18
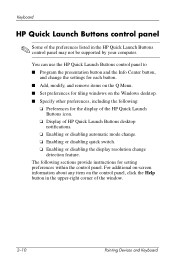
... or disabling quick switch. ❏ Enabling or disabling the display resolution change detection feature. Keyboard HP Quick Launch Buttons control panel ✎ Some of the window. 2-10 Pointing Devices and Keyboard The following : ❏ Preferences for tiling windows on the control panel, click the Help button in the upper-right corner of the preferences...
... or disabling quick switch. ❏ Enabling or disabling the display resolution change detection feature. Keyboard HP Quick Launch Buttons control panel ✎ Some of the window. 2-10 Pointing Devices and Keyboard The following : ❏ Preferences for tiling windows on the control panel, click the Help button in the upper-right corner of the preferences...

Pointing Devices and Keyboard - Windows Vista
Page 40
...Windows security button* In Windows, functions like the reset button on a standard keyboard. Manual Jog dial* Enters commands or scrolls the image up or down. Manual *These controls are programmable. For instructions, refer to "Setting command control preferences," later in this chapter. 4-10 Pointing Devices and Keyboard Pen and command controls (Tablet PC... Pen between landscape and portrait. Button Default function Activation Tablet PC Input Panel launch button* Opens and closes Tablet PC Input Pen Panel, which includes a writing pad and the on-screen keyboard.
...Windows security button* In Windows, functions like the reset button on a standard keyboard. Manual Jog dial* Enters commands or scrolls the image up or down. Manual *These controls are programmable. For instructions, refer to "Setting command control preferences," later in this chapter. 4-10 Pointing Devices and Keyboard Pen and command controls (Tablet PC... Pen between landscape and portrait. Button Default function Activation Tablet PC Input Panel launch button* Opens and closes Tablet PC Input Pen Panel, which includes a writing pad and the on-screen keyboard.
Pointing Devices and Keyboard - Windows Vista
Page 47
... 1-3 pen 4-2 presentation mode 2-8 Q 4-11 reset 4-12 right pointing stick 1-3 right TouchPad 1-3 rotate 4-11 Tablet PC Input Panel launch 4-11 Windows Security 4-12 Windows security 4-9 See also jog dial C command controls identified 4-8 procedures 4-11 quick reference 4-10 Computer Setup utility resetting the tablet PC 4-12 controls, command 4-8 ctrl+alt+delete command 4-12 D dial, jog 4-13 disabling internal keypad...
... 1-3 pen 4-2 presentation mode 2-8 Q 4-11 reset 4-12 right pointing stick 1-3 right TouchPad 1-3 rotate 4-11 Tablet PC Input Panel launch 4-11 Windows Security 4-12 Windows security 4-9 See also jog dial C command controls identified 4-8 procedures 4-11 quick reference 4-10 Computer Setup utility resetting the tablet PC 4-12 controls, command 4-8 ctrl+alt+delete command 4-12 D dial, jog 4-13 disabling internal keypad...
Power
Page 16
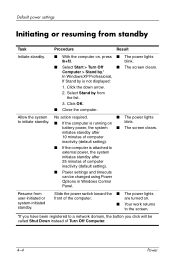
... The power lights front of computer inactivity (default setting). ■ If the computer is not displayed: 1. Computer > Stand by.* In Windows XP Professional, If Stand by from user-initiated or system-initiated standby. Allow the system No action required. ■ The power lights to... turned on , press ■ The power lights fn+f3. battery power, the system ■ The screen clears. initiates standby after 10 minutes of the computer. Default power settings Initiating or resuming from standby Task Procedure Result Initiate standby. ■ With the computer on ....
... The power lights front of computer inactivity (default setting). ■ If the computer is not displayed: 1. Computer > Stand by.* In Windows XP Professional, If Stand by from user-initiated or system-initiated standby. Allow the system No action required. ■ The power lights to... turned on , press ■ The power lights fn+f3. battery power, the system ■ The screen clears. initiates standby after 10 minutes of the computer. Default power settings Initiating or resuming from standby Task Procedure Result Initiate standby. ■ With the computer on ....
Reference Guide
Page 37
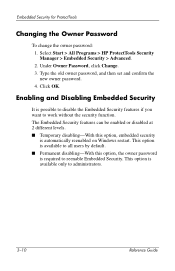
...owner password, and then set and confirm the new owner password. 4. Enabling and Disabling Embedded Security It is automatically reenabled on Windows restart. Under Owner Password, click Change. 3. This option is available to all users by default. ■ Permanent disabling-...features if you want to work without the security function. Click OK. This option is required to administrators. 3-10 Reference Guide Select Start > All Programs > HP ProtectTools Security Manager > Embedded Security > Advanced. 2. Embedded Security for ProtectTools Changing the Owner Password To change the...
...owner password, and then set and confirm the new owner password. 4. Enabling and Disabling Embedded Security It is automatically reenabled on Windows restart. Under Owner Password, click Change. 3. This option is available to all users by default. ■ Permanent disabling-...features if you want to work without the security function. Click OK. This option is required to administrators. 3-10 Reference Guide Select Start > All Programs > HP ProtectTools Security Manager > Embedded Security > Advanced. 2. Embedded Security for ProtectTools Changing the Owner Password To change the...
Reference Guide
Page 64
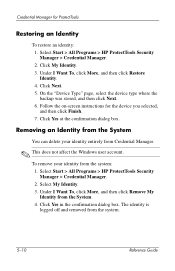
Click Next. 5. Click Yes at the confirmation dialog box. To remove your identity entirely from the system. 5-10 Reference Guide Under I Want To, click More, and then click Restore Identity. 4. Under I Want To, click More, and then click ...an Identity To restore an identity: 1. Select Start > All Programs > HP ProtectTools Security Manager > Credential Manager. 2. Select My Identity. 3. The identity is logged off and removed from Credential Manager. ✎ This does not affect the Windows user account. Credential Manager for the device you selected, and then click...
Click Next. 5. Click Yes at the confirmation dialog box. To remove your identity entirely from the system. 5-10 Reference Guide Under I Want To, click More, and then click Restore Identity. 4. Under I Want To, click More, and then click ...an Identity To restore an identity: 1. Select Start > All Programs > HP ProtectTools Security Manager > Credential Manager. 2. Select My Identity. 3. The identity is logged off and removed from Credential Manager. ✎ This does not affect the Windows user account. Credential Manager for the device you selected, and then click...
Reference Guide
Page 85
Index power-on authentication enabling and disabling 4-4 on Windows restart 4-15 power-on password definition 1-4 setting and changing 4-12 profile password definition 1-5 setting 4-9 profiles applying 4-10 deleting 4-9 displaying menu 4-8 saving 4-9 properties application 5-17 authentication 5-20 credential 5-22 ProtectTools Security Manager 1-1 R recovery identity 5-10 Single Sign On 5-19 smart cards 2-13 registering application 5-16 credentials...
Index power-on authentication enabling and disabling 4-4 on Windows restart 4-15 power-on password definition 1-4 setting and changing 4-12 profile password definition 1-5 setting 4-9 profiles applying 4-10 deleting 4-9 displaying menu 4-8 saving 4-9 properties application 5-17 authentication 5-20 credential 5-22 ProtectTools Security Manager 1-1 R recovery identity 5-10 Single Sign On 5-19 smart cards 2-13 registering application 5-16 credentials...

Reference Guide ProtectTools Security Manager
Page 5
... 5-8 6 Credential Manager for ProtectTools Basic concepts 6-1 Setup procedures 6-2 Logging on to Credential Manger 6-2 Registering credentials 6-5 General tasks 6-9 Creating a virtual token 6-9 Changing the Windows logon password 6-10 Changing a token PIN 6-10 Managing identity 6-11 Locking the computer 6-13 Using Microsoft Network logon 6-14 Using Single Sign On 6-17 Advanced tasks (administrator only 6-22 Specifying...
... 5-8 6 Credential Manager for ProtectTools Basic concepts 6-1 Setup procedures 6-2 Logging on to Credential Manger 6-2 Registering credentials 6-5 General tasks 6-9 Creating a virtual token 6-9 Changing the Windows logon password 6-10 Changing a token PIN 6-10 Managing identity 6-11 Locking the computer 6-13 Using Microsoft Network logon 6-14 Using Single Sign On 6-17 Advanced tasks (administrator only 6-22 Specifying...
Reference Guide ProtectTools Security Manager
Page 49
...and confirm the new owner password. 5. This option is available to reenable Embedded Security. For more information, refer to administrators. 4-10 Reference Guide In the right pane, under Owner Password, click Change. 4. This option is available only to the online Help.... features can help a user to work without the security function. Select Start > All Programs > HP ProtectTools Security Manager. 2. Enabling and disabling Embedded Security It is automatically reenabled on Windows restart. In the left pane, select Embedded Security, and then select Advanced. 3.
...and confirm the new owner password. 5. This option is available to reenable Embedded Security. For more information, refer to administrators. 4-10 Reference Guide In the right pane, under Owner Password, click Change. 4. This option is available only to the online Help.... features can help a user to work without the security function. Select Start > All Programs > HP ProtectTools Security Manager. 2. Enabling and disabling Embedded Security It is automatically reenabled on Windows restart. In the left pane, select Embedded Security, and then select Advanced. 3.

