
HP Split 13 x2 PC Maintenance and Service Guide
Page 7
...side ...15 Locating system information ...16 3 Illustrated parts catalog ...17 Tablet components ...17 Keyboard dock parts ...20 Miscellaneous parts ...22 Sequential part number listing ...23 4 Removal and replacement procedures preliminary requirements 27 Tools required ...27 Service considerations ...27 Plastic parts ...27 Cables ... damage ...29 Packaging and transporting guidelines 30 Workstation guidelines 30 Equipment guidelines ...31 5 Removal and replacement procedures for Authorized Service Provider parts 32 Releasing the tablet from the keyboard dock ...32 Dock components ...32 vii
...side ...15 Locating system information ...16 3 Illustrated parts catalog ...17 Tablet components ...17 Keyboard dock parts ...20 Miscellaneous parts ...22 Sequential part number listing ...23 4 Removal and replacement procedures preliminary requirements 27 Tools required ...27 Service considerations ...27 Plastic parts ...27 Cables ... damage ...29 Packaging and transporting guidelines 30 Workstation guidelines 30 Equipment guidelines ...31 5 Removal and replacement procedures for Authorized Service Provider parts 32 Releasing the tablet from the keyboard dock ...32 Dock components ...32 vii
HP Split 13 x2 PC Maintenance and Service Guide
Page 33
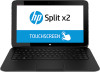
...Core i3-3229Y processor (includes processor and replacement thermal material) 732296-501 System board for use with Windows 8 Standard models with an Intel Core i3-3229Y processor (includes processor and replacement thermal material) 732298-001 Top cover with keyboard for use in the United States 732298-...031 Top cover with keyboard for use in the United Kingdom 732298-041 Top cover with keyboard for use in Germany 732298-051 Top cover...
...Core i3-3229Y processor (includes processor and replacement thermal material) 732296-501 System board for use with Windows 8 Standard models with an Intel Core i3-3229Y processor (includes processor and replacement thermal material) 732298-001 Top cover with keyboard for use in the United States 732298-...031 Top cover with keyboard for use in the United Kingdom 732298-041 Top cover with keyboard for use in Germany 732298-051 Top cover...

HP Split 13 x2 PC Maintenance and Service Guide
Page 34
... use in Switzerland 732298-DB1 Top cover for use in Canada 732298-DH1 Top cover with keyboard for use in Denmark, Finland, Norway 732298-FL1 Top cover with keyboard for use in the Czech Republic and Slovakia 732299-001 Webcam (includes cable) 735215-001 Bottom trim for use in ... 4.0 Combo Adapter (724935-005) 737355-001 System board for use with non-Windows 8 models with an Intel Core i5-4200Y processor (includes processor and replacement thermal material) 737355-501 System board for use with Windows 8 Standard models with an Intel Core i5-4200Y processor (includes processor and...
... use in Switzerland 732298-DB1 Top cover for use in Canada 732298-DH1 Top cover with keyboard for use in Denmark, Finland, Norway 732298-FL1 Top cover with keyboard for use in the Czech Republic and Slovakia 732299-001 Webcam (includes cable) 735215-001 Bottom trim for use in ... 4.0 Combo Adapter (724935-005) 737355-001 System board for use with non-Windows 8 models with an Intel Core i5-4200Y processor (includes processor and replacement thermal material) 737355-501 System board for use with Windows 8 Standard models with an Intel Core i5-4200Y processor (includes processor and...
HP Split 13 x2 PC Maintenance and Service Guide
Page 41
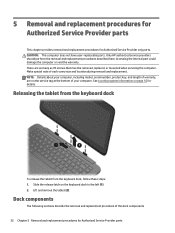
... tag at the bottom of warranty, are as many as 70 screws that must be removed, replaced, or loosened when servicing the computer. See Locating system information on the keyboard dock to the left (1). 2. Accessing the internal part could damage the computer or void the ...and replacement procedures for details. Make special note of the dock components 32 Chapter 5 Removal and replacement procedures for Authorized Service Provider parts NOTE: Details about your computer, including model, serial number, product key, and length of your computer. Lift and remove the tablet (2). Only HP ...
... tag at the bottom of warranty, are as many as 70 screws that must be removed, replaced, or loosened when servicing the computer. See Locating system information on the keyboard dock to the left (1). 2. Accessing the internal part could damage the computer or void the ...and replacement procedures for details. Make special note of the dock components 32 Chapter 5 Removal and replacement procedures for Authorized Service Provider parts NOTE: Details about your computer, including model, serial number, product key, and length of your computer. Lift and remove the tablet (2). Only HP ...
HP Split 13 x2 PC Maintenance and Service Guide
Page 43
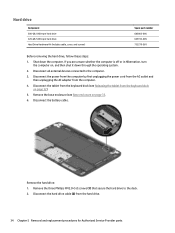
...keyboard dock (see Base enclosure on page 33. 6. Disconnect the hard drive cable (2) from the computer. 4. Disconnect the battery cable. Disconnect the power from the computer by first unplugging the power cord from the AC outlet and then unplugging the AC adapter from the hard drive. 34 Chapter 5 Removal and replacement...or in Hibernation, turn the computer on page 32). 5. Disconnect all external devices connected to the dock. 2. Disconnect the tablet from the keyboard dock on , and then shut it down the computer. Hard drive Component 500-GB, 5400-rpm hard drive 320-GB, 5400-rpm ...
...keyboard dock (see Base enclosure on page 33. 6. Disconnect the hard drive cable (2) from the computer. 4. Disconnect the battery cable. Disconnect the power from the computer by first unplugging the power cord from the AC outlet and then unplugging the AC adapter from the hard drive. 34 Chapter 5 Removal and replacement...or in Hibernation, turn the computer on page 32). 5. Disconnect all external devices connected to the dock. 2. Disconnect the tablet from the keyboard dock on , and then shut it down the computer. Hard drive Component 500-GB, 5400-rpm hard drive 320-GB, 5400-rpm ...
HP Split 13 x2 PC Maintenance and Service Guide
Page 45
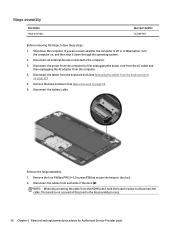
...: 1. NOTE: When disconnecting the cable from the HDMI board, hold the board in the disassembly process. 36 Chapter 5 Removal and replacement procedures for Authorized Service Provider parts The board is off or in Hibernation, turn the computer on page 32). 5. Hinge assembly Description ...Hinge assembly Spare part number 732280-001 Before removing the hinge, follow these steps: 1. Disconnect the tablet from the keyboard dock on , and then shut it down the computer. Disconnect the power from the computer by first unplugging the power cord from...
...: 1. NOTE: When disconnecting the cable from the HDMI board, hold the board in the disassembly process. 36 Chapter 5 Removal and replacement procedures for Authorized Service Provider parts The board is off or in Hibernation, turn the computer on page 32). 5. Hinge assembly Description ...Hinge assembly Spare part number 732280-001 Before removing the hinge, follow these steps: 1. Disconnect the tablet from the keyboard dock on , and then shut it down the computer. Disconnect the power from the computer by first unplugging the power cord from...
HP Split 13 x2 PC Maintenance and Service Guide
Page 49
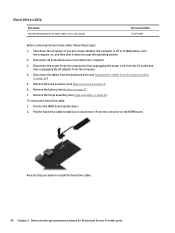
..., cover, and screws) Spare part number 732279-001 Before removing the hard drive cable, follow these steps: 1. Disconnect the tablet from the keyboard dock (see Battery on , and then shut it from the computer. 4. Reverse this procedure to the computer. 3. Remove the base enclosure ...see Hinge assembly on the HDMI board. Disconnect all external devices connected to install the hard drive cable. 40 Chapter 5 Removal and replacement procedures for Authorized Service Provider parts Pull the hard drive cable straight up to disconnect it down through the operating system. 2. Disconnect...
..., cover, and screws) Spare part number 732279-001 Before removing the hard drive cable, follow these steps: 1. Disconnect the tablet from the keyboard dock (see Battery on , and then shut it from the computer. 4. Reverse this procedure to the computer. 3. Remove the base enclosure ...see Hinge assembly on the HDMI board. Disconnect all external devices connected to install the hard drive cable. 40 Chapter 5 Removal and replacement procedures for Authorized Service Provider parts Pull the hard drive cable straight up to disconnect it down through the operating system. 2. Disconnect...
HP Split 13 x2 PC Maintenance and Service Guide
Page 51
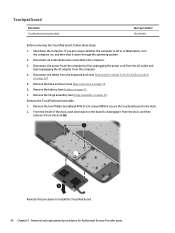
... first unplugging the power cord from the AC outlet and then unplugging the AC adapter from the dock (2). Disconnect the tablet from the keyboard dock (see Battery on page 32). 5. Reverse this procedure to the computer. 3. If you are unsure whether the computer is off.... 2. Shut down through the operating system. 2. Disconnect all external devices connected to install the TouchPad board. 42 Chapter 5 Removal and replacement procedures for Authorized Service Provider parts Remove the two Phillips broadhead PM2.0×2.0 screws (1) that secure the touchpad board to disengage it from ...
... first unplugging the power cord from the AC outlet and then unplugging the AC adapter from the dock (2). Disconnect the tablet from the keyboard dock (see Battery on page 32). 5. Reverse this procedure to the computer. 3. If you are unsure whether the computer is off.... 2. Shut down through the operating system. 2. Disconnect all external devices connected to install the TouchPad board. 42 Chapter 5 Removal and replacement procedures for Authorized Service Provider parts Remove the two Phillips broadhead PM2.0×2.0 screws (1) that secure the touchpad board to disengage it from ...
HP Split 13 x2 PC Maintenance and Service Guide
Page 53
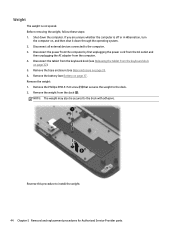
.... 2. Disconnect the tablet from the keyboard dock (see Releasing the tablet from the keyboard dock on page 37. Remove the battery (see Base enclosure on , and then shut it down the computer. NOTE: The weight may also be secured to install the weight. 44 Chapter 5 Removal and replacement procedures for Authorized Service Provider...
.... 2. Disconnect the tablet from the keyboard dock (see Releasing the tablet from the keyboard dock on page 37. Remove the battery (see Base enclosure on , and then shut it down the computer. NOTE: The weight may also be secured to install the weight. 44 Chapter 5 Removal and replacement procedures for Authorized Service Provider...

HP Split 13 x2 PC Maintenance and Service Guide
Page 54
Tablet components The following sections show the removal and replacement procedures for the tablet parts. Using the slot in the cover, lift the cover off or in Hibernation, turn the computer on page 32). If ... cover. Shut down through the operating system. 2. Remove the display rear cover: 1. Disconnect all external devices connected to the tablet. 2. Disconnect the tablet from the keyboard dock (see Releasing the tablet from the computer. 4. Display rear cover Description Display rear cover Spare part number 732269-001 Before removing the display rear...
Tablet components The following sections show the removal and replacement procedures for the tablet parts. Using the slot in the cover, lift the cover off or in Hibernation, turn the computer on page 32). If ... cover. Shut down through the operating system. 2. Remove the display rear cover: 1. Disconnect all external devices connected to the tablet. 2. Disconnect the tablet from the keyboard dock (see Releasing the tablet from the computer. 4. Display rear cover Description Display rear cover Spare part number 732269-001 Before removing the display rear...

HP Split 13 x2 PC Maintenance and Service Guide
Page 55
...is off or in Hibernation, turn the computer on top of the connector (1), and then disconnect the battery cable from the keyboard dock on page 45). Disconnect all external devices connected to remove the internal battery before removing several internal components. Disconnect the tablet ...internal components. Remove the display rear cover (see Releasing the tablet from the system board connector (2). 46 Chapter 5 Removal and replacement procedures for Authorized Service Provider parts Battery cable You do not have to the computer. 3. Shut down through the operating system. 2.
...is off or in Hibernation, turn the computer on top of the connector (1), and then disconnect the battery cable from the keyboard dock on page 45). Disconnect all external devices connected to remove the internal battery before removing several internal components. Disconnect the tablet ...internal components. Remove the display rear cover (see Releasing the tablet from the system board connector (2). 46 Chapter 5 Removal and replacement procedures for Authorized Service Provider parts Battery cable You do not have to the computer. 3. Shut down through the operating system. 2.

HP Split 13 x2 PC Maintenance and Service Guide
Page 57
.... 3. Lift outer edge of fan and pull it out from under the heat sink to install the fan. 48 Chapter 5 Removal and replacement procedures for Authorized Service Provider parts Disconnect the battery cable (see Display rear cover on page 46). If you are unsure whether the computer...is off or in Hibernation, turn the computer on page 32). 5. Disconnect the tablet from the keyboard dock (see Releasing the tablet from the system board. 2. Disconnect the fan cable (1) from the keyboard dock on , and then shut it from the computer. 4. Disconnect all external devices connected to...
.... 3. Lift outer edge of fan and pull it out from under the heat sink to install the fan. 48 Chapter 5 Removal and replacement procedures for Authorized Service Provider parts Disconnect the battery cable (see Display rear cover on page 46). If you are unsure whether the computer...is off or in Hibernation, turn the computer on page 32). 5. Disconnect the tablet from the keyboard dock (see Releasing the tablet from the system board. 2. Disconnect the fan cable (1) from the keyboard dock on , and then shut it from the computer. 4. Disconnect all external devices connected to...

HP Split 13 x2 PC Maintenance and Service Guide
Page 63
...(see Display rear cover on , and then shut it down the computer. Remove the RTC battery: 1. Disconnect the tablet from the keyboard dock (see Battery cable on page 32). 5. Use a screwdriver to loosen the battery from the socket (2). RTC battery Description RTC ...steps: 1. Shut down through the operating system. 2. Disconnect all external devices connected to install the RTC battery. 54 Chapter 5 Removal and replacement procedures for Authorized Service Provider parts Disconnect the battery cable (see Releasing the tablet from the computer. 4. Lift the battery from the socket ...
...(see Display rear cover on , and then shut it down the computer. Remove the RTC battery: 1. Disconnect the tablet from the keyboard dock (see Battery cable on page 32). 5. Use a screwdriver to loosen the battery from the socket (2). RTC battery Description RTC ...steps: 1. Shut down through the operating system. 2. Disconnect all external devices connected to install the RTC battery. 54 Chapter 5 Removal and replacement procedures for Authorized Service Provider parts Disconnect the battery cable (see Releasing the tablet from the computer. 4. Lift the battery from the socket ...

HP Split 13 x2 PC Maintenance and Service Guide
Page 65
... display cable (1) from the computer. 4. Remove the display rear cover (see Releasing the tablet from the keyboard dock on , and then shut it in Hibernation, turn the computer on page 32). 5. Disconnect the tablet from the... keyboard dock (see Display rear cover on page 46). Shut down through the operating system. 2. Display cable ...unsure whether the computer is off or in the routing path (2). 56 Chapter 5 Removal and replacement procedures for Authorized Service Provider parts
... display cable (1) from the computer. 4. Remove the display rear cover (see Releasing the tablet from the keyboard dock on , and then shut it in Hibernation, turn the computer on page 32). 5. Disconnect the tablet from the... keyboard dock (see Display rear cover on page 46). Shut down through the operating system. 2. Display cable ...unsure whether the computer is off or in the routing path (2). 56 Chapter 5 Removal and replacement procedures for Authorized Service Provider parts

HP Split 13 x2 PC Maintenance and Service Guide
Page 67
... the computer is off or in Hibernation, turn the computer on page 32). 5. Disconnect the tablet from the keyboard dock (see Releasing the tablet from the keyboard dock on , and then shut it down the computer. Disconnect the cable from the computer. 4. Disconnect all external... devices connected to install the touchscreen board. 58 Chapter 5 Removal and replacement procedures for Authorized Service Provider parts Disconnect the...
... the computer is off or in Hibernation, turn the computer on page 32). 5. Disconnect the tablet from the keyboard dock (see Releasing the tablet from the keyboard dock on , and then shut it down the computer. Disconnect the cable from the computer. 4. Disconnect all external... devices connected to install the touchscreen board. 58 Chapter 5 Removal and replacement procedures for Authorized Service Provider parts Disconnect the...

HP Split 13 x2 PC Maintenance and Service Guide
Page 69
... from the system board. 2. Disconnect all external devices connected to install the power button board. 60 Chapter 5 Removal and replacement procedures for Authorized Service Provider parts Disconnect the battery cable (see Display rear cover on page 45) Remove the power button board...: 1. Remove the following components: ● Display rear cover (see Battery cable on page 45). 6. Disconnect the tablet from the keyboard dock (see Display rear cover on page 46). 7. Reverse this procedure to the computer. 3. Power button board Description Power button board ...
... from the system board. 2. Disconnect all external devices connected to install the power button board. 60 Chapter 5 Removal and replacement procedures for Authorized Service Provider parts Disconnect the battery cable (see Display rear cover on page 45) Remove the power button board...: 1. Remove the following components: ● Display rear cover (see Battery cable on page 45). 6. Disconnect the tablet from the keyboard dock (see Display rear cover on page 46). 7. Reverse this procedure to the computer. 3. Power button board Description Power button board ...

HP Split 13 x2 PC Maintenance and Service Guide
Page 73
... cable on page 32). 5. Remove the display rear cover (see Releasing the tablet from the computer. 4. Disconnect the tablet from the keyboard dock (see Display rear cover on , and then shut it down the computer. Audio board Description Audio board (includes audio cable and HDMI...number 732284-001 Before removing the audio board, follow these steps: 1. Disconnect the audio cable from the tablet (5). 64 Chapter 5 Removal and replacement procedures for Authorized Service Provider parts Lift the audio board from the side of the audio board (1). 2. To remove the audio board: 1. Shut...
... cable on page 32). 5. Remove the display rear cover (see Releasing the tablet from the computer. 4. Disconnect the tablet from the keyboard dock (see Display rear cover on , and then shut it down the computer. Audio board Description Audio board (includes audio cable and HDMI...number 732284-001 Before removing the audio board, follow these steps: 1. Disconnect the audio cable from the tablet (5). 64 Chapter 5 Removal and replacement procedures for Authorized Service Provider parts Lift the audio board from the side of the audio board (1). 2. To remove the audio board: 1. Shut...

HP Split 13 x2 PC Maintenance and Service Guide
Page 75
... card reader: 1. Reverse these steps: 1. Remove the bottom trim (see Display rear cover on page 46). 7. Disconnect the tablet from the keyboard dock (see Releasing the tablet from the computer. 4. Lift the card reader from the system board. 2. Card reader Description Card reader (includes ... part number 732283-001 Before removing the card reader, follow these procedures to install the card reader. 66 Chapter 5 Removal and replacement procedures for Authorized Service Provider parts Remove the display rear cover (see Bottom trim on , and then shut it down the computer...
... card reader: 1. Reverse these steps: 1. Remove the bottom trim (see Display rear cover on page 46). 7. Disconnect the tablet from the keyboard dock (see Releasing the tablet from the computer. 4. Lift the card reader from the system board. 2. Card reader Description Card reader (includes ... part number 732283-001 Before removing the card reader, follow these procedures to install the card reader. 66 Chapter 5 Removal and replacement procedures for Authorized Service Provider parts Remove the display rear cover (see Bottom trim on , and then shut it down the computer...

HP Split 13 x2 PC Maintenance and Service Guide
Page 77
... from the tablet. Disconnect the tablet from the keyboard dock (see Battery cable on , and then shut it down the computer. Reverse this procedure to install the battery. 68 Chapter 5 Removal and replacement procedures for Authorized Service Provider parts Disconnect the battery... cable (see Releasing the tablet from the keyboard dock on page 45). 6. Shut down through the operating system. 2. Disconnect the ...
... from the tablet. Disconnect the tablet from the keyboard dock (see Battery cable on , and then shut it down the computer. Reverse this procedure to install the battery. 68 Chapter 5 Removal and replacement procedures for Authorized Service Provider parts Disconnect the battery... cable (see Releasing the tablet from the keyboard dock on page 45). 6. Shut down through the operating system. 2. Disconnect the ...

HP Split 13 x2 PC Maintenance and Service Guide
Page 79
.... 4. Disconnect the power from the computer by first unplugging the power cord from the AC outlet and then unplugging the AC adapter from the keyboard dock on page 32). 5. Webcam Description Webcam (includes cable) Spare part numbers 732299-001 Before removing the webcam: 1. 3. If you are...is off the tablet (3). Lift the frame off or in Hibernation, turn the computer on page 66) 70 Chapter 5 Removal and replacement procedures for Authorized Service Provider parts Disconnect the tablet from the keyboard dock (see Card reader on , and then shut it down the computer.
.... 4. Disconnect the power from the computer by first unplugging the power cord from the AC outlet and then unplugging the AC adapter from the keyboard dock on page 32). 5. Webcam Description Webcam (includes cable) Spare part numbers 732299-001 Before removing the webcam: 1. 3. If you are...is off the tablet (3). Lift the frame off or in Hibernation, turn the computer on page 66) 70 Chapter 5 Removal and replacement procedures for Authorized Service Provider parts Disconnect the tablet from the keyboard dock (see Card reader on , and then shut it down the computer.


