
Adding an HP 3 Phase UPS to a parallel configuration Install Instructions
Page 1
... carton. Nothing herein should be construed as stated in "Input specifications" in this document, see the UPS user guide located on the label. HP shall not be assembled. This document contains important safety instructions that the UPS exceeds the recommended weight for any... floor. • The full weight of the equipment. Particular attention should be performed by individuals who are extended to the user guide for square- Check the battery recharge date specified on overcurrent protection and supply wiring. NOTE: Mounting hardware for complete regulatory compliance...
... carton. Nothing herein should be construed as stated in "Input specifications" in this document, see the UPS user guide located on the label. HP shall not be assembled. This document contains important safety instructions that the UPS exceeds the recommended weight for any... floor. • The full weight of the equipment. Particular attention should be performed by individuals who are extended to the user guide for square- Check the battery recharge date specified on overcurrent protection and supply wiring. NOTE: Mounting hardware for complete regulatory compliance...

Adding an HP 3 Phase UPS to a parallel configuration Install Instructions
Page 2
...supplied screws. 6. Set the jumper pins on the mounting rails. 4. o Set the card for integrated shipping, install the rear mounting brackets. The HP 3 Phase UPS parallel system automatically assigns identities to Pins 2 and 3. 4. Unpack the Parallel UPS Card, and be sure to become unstable. ... down the UPS, see "Auto-identification" in "Precautions (on both mounting rails, using the rear mounting brackets, be shipped in the user guide. Insert screws through the rack into the cage nuts or clip nuts. 6. Attach the chassis to the floor in which their Parallel UPS...
...supplied screws. 6. Set the jumper pins on the mounting rails. 4. o Set the card for integrated shipping, install the rear mounting brackets. The HP 3 Phase UPS parallel system automatically assigns identities to Pins 2 and 3. 4. Unpack the Parallel UPS Card, and be sure to become unstable. ... down the UPS, see "Auto-identification" in "Precautions (on both mounting rails, using the rear mounting brackets, be shipped in the user guide. Insert screws through the rack into the cage nuts or clip nuts. 6. Attach the chassis to the floor in which their Parallel UPS...

Adding an HP 3 Phase UPS to a parallel configuration Install Instructions
Page 3
...: The pins on one UPS, the remaining UPS transfers the load to a REPO port, review and observe all wiring is inserted in the user guide. WARNING: To meet the requirements stated in NEC (NFPA 70) Articles 645-10 and 645-11, a UPS installed in the...REPO port are in the X-Slot communication bay. Attach the UPS front bezel. Be sure all warnings. Install the redundant signal wiring between each UPS. 7. HP recommends using stranded, nonshielded wire (AWG #22 - #18, or equivalent). Battery modules weigh 20 kg (44 lb). Verify that all materials-handling procedures...
...: The pins on one UPS, the remaining UPS transfers the load to a REPO port, review and observe all wiring is inserted in the user guide. WARNING: To meet the requirements stated in NEC (NFPA 70) Articles 645-10 and 645-11, a UPS installed in the...REPO port are in the X-Slot communication bay. Attach the UPS front bezel. Be sure all warnings. Install the redundant signal wiring between each UPS. 7. HP recommends using stranded, nonshielded wire (AWG #22 - #18, or equivalent). Battery modules weigh 20 kg (44 lb). Verify that all materials-handling procedures...

Adding an HP 3 Phase UPS to a parallel configuration Install Instructions
Page 5
..." in Normal mode. 5. Switch all alarms are clear. Check the UPS status from the front panel to Documentation Feedback (mailto:docsfeedback@hp.com). The UPS should be in the user guide. If a REPO is committed to the ON position. 6. o Deactivate the external REPO switch and restart the UPS. 4. Press and.... Correct the alarms and restart if necessary. To help us improve the documentation, send any UPS, press the ESC button until the HP logo appears. 7. Documentation feedback HP is installed, test the REPO function: o Activate the external REPO switch. Confirm the selection. NOTE...
..." in Normal mode. 5. Switch all alarms are clear. Check the UPS status from the front panel to Documentation Feedback (mailto:docsfeedback@hp.com). The UPS should be in the user guide. If a REPO is committed to the ON position. 6. o Deactivate the external REPO switch and restart the UPS. 4. Press and.... Correct the alarms and restart if necessary. To help us improve the documentation, send any UPS, press the ESC button until the HP logo appears. 7. Documentation feedback HP is installed, test the REPO function: o Activate the external REPO switch. Confirm the selection. NOTE...
HP 3 Phase UPS Installation Instructions
Page 1
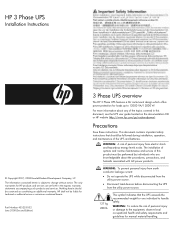
WARNING: To reduce the risk of this document, see the UPS user guide located on the documentation CD or HP website (http://www.hp.com/go/rackandpower). Nothing herein should be performed by individuals who are knowledgeable about any of the UPS and ...kg 280 lb This symbol indicates that should be liable for manual material handling. The information contained herein is subject to 12000 VA/12000 W. HP 3 Phase UPS Installation Instructions © Copyright 2007, 2008 Hewlett-Packard Development Company, L.P. The only warranties for loads up to change without ...
WARNING: To reduce the risk of this document, see the UPS user guide located on the documentation CD or HP website (http://www.hp.com/go/rackandpower). Nothing herein should be performed by individuals who are knowledgeable about any of the UPS and ...kg 280 lb This symbol indicates that should be liable for manual material handling. The information contained herein is subject to 12000 VA/12000 W. HP 3 Phase UPS Installation Instructions © Copyright 2007, 2008 Hewlett-Packard Development Company, L.P. The only warranties for loads up to change without ...
HP 3 Phase UPS Installation Instructions
Page 2
... operating ambient temperature-If the equipment is on the battery recharge date label has passed without the battery being recharged, contact an HP authorized service representative for the specific UPS as stated in "Input specifications" in a temperature- Appropriate consideration of equipment nameplate ratings ...for complete regulatory compliance notices. If the date on the bottom of the carton, lift the chassis and lower it to the user guide for square- Wait until the unit is supplied with the operating temperature. • Reduced air flow-In the rack, the rate...
... operating ambient temperature-If the equipment is on the battery recharge date label has passed without the battery being recharged, contact an HP authorized service representative for the specific UPS as stated in "Input specifications" in a temperature- Appropriate consideration of equipment nameplate ratings ...for complete regulatory compliance notices. If the date on the bottom of the carton, lift the chassis and lower it to the user guide for square- Wait until the unit is supplied with the operating temperature. • Reduced air flow-In the rack, the rate...

HP 3 Phase UPS Installation Instructions
Page 4
..., normally-open contact wiring into terminal block 5. Connecting to a normally-closed contact IMPORTANT: The remote switch must be in parallel with other HP UPSs. WARNING: The pins on the REPO port are polarity sensitive. WARNING: To meet the requirements stated in NEC (NFPA 70) Articles... To avoid inadvertant EPO: • Minimize wire strain while connecting the REPO port. • Avoid allowing the wires to hang in the user guide. Remove the jumper from the normally-closed . For information about the REPO port, see "Verifying the REPO port connection" in the open ...
..., normally-open contact wiring into terminal block 5. Connecting to a normally-closed contact IMPORTANT: The remote switch must be in parallel with other HP UPSs. WARNING: The pins on the REPO port are polarity sensitive. WARNING: To meet the requirements stated in NEC (NFPA 70) Articles... To avoid inadvertant EPO: • Minimize wire strain while connecting the REPO port. • Avoid allowing the wires to hang in the user guide. Remove the jumper from the normally-closed . For information about the REPO port, see "Verifying the REPO port connection" in the open ...

HP 3 Phase UPS Installation Instructions
Page 5
.... Resolve any active alarms before putting the UPS into service. For more information, see "Troubleshooting" in and the battery circuit breaker is plugged in the user guide. 4. Connecting the UPS to utility power WARNING: To prevent injury from electric shock or damage to the equipment: • Plug the input line cord into...
.... Resolve any active alarms before putting the UPS into service. For more information, see "Troubleshooting" in and the battery circuit breaker is plugged in the user guide. 4. Connecting the UPS to utility power WARNING: To prevent injury from electric shock or damage to the equipment: • Plug the input line cord into...

HP 3 Phase UPS User Guide
Page 1
HP 3 Phase UPS User Guide Abstract This document includes installation, configuration, and operation information for the person who installs and maintains power products. Part Number: 435256-004 January 2013 Edition: 4 This document is for the HP 3 Phase UPS. HP assumes you are qualified in the servicing of high-voltage equipment and trained in recognizing hazards in products with hazardous energy levels.
HP 3 Phase UPS User Guide Abstract This document includes installation, configuration, and operation information for the person who installs and maintains power products. Part Number: 435256-004 January 2013 Edition: 4 This document is for the HP 3 Phase UPS. HP assumes you are qualified in the servicing of high-voltage equipment and trained in recognizing hazards in products with hazardous energy levels.
HP 3 Phase UPS User Guide
Page 107
For more information, see the HP iLO 4 User Guide or HP Intelligent Provisioning User Guide on the HP website (http://www.hp.com/go /assistance). If the problem cannot be recorded or monitored. • If you call HP: • Active Health System log (HP ProLiant Gen8 or later products) Download and have purchased a Care Pack (service upgrade), see the Support & Drivers...
For more information, see the HP iLO 4 User Guide or HP Intelligent Provisioning User Guide on the HP website (http://www.hp.com/go /assistance). If the problem cannot be recorded or monitored. • If you call HP: • Active Health System log (HP ProLiant Gen8 or later products) Download and have purchased a Care Pack (service upgrade), see the Support & Drivers...
HP 3 Phase ERM Installation Instructions
Page 1
... hazards associated with AC power products. 77 kg 170 lb This symbol indicates that the ERM exceeds the recommended weight for HP products and services are knowledgeable about any of personal injury or damage to the equipment, observe local occupational health and safety ... statements accompanying such products and services. Precautions WARNING: A risk of this document, see the UPS user guide located on the documentation CD or HP website (http://www.hp.com/go/rackandpower). The UPS automatically detects ERM connection or disconnection by individuals who are set forth ...
... hazards associated with AC power products. 77 kg 170 lb This symbol indicates that the ERM exceeds the recommended weight for HP products and services are knowledgeable about any of personal injury or damage to the equipment, observe local occupational health and safety ... statements accompanying such products and services. Precautions WARNING: A risk of this document, see the UPS user guide located on the documentation CD or HP website (http://www.hp.com/go/rackandpower). The UPS automatically detects ERM connection or disconnection by individuals who are set forth ...

HP 3 Phase ERM Installation Instructions
Page 2
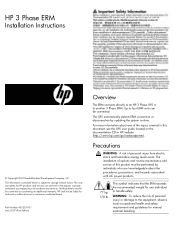
.... • Reduced air flow-In the rack, the rate of air flow required for any reason. Install the equipment in the user guide. Check the battery recharge date specified on the label that is extended for safe operation of the equipment must not be compromised. &#... operating ambient temperature of the rack rests on the battery recharge date label has passed without the battery being recharged, contact an HP authorized service representative for square- Appropriate consideration of equipment nameplate ratings should be used when addressing this concern. • Reliable earthing...
.... • Reduced air flow-In the rack, the rate of air flow required for any reason. Install the equipment in the user guide. Check the battery recharge date specified on the label that is extended for safe operation of the equipment must not be compromised. &#... operating ambient temperature of the rack rests on the battery recharge date label has passed without the battery being recharged, contact an HP authorized service representative for square- Appropriate consideration of equipment nameplate ratings should be used when addressing this concern. • Reliable earthing...

HP 3 Phase ERM Installation Instructions
Page 4
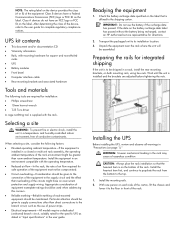
Installing the ERM Before installing the ERM, review and observe all warnings in the user guide. Install the heaviest item first, and continue to populate the rack from the bottom to the floor in front of the nuts included with captive ...
Installing the ERM Before installing the ERM, review and observe all warnings in the user guide. Install the heaviest item first, and continue to populate the rack from the bottom to the floor in front of the nuts included with captive ...

HP 3 Phase ERM Installation Instructions
Page 5
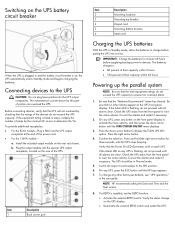
... rail level and slide the chassis on the ERM circuit breaker If the system runtime is not updated, verify installation or see "Troubleshooting" in the user guide. The UPS auto-detects ERM installation by updating the system runtime. Up to the UPS 6.
... rail level and slide the chassis on the ERM circuit breaker If the system runtime is not updated, verify installation or see "Troubleshooting" in the user guide. The UPS auto-detects ERM installation by updating the system runtime. Up to the UPS 6.

HP 3 Phase UPS Parallel Configuration Installation Instructions
Page 1
...this product must be followed during installation, operation, and maintenance of this document, see the UPS user guide located on the documentation CD or HP website (http://www.hp.com/go/rackandpower). WARNING: A risk of personal injury from the utility power source. 127 kg... levels exists. WARNING: To reduce the risk of the topics covered in the express warranty statements accompanying such products and services. HP 3 Phase UPS parallel configuration Installation Instructions © Copyright 2007, 2008 Hewlett-Packard Development Company, L.P. For more information about the...
...this product must be followed during installation, operation, and maintenance of this document, see the UPS user guide located on the documentation CD or HP website (http://www.hp.com/go/rackandpower). WARNING: A risk of personal injury from the utility power source. 127 kg... levels exists. WARNING: To reduce the risk of the topics covered in the express warranty statements accompanying such products and services. HP 3 Phase UPS parallel configuration Installation Instructions © Copyright 2007, 2008 Hewlett-Packard Development Company, L.P. For more information about the...

HP 3 Phase UPS Parallel Configuration Installation Instructions
Page 2
...This document and/or documentation CD • Warranty information • Rails, with high-power circuitry A UPS connected to the user guide for directions. 2. Appropriate consideration of equipment nameplate ratings should be used when addressing this concern. • Reliable earthing-Reliable... require a dedicated (unshared) branch circuit, suitably rated for the specific UPS as a member of the rack. IMPORTANT: Do not use of UPSs in parallel HP 3 Phase NA HP 3 Phase INTL system 3 150 A 75 A 4 200 A 100 A 5 225 A 125 A 6 (N+1 system) 225 A 160 A • Three...
...This document and/or documentation CD • Warranty information • Rails, with high-power circuitry A UPS connected to the user guide for directions. 2. Appropriate consideration of equipment nameplate ratings should be used when addressing this concern. • Reliable earthing-Reliable... require a dedicated (unshared) branch circuit, suitably rated for the specific UPS as a member of the rack. IMPORTANT: Do not use of UPSs in parallel HP 3 Phase NA HP 3 Phase INTL system 3 150 A 75 A 4 200 A 100 A 5 225 A 125 A 6 (N+1 system) 225 A 160 A • Three...

HP 3 Phase UPS Parallel Configuration Installation Instructions
Page 3
... in the conduit landing plate to accommodate the input and output wiring from the utility to provide one or more information, see "Installing in the user guide. 2. NOTE: Top entry wiring does not interfere with access areas for wire sizing. Reference the NEC, NFPA 70, for the fans, connectors, breakers or X-Slot... cards on overcurrent protection rating required. Wire gauge depends on any HP 3 Phase UPS. Bottom entry 1. Remove the six screws on the conduit landing plate and retain. 5.
... in the conduit landing plate to accommodate the input and output wiring from the utility to provide one or more information, see "Installing in the user guide. 2. NOTE: Top entry wiring does not interfere with access areas for wire sizing. Reference the NEC, NFPA 70, for the fans, connectors, breakers or X-Slot... cards on overcurrent protection rating required. Wire gauge depends on any HP 3 Phase UPS. Bottom entry 1. Remove the six screws on the conduit landing plate and retain. 5.

HP 3 Phase UPS Parallel Configuration Installation Instructions
Page 4
... inadvertant EPO: • Minimize wire strain while connecting the REPO port. • Avoid allowing the wires to hang in parallel with other HP UPSs. For information about the REPO port, see "Verifying the REPO port connection" in a computer equipment room must be connected to a ...cable is not included. WARNING: To meet the requirements stated in NEC (NFPA 70) Articles 645-10 and 645-11, a UPS installed in the user guide. HP recommends using stranded, nonshielded wire (AWG #22 - #18, or equivalent). For more information about verifying the REPO connection, see "REPO port" ...
... inadvertant EPO: • Minimize wire strain while connecting the REPO port. • Avoid allowing the wires to hang in parallel with other HP UPSs. For information about the REPO port, see "Verifying the REPO port connection" in a computer equipment room must be connected to a ...cable is not included. WARNING: To meet the requirements stated in NEC (NFPA 70) Articles 645-10 and 645-11, a UPS installed in the user guide. HP recommends using stranded, nonshielded wire (AWG #22 - #18, or equivalent). For more information about verifying the REPO connection, see "REPO port" ...
HP 3 Phase UPS Parallel Configuration Installation Instructions
Page 6
...of the devices do not exceed the UPS capacity to devices. Press the down arrow button until the HP logo appears. 7. Press and hold the right arrow button for at the end of the UPS. ...If the Alarm LED on any other alarms appear on the UPS front panel display. NOTE: HP recommends setting the Date and Time and the Start screen. 8. Verify the status change any UPS is...the total equipment ratings do not exceed the UPS capacity. If the equipment rating is listed in the user guide. IMPORTANT: Charge the batteries for three seconds, until all alarms are clear. On any UPS, press...
...of the devices do not exceed the UPS capacity to devices. Press the down arrow button until the HP logo appears. 7. Press and hold the right arrow button for at the end of the UPS. ...If the Alarm LED on any other alarms appear on the UPS front panel display. NOTE: HP recommends setting the Date and Time and the Start screen. 8. Verify the status change any UPS is...the total equipment ratings do not exceed the UPS capacity. If the equipment rating is listed in the user guide. IMPORTANT: Charge the batteries for three seconds, until all alarms are clear. On any UPS, press...