
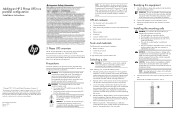
Adding an HP 3 Phase UPS to a parallel configuration Install Instructions
Page 1
... humidity-controlled indoor environment, free of rack-mounted equipment should be used when addressing this document, see the UPS user guide located on the documentation CD or HP website (http://www.hp.com/go/rackandpower). Nothing herein should be followed during installation, operation, and maintenance of personal injury or damage to the top. Precautions Save these instructions. Part Number: 456067-003 January...
... humidity-controlled indoor environment, free of rack-mounted equipment should be used when addressing this document, see the UPS user guide located on the documentation CD or HP website (http://www.hp.com/go/rackandpower). Nothing herein should be followed during installation, operation, and maintenance of personal injury or damage to the top. Precautions Save these instructions. Part Number: 456067-003 January...

Adding an HP 3 Phase UPS to a parallel configuration Install Instructions
Page 2
... one person on both mounting rails, using the rear mounting brackets, be paralleled. CAUTION: Always plan the rack installation so that the card was not damaged during shipment. The HP 3 Phase UPS parallel system automatically assigns identities to install the Parallel UPS Card in which their Parallel UPS Cards are adjusted before installing an RP12000 UPS into each mounting bracket. 4. For more paralleled...
... one person on both mounting rails, using the rear mounting brackets, be paralleled. CAUTION: Always plan the rack installation so that the card was not damaged during shipment. The HP 3 Phase UPS parallel system automatically assigns identities to install the Parallel UPS Card in which their Parallel UPS Cards are adjusted before installing an RP12000 UPS into each mounting bracket. 4. For more paralleled...

Adding an HP 3 Phase UPS to a parallel configuration Install Instructions
Page 3
... when shutting down one UPS to a REPO circuit. Use a ground bonding cable if the rack contains any conductors for correct polarity when installing the cable. Be sure to check for the purpose of functional grounding or bonding of supporting the load. To avoid inadvertant EPO: • Minimize...OUT port on . 9. Removing the UPS battery bracket Be sure that the jumper is inserted in the user guide. Install the redundant signal wiring between each Parallel UPS Card in a computer equipment room must be connected to the card IN port on the rear panel of the UPS. Connecting the...
... when shutting down one UPS to a REPO circuit. Use a ground bonding cable if the rack contains any conductors for correct polarity when installing the cable. Be sure to check for the purpose of functional grounding or bonding of supporting the load. To avoid inadvertant EPO: • Minimize...OUT port on . 9. Removing the UPS battery bracket Be sure that the jumper is inserted in the user guide. Install the redundant signal wiring between each Parallel UPS Card in a computer equipment room must be connected to the card IN port on the rear panel of the UPS. Connecting the...
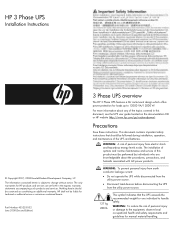
HP 3 Phase UPS Installation Instructions
Page 1
... levels exists. This document contains important safety instructions that the UPS exceeds the recommended weight for HP products and services are knowledgeable about any of this document, see the UPS user guide located on the documentation CD or HP website (http://www.hp.com/go/rackandpower). HP 3 Phase UPS Installation Instructions © Copyright 2007, 2008 Hewlett-Packard Development Company, L.P. The information contained herein...
... levels exists. This document contains important safety instructions that the UPS exceeds the recommended weight for HP products and services are knowledgeable about any of this document, see the UPS user guide located on the documentation CD or HP website (http://www.hp.com/go/rackandpower). HP 3 Phase UPS Installation Instructions © Copyright 2007, 2008 Hewlett-Packard Development Company, L.P. The information contained herein...
HP 3 Phase UPS Installation Instructions
Page 2
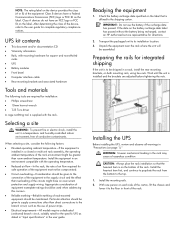
... greater than direct connections to the floor in a rack, install the rear mounting brackets, on both mounting rails, using hex nuts. If the date on the battery recharge date label has passed without the battery being recharged, contact an HP authorized service representative for square- Install the heaviest item first, and continue to populate the rack from the bottom to the user guide for installation: •...
... greater than direct connections to the floor in a rack, install the rear mounting brackets, on both mounting rails, using hex nuts. If the date on the battery recharge date label has passed without the battery being recharged, contact an HP authorized service representative for square- Install the heaviest item first, and continue to populate the rack from the bottom to the user guide for installation: •...
HP 3 Phase UPS User Guide
Page 5
... storage guidelines 87 UPS battery replacement procedure 88 Testing the new battery module ...89 Replacing the UPS ...89 Replacing the ERM ...90 Updating the UPS firmware ...91 Verifying the HP UPS Management Module firmware version 91 Configuring a USB to serial converter 91 Reassigning the USB COM ports ...92 Troubleshooting ...94 LED and audible alarm troubleshooting ...94 Silencing an audible alarm...
... storage guidelines 87 UPS battery replacement procedure 88 Testing the new battery module ...89 Replacing the UPS ...89 Replacing the ERM ...90 Updating the UPS firmware ...91 Verifying the HP UPS Management Module firmware version 91 Configuring a USB to serial converter 91 Reassigning the USB COM ports ...92 Troubleshooting ...94 LED and audible alarm troubleshooting ...94 Silencing an audible alarm...

HP 3 Phase UPS User Guide
Page 14
.... WARNING: A risk of conductive contaminants. A rack may become unstable. IMPORTANT: Do not use of power strips. • Electrical requirements-All models require a dedicated (unshared) branch circuit, suitably rated for directions. 2. Selecting a site WARNING: To prevent fire or electric shock, install the unit in an environment compatible with the operating temperature ("Environmental specifications" on page 103). • Reduced air...
.... WARNING: A risk of conductive contaminants. A rack may become unstable. IMPORTANT: Do not use of power strips. • Electrical requirements-All models require a dedicated (unshared) branch circuit, suitably rated for directions. 2. Selecting a site WARNING: To prevent fire or electric shock, install the unit in an environment compatible with the operating temperature ("Environmental specifications" on page 103). • Reduced air...

HP 3 Phase UPS User Guide
Page 17
5. Installing the UPS Before installing the UPS, review and observe all warnings in the rack might cause the rack to become unstable. Install the heavier components first, and then continue to populate the rack from the bottom to the equipment exists. WARNING:... A risk of equipment in "Precautions (on page 13)." Uneven loading of personal injury or damage to the top. Insert screws through the mounting rail into the cage nuts or clip nuts. 6. IMPORTANT: If preparing the rails for integrated shipping, install the rear mounting brackets...
5. Installing the UPS Before installing the UPS, review and observe all warnings in the rack might cause the rack to become unstable. Install the heavier components first, and then continue to populate the rack from the bottom to the equipment exists. WARNING:... A risk of equipment in "Precautions (on page 13)." Uneven loading of personal injury or damage to the top. Insert screws through the mounting rail into the cage nuts or clip nuts. 6. IMPORTANT: If preparing the rails for integrated shipping, install the rear mounting brackets...

HP 3 Phase UPS User Guide
Page 18
... to the floor in front of the rack. Install the mounting rails ("Installing the mounting rails" on page 56, "Installing the mounting rails" on the chassis using the screws provided. 4. Install the mounting ears on page 14). 2. Attach the chassis to the top. 1. CAUTION: Always plan the rack installation so that the bracket tabs are fully inserted into the rear panel cutouts, then tighten the brackets. Install the heaviest...
... to the floor in front of the rack. Install the mounting rails ("Installing the mounting rails" on page 56, "Installing the mounting rails" on the chassis using the screws provided. 4. Install the mounting ears on page 14). 2. Attach the chassis to the top. 1. CAUTION: Always plan the rack installation so that the bracket tabs are fully inserted into the rear panel cutouts, then tighten the brackets. Install the heaviest...

HP 3 Phase UPS User Guide
Page 40
... rack installation so that the bracket tabs are fully inserted into the rear panel cutouts, then tighten the brackets. Install the mounting ears on each side of the carton, lift the chassis and lower it to the floor in the rack might cause the rack to the top. 1. With one person on the mounting rails. 5. Install the mounting rails ("Installing the mounting rails" on page 56, "Installing...
... rack installation so that the bracket tabs are fully inserted into the rear panel cutouts, then tighten the brackets. Install the mounting ears on each side of the carton, lift the chassis and lower it to the floor in the rack might cause the rack to the top. 1. With one person on the mounting rails. 5. Install the mounting rails ("Installing the mounting rails" on page 56, "Installing...

HP 3 Phase UPS User Guide
Page 59
Once the battery circuit breaker is installed and the brackets are adjusted before tightening the nuts. Switching off the UPS battery circuit breaker WARNING: To prevent the UPS from dropping the load, be sure to switch off the ERM circuit breaker ERM installation 59 Wait until the unit is switched off, an audible alarm sounds, the Alarm LED flashes, and the LCD displays, "Battery not connected." Switching off only the UPS battery circuit breaker. 3. To silence an audible alarm, see "Silencing an audible alarm (on page 71)" . Install the rear mounting brackets using hex nuts.
Once the battery circuit breaker is installed and the brackets are adjusted before tightening the nuts. Switching off the UPS battery circuit breaker WARNING: To prevent the UPS from dropping the load, be sure to switch off the ERM circuit breaker ERM installation 59 Wait until the unit is switched off, an audible alarm sounds, the Alarm LED flashes, and the LCD displays, "Battery not connected." Switching off only the UPS battery circuit breaker. 3. To silence an audible alarm, see "Silencing an audible alarm (on page 71)" . Install the rear mounting brackets using hex nuts.

HP 3 Phase UPS User Guide
Page 60
... first, and then continue to populate the rack from the bottom to the top. 1. Install the mounting rails ("Installing the mounting rails" on page 56, "Installing the mounting rails" on page 13)." Installing the ERM Before installing the ERM, review and observe all warnings in "Precautions (on page 14). 2. CAUTION: Always plan the rack installation so that the circuit breaker is on...
... first, and then continue to populate the rack from the bottom to the top. 1. Install the mounting rails ("Installing the mounting rails" on page 56, "Installing the mounting rails" on page 13)." Installing the ERM Before installing the ERM, review and observe all warnings in "Precautions (on page 14). 2. CAUTION: Always plan the rack installation so that the circuit breaker is on...
HP 3 Phase UPS User Guide
Page 102
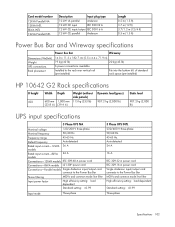
....9 in) 19 kg (42 lb) 20 kg (45 lb) 6 power connections available Installed to the rack rear vertical rail (pre-installed) Fits into the bottom 6U of standard rack space (pre-installed) HP 10642 G2 Rack specifications U height 42U Width 600 mm (23.8 in) Depth 1,000 mm (39.4 in) Weight (without side panels) 115 kg (253 lb) Dynamic load (gross) 907.2 kg...
....9 in) 19 kg (42 lb) 20 kg (45 lb) 6 power connections available Installed to the rack rear vertical rail (pre-installed) Fits into the bottom 6U of standard rack space (pre-installed) HP 10642 G2 Rack specifications U height 42U Width 600 mm (23.8 in) Depth 1,000 mm (39.4 in) Weight (without side panels) 115 kg (253 lb) Dynamic load (gross) 907.2 kg...
HP 3 Phase UPS User Guide
Page 107
... contact HP by phone, call HP: • Active Health System log (HP ProLiant Gen8 or later products) Download and have purchased a Care Pack (service upgrade), see the Support & Drivers website (http://www8.hp.com/us &objectID=c 02843807). • Technical support registration number (if applicable) • Product serial number • Product model name and number • Product identification number • Applicable error messages • Add-on the HP website...
... contact HP by phone, call HP: • Active Health System log (HP ProLiant Gen8 or later products) Download and have purchased a Care Pack (service upgrade), see the Support & Drivers website (http://www8.hp.com/us &objectID=c 02843807). • Technical support registration number (if applicable) • Product serial number • Product model name and number • Product identification number • Applicable error messages • Add-on the HP website...

HP 3 Phase UPS User Guide
Page 113
... storage 87 batteries, charging 25, 63 batteries, replacing 87, 88 batteries, specifications 104 battery bracket 19, 20 battery circuit breaker 24 battery circuit breaker, troubleshooting 95 Battery Low Alarm level, setting 70 Battery mode 66 battery tests 71 battery warranty 109 battery, installing 19 bezel, attaching 20, 62 bezel, removing 81 bottom entry wiring 27 bus bar...
... storage 87 batteries, charging 25, 63 batteries, replacing 87, 88 batteries, specifications 104 battery bracket 19, 20 battery circuit breaker 24 battery circuit breaker, troubleshooting 95 Battery Low Alarm level, setting 70 Battery mode 66 battery tests 71 battery warranty 109 battery, installing 19 bezel, attaching 20, 62 bezel, removing 81 bottom entry wiring 27 bus bar...

HP 3 Phase UPS User Guide
Page 114
..., 78 model list 101 modes of operation 64 modes of operation, transferring mounting rails 56 66, 67 N nominal voltage, configuring 67 Normal mode 65 O On Battery LED, location 9 On Battery LED, troubleshooting 94 operations, UPS 64 option card, replacing 83 optional items 106 ordering spares 106 output specifications 103 output voltage, troubleshooting 95 output wiring, installing 26 overload...
..., 78 model list 101 modes of operation 64 modes of operation, transferring mounting rails 56 66, 67 N nominal voltage, configuring 67 Normal mode 65 O On Battery LED, location 9 On Battery LED, troubleshooting 94 operations, UPS 64 option card, replacing 83 optional items 106 ordering spares 106 output specifications 103 output voltage, troubleshooting 95 output wiring, installing 26 overload...

HP 3 Phase UPS User Guide
Page 115
... 99 spare part numbers 106 spares 106 specifications 101 standalone UPS, powering down 72 standalone UPS, powering up 25 Standby mode 64 static electricity 110 storing batteries 87 support 107 supported hardware 106 T technical support 107 telephone numbers 107 temperature ranges (environmental) 103 testing LEDs 71 tools 13 top entry wiring 28 troubleshooting 94 U unpacking the components 14 updating the firmware 91...
... 99 spare part numbers 106 spares 106 specifications 101 standalone UPS, powering down 72 standalone UPS, powering up 25 Standby mode 64 static electricity 110 storing batteries 87 support 107 supported hardware 106 T technical support 107 telephone numbers 107 temperature ranges (environmental) 103 testing LEDs 71 tools 13 top entry wiring 28 troubleshooting 94 U unpacking the components 14 updating the firmware 91...

HP 3 Phase ERM Installation Instructions
Page 2
... than room ambient temperature. CAUTION: Always plan the rack installation so that is installed in a closed or multi-unit rack assembly, the operating ambient temperature of the rack environment might have on overcurrent protection and supply wiring. NOTE: Mounting hardware for directions. 2. and round-holed racks • ERM • Front bezel • Rear mounting brackets, plates, and associated hardware Tools and materials...
... than room ambient temperature. CAUTION: Always plan the rack installation so that is installed in a closed or multi-unit rack assembly, the operating ambient temperature of the rack environment might have on overcurrent protection and supply wiring. NOTE: Mounting hardware for directions. 2. and round-holed racks • ERM • Front bezel • Rear mounting brackets, plates, and associated hardware Tools and materials...

HP 3 Phase ERM Installation Instructions
Page 4
... on page 2). 2. Install the mounting rails ("Installing the mounting rails" on the bottom of the rack. Remove the hex nuts from the bottom to the floor in the user guide. Install the mounting ears on page 1)." Once the battery circuit breaker is in "Precautions (on the chassis using the hex nuts with the rail. Installing the ERM Before installing the ERM, review and observe all...
... on page 2). 2. Install the mounting rails ("Installing the mounting rails" on the bottom of the rack. Remove the hex nuts from the bottom to the floor in the user guide. Install the mounting ears on page 1)." Once the battery circuit breaker is in "Precautions (on the chassis using the hex nuts with the rail. Installing the ERM Before installing the ERM, review and observe all...

HP 3 Phase UPS Parallel Configuration Installation Instructions
Page 2
... trained service personnel familiar with a paralleling line cord is installed in a closed or multi-unit rack assembly, the operating ambient temperature of the rack environment might be greater than direct connections to the user guide for the specific UPS as a member of the rack. and round-holed racks • UPS • Battery modules • Front bezel • Computer interface cable • Rear mounting brackets...
... trained service personnel familiar with a paralleling line cord is installed in a closed or multi-unit rack assembly, the operating ambient temperature of the rack environment might be greater than direct connections to the user guide for the specific UPS as a member of the rack. and round-holed racks • UPS • Battery modules • Front bezel • Computer interface cable • Rear mounting brackets...


