HP ProLiant SL165s G7 Server Installation Instructions
Page 4
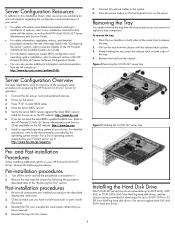
...cord and peripheral devices. 2. For detailed procedures, refer to the documentation provided by your ProLiant server, go to http://www.hp.com/go/supportos. For a list of your HP ProLiant SL165s G7 Server, observe the following the procedure described later in the "Removing the tray" ... to system BIOS configuration and operating system installation, refer to relevant section of the necessary setup procedures for preparing the HP ProLiant SL165s G7 Server for more information regarding the configuration and maintenance of your server: • For safety information and detailed procedures...
...cord and peripheral devices. 2. For detailed procedures, refer to the documentation provided by your ProLiant server, go to http://www.hp.com/go/supportos. For a list of your HP ProLiant SL165s G7 Server, observe the following the procedure described later in the "Removing the tray" ... to system BIOS configuration and operating system installation, refer to relevant section of the necessary setup procedures for preparing the HP ProLiant SL165s G7 Server for more information regarding the configuration and maintenance of your server: • For safety information and detailed procedures...
HP ProLiant SL165s G7 Server Installation Instructions
Page 5
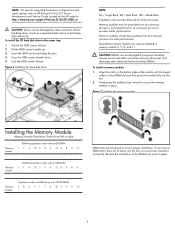
... 5. Memory modules should be installed in memory sockets 2, 5, 8, and 11. NOTE: For specific supported hard drive configurations and cable routing, refer to HP ProLiant SL165s G7 Server Maintenance and Service Guide located on the bottom edge of the module with SR/DR DIMM 2 8 5 11 1 7 4 10 3 ...touch an unpainted metal surface to discharge static electricity. Unlock the HDD carrier latches. 2. Align the notch on the HP website: http://www.hp.com/support/ProLiant_SL165sG7_MSG_en CAUTION: Drives can only be populated four at a time per processor for both processors. Reverse the...
... 5. Memory modules should be installed in memory sockets 2, 5, 8, and 11. NOTE: For specific supported hard drive configurations and cable routing, refer to HP ProLiant SL165s G7 Server Maintenance and Service Guide located on the bottom edge of the module with SR/DR DIMM 2 8 5 11 1 7 4 10 3 ...touch an unpainted metal surface to discharge static electricity. Unlock the HDD carrier latches. 2. Align the notch on the HP website: http://www.hp.com/support/ProLiant_SL165sG7_MSG_en CAUTION: Drives can only be populated four at a time per processor for both processors. Reverse the...

HP ProLiant SL165s G7 Server Installation Instructions
Page 7
... Installing the DIMM air baffle into the tray Figure 13 Installing the CPU air baffle into the tray Additional Documentation For additional documentation, refer to HP ProLiant SL165s G7 Server Easy Set-up CD. To install the CPU air baffle: 1. Align the CPU air baffle to the tray. 2. Hold the latch on the... baffle and align it completely installed on the tray. 7 NOTE: Do not over tighten the heat sink's spring-loaded screws to prevent them from the HP external website, either by connecting directly or through the Easy Set-up CD.
... Installing the DIMM air baffle into the tray Figure 13 Installing the CPU air baffle into the tray Additional Documentation For additional documentation, refer to HP ProLiant SL165s G7 Server Easy Set-up CD. To install the CPU air baffle: 1. Align the CPU air baffle to the tray. 2. Hold the latch on the... baffle and align it completely installed on the tray. 7 NOTE: Do not over tighten the heat sink's spring-loaded screws to prevent them from the HP external website, either by connecting directly or through the Easy Set-up CD.


