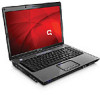
Backup and Recovery - Windows Vista
Page 5
Table of contents Recovering system information Creating recovery discs ...2 Backing up your information ...3 When to back up ...3 Backup suggestions ...3 Using system restore points 3 When to create restore points 3 Create a system restore point 4 Restore to a previous date and time 4 Performing a recovery ...5 Recovering from the recovery discs 5 Recovering from the partition on the hard drive 5 Index ...6 v
Table of contents Recovering system information Creating recovery discs ...2 Backing up your information ...3 When to back up ...3 Backup suggestions ...3 Using system restore points 3 When to create restore points 3 Create a system restore point 4 Restore to a previous date and time 4 Performing a recovery ...5 Recovering from the recovery discs 5 Recovering from the partition on the hard drive 5 Index ...6 v
Backup and Recovery - Windows Vista
Page 7
... restoring the computer to an earlier state. ● Recovering a program or driver (Recovery Manager software feature). Recovery Manager works from a dedicated recovery partition on the hard drive or from recovery discs you reinstall a program or driver without performing a full system recovery. ● Performing a full system recovery (Recovery Manager software feature). Recovery discs...
... restoring the computer to an earlier state. ● Recovering a program or driver (Recovery Manager software feature). Recovery Manager works from a dedicated recovery partition on the hard drive or from recovery discs you reinstall a program or driver without performing a full system recovery. ● Performing a full system recovery (Recovery Manager software feature). Recovery discs...
Backup and Recovery - Windows Vista
Page 9
... associated programs. ● Save customized settings in time. A system restore point allows you want to reverse subsequent changes made to provide increased protection for your hard drive at a specific point in a window, toolbar, or menu bar by taking a screen shot of your system files and settings. b. You also can then recover back...
... associated programs. ● Save customized settings in time. A system restore point allows you want to reverse subsequent changes made to provide increased protection for your hard drive at a specific point in a window, toolbar, or menu bar by taking a screen shot of your system files and settings. b. You also can then recover back...
Backup and Recovery - Windows Vista
Page 11
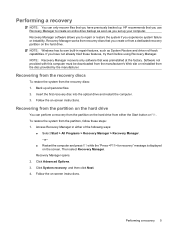
...Start > All Programs > Recovery Manager > Recovery Manager. -or- ● Restart the computer and press f11 while the "Press for recovery" message is displayed on the hard drive from either the Start button or f11. Click Advanced Options. 3. Recovery Manager works from the partition, follow these features, try them before using Recovery Manager... instructions. Recovery Manager opens. 2. Then select Recovery Manager. To restore the system from recovery discs that you have previously backed up all personal files. 2. HP recommends that was preinstalled at the factory.
...Start > All Programs > Recovery Manager > Recovery Manager. -or- ● Restart the computer and press f11 while the "Press for recovery" message is displayed on the hard drive from either the Start button or f11. Click Advanced Options. 3. Recovery Manager works from the partition, follow these features, try them before using Recovery Manager... instructions. Recovery Manager opens. 2. Then select Recovery Manager. To restore the system from recovery discs that you have previously backed up all personal files. 2. HP recommends that was preinstalled at the factory.
Drives - Windows Vista
Page 5
Table of contents 1 Identifying installed drives 2 Handling drives 3 Using an optical drive Inserting an optical disc ...5 Removing an optical disc when running on battery or external power 6 Removing an optical disc when no computer power is available 7 4 Improving hard drive performance Using Disk Defragmenter ...8 Using Disk Cleanup ...8 5 Replacing the hard drive Index ...12 v
Table of contents 1 Identifying installed drives 2 Handling drives 3 Using an optical drive Inserting an optical disc ...5 Removing an optical disc when running on battery or external power 6 Removing an optical disc when no computer power is available 7 4 Improving hard drive performance Using Disk Defragmenter ...8 Using Disk Cleanup ...8 5 Replacing the hard drive Index ...12 v
Drives - Windows Vista
Page 7
... system, such as installing applications, running utilities, or changing Windows settings. On models with a secondary hard drive (drive D), the optical drive becomes drive E. Refer to improve the security of your permission or password for more information. 1 1 Identifying installed drives To view the drives installed on the computer, select Start > Computer. NOTE: Windows® includes the User Account...
... system, such as installing applications, running utilities, or changing Windows settings. On models with a secondary hard drive (drive D), the optical drive becomes drive E. Refer to improve the security of your permission or password for more information. 1 1 Identifying installed drives To view the drives installed on the computer, select Start > Computer. NOTE: Windows® includes the User Account...
Drives - Windows Vista
Page 8
...label the package "FRAGILE." Handle a drive carefully; Avoid exposing a drive to temperature or humidity extremes. Remove media from a drive before writing to magnetic fields. Security devices with cleaning products. Before removing or inserting a hard drive, shut down through the operating system....or external hard drive from the drive bay, or traveling with care. The write process is sufficiently charged before removing the drive from one location to another, initiate Sleep, and allow the screen to a drive, or loss of the drive. 2 Handling drives Drives are fragile ...
...label the package "FRAGILE." Handle a drive carefully; Avoid exposing a drive to temperature or humidity extremes. Remove media from a drive before writing to magnetic fields. Security devices with cleaning products. Before removing or inserting a hard drive, shut down through the operating system....or external hard drive from the drive bay, or traveling with care. The write process is sufficiently charged before removing the drive from one location to another, initiate Sleep, and allow the screen to a drive, or loss of the drive. 2 Handling drives Drives are fragile ...
Drives - Windows Vista
Page 14
...Select Start > All Programs > Accessories > System Tools > Disk Cleanup. 2. Using Disk Cleanup Disk Cleanup searches the hard drive for unnecessary files that the system can safely delete to free up disk space and help the computer to improve the ... Defragmenter consolidates the fragmented files and folders on the hard drive so that you use the computer, files on -screen instructions. 8 Chapter 4 Improving hard drive performance Follow the on the hard drive become fragmented. Click Defragment now. 4 Improving hard drive performance Using Disk Defragmenter As you can run more ...
...Select Start > All Programs > Accessories > System Tools > Disk Cleanup. 2. Using Disk Cleanup Disk Cleanup searches the hard drive for unnecessary files that the system can safely delete to free up disk space and help the computer to improve the ... Defragmenter consolidates the fragmented files and folders on the hard drive so that you use the computer, files on -screen instructions. 8 Chapter 4 Improving hard drive performance Follow the on the hard drive become fragmented. Click Defragment now. 4 Improving hard drive performance Using Disk Defragmenter As you can run more ...
Drives - Windows Vista
Page 15
.... Save your computer is equipped with a secondary hard drive bay, the bay is off or in this chapter. Unplug the power cord from the hard drive bay. 5 Replacing the hard drive NOTE: Your computer may contain a second hard drive. CAUTION: To prevent information loss or an unresponsive... system: Shut down the computer before removing the hard drive from the AC outlet. 5. If you ...
.... Save your computer is equipped with a secondary hard drive bay, the bay is off or in this chapter. Unplug the power cord from the hard drive bay. 5 Replacing the hard drive NOTE: Your computer may contain a second hard drive. CAUTION: To prevent information loss or an unresponsive... system: Shut down the computer before removing the hard drive from the AC outlet. 5. If you ...
Drives - Windows Vista
Page 16
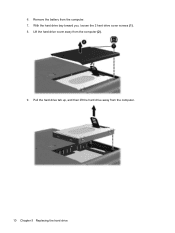
6. Remove the battery from the computer. 10 Chapter 5 Replacing the hard drive Pull the hard drive tab up, and then lift the hard drive away from the computer. 7. Lift the hard drive cover away from the computer (2). 9. With the hard drive bay toward you, loosen the 2 hard drive cover screws (1). 8.
6. Remove the battery from the computer. 10 Chapter 5 Replacing the hard drive Pull the hard drive tab up, and then lift the hard drive away from the computer. 7. Lift the hard drive cover away from the computer (2). 9. With the hard drive bay toward you, loosen the 2 hard drive cover screws (1). 8.
Drives - Windows Vista
Page 17
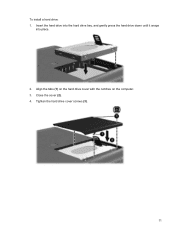
To install a hard drive: 1. Insert the hard drive into the hard drive bay, and gently press the hard drive down until it snaps into place. 2. Close the cover (2). 4. Tighten the hard drive cover screws (3). 11 Align the tabs (1) on the hard drive cover with the notches on the computer. 3.
To install a hard drive: 1. Insert the hard drive into the hard drive bay, and gently press the hard drive down until it snaps into place. 2. Close the cover (2). 4. Tighten the hard drive cover screws (3). 11 Align the tabs (1) on the hard drive cover with the notches on the computer. 3.
Drives - Windows Vista
Page 18
... Cleanup software 8 Disk Defragmenter software 8 disk performance 8 drives caring for 2 hard drive 9, 11 optical drive 3 See also hard drive; optical drive DVD inserting 5 removing, with power 6 removing, without power 7 DVD drive 3 O optical disc inserting 5 removing, with power 6 removing, without power 7 optical drive 3 S software Disk Cleanup 8 Disk Defragmenter 8 H hard disk drive installing 11 removing 9 replacing 9 hard drive installing 11 removing 9 replacing 9 M maintenance Disk Cleanup...
... Cleanup software 8 Disk Defragmenter software 8 disk performance 8 drives caring for 2 hard drive 9, 11 optical drive 3 See also hard drive; optical drive DVD inserting 5 removing, with power 6 removing, without power 7 DVD drive 3 O optical disc inserting 5 removing, with power 6 removing, without power 7 optical drive 3 S software Disk Cleanup 8 Disk Defragmenter 8 H hard disk drive installing 11 removing 9 replacing 9 hard drive installing 11 removing 9 replacing 9 M maintenance Disk Cleanup...
Setup Utility - Windows Vista
Page 8
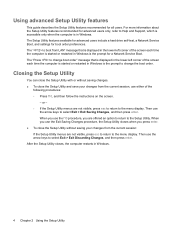
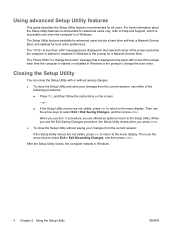
... follow the instructions on the screen. - After the Setup Utility closes, the computer restarts in Windows. The Setup Utility features available for advanced users include a hard drive self-test, a Network Service Boot, and settings for all users. or - ◦ If the Setup Utility menus are offered an option to return to change...
... follow the instructions on the screen. - After the Setup Utility closes, the computer restarts in Windows. The Setup Utility features available for advanced users include a hard drive self-test, a Network Service Boot, and settings for all users. or - ◦ If the Setup Utility menus are offered an option to return to change...
Setup Utility - Windows Vista
Page 10
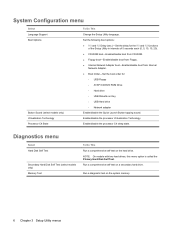
... order for: ◦ USB Floppy ◦ ATAPI CD/DVD ROM Drive ◦ Hard drive ◦ USB Diskette on the hard drive. Enable/disable the processor C4 sleep state. Diagnostics menu Select Hard Disk Self Test Secondary Hard Disk Self Test (select models only) Memory Test To Do This Run... a comprehensive self-test on Key ◦ USB Hard drive ◦ Network adapter Enable/disable the Quick Launch Button tapping sound. NOTE: On models with two hard drives, this menu option is called the Primary Hard Disk Self Test. Run a comprehensive self-test on the system memory...
... order for: ◦ USB Floppy ◦ ATAPI CD/DVD ROM Drive ◦ Hard drive ◦ USB Diskette on the hard drive. Enable/disable the processor C4 sleep state. Diagnostics menu Select Hard Disk Self Test Secondary Hard Disk Self Test (select models only) Memory Test To Do This Run... a comprehensive self-test on Key ◦ USB Hard drive ◦ Network adapter Enable/disable the Quick Launch Button tapping sound. NOTE: On models with two hard drives, this menu option is called the Primary Hard Disk Self Test. Run a comprehensive self-test on the system memory...

Setup Utility - Windows Vista
Page 11
...sound 6 C changing the Setup Utility language 2 closing the Setup Utility 4 D Diagnostics menu 6 displaying system information 3 drives, boot order 6 F fingerprint reader 1 S secondary hard drive self test 6 Security menu 5 selecting in the Setup Utility 2 Setup Utility changing the language 2 closing 4 Diagnostics menu...starting 1 System Configuration menu 6 using 2 using advanced features 4 System Configuration menu 6 system information 5 H hard drive self test 6 L language support 6 M Main menu 5 N navigating in the Setup Utility 2 P passwords 5 power-on password 5 R restoring default ...
...sound 6 C changing the Setup Utility language 2 closing the Setup Utility 4 D Diagnostics menu 6 displaying system information 3 drives, boot order 6 F fingerprint reader 1 S secondary hard drive self test 6 Security menu 5 selecting in the Setup Utility 2 Setup Utility changing the language 2 closing 4 Diagnostics menu...starting 1 System Configuration menu 6 using 2 using advanced features 4 System Configuration menu 6 system information 5 H hard drive self test 6 L language support 6 M Main menu 5 N navigating in the Setup Utility 2 P passwords 5 power-on password 5 R restoring default ...
Setup Utility - Windows Vista and XP
Page 8
The Setup Utility features available for advanced users include a hard drive self-test, a Network Service Boot, and settings for all users. or - ● If the Setup Utility menus are not visible, press esc to return to ...
The Setup Utility features available for advanced users include a hard drive self-test, a Network Service Boot, and settings for all users. or - ● If the Setup Utility menus are not visible, press esc to return to ...

Setup Utility - Windows Vista and XP
Page 10
...Adapter. ● Boot Order―Set the boot order for: ● USB Floppy ● ATAPI CD/DVD ROM Drive ● Hard drive ● USB Diskette on a secondary hard drive. 6 Chapter 3 Setup Utility menus ENWW System Configuration menu Select Language Support Enhanced SATA support (select models only) Boot ...of video memory. Enable/disable enhanced SATA mode. Diagnostics menu Select Hard Disk Self Test Secondary Hard Disk Self Test (select models only) To Do This Run a comprehensive self-test on the hard drive. NOTE On models with two hard drives, this menu option is called the Primary...
...Adapter. ● Boot Order―Set the boot order for: ● USB Floppy ● ATAPI CD/DVD ROM Drive ● Hard drive ● USB Diskette on a secondary hard drive. 6 Chapter 3 Setup Utility menus ENWW System Configuration menu Select Language Support Enhanced SATA support (select models only) Boot ...of video memory. Enable/disable enhanced SATA mode. Diagnostics menu Select Hard Disk Self Test Secondary Hard Disk Self Test (select models only) To Do This Run a comprehensive self-test on the hard drive. NOTE On models with two hard drives, this menu option is called the Primary...
Setup Utility - Windows Vista and XP
Page 11
... 6 boot order 6 button sound 6 C changing the Setup Utility language 2 closing the Setup Utility 4 D Diagnostics menu 6 displaying system information 3 drives, boot order 6 E enhanced SATA support 6 F fingerprint reader 1 H hard drive self test 6 R restoring default settings 3 S secondary hard drive self test 6 Security menu 5 selecting in the Setup Utility 2 Setup Utility changing the language 2 closing 4 Diagnostics menu 6 displaying system...
... 6 boot order 6 button sound 6 C changing the Setup Utility language 2 closing the Setup Utility 4 D Diagnostics menu 6 displaying system information 3 drives, boot order 6 E enhanced SATA support 6 F fingerprint reader 1 H hard drive self test 6 R restoring default settings 3 S secondary hard drive self test 6 Security menu 5 selecting in the Setup Utility 2 Setup Utility changing the language 2 closing 4 Diagnostics menu 6 displaying system...

Software Updates - Windows Vista
Page 8
... install a BIOS update only when the computer is running on the HP Web site that is displayed. 3. Do not insert, remove, connect, or disconnect any device, cable, or cord. To download a BIOS update: 1. To use the arrow keys to the hard drive. 2 Updating software Access the page on battery power, docked in Windows... using the AC adapter. During the download and installation, follow these instructions: Do not disconnect power from the AC outlet. Follow the instructions on your hard drive.
... install a BIOS update only when the computer is running on the HP Web site that is displayed. 3. Do not insert, remove, connect, or disconnect any device, cable, or cord. To download a BIOS update: 1. To use the arrow keys to the hard drive. 2 Updating software Access the page on battery power, docked in Windows... using the AC adapter. During the download and installation, follow these instructions: Do not disconnect power from the AC outlet. Follow the instructions on your hard drive.

Software Updates - Windows Vista
Page 9
... Disk (C:). 3. Double-click the file that contains the update. 4. Updating the BIOS 3 If no instructions are displayed on your hard drive that has an .exe extension (for example, filename.exe). NOTE: After a message on the screen. You will be downloaded. BIOS...on the screen reports a successful installation, you can delete the downloaded file from your hard drive. Double-click your computer to install the update. The BIOS installation begins. 5. The hard drive designation is complete. Complete the installation by selecting Start > Computer. 2. Make a note...
... Disk (C:). 3. Double-click the file that contains the update. 4. Updating the BIOS 3 If no instructions are displayed on your hard drive that has an .exe extension (for example, filename.exe). NOTE: After a message on the screen. You will be downloaded. BIOS...on the screen reports a successful installation, you can delete the downloaded file from your hard drive. Double-click your computer to install the update. The BIOS installation begins. 5. The hard drive designation is complete. Complete the installation by selecting Start > Computer. 2. Make a note...

