
Security - Windows Vista
Page 8
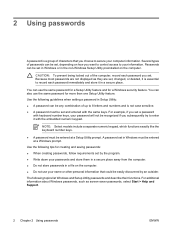
... password will not be set a password with keyboard number keys, your passwords and store them in a secure place away from the computer. ● Do not store passwords in the non-Windows Setup Utility preinstalled on how you want to control access to your information. For additional information about Windows passwords, such as they are not displayed as screen-saver passwords, select Start > Help and Support. 2 Chapter 2 Using passwords ENWW A password set in a secure place. 2 Using passwords A password...
... password will not be set a password with keyboard number keys, your passwords and store them in a secure place away from the computer. ● Do not store passwords in the non-Windows Setup Utility preinstalled on how you want to control access to your information. For additional information about Windows passwords, such as they are not displayed as screen-saver passwords, select Start > Help and Support. 2 Chapter 2 Using passwords ENWW A password set in a secure place. 2 Using passwords A password...
Security - Windows Vista
Page 18
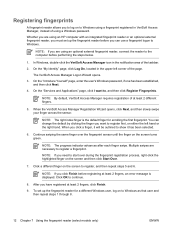
... change the default by clicking the finger you must set up the fingerprint reader before registering at least 2 fingers, an error message is the default finger for a different Windows user, log on to start over the fingerprint sensor until the finger on the screen turns green. Whether you are necessary to Windows using a Windows password. In Windows, double-click the VeriSoft Access Manager icon in VeriSoft Access Manager, instead of using...
... change the default by clicking the finger you must set up the fingerprint reader before registering at least 2 fingers, an error message is the default finger for a different Windows user, log on to start over the fingerprint sensor until the finger on the screen turns green. Whether you are necessary to Windows using a Windows password. In Windows, double-click the VeriSoft Access Manager icon in VeriSoft Access Manager, instead of using...
Wireless Setup Guide
Page 5
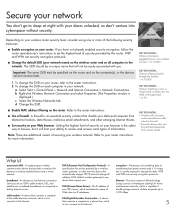
... instructions. ■ Use a firewall. Secure your network You don't go to sleep at speeds up Internet access. Important: The same SSID must be easily associated with your network: a Select Start > Control Panel > Network and Internet Connection > Network Connections. Refer to browse, but it . Setting the highest level of security on your browser is usually required to dial-up to the Internet. If you . Ethernet-The most common LAN...
... instructions. ■ Use a firewall. Secure your network You don't go to sleep at speeds up Internet access. Important: The same SSID must be easily associated with your network: a Select Start > Control Panel > Network and Internet Connection > Network Connections. Refer to browse, but it . Setting the highest level of security on your browser is usually required to dial-up to the Internet. If you . Ethernet-The most common LAN...
Wireless Setup Guide
Page 7
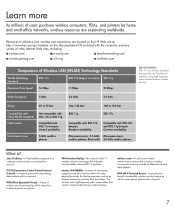
WPA (Wi-Fi Protected Access)-A specificationbased, interoperable wireless security feature for which a pass phrase (password) is connected to a network. TCP/IP (Transmission Control Protocol/Internet Protocol)-A network protocol for transmitting data packets within the same physical proximity for sharing resources such as an Internet connection, printers, files, and drives. wireless LAN (WLAN)-A system of connecting computers and other devices within a network. Radio Frequency 5 GHz 2.4 GHz 2.4 GHz Range...
WPA (Wi-Fi Protected Access)-A specificationbased, interoperable wireless security feature for which a pass phrase (password) is connected to a network. TCP/IP (Transmission Control Protocol/Internet Protocol)-A network protocol for transmitting data packets within the same physical proximity for sharing resources such as an Internet connection, printers, files, and drives. wireless LAN (WLAN)-A system of connecting computers and other devices within a network. Radio Frequency 5 GHz 2.4 GHz 2.4 GHz Range...
Compaq Presario V6000 Notebook PC Maintenance and Service Guide
Page 15
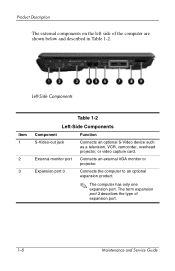
... has only one expansion port. Left-Side Components Item 1 2 3 Table 1-2 Left-Side Components Component Function S-Video-out jack Connects an optional S-Video device such as a television, VCR, camcorder, overhead projector, or video capture card. The term expansion port 3 describes the type of the computer are shown below and described in Table 1-2. Product Description The external components on the left side of expansion port. 1-8 Maintenance and Service Guide
... has only one expansion port. Left-Side Components Item 1 2 3 Table 1-2 Left-Side Components Component Function S-Video-out jack Connects an optional S-Video device such as a television, VCR, camcorder, overhead projector, or video capture card. The term expansion port 3 describes the type of the computer are shown below and described in Table 1-2. Product Description The external components on the left side of expansion port. 1-8 Maintenance and Service Guide

Compaq Presario V6000 Notebook PC Maintenance and Service Guide
Page 20
... esc key. Windows applications key Displays a shortcut menu for items beneath the pointer. Product Description Item 1 2 3 4 5 6 7 8 Table 1-4 Keyboard Components Component Function Function keys Execute frequently used system functions when pressed in combination with the fn key. Maintenance and Service Guide 1-13 Embedded numeric keypad keys Can be used like the keys on the caps lock light. num lock key Enables numeric lock, turns on the embedded numeric keypad, and turns on the num lock light. Windows logo key Displays the Microsoft Windows Start menu.
... esc key. Windows applications key Displays a shortcut menu for items beneath the pointer. Product Description Item 1 2 3 4 5 6 7 8 Table 1-4 Keyboard Components Component Function Function keys Execute frequently used system functions when pressed in combination with the fn key. Maintenance and Service Guide 1-13 Embedded numeric keypad keys Can be used like the keys on the caps lock light. num lock key Enables numeric lock, turns on the embedded numeric keypad, and turns on the num lock light. Windows logo key Displays the Microsoft Windows Start menu.

Compaq Presario V6000 Notebook PC Maintenance and Service Guide
Page 29
... fan is controlled by high external temperatures, system power consumption, power management/battery conservation configurations, battery fast charging, and software. Exhaust air is designed to identify replacement parts, and Chapter 5, "Removal and Replacement Procedures," for ventilation. The computer uses an electric fan for disassembly steps. Product Description 1.5 Design overview This section presents a design overview of key parts and features of the computer. 1-22 Maintenance and Service Guide Refer to Chapter 3, "Illustrated Parts Catalog," to turn...
... fan is controlled by high external temperatures, system power consumption, power management/battery conservation configurations, battery fast charging, and software. Exhaust air is designed to identify replacement parts, and Chapter 5, "Removal and Replacement Procedures," for ventilation. The computer uses an electric fan for disassembly steps. Product Description 1.5 Design overview This section presents a design overview of key parts and features of the computer. 1-22 Maintenance and Service Guide Refer to Chapter 3, "Illustrated Parts Catalog," to turn...

Compaq Presario V6000 Notebook PC Maintenance and Service Guide
Page 33
... the Setup Utility and save your changes from the current session, use the Exit Saving Changes procedure, the Setup Utility closes when you use either of the screen each time the computer is started or restarted in Windows or restored from LAN" message that is displayed in Windows. The Setup Utility features available for advanced users include a hard drive self-test, a Network Service Boot, and settings for all users. The " to change boot order" message that is displayed in...
... the Setup Utility and save your changes from the current session, use the Exit Saving Changes procedure, the Setup Utility closes when you use either of the screen each time the computer is started or restarted in Windows or restored from LAN" message that is displayed in Windows. The Setup Utility features available for advanced users include a hard drive self-test, a Network Service Boot, and settings for all users. The " to change boot order" message that is displayed in...

Compaq Presario V6000 Notebook PC Maintenance and Service Guide
Page 39
... procedure explains how to Help and Support, which is accessible only when the computer is in the lower-left corner of the screen. 2. If the Setup Utility is already running , begin at step 1. Using Advanced Setup Utility Features This guide describes the Setup Utility features recommended for boot order preferences. Troubleshooting Restoring Default Settings in Windows is the prompt for a Network Service Boot. 2-10 Maintenance and Service Guide The Setup Utility default settings are not changed when you restore the factory default settings.
... procedure explains how to Help and Support, which is accessible only when the computer is in the lower-left corner of the screen. 2. If the Setup Utility is already running , begin at step 1. Using Advanced Setup Utility Features This guide describes the Setup Utility features recommended for boot order preferences. Troubleshooting Restoring Default Settings in Windows is the prompt for a Network Service Boot. 2-10 Maintenance and Service Guide The Setup Utility default settings are not changed when you restore the factory default settings.

Compaq Presario V6000 Notebook PC Maintenance and Service Guide
Page 118
... hard drive cover 6 removed to disassemble the hard drive Computer Feet 0 Memory Module 3 loosened to remove the num lock board Keyboard 3 Maintenance and Service Guide 5-3 If you install a device and then receive a warning message, remove the device to be referenced when removing computer components. Then contact technical support by the governmental agency that regulates wireless devices in your country or region. Removal and Replacement Procedures 5.2 Disassembly Sequence Chart Use the chart below to determine the section number to restore computer functionality...
... hard drive cover 6 removed to disassemble the hard drive Computer Feet 0 Memory Module 3 loosened to remove the num lock board Keyboard 3 Maintenance and Service Guide 5-3 If you install a device and then receive a warning message, remove the device to be referenced when removing computer components. Then contact technical support by the governmental agency that regulates wireless devices in your country or region. Removal and Replacement Procedures 5.2 Disassembly Sequence Chart Use the chart below to determine the section number to restore computer functionality...

Compaq Presario V6000 Notebook PC Maintenance and Service Guide
Page 240
... restore your personal settings. If the driver is not listed, it does not need to remove, and then click Uninstall. 2. Reinstall the program or driver: a. b. When the installation wizard opens, follow the installation instructions on -screen instructions. Restart the computer if prompted. Remove the program or driver: ✎ In some cases, drivers are not listed in Windows Vista ■ In all cases, if a program has been deleted from Discs 1. c. C-6 Maintenance and Service Guide Backup...
... restore your personal settings. If the driver is not listed, it does not need to remove, and then click Uninstall. 2. Reinstall the program or driver: a. b. When the installation wizard opens, follow the installation instructions on -screen instructions. Restart the computer if prompted. Remove the program or driver: ✎ In some cases, drivers are not listed in Windows Vista ■ In all cases, if a program has been deleted from Discs 1. c. C-6 Maintenance and Service Guide Backup...

Compaq Presario V6000 Notebook PC Maintenance and Service Guide
Page 273
... part number 3-37 S Screw Kit, spare part numbers 3-29, 3-37, 3-40 screw listing A-1 security cable slot 1-11 serial number 3-1, 5-2 service considerations 4-2 Setup Utility 2-1 speakers 1-15 specifications battery 6-7 computer 6-1 display 6-3 DVD/CD-RW Combo Drive 6-8 DVD±RW/R and CD-RW Combo Drive 6-10 hard drive 6-4 I/O addresses 6-15 interrupts 6-13 optical drive 6-8 system DMA 6-12 static shielding materials 4-8 S-Video-out jack location 1-8 pin assignments D-3 switch cover removal 5-22 spare part numbers 3-3, 3-37, 5-22 system board removal 5-57 Maintenance and Service Guide Index...
... part number 3-37 S Screw Kit, spare part numbers 3-29, 3-37, 3-40 screw listing A-1 security cable slot 1-11 serial number 3-1, 5-2 service considerations 4-2 Setup Utility 2-1 speakers 1-15 specifications battery 6-7 computer 6-1 display 6-3 DVD/CD-RW Combo Drive 6-8 DVD±RW/R and CD-RW Combo Drive 6-10 hard drive 6-4 I/O addresses 6-15 interrupts 6-13 optical drive 6-8 system DMA 6-12 static shielding materials 4-8 S-Video-out jack location 1-8 pin assignments D-3 switch cover removal 5-22 spare part numbers 3-3, 3-37, 5-22 system board removal 5-57 Maintenance and Service Guide Index...
Software Update, Backup, and Recovery - Windows Vista
Page 5
... transfer among hardware devices, including the time and date. Most software and BIOS updates on the computer. Some download packages contain a file named Readme.txt, which contains information regarding installing and troubleshooting the file. 1 Updating software Updated versions of your computer model, product category, and series or family. NOTE The computer system BIOS is connected to Windows online Help for tasks such as installing applications, running utilities, or changing Windows settings.
... transfer among hardware devices, including the time and date. Most software and BIOS updates on the computer. Some download packages contain a file named Readme.txt, which contains information regarding installing and troubleshooting the file. 1 Updating software Updated versions of your computer model, product category, and series or family. NOTE The computer system BIOS is connected to Windows online Help for tasks such as installing applications, running utilities, or changing Windows settings.
Software Update, Backup, and Recovery - Windows Vista
Page 6
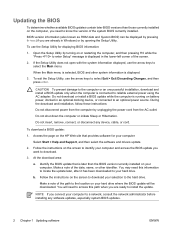
... arrow keys to reliable external power using the AC adapter. Access the page on the screen to download your computer. Identify the BIOS update that provides software for displaying BIOS information: 1. When the Main menu is later than those currently installed on battery power, docked in Windows) or by unplugging the power cord from the computer by opening the Setup Utility. Follow the instructions on your selection to a network, consult the network administrator before installing any device, cable...
... arrow keys to reliable external power using the AC adapter. Access the page on the screen to download your computer. Identify the BIOS update that provides software for displaying BIOS information: 1. When the Main menu is later than those currently installed on battery power, docked in Windows) or by unplugging the power cord from the computer by opening the Setup Utility. Follow the instructions on your selection to a network, consult the network administrator before installing any device, cable...

Wireless (Select Models Only) - Windows Vista
Page 11
In the left pane, click Device Manager. 3. The listing for a WLAN device may be prompted for your permission or password for tasks such as installing applications, running utilities, or changing Windows settings. ENWW Identifying a WLAN device 7 Select Start > Computer > System properties tab. 2. NOTE If no WLAN device is not properly installed. Identify the WLAN device from the Network adapters list. You may include the term wireless, wireless LAN, WLAN, or 802.11...
In the left pane, click Device Manager. 3. The listing for a WLAN device may be prompted for your permission or password for tasks such as installing applications, running utilities, or changing Windows settings. ENWW Identifying a WLAN device 7 Select Start > Computer > System properties tab. 2. NOTE If no WLAN device is not properly installed. Identify the WLAN device from the Network adapters list. You may include the term wireless, wireless LAN, WLAN, or 802.11...
Multimedia - Windows Vista
Page 27
... 20 removing, with power 13 removing, without power 14 writing to 20 DVD button, identifying 6 DVD region settings 21 E earbuds 2 external monitor port 7 H headphone jack 2 headphones 2 I internal microphones 1 J jacks audio-in (microphone) 1, 3 audio-out (headphone) 2, 3 audio-out (headphone) S/ PDIF 2 S-Video-out 7 M media activity buttons, identifying 16 media activity hotkeys, identifying 15 media button, identifying 6 microphone jack 1 microphones, supported 3 monitor, connecting 7 multimedia software described 17 using 19 mute button 2, 5 O optical disc inserting 12 removing, with power...
... 20 removing, with power 13 removing, without power 14 writing to 20 DVD button, identifying 6 DVD region settings 21 E earbuds 2 external monitor port 7 H headphone jack 2 headphones 2 I internal microphones 1 J jacks audio-in (microphone) 1, 3 audio-out (headphone) 2, 3 audio-out (headphone) S/ PDIF 2 S-Video-out 7 M media activity buttons, identifying 16 media activity hotkeys, identifying 15 media button, identifying 6 microphone jack 1 microphones, supported 3 monitor, connecting 7 multimedia software described 17 using 19 mute button 2, 5 O optical disc inserting 12 removing, with power...

Power Management - Windows Vista
Page 17
... Change advanced power settings. 6. Click Save changes. The battery light on the computer turns on the computer turns off the display and Put the computer to sleep settings to an AC adapter, optional power adapter, optional expansion product, or optional docking device, and then plug the adapter or device into the computer. 2. Step 2: Disable Hibernation and Sleep 1. NOTE The battery charges whether the computer is off . Click Start > Control Panel > System and Maintenance > Power Options. 2. ENWW Calibrating a battery 13 Calibrating a battery Calibrate a battery...
... Change advanced power settings. 6. Click Save changes. The battery light on the computer turns on the computer turns off the display and Put the computer to sleep settings to an AC adapter, optional power adapter, optional expansion product, or optional docking device, and then plug the adapter or device into the computer. 2. Step 2: Disable Hibernation and Sleep 1. NOTE The battery charges whether the computer is off . Click Start > Control Panel > System and Maintenance > Power Options. 2. ENWW Calibrating a battery 13 Calibrating a battery Calibrate a battery...
Power Management - Windows Vista
Page 19
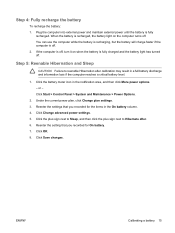
... click More power options. - Under the current power plan, click Change plan settings. 3. Step 4: Fully recharge the battery To recharge the battery: 1. If the computer is off, turn it on the computer turns off . 2. Click Start > Control Panel > System and Maintenance > Power Options. 2. Click Change advanced power settings. 5. Plug the computer into external power and maintain external power until the battery is recharged, the battery light on when the battery is off . When the battery is fully...
... click More power options. - Under the current power plan, click Change plan settings. 3. Step 4: Fully recharge the battery To recharge the battery: 1. If the computer is off, turn it on the computer turns off . 2. Click Start > Control Panel > System and Maintenance > Power Options. 2. Click Change advanced power settings. 5. Plug the computer into external power and maintain external power until the battery is recharged, the battery light on when the battery is off . When the battery is fully...
Power Management - Windows Vista
Page 25
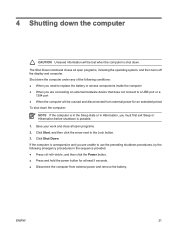
... are unable to use the preceding shutdown procedures, try the following conditions: ● When you need to replace the battery or access components inside the computer ● When you are connecting an external hardware device that does not connect to the Lock button. 3. Save your work and close all open programs. 2. Click Start, and then click the arrow next to a USB port or a 1394 port ● When the...
... are unable to use the preceding shutdown procedures, try the following conditions: ● When you need to replace the battery or access components inside the computer ● When you are connecting an external hardware device that does not connect to the Lock button. 3. Save your work and close all open programs. 2. Click Start, and then click the arrow next to a USB port or a 1394 port ● When the...

TouchPad and Keyboard - Windows Vista
Page 13
... num lock light is turned on, each key on an external keypad. To turn num lock on or off at the factory.) For example: ● When num lock is on, most keypad keys type numbers. ● When num lock is connected to the computer or to their keypad functions by the icon in uppercase. Using an external numeric keypad Most keys on most external numeric keypads function differently according to enable...
... num lock light is turned on, each key on an external keypad. To turn num lock on or off at the factory.) For example: ● When num lock is on, most keypad keys type numbers. ● When num lock is connected to the computer or to their keypad functions by the icon in uppercase. Using an external numeric keypad Most keys on most external numeric keypads function differently according to enable...


