Security - Windows Vista
Page 20
... 9 critical updates, software 8 E entering a power-on password 5 entering an administrator password 4 F fingerprint reader 10 fingerprint reader location 11 firewall software 7 M managing a power-on password 4 managing an administrator password 4 P passwords administrator 3 power-on 4 set in Setup Utility 3 set in Windows 3 power-on password entering 5 managing 4 Q QuickLock 3 R registering fingerprints 12 S security features 1 passwords 2 security...
... 9 critical updates, software 8 E entering a power-on password 5 entering an administrator password 4 F fingerprint reader 10 fingerprint reader location 11 firewall software 7 M managing a power-on password 4 managing an administrator password 4 P passwords administrator 3 power-on 4 set in Setup Utility 3 set in Windows 3 power-on password entering 5 managing 4 Q QuickLock 3 R registering fingerprints 12 S security features 1 passwords 2 security...
Wireless Setup Guide
Page 5
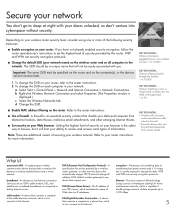
...the cable television network, which in turn connects to dial-up to access and receive some router manufacturers offer a built-in 10,000 DID YOU KNOW... DHCP (Dynamic Host Configuration Protocol)-A specification for more of the following security measures: ■ Enable encryption...wireless link between a wireless-enabled device and a wired network. b Right-click Wireless Network Connection and select Properties. (The Properties window is usually required to sleep at speeds up Internet access. Refer to your router instructions for service provided by the router. Refer ...
...the cable television network, which in turn connects to dial-up to access and receive some router manufacturers offer a built-in 10,000 DID YOU KNOW... DHCP (Dynamic Host Configuration Protocol)-A specification for more of the following security measures: ■ Enable encryption...wireless link between a wireless-enabled device and a wired network. b Right-click Wireless Network Connection and select Properties. (The Properties window is usually required to sleep at speeds up Internet access. Refer to your router instructions for service provided by the router. Refer ...

Compaq Presario V6000 Notebook PC Maintenance and Service Guide
Page 39
... and then press enter. 3. The Setup Utility default settings are not changed when you restore the factory default settings. Troubleshooting Restoring Default Settings in Windows. To set when you exit the Setup Utility and go into effect when the computer restarts. ✎ Your password, security, and language settings ... to enter setup" is displayed in the lower-left corner of the screen each time the computer is started or restarted in Windows is displayed in the lower-left corner of the screen. 2. For more information about the Setup Utility features recommended for a Network Service ...
... and then press enter. 3. The Setup Utility default settings are not changed when you restore the factory default settings. Troubleshooting Restoring Default Settings in Windows. To set when you exit the Setup Utility and go into effect when the computer restarts. ✎ Your password, security, and language settings ... to enter setup" is displayed in the lower-left corner of the screen each time the computer is started or restarted in Windows is displayed in the lower-left corner of the screen. 2. For more information about the Setup Utility features recommended for a Network Service ...

Compaq Presario V6000 Notebook PC Maintenance and Service Guide
Page 234
... instructions provided by the software manufacturer. To access update links for the operating system and other software provided on -screen instructions. B-10 Maintenance and Service Guide Backup and Recovery in Windows XP 4. Click OK. 5. To update optional software, follow the on your computer: » Select Start > Help and Support. Updating Reinstalled Software...
... instructions provided by the software manufacturer. To access update links for the operating system and other software provided on -screen instructions. B-10 Maintenance and Service Guide Backup and Recovery in Windows XP 4. Click OK. 5. To update optional software, follow the on your computer: » Select Start > Help and Support. Updating Reinstalled Software...

Compaq Presario V6000 Notebook PC Maintenance and Service Guide
Page 268
... (microphone) jack location 1-7 pin assignments D-6 audio-out (headphone) jack location 1-7 pin assignments D-6 B backpack, spare part number 3-27, 3-31 Backup and Recovery Windows Vista C-1 Windows XP B-1 backup suggestions B-2, C-2 base enclosure, spare part numbers 3-10, 3-37, 3-38, 3-40 battery removal 5-5 spare part numbers 3-8, 3-38, 5-5 specifications 6-7 battery bay 1-20 battery light 1-6 battery release latch 1-20 Bluetooth...
... (microphone) jack location 1-7 pin assignments D-6 audio-out (headphone) jack location 1-7 pin assignments D-6 B backpack, spare part number 3-27, 3-31 Backup and Recovery Windows Vista C-1 Windows XP B-1 backup suggestions B-2, C-2 base enclosure, spare part numbers 3-10, 3-37, 3-38, 3-40 battery removal 5-5 spare part numbers 3-8, 3-38, 5-5 specifications 6-7 battery bay 1-20 battery light 1-6 battery release latch 1-20 Bluetooth...

Compaq Presario V6000 Notebook PC Maintenance and Service Guide
Page 269
...1-16, 1-18 composite S-Video and audio input cable, spare part number 3-27, 3-35 computer feet, locations 5-10 Computer Setup Advanced Menu 2-7, 2-14 File Menu 2-5, 2-12 Security Menu 2-6, 2-12 Tools Menu 2-6, 2-12 computer ... Universal Serial Bus (USB) D-1 connectors, service considerations 4-2 consumer infrared lens 1-7 creating recovery discs Windows Vista C-4 Windows XP B-4 system restore point Windows Vista C-3 Windows XP B-3 D deleting recovery partition Windows Vista C-8 Windows XP B-9 design overview 1-22 disassembly sequence chart 5-3 diskette drive, OS loading problems 2-29 display ...
...1-16, 1-18 composite S-Video and audio input cable, spare part number 3-27, 3-35 computer feet, locations 5-10 Computer Setup Advanced Menu 2-7, 2-14 File Menu 2-5, 2-12 Security Menu 2-6, 2-12 Tools Menu 2-6, 2-12 computer ... Universal Serial Bus (USB) D-1 connectors, service considerations 4-2 consumer infrared lens 1-7 creating recovery discs Windows Vista C-4 Windows XP B-4 system restore point Windows Vista C-3 Windows XP B-3 D deleting recovery partition Windows Vista C-8 Windows XP B-9 design overview 1-22 disassembly sequence chart 5-3 diskette drive, OS loading problems 2-29 display ...

Compaq Presario V6000 Notebook PC Maintenance and Service Guide
Page 272
... lock key 1-13 O optical drive location 1-11, 1-20 OS loading problems 2-30 precautions 4-3 removal 5-20 spare part numbers 3-10, 3-24, 5-20 specifications 6-8 optical drive bracket, removal 5-21 P packing precautions 4-5 password clearing 1-4 performing a recovery Windows Vista C-7 Windows XP B-7 plastic parts 4-2 Plastics Kit contents 3-26 spare part number 3-6, 3-26, 3-40 pointing device, troubleshooting 2-35 power...
... lock key 1-13 O optical drive location 1-11, 1-20 OS loading problems 2-30 precautions 4-3 removal 5-20 spare part numbers 3-10, 3-24, 5-20 specifications 6-8 optical drive bracket, removal 5-21 P packing precautions 4-5 password clearing 1-4 performing a recovery Windows Vista C-7 Windows XP B-7 plastic parts 4-2 Plastics Kit contents 3-26 spare part number 3-6, 3-26, 3-40 pointing device, troubleshooting 2-35 power...

Compaq Presario V6000 Notebook PC Maintenance and Service Guide
Page 273
...Windows Vista C-7 Windows XP B-8 remote control spare part numbers 3-40, 3-41 remote control, spare part numbers 3-27, 3-33, 3-40 removal preliminaries 4-1 procedures 5-1 replacement preliminaries 4-1 procedures 5-1 RF cable, spare part number 3-27, 3-35 RF input adapter cable, spare part number 3-27, 3-35 right-side components 1-10... 1-15 specifications battery 6-7 computer 6-1 display 6-3 DVD/CD-RW Combo Drive 6-8 DVD±RW/R and CD-RW Combo Drive 6-10 hard drive 6-4 I/O addresses 6-15 interrupts 6-13 optical drive 6-8 system DMA 6-12 static shielding materials 4-8 S-Video-out jack location...
...Windows Vista C-7 Windows XP B-8 remote control spare part numbers 3-40, 3-41 remote control, spare part numbers 3-27, 3-33, 3-40 removal preliminaries 4-1 procedures 5-1 replacement preliminaries 4-1 procedures 5-1 RF cable, spare part number 3-27, 3-35 RF input adapter cable, spare part number 3-27, 3-35 right-side components 1-10... 1-15 specifications battery 6-7 computer 6-1 display 6-3 DVD/CD-RW Combo Drive 6-8 DVD±RW/R and CD-RW Combo Drive 6-10 hard drive 6-4 I/O addresses 6-15 interrupts 6-13 optical drive 6-8 system DMA 6-12 static shielding materials 4-8 S-Video-out jack location...
Modem and Local Area Network - Windows Vista
Page 11
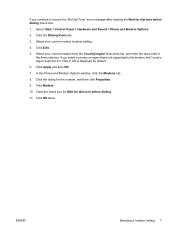
... location setting. 4. Click the listing for the modem, and then click Properties. 9. Select Start > Control Panel > Hardware and Sound > Phone and Modem Options. 2. Click Modem. 10. ENWW Selecting a location setting 7 Click Apply and then OK. 7. Click Edit. 5. Clear the check box for Wait for dial tone before dialing check box: 1. Select... that is not supported by the modem, the Country/ region selection for USA or UK is displayed by default. 6. In the Phone and Modem Options window, click the Modems tab. 8. Click the Dialing Rules tab. 3.
... location setting. 4. Click the listing for the modem, and then click Properties. 9. Select Start > Control Panel > Hardware and Sound > Phone and Modem Options. 2. Click Modem. 10. ENWW Selecting a location setting 7 Click Apply and then OK. 7. Click Edit. 5. Clear the check box for Wait for dial tone before dialing check box: 1. Select... that is not supported by the modem, the Country/ region selection for USA or UK is displayed by default. 6. In the Phone and Modem Options window, click the Modems tab. 8. Click the Dialing Rules tab. 3.
Software Update, Backup, and Recovery - Windows Vista
Page 14
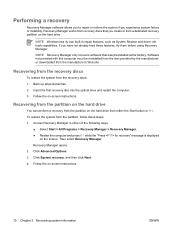
... instructions. Insert the first recovery disc into the optical drive and restart the computer. 3. Click Advanced Options. 3. Follow the on -screen instructions. 10 Chapter 2 Recovering system information ENWW NOTE Windows has its own built-in either the Start button or f11. Back up all personal files. 2. Performing a recovery Recovery Manager software allows...
... instructions. Insert the first recovery disc into the optical drive and restart the computer. 3. Click Advanced Options. 3. Follow the on -screen instructions. 10 Chapter 2 Recovering system information ENWW NOTE Windows has its own built-in either the Start button or f11. Back up all personal files. 2. Performing a recovery Recovery Manager software allows...

Power - Windows XP
Page 14
.... ● Disconnect the computer from external power and remove the battery pack. For more information about removing and storing a battery pack, refer to use normal Windows shutdown procedures, try the following emergency procedures in the loss of unsaved information. If the computer is unresponsive and you are unable to "Batteries...
.... ● Disconnect the computer from external power and remove the battery pack. For more information about removing and storing a battery pack, refer to use normal Windows shutdown procedures, try the following emergency procedures in the loss of unsaved information. If the computer is unresponsive and you are unable to "Batteries...

Power - Windows XP
Page 15
... Task Initiate standby. No action required. ● ● If the computer is running on battery power, the ● system initiates standby after 10 minutes of computer inactivity (default setting). ● If the computer is not displayed: a. Click the down arrow. c. Click OK. Resume from ...Select Start > Turn Off Computer > Stand by is plugged into external power, the system initiates standby after 25 minutes of Turn Off Computer. In Windows XP Professional, if Stand by .* ● The power lights blink. ● The screen clears. NOTE Power settings and timeouts can be called...
... Task Initiate standby. No action required. ● ● If the computer is running on battery power, the ● system initiates standby after 10 minutes of computer inactivity (default setting). ● If the computer is not displayed: a. Click the down arrow. c. Click OK. Resume from ...Select Start > Turn Off Computer > Stand by is plugged into external power, the system initiates standby after 25 minutes of Turn Off Computer. In Windows XP Professional, if Stand by .* ● The power lights blink. ● The screen clears. NOTE Power settings and timeouts can be called...
Power Management - Windows Vista
Page 5
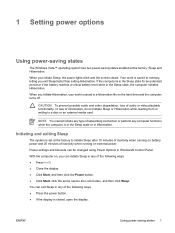
...; Close the display. ● Click Start, and then click the Power button. ● Click Start, click the arrow next to initiate Sleep after 10 minutes of inactivity when running on , you initiate Sleep, the power lights blink and the screen clears. ENWW Using power-saving states 1 When you exit... and exiting Sleep The system is in the Sleep state for an extended period or if the battery reaches a critical battery level while in Windows® Control Panel. With the computer on external power. When you can be changed using Power Options in the Sleep state, the computer initiates...
...; Close the display. ● Click Start, and then click the Power button. ● Click Start, click the arrow next to initiate Sleep after 10 minutes of inactivity when running on , you initiate Sleep, the power lights blink and the screen clears. ENWW Using power-saving states 1 When you exit... and exiting Sleep The system is in the Sleep state for an extended period or if the battery reaches a critical battery level while in Windows® Control Panel. With the computer on external power. When you can be changed using Power Options in the Sleep state, the computer initiates...

Bluetooth for Windows XP
Page 3
Table of contents Bluetooth for Windows Bluetooth for Windows software ...2 Configuring Bluetooth software ...3 Enabling the hardware ...3 Setting up the software ...4 Configuring Bluetooth service selections 5 Reconfiguring Bluetooth ...10 Index ...11 ENWW iii
Table of contents Bluetooth for Windows Bluetooth for Windows software ...2 Configuring Bluetooth software ...3 Enabling the hardware ...3 Setting up the software ...4 Configuring Bluetooth service selections 5 Reconfiguring Bluetooth ...10 Index ...11 ENWW iii

Bluetooth for Windows XP
Page 14
... devices. ● I want to change , modify, or configure your Bluetooth device, select the Bluetooth Setup Wizard from any of the Bluetooth icons or menu items. 10 Bluetooth for Windows ENWW
... devices. ● I want to change , modify, or configure your Bluetooth device, select the Bluetooth Setup Wizard from any of the Bluetooth icons or menu items. 10 Bluetooth for Windows ENWW

Bluetooth for Windows XP
Page 15
Index B Bluetooth device description 1 enabling 3 reconfiguring 10 services 5 software 2 Bluetooth for Windows software 2 S software Bluetooth for Windows 2 configuring 3 reconfiguring 10 setting up 4 ENWW Index 11
Index B Bluetooth device description 1 enabling 3 reconfiguring 10 services 5 software 2 Bluetooth for Windows software 2 S software Bluetooth for Windows 2 configuring 3 reconfiguring 10 setting up 4 ENWW Index 11
Multimedia
Page 14
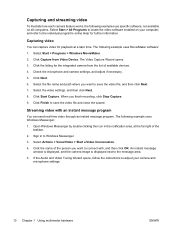
...the following examples use specific software, not available on your camera and microphone settings. 10 Chapter 1 Using multimedia hardware ENWW Capturing video You can send real-time video through an instant message program. Select Start > Programs > Windows MovieMaker. 2. The Video Capture Wizard opens. 3. Click Next. 6. Click Start ...want to save the video file and close the wizard. Streaming video with , and then click OK. An instant message window is displayed, and the camera image is displayed next to save the video file, and then click Next. 7. The following example uses...
...the following examples use specific software, not available on your camera and microphone settings. 10 Chapter 1 Using multimedia hardware ENWW Capturing video You can send real-time video through an instant message program. Select Start > Programs > Windows MovieMaker. 2. The Video Capture Wizard opens. 3. Click Next. 6. Click Start ...want to save the video file and close the wizard. Streaming video with , and then click OK. An instant message window is displayed, and the camera image is displayed next to save the video file, and then click Next. 7. The following example uses...

Power
Page 14
...system to a network domain, the button you have been registered to initiate standby. NOTE Power settings and timeouts can be changed using Power Options in Windows Control Panel. Click OK. The screen clears. Press the power button. ● The power lights turn on. ● Your work returns to... standby. ● With the computer on battery ● power, the system initiates standby after 25 minutes of Turn Off Computer. 10 Chapter 4 Power settings ENWW c. No action required. ● ● If the computer is plugged into external power, the system initiates standby after...
...system to a network domain, the button you have been registered to initiate standby. NOTE Power settings and timeouts can be changed using Power Options in Windows Control Panel. Click OK. The screen clears. Press the power button. ● The power lights turn on. ● Your work returns to... standby. ● With the computer on battery ● power, the system initiates standby after 25 minutes of Turn Off Computer. 10 Chapter 4 Power settings ENWW c. No action required. ● ● If the computer is plugged into external power, the system initiates standby after...

Notebook Tour - Windows Vista
Page 23
... adapter, identifying 14 altitude specifications 16 antennae 13 applications key, Windows 5 audio-in (microphone) 7 audio-out (headphone) 7 RJ-11 (modem) 10 RJ-45 (network 10 S-Video-out 10 K keypad keys, identifying 5 keys esc 5 fn 5 function 5 keypad 5 Windows applications 5 Windows logo 5 L labels Bluetooth 15 Microsoft Certificate of Authenticity 15 modem approval 15 regulatory 15 service tag 15...
... adapter, identifying 14 altitude specifications 16 antennae 13 applications key, Windows 5 audio-in (microphone) 7 audio-out (headphone) 7 RJ-11 (modem) 10 RJ-45 (network 10 S-Video-out 10 K keypad keys, identifying 5 keys esc 5 fn 5 function 5 keypad 5 Windows applications 5 Windows logo 5 L labels Bluetooth 15 Microsoft Certificate of Authenticity 15 modem approval 15 regulatory 15 service tag 15...
Notebook Tour - Windows Vista
Page 24
...Authenticity label 15 Product Key 15 optical drive light, identifying 9 optical drive, identifying 9 P ports 1394 10 expansion 10 external monitor 10 HDMI 10 USB 9, 10 power button, identifying 4 power connector, identifying 9 power cord 14 power lights, identifying 3 Product Key ...mute button, identifying 4 volume mute light, identifying 3 volume scroll zone, identifying 4 volume up light, identifying 3 W Windows applications key, identifying 5 Windows logo key, identifying 5 wireless antennae 13 wireless certification label 15 wireless light, identifying 7 wireless switch, identifying 7 WLAN ...
...Authenticity label 15 Product Key 15 optical drive light, identifying 9 optical drive, identifying 9 P ports 1394 10 expansion 10 external monitor 10 HDMI 10 USB 9, 10 power button, identifying 4 power connector, identifying 9 power cord 14 power lights, identifying 3 Product Key ...mute button, identifying 4 volume mute light, identifying 3 volume scroll zone, identifying 4 volume up light, identifying 3 W Windows applications key, identifying 5 Windows logo key, identifying 5 wireless antennae 13 wireless certification label 15 wireless light, identifying 7 wireless switch, identifying 7 WLAN ...


