Using LightScribe (Select Models Only)
Page 7
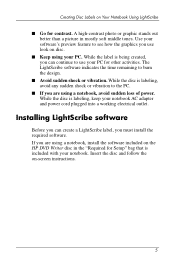
... is included with your notebook. While the disc is labeling, keep your notebook AC adapter and power cord plugged into a working electrical outlet. While the disc is labeling, avoid any sudden shock or vibration to use look on -screen instructions. 5 If you use your PC. While the label is... of power. Installing LightScribe software Before you can create a LightScribe label, you can continue to the PC. ■ If you are using a notebook, install the software included on the HP DVD Writer disc in mostly soft middle tones. Use your software's preview feature to burn the design....
... is included with your notebook. While the disc is labeling, keep your notebook AC adapter and power cord plugged into a working electrical outlet. While the disc is labeling, avoid any sudden shock or vibration to use look on -screen instructions. 5 If you use your PC. While the label is... of power. Installing LightScribe software Before you can create a LightScribe label, you can continue to the PC. ■ If you are using a notebook, install the software included on the HP DVD Writer disc in mostly soft middle tones. Use your software's preview feature to burn the design....
HP Pavilion dv4000 Notebook PC and Compaq Presario V4000 Notebook PC - Maintenance and Service Guide
Page 8
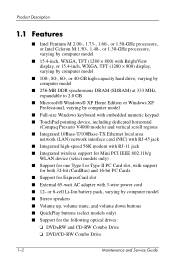
... varying by computer model ■ Full-size Windows keyboard with embedded numeric keypad ■ TouchPad pointing device, including dedicated horizontal (Compaq Presario V4000 models) and vertical scroll regions ■ Integrated 10Base-T/100Base-TX Ethernet local area network (LAN) network interface card (NIC) with RJ... ■ QuickPlay buttons (select models only) ■ Support for ExpressCard slot ■ External 65-watt AC adapter with support for both 32-bit (CardBus) and 16-bit PC Cards ■ Support for the following optical drives: ❏ DVD±RW and CD-RW Combo Drive...
... varying by computer model ■ Full-size Windows keyboard with embedded numeric keypad ■ TouchPad pointing device, including dedicated horizontal (Compaq Presario V4000 models) and vertical scroll regions ■ Integrated 10Base-T/100Base-TX Ethernet local area network (LAN) network interface card (NIC) with RJ... ■ QuickPlay buttons (select models only) ■ Support for ExpressCard slot ■ External 65-watt AC adapter with support for both 32-bit (CardBus) and 16-bit PC Cards ■ Support for the following optical drives: ❏ DVD±RW and CD-RW Combo Drive...
HP Pavilion dv4000 Notebook PC and Compaq Presario V4000 Notebook PC - Maintenance and Service Guide
Page 18
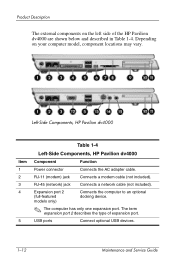
... and described in Table 1-4. USB ports Connect optional USB devices. 1-12 Maintenance and Service Guide Left-Side Components, HP Pavilion dv4000 Item 1 2 3 4 5 Table 1-4 Left-Side Components, HP Pavilion dv4000 Component Function Power connector Connects the AC adapter cable. Depending on the left side of expansion port. RJ-45 (network) jack Connects a network cable (not...
... and described in Table 1-4. USB ports Connect optional USB devices. 1-12 Maintenance and Service Guide Left-Side Components, HP Pavilion dv4000 Item 1 2 3 4 5 Table 1-4 Left-Side Components, HP Pavilion dv4000 Component Function Power connector Connects the AC adapter cable. Depending on the left side of expansion port. RJ-45 (network) jack Connects a network cable (not...

HP Pavilion dv4000 Notebook PC and Compaq Presario V4000 Notebook PC - Maintenance and Service Guide
Page 20
Left-Side Components, Compaq Presario V4000 Table 1-5 Left-Side Components, Compaq Presario V4000 Item Component Function 1 Power connector Connects the AC adapter cable. 2 RJ-11 (modem) jack Connects a modem cable (not included). 3 RJ-45 (network) jack Connects a network cable (not ...expansion port 2 describes the type of expansion port. 5 USB ports Connect optional USB devices. ✎ Number of the Compaq Presario V4000 are shown below and described in Table 1-5. Product Description The external components on your computer model, component locations may vary. Depending ...
Left-Side Components, Compaq Presario V4000 Table 1-5 Left-Side Components, Compaq Presario V4000 Item Component Function 1 Power connector Connects the AC adapter cable. 2 RJ-11 (modem) jack Connects a modem cable (not included). 3 RJ-45 (network) jack Connects a network cable (not ...expansion port 2 describes the type of expansion port. 5 USB ports Connect optional USB devices. ✎ Number of the Compaq Presario V4000 are shown below and described in Table 1-5. Product Description The external components on your computer model, component locations may vary. Depending ...
HP Pavilion dv4000 Notebook PC and Compaq Presario V4000 Notebook PC - Maintenance and Service Guide
Page 44
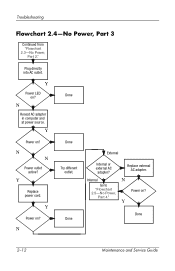
Y Power on ? N Done Done Try different outlet. Replace external AC adapter. N Reseat AC adapter in computer and at power source. N N Power outlet active? Y Replace power cord. Internal Go to "Flowchart 2.5-No Power, Part 4." Y Done Done 2-12 Maintenance and Service Guide Y Power LED on ? External Internal or external AC adapter? N Power on ? Y Power on ? Troubleshooting Flowchart 2.4-No Power, Part 3 Continued from "Flowchart 2.3-No Power, Part 2." Plug directly into AC outlet.
Y Power on ? N Done Done Try different outlet. Replace external AC adapter. N Reseat AC adapter in computer and at power source. N N Power outlet active? Y Replace power cord. Internal Go to "Flowchart 2.5-No Power, Part 4." Y Done Done 2-12 Maintenance and Service Guide Y Power LED on ? External Internal or external AC adapter? N Power on ? Y Power on ? Troubleshooting Flowchart 2.4-No Power, Part 3 Continued from "Flowchart 2.3-No Power, Part 2." Plug directly into AC outlet.
HP Pavilion dv4000 Notebook PC and Compaq Presario V4000 Notebook PC - Maintenance and Service Guide
Page 45
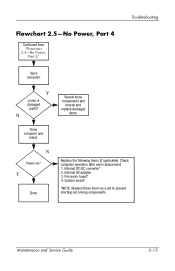
Y Loose or damaged parts? N Power on? Troubleshooting Open computer. Internal DC-DC converter* 2. Flowchart 2.5-No Power, Part 4 Continued from "Flowchart 2.4-No Power, Part 3." Internal AC adapter 3. Processor board* 4. Y Done Replace the following items (if applicable). Maintenance and Service Guide 2-13 N Reseat loose components and boards and replace damaged items. Close computer and retest. Check computer operation after each replacement: 1. System board* *NOTE: Replace these items as a set to prevent shorting out among components.
Y Loose or damaged parts? N Power on? Troubleshooting Open computer. Internal DC-DC converter* 2. Flowchart 2.5-No Power, Part 4 Continued from "Flowchart 2.4-No Power, Part 3." Internal AC adapter 3. Processor board* 4. Y Done Replace the following items (if applicable). Maintenance and Service Guide 2-13 N Reseat loose components and boards and replace damaged items. Close computer and retest. Check computer operation after each replacement: 1. System board* *NOTE: Replace these items as a set to prevent shorting out among components.

Hardware and Software Guide
Page 19
Refer to the following illustrations. Component 1 Power connector 2 RJ-11 (modem) jack 3 RJ-45 (network) jack Description Connects the AC adapter cable. Connects the modem cable. Connects a network cable (not included). (Continued) 1-10 Hardware and Software Guide Component ID Left-Side Components Ports and Jacks Depending on your notebook model, component locations may vary.
Refer to the following illustrations. Component 1 Power connector 2 RJ-11 (modem) jack 3 RJ-45 (network) jack Description Connects the AC adapter cable. Connects the modem cable. Connects a network cable (not included). (Continued) 1-10 Hardware and Software Guide Component ID Left-Side Components Ports and Jacks Depending on your notebook model, component locations may vary.

Hardware and Software Guide
Page 26
Component Description 1 AC adapter Converts AC power to DC power. 2 Power cord* Connects an AC adapter to an AC outlet. 3 Battery pack 4 Modem cable* Powers the notebook when the notebook is included with the notebook. Hardware and Software Guide 1-17 Component ID Additional Hardware Components The following illustration and table identify and describe the additional equipment that is not connected...
Component Description 1 AC adapter Converts AC power to DC power. 2 Power cord* Connects an AC adapter to an AC outlet. 3 Battery pack 4 Modem cable* Powers the notebook when the notebook is included with the notebook. Hardware and Software Guide 1-17 Component ID Additional Hardware Components The following illustration and table identify and describe the additional equipment that is not connected...

Hardware and Software Guide
Page 29
The grounding pin is easily accessible at all times. ■ Disconnect power from the notebook by unplugging the power cord from the AC outlet (not by attaching a 2-pin adapter. Hardware and Software Guide 2-1 2 Power Å WARNING: To reduce the risk of electric shock or damage to your power cord, ...plug the cord into an AC outlet that is not properly grounded. ✎ For the ...
The grounding pin is easily accessible at all times. ■ Disconnect power from the notebook by unplugging the power cord from the AC outlet (not by attaching a 2-pin adapter. Hardware and Software Guide 2-1 2 Power Å WARNING: To reduce the risk of electric shock or damage to your power cord, ...plug the cord into an AC outlet that is not properly grounded. ✎ For the ...

Hardware and Software Guide
Page 30
... following devices: ❐ AC adapter ❐ Optional AC adapter ❐ Optional docking device ❐ Optional automobile or aircraft adapter External power supplied through ■ AC adapter ■ Optional AC adapter ■ Optional docking device 2-2 Hardware and Software Guide Power Power Sources The notebook can run on internal or external AC power. The following devices: ■ AC adapter ■ Optional AC adapter ■ Optional docking device...
... following devices: ❐ AC adapter ❐ Optional AC adapter ❐ Optional docking device ❐ Optional automobile or aircraft adapter External power supplied through ■ AC adapter ■ Optional AC adapter ■ Optional docking device 2-2 Hardware and Software Guide Power Power Sources The notebook can run on internal or external AC power. The following devices: ■ AC adapter ■ Optional AC adapter ■ Optional docking device...

Hardware and Software Guide
Page 43
... fully charged or not installed. Hardware and Software Guide 2-15 A battery pack inserted in the notebook charges whether the notebook is off or in the notebook charges whenever the notebook is off. For information about determining the amount of charge in a battery pack, refer to about...through an optional docking device or an optional automobile or aircraft adapter. A battery pack inserted in use, but the battery pack charges faster while the notebook is connected to external power through an AC adapter or through the AC adapter. ❏ When you charge the battery pack, charge it ...
... fully charged or not installed. Hardware and Software Guide 2-15 A battery pack inserted in the notebook charges whether the notebook is off or in the notebook charges whenever the notebook is off. For information about determining the amount of charge in a battery pack, refer to about...through an optional docking device or an optional automobile or aircraft adapter. A battery pack inserted in use, but the battery pack charges faster while the notebook is connected to external power through an AC adapter or through the AC adapter. ❏ When you charge the battery pack, charge it ...

Hardware and Software Guide
Page 48
.... If you must remain on as the battery pack charges.) 3. Connect the notebook to external power through the AC adapter or an optional automobile or aircraft adapter. (The notebook battery light is on. Charging the Battery Pack Charge the battery pack while the notebook is on throughout the discharge process. To charge the battery pack: 1. Leave...
.... If you must remain on as the battery pack charges.) 3. Connect the notebook to external power through the AC adapter or an optional automobile or aircraft adapter. (The notebook battery light is on. Charging the Battery Pack Charge the battery pack while the notebook is on throughout the discharge process. To charge the battery pack: 1. Leave...

Hardware and Software Guide
Page 156
...Installing an Update Most software at the Compaq Web site is connected to reliable external power using the AC adapter. (Do not download or install a ROM update while the notebook is packaged in compressed files called ROMPaqs. A Readme.txt file contains detailed descriptive, installation, and ...oprional docking device or running on battery power.) During the download and installation: ■ Do not unplug the notebook from the electrical outlet. ■ Do not shut down the notebook or initiate standby or hibernation. ■ Do not insert, remove, connect, or disconnect any device, cable...
...Installing an Update Most software at the Compaq Web site is connected to reliable external power using the AC adapter. (Do not download or install a ROM update while the notebook is packaged in compressed files called ROMPaqs. A Readme.txt file contains detailed descriptive, installation, and ...oprional docking device or running on battery power.) During the download and installation: ■ Do not unplug the notebook from the electrical outlet. ■ Do not shut down the notebook or initiate standby or hibernation. ■ Do not insert, remove, connect, or disconnect any device, cable...

Hardware and Software Guide
Page 161
...the application. ■ In all cases: If an application has been deleted from your hard drive. Make sure the notebook is still installed on your notebook, the reinstallation process does not affect your settings within the application. ■ In most cases: If the application you... earlier time, and then follow the instructions on your notebook, such as those available in the Software Setup utility, can also be repaired or reinstalled from your operating system, some applications preloaded on the screen. Select Restore my computer to a reliable AC outlet through the AC adapter. 2.
...the application. ■ In all cases: If an application has been deleted from your hard drive. Make sure the notebook is still installed on your notebook, the reinstallation process does not affect your settings within the application. ■ In most cases: If the application you... earlier time, and then follow the instructions on your notebook, such as those available in the Software Setup utility, can also be repaired or reinstalled from your operating system, some applications preloaded on the screen. Select Restore my computer to a reliable AC outlet through the AC adapter. 2.

Hardware and Software Guide
Page 163
Press the power button again to repair the selected Windows installation. (The repair process begins. Press R to start the notebook. 5. Press f8 to a power outlet through the AC adapter and turn on the notebook. 2. Software Updates and Recoveries Repairing the Operating System To attempt an operating system repair without deleting your operating system. ✎ If...
Press the power button again to repair the selected Windows installation. (The repair process begins. Press R to start the notebook. 5. Press f8 to a power outlet through the AC adapter and turn on the notebook. 2. Software Updates and Recoveries Repairing the Operating System To attempt an operating system repair without deleting your operating system. ✎ If...

Hardware and Software Guide
Page 164
... procedure for your operating system. ✎ If you may be prompted for 5 seconds. 4. Press enter to Setup screen is displayed.) 7. Connect the notebook to a power outlet through the AC adapter and turn on the notebook will be lost during the operating system reinstallation process. ✎ During the reinstallation, you are unable to start the...
... procedure for your operating system. ✎ If you may be prompted for 5 seconds. 4. Press enter to Setup screen is displayed.) 7. Connect the notebook to a power outlet through the AC adapter and turn on the notebook will be lost during the operating system reinstallation process. ✎ During the reinstallation, you are unable to start the...

Hardware and Software Guide
Page 174
... that the notebook be powered only with an AC adapter or DC power cord supplied with or approved for IT power systems in this section might be supplied by an AC or a DC power source. Input Power Operating voltage Operating current Rating 18.5 V dc @ 3.5 A - 65 W 3.5 A This product is designed for your notebook. The notebook operates on...
... that the notebook be powered only with an AC adapter or DC power cord supplied with or approved for IT power systems in this section might be supplied by an AC or a DC power source. Input Power Operating voltage Operating current Rating 18.5 V dc @ 3.5 A - 65 W 3.5 A This product is designed for your notebook. The notebook operates on...

Hardware and Software Guide
Page 177
..., reinstalling or repairing 1-18 applications. See software; software updates audio-in jack identifying 1-11, 1-13 using 4-2 audio-out jack identifying 1-11, 1-13 using 4-3 automobile adapter 2-15 AutoPlay 4-8 autorun 4-8 B battery bay 1-16 battery light displaying charge status 2-15, 2-17 identifying 1-9 battery pack acceptable temperature ranges 2-26 calibrating 2-19 charging 2-... 2-16 recharging 2-22 removing 2-24 storing 2-26 battery pack release latch 1-16, 2-24 Hardware and Software Guide Index-1 Index 1394 port 1-11 A AC adapter 1-17 adapter, modem 10-3 administrative password.
..., reinstalling or repairing 1-18 applications. See software; software updates audio-in jack identifying 1-11, 1-13 using 4-2 audio-out jack identifying 1-11, 1-13 using 4-3 automobile adapter 2-15 AutoPlay 4-8 autorun 4-8 B battery bay 1-16 battery light displaying charge status 2-15, 2-17 identifying 1-9 battery pack acceptable temperature ranges 2-26 calibrating 2-19 charging 2-... 2-16 recharging 2-22 removing 2-24 storing 2-26 battery pack release latch 1-16, 2-24 Hardware and Software Guide Index-1 Index 1394 port 1-11 A AC adapter 1-17 adapter, modem 10-3 administrative password.

Hardware and Software Guide
Page 184
hibernation; Index power AC adapter 1-17 connecting 2-1 conserving 2-22 disconnecting 2-1 schemes 2-13 selecting a source 2-2 setting preferences 2-10 travelling tips 16-2 See also battery pack; standby power connector ... changing function 2-12 identifying 1-4 setting preferences 2-12 power/standby light 1-6, 1-9 power-on password 12-4, 12-8 product information 14-2 Product Key 1-18 product name and number, notebook 1-18, 3-7 projector connecting 1-11, 1-14 switching image 3-8 Q QuickLock 3-10 QuickLock hotkey 12-3 R RAM (random access memory) 8-1, 8-6 rated input power specifications 17-2...
hibernation; Index power AC adapter 1-17 connecting 2-1 conserving 2-22 disconnecting 2-1 schemes 2-13 selecting a source 2-2 setting preferences 2-10 travelling tips 16-2 See also battery pack; standby power connector ... changing function 2-12 identifying 1-4 setting preferences 2-12 power/standby light 1-6, 1-9 power-on password 12-4, 12-8 product information 14-2 Product Key 1-18 product name and number, notebook 1-18, 3-7 projector connecting 1-11, 1-14 switching image 3-8 Q QuickLock 3-10 QuickLock hotkey 12-3 R RAM (random access memory) 8-1, 8-6 rated input power specifications 17-2...


