

Hardware Guide
Page 7
Contents Using Digital Media Cards (Select Models 8-5 Inserting an Optional Digital Media Card 8-6 Removing an Optional Digital Media Card 8-7 Disabling an Optional Digital Media Card 8-8 Increasing Memory 8-8 Displaying Memory Information 8-8 Removing or Inserting a Memory Module 8-9 Replacing the Hard Drive 8-14 Finding More Upgrade Information 8-17 9 Specifications Operating Environment 9-1 Rated Input Power 9-1 Index Hardware Guide vii
Contents Using Digital Media Cards (Select Models 8-5 Inserting an Optional Digital Media Card 8-6 Removing an Optional Digital Media Card 8-7 Disabling an Optional Digital Media Card 8-8 Increasing Memory 8-8 Displaying Memory Information 8-8 Removing or Inserting a Memory Module 8-9 Replacing the Hard Drive 8-14 Finding More Upgrade Information 8-17 9 Specifications Operating Environment 9-1 Rated Input Power 9-1 Index Hardware Guide vii

Hardware Guide
Page 22
...accessible for an optional 128-MB, 256-MB, 512-MB, or 1024-MB memory module upgrade. Bottom Components Hardware Components Component 1 Battery release latch 2 Battery bay 3 Exhaust vents 4 Hard drive bay 5 Memory compartment Description Releases the battery pack from the battery bay. Holds the primary hard... components. Ä To prevent overheating, do not obstruct the vent. As shipped, the memory slot might be filled with a replaceable memory module, or it might be vacant, depending on the notebook model. Holds the battery pack. (Battery shipment and type vary by model.) Allow airflow to...
...accessible for an optional 128-MB, 256-MB, 512-MB, or 1024-MB memory module upgrade. Bottom Components Hardware Components Component 1 Battery release latch 2 Battery bay 3 Exhaust vents 4 Hard drive bay 5 Memory compartment Description Releases the battery pack from the battery bay. Holds the primary hard... components. Ä To prevent overheating, do not obstruct the vent. As shipped, the memory slot might be filled with a replaceable memory module, or it might be vacant, depending on the notebook model. Holds the battery pack. (Battery shipment and type vary by model.) Allow airflow to...

Hardware Guide
Page 91
... the Personal Computer Memory Card International Association (PCMCIA). Configuring a PC Card Ä CAUTION: If you are not supported. PC Smart Card Reader and biometric identification PC Cards can be used to add modem, sound, memory, storage, and digital camera functions to use in your notebook varies by model. Hardware Upgrades Using PC Cards An optional PC Card is a credit...
... the Personal Computer Memory Card International Association (PCMCIA). Configuring a PC Card Ä CAUTION: If you are not supported. PC Smart Card Reader and biometric identification PC Cards can be used to add modem, sound, memory, storage, and digital camera functions to use in your notebook varies by model. Hardware Upgrades Using PC Cards An optional PC Card is a credit...

Hardware Guide
Page 94
The 5-in-1 Memory Reader supports the following digital media formats: ■ Secure Digital (SD) ■ MultiMediaCard ■ Memory Stick ■ Memory Stick Pro ■ SmartMedia Hardware Guide 8-5 Hardware Upgrades Using Digital Media Cards (Select Models) Optional digital media cards are removable storage devices that provide a convenient method of storing data and sharing it with other devices such as PDAs, cameras, and other memory card-equipped PCs.
The 5-in-1 Memory Reader supports the following digital media formats: ■ Secure Digital (SD) ■ MultiMediaCard ■ Memory Stick ■ Memory Stick Pro ■ SmartMedia Hardware Guide 8-5 Hardware Upgrades Using Digital Media Cards (Select Models) Optional digital media cards are removable storage devices that provide a convenient method of storing data and sharing it with other devices such as PDAs, cameras, and other memory card-equipped PCs.

Hardware Guide
Page 95
Inserting a digital media card 8-6 Hardware Guide To insert a digital media card: 1. Slide the media card into a Memory Reader. Hold the digital media card label-side up (finger-side up for SD cards) with the connectors facing the notebook. 2. Hardware Upgrades Inserting an Optional Digital Media Card Ä CAUTION: To prevent damage to the digital media card connectors, use minimal pressure when inserting a digital media card into the Memory Reader until the card is seated.
Inserting a digital media card 8-6 Hardware Guide To insert a digital media card: 1. Slide the media card into a Memory Reader. Hold the digital media card label-side up (finger-side up for SD cards) with the connectors facing the notebook. 2. Hardware Upgrades Inserting an Optional Digital Media Card Ä CAUTION: To prevent damage to the digital media card connectors, use minimal pressure when inserting a digital media card into the Memory Reader until the card is seated.

Hardware Guide
Page 97
... > General. ■ To display both the amount of free space on the notebook model, the notebook might ship with an optional memory module approved by the Hibernation file. Hardware Upgrades Disabling an Optional Digital Media Card A digital media card inserted into the Memory Reader uses power even when the card is accessible for the Hibernation...
... > General. ■ To display both the amount of free space on the notebook model, the notebook might ship with an optional memory module approved by the Hibernation file. Hardware Upgrades Disabling an Optional Digital Media Card A digital media card inserted into the Memory Reader uses power even when the card is accessible for the Hibernation...
Hardware Guide
Page 98
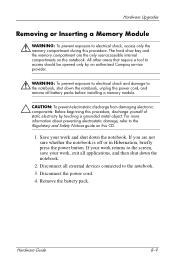
... battery pack. Hardware Upgrades Removing or Inserting a Memory Module Å WARNING: To prevent exposure to electrical shock, access only the memory compartment during this procedure, discharge yourself of static electricity by an authorized Compaq service provider. Å WARNING: To prevent exposure to electrical shock and damage to the notebook, shut down the notebook. 2. All other...
... battery pack. Hardware Upgrades Removing or Inserting a Memory Module Å WARNING: To prevent exposure to electrical shock, access only the memory compartment during this procedure, discharge yourself of static electricity by an authorized Compaq service provider. Å WARNING: To prevent exposure to electrical shock and damage to the notebook, shut down the notebook. 2. All other...

Hardware Guide
Page 99
Opening the memory compartment 8-10 Hardware Guide Turn the notebook upside down. 6. Hardware Upgrades 5. Loosen the screw that secures the memory compartment cover 1, and then tilt and remove the cover 2.
Opening the memory compartment 8-10 Hardware Guide Turn the notebook upside down. 6. Hardware Upgrades 5. Loosen the screw that secures the memory compartment cover 1, and then tilt and remove the cover 2.

Hardware Guide
Page 100
To protect a memory module after removal, place it out of the memory slot 2. Pull away the retention clips on each side of the memory module and gently pull it in an electrostatic-safe container. Remove or insert the memory module. To remove a memory module: a. Hardware Upgrades 7. c. Grasp the edges of the module 1. (The module tilts up.) b. Removing a memory module Hardware Guide 8-11
To protect a memory module after removal, place it out of the memory slot 2. Pull away the retention clips on each side of the memory module and gently pull it in an electrostatic-safe container. Remove or insert the memory module. To remove a memory module: a. Hardware Upgrades 7. c. Grasp the edges of the module 1. (The module tilts up.) b. Removing a memory module Hardware Guide 8-11

Hardware Guide
Page 101
Align the keyed (notched) edge of the module with the keyed area in the expansion slot 1. b. Inserting a memory module 8-12 Hardware Guide c. Press the module down until the retention clips snap into the slot until it is seated 2. Hardware Upgrades To insert a memory module: a. From a 45-degree angle, press the module into place.
Align the keyed (notched) edge of the module with the keyed area in the expansion slot 1. b. Inserting a memory module 8-12 Hardware Guide c. Press the module down until the retention clips snap into the slot until it is seated 2. Hardware Upgrades To insert a memory module: a. From a 45-degree angle, press the module into place.

Hardware Guide
Page 102
Reinsert and tighten the screw that secures the cover to the notebook 2. 11. Closing the memory compartment Hardware Guide 8-13 Tilt the cover down until it is seated 1. 10. Hardware Upgrades 8. Replace the battery pack, reconnect AC power, and then restart the notebook. Align the tabs on the memory compartment cover with the cover slots on the notebook. 9.
Reinsert and tighten the screw that secures the cover to the notebook 2. 11. Closing the memory compartment Hardware Guide 8-13 Tilt the cover down until it is seated 1. 10. Hardware Upgrades 8. Replace the battery pack, reconnect AC power, and then restart the notebook. Align the tabs on the memory compartment cover with the cover slots on the notebook. 9.

Getting Started
Page 35
...cool internal components. Ä To prevent overheating, do not obstruct the vent. As shipped, the memory slot might be filled with a replaceable memory module, or it might be vacant, depending on the notebook model. 5 Battery release latch Releases the battery pack from the battery bay. Startup Guide 3-15 ... shipment mode vary by model.) 2 Exhaust vents Allows airflow to block airflow. 3 Hard drive bay Holds the primary hard drive. 4 Memory compartment Contains 2 memory slots, one of which is accessible for an optional 128-MB, 256-MB, 512-MB, or 1024-MB memory module upgrade.
...cool internal components. Ä To prevent overheating, do not obstruct the vent. As shipped, the memory slot might be filled with a replaceable memory module, or it might be vacant, depending on the notebook model. 5 Battery release latch Releases the battery pack from the battery bay. Startup Guide 3-15 ... shipment mode vary by model.) 2 Exhaust vents Allows airflow to block airflow. 3 Hard drive bay Holds the primary hard drive. 4 Memory compartment Contains 2 memory slots, one of which is accessible for an optional 128-MB, 256-MB, 512-MB, or 1024-MB memory module upgrade.

