HP Pavilion ze2000 Notebook PC, Compaq Presario M2000 Notebook PC - Maintenance and Service Guide
Page 9
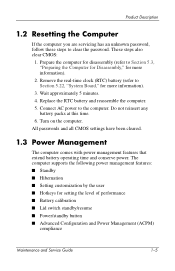
...Hibernation ■ Setting customization by the user ■ Hotkeys for setting the level of performance ■ Battery calibration ■ Lid switch standby/resume ■ Power/standby button ■ Advanced Configuration and Power Management (ACPM) compliance Maintenance and Service Guide 1-5 Turn on the computer. Connect AC power to clear the password. All passwords and all CMOS settings have been cleared. 1.3 Power Management The computer comes with power management features that extend battery operating time and conserve power. Replace the RTC battery and reassemble...
...Hibernation ■ Setting customization by the user ■ Hotkeys for setting the level of performance ■ Battery calibration ■ Lid switch standby/resume ■ Power/standby button ■ Advanced Configuration and Power Management (ACPM) compliance Maintenance and Service Guide 1-5 Turn on the computer. Connect AC power to clear the password. All passwords and all CMOS settings have been cleared. 1.3 Power Management The computer comes with power management features that extend battery operating time and conserve power. Replace the RTC battery and reassemble...
HP Pavilion ze2000 Notebook PC, Compaq Presario M2000 Notebook PC - Maintenance and Service Guide
Page 25
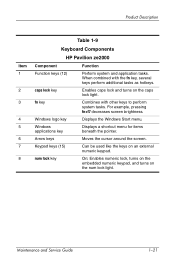
... decreases screen brightness. Keypad keys (15) Can be used like the keys on the caps lock light. Windows applications key Displays a shortcut menu for items beneath the pointer. Maintenance and Service Guide 1-21 Product Description Item 1 2 3 4 5 6 7 8 Table 1-9 Keyboard Components HP Pavilion ze2000 Component Function Function keys (12) Perform system and application tasks. Arrow keys Moves the cursor around the screen. When combined with other keys to perform system tasks. caps lock key Enables caps lock and turns...
... decreases screen brightness. Keypad keys (15) Can be used like the keys on the caps lock light. Windows applications key Displays a shortcut menu for items beneath the pointer. Maintenance and Service Guide 1-21 Product Description Item 1 2 3 4 5 6 7 8 Table 1-9 Keyboard Components HP Pavilion ze2000 Component Function Function keys (12) Perform system and application tasks. Arrow keys Moves the cursor around the screen. When combined with other keys to perform system tasks. caps lock key Enables caps lock and turns...

HP Pavilion ze2000 Notebook PC, Compaq Presario M2000 Notebook PC - Maintenance and Service Guide
Page 27
... function keys perform additional tasks as hotkeys. Windows logo key Displays the Windows Start menu. Maintenance and Service Guide 1-23 caps lock key Enables caps lock and turns on the num lock light. Arrow keys Move the cursor around the screen. For example, pressing Fn+F7 decreases screen brightness. Windows applications key Displays a shortcut menu for items beneath the pointer. num lock key Enables numeric lock, turns on the embedded numeric keypad, and turns on the caps lock light. Keypad keys (15) Can be used like the keys...
... function keys perform additional tasks as hotkeys. Windows logo key Displays the Windows Start menu. Maintenance and Service Guide 1-23 caps lock key Enables caps lock and turns on the num lock light. Arrow keys Move the cursor around the screen. For example, pressing Fn+F7 decreases screen brightness. Windows applications key Displays a shortcut menu for items beneath the pointer. num lock key Enables numeric lock, turns on the embedded numeric keypad, and turns on the caps lock light. Keypad keys (15) Can be used like the keys...
HP Pavilion ze2000 Notebook PC, Compaq Presario M2000 Notebook PC - Maintenance and Service Guide
Page 77
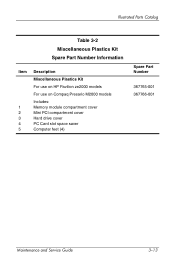
Illustrated Parts Catalog Table 3-2 Miscellaneous Plastics Kit Spare Part Number Information Item 1 2 3 4 5 Description Miscellaneous Plastics Kit For use on HP Pavilion ze2000 models For use on Compaq Presario M2000 models Includes: Memory module compartment cover Mini PCI compartment cover Hard drive cover PC Card slot space saver Computer feet (4) Spare Part Number 367765-001 367766-001 Maintenance and Service Guide 3-13
Illustrated Parts Catalog Table 3-2 Miscellaneous Plastics Kit Spare Part Number Information Item 1 2 3 4 5 Description Miscellaneous Plastics Kit For use on HP Pavilion ze2000 models For use on Compaq Presario M2000 models Includes: Memory module compartment cover Mini PCI compartment cover Hard drive cover PC Card slot space saver Computer feet (4) Spare Part Number 367765-001 367766-001 Maintenance and Service Guide 3-13

HP Pavilion ze2000 Notebook PC, Compaq Presario M2000 Notebook PC - Maintenance and Service Guide
Page 216
... part numbers 3-7, 3-23, 3-25, 3-26 TouchPad 1-24, 1-26 TouchPad buttons 1-24, 1-26 TouchPad horizontal scroll region 1-27 TouchPad vertical scroll region 1-25, 1-27 transporting precautions 4-5 troubleshooting audio 2-23 Computer Setup 2-2 docking device 2-16 flowcharts 2-7 keyboard 2-26 modem 2-28 network 2-28 nonfunctioning device 2-16, 2-25 OS loading 2-17 overview 2-1 pointing device 2-27 power 2-10 video 2-14 U Universal Serial Bus (USB) port location 1-11, 1-13, 1-15, 1-17 pin assignments A-1 USB digital drive, spare part number 3-15, 3-18 Index-6 Maintenance and Service Guide
... part numbers 3-7, 3-23, 3-25, 3-26 TouchPad 1-24, 1-26 TouchPad buttons 1-24, 1-26 TouchPad horizontal scroll region 1-27 TouchPad vertical scroll region 1-25, 1-27 transporting precautions 4-5 troubleshooting audio 2-23 Computer Setup 2-2 docking device 2-16 flowcharts 2-7 keyboard 2-26 modem 2-28 network 2-28 nonfunctioning device 2-16, 2-25 OS loading 2-17 overview 2-1 pointing device 2-27 power 2-10 video 2-14 U Universal Serial Bus (USB) port location 1-11, 1-13, 1-15, 1-17 pin assignments A-1 USB digital drive, spare part number 3-15, 3-18 Index-6 Maintenance and Service Guide
Wireless Setup Guide
Page 7
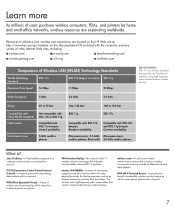
.../go/wireless, on number-sequence encryption. wireless LAN (WLAN)-A system of connecting computers and other features. wireless router-An all-in-one wireless communication device that indicates interoperability among wireless devices. WPA (Wi-Fi Protected Access)-A specificationbased, interoperable wireless security feature for sharing resources such as an Internet connection, printers, files, and drives. TCP/IP (Transmission Control Protocol/Internet Protocol)-A network protocol for home and small-office networks, wireless resources are located...
.../go/wireless, on number-sequence encryption. wireless LAN (WLAN)-A system of connecting computers and other features. wireless router-An all-in-one wireless communication device that indicates interoperability among wireless devices. WPA (Wi-Fi Protected Access)-A specificationbased, interoperable wireless security feature for sharing resources such as an Internet connection, printers, files, and drives. TCP/IP (Transmission Control Protocol/Internet Protocol)-A network protocol for home and small-office networks, wireless resources are located...

Hardware and Software Guide
Page 5
... Charge in a Battery Pack 3-15 Managing Low-Battery Conditions 3-16 Calibrating a Battery Pack 3-18 Conserving Battery Pack Power 3-22 Replacing a Battery Pack 3-23 Storing a Battery Pack 3-26 Disposing of a Used Battery Pack 3-26 4 Multimedia Internal Speakers 4-1 Volume Controls 4-2 External Audio Devices 4-3 Using the Audio-Out (Headphone) Jack 4-3 Using the Audio-In (Microphone) Jack 4-4 External Video Devices 4-4 Connecting an S-Video Device (Select Models Only 4-4 Displaying a Video Image 4-6 CD and DVD Procedures 4-6 Inserting or Removing a Disc 4-6 Using Media Activity...
... Charge in a Battery Pack 3-15 Managing Low-Battery Conditions 3-16 Calibrating a Battery Pack 3-18 Conserving Battery Pack Power 3-22 Replacing a Battery Pack 3-23 Storing a Battery Pack 3-26 Disposing of a Used Battery Pack 3-26 4 Multimedia Internal Speakers 4-1 Volume Controls 4-2 External Audio Devices 4-3 Using the Audio-Out (Headphone) Jack 4-3 Using the Audio-In (Microphone) Jack 4-4 External Video Devices 4-4 Connecting an S-Video Device (Select Models Only 4-4 Displaying a Video Image 4-6 CD and DVD Procedures 4-6 Inserting or Removing a Disc 4-6 Using Media Activity...
Hardware and Software Guide
Page 6
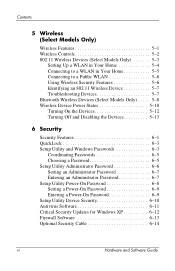
...Turning Off and Disabling the Devices 5-13 6 Security Security Features 6-1 QuickLock 6-3 Setup Utility and Windows Passwords 6-3 Coordinating Passwords 6-5 Choosing a Password 6-5 Setup Utility Administrator Password 6-6 Setting an Administrator Password 6-7 Entering an Administrator Password 6-7 Setup Utility Power-On Password 6-8 Setting a Power-On Password 6-9 Entering a Power-On Password 6-9 Setup Utility Device Security 6-10 Antivirus Software 6-11 Critical Security Updates for Windows XP 6-12 Firewall Software 6-13 Optional Security Cable 6-14 vi Hardware and Software...
...Turning Off and Disabling the Devices 5-13 6 Security Security Features 6-1 QuickLock 6-3 Setup Utility and Windows Passwords 6-3 Coordinating Passwords 6-5 Choosing a Password 6-5 Setup Utility Administrator Password 6-6 Setting an Administrator Password 6-7 Entering an Administrator Password 6-7 Setup Utility Power-On Password 6-8 Setting a Power-On Password 6-9 Entering a Power-On Password 6-9 Setup Utility Device Security 6-10 Antivirus Software 6-11 Critical Security Updates for Windows XP 6-12 Firewall Software 6-13 Optional Security Cable 6-14 vi Hardware and Software...
Hardware and Software Guide
Page 7
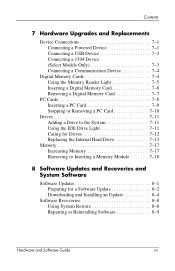
... a Powered Device 7-1 Connecting a USB Device 7-2 Connecting a 1394 Device (Select Models Only 7-3 Connecting a Communication Device 7-4 Digital Memory Cards 7-4 Using the Memory Reader Light 7-5 Inserting a Digital Memory Card 7-6 Removing a Digital Memory Card 7-7 PC Cards 7-8 Inserting a PC Card 7-9 Stopping or Removing a PC Card 7-10 Drives 7-11 Adding a Drive to the System 7-11 Using the IDE Drive Light 7-11 Caring for Drives 7-12 Replacing the Internal Hard Drive 7-13 Memory 7-17 Increasing Memory 7-17 Removing or Inserting a Memory Module 7-18 8 Software Updates and...
... a Powered Device 7-1 Connecting a USB Device 7-2 Connecting a 1394 Device (Select Models Only 7-3 Connecting a Communication Device 7-4 Digital Memory Cards 7-4 Using the Memory Reader Light 7-5 Inserting a Digital Memory Card 7-6 Removing a Digital Memory Card 7-7 PC Cards 7-8 Inserting a PC Card 7-9 Stopping or Removing a PC Card 7-10 Drives 7-11 Adding a Drive to the System 7-11 Using the IDE Drive Light 7-11 Caring for Drives 7-12 Replacing the Internal Hard Drive 7-13 Memory 7-17 Increasing Memory 7-17 Removing or Inserting a Memory Module 7-18 8 Software Updates and...

Hardware and Software Guide
Page 27
... or preloaded on your notebook. Hardware and Software Guide 1-19 Hardware Optical Discs Software on optical discs, such as CDs or DVDs, is provided with your notebook provide operating system recovery software and driver recovery software. Application recovery software is included with all of these applications. ■ The software applications packaged in case you ever need to repair or reinstall this software. ❏ Additional discs packaged with select notebook models. ❏ The User Guides CD contains Adobe...
... or preloaded on your notebook. Hardware and Software Guide 1-19 Hardware Optical Discs Software on optical discs, such as CDs or DVDs, is provided with your notebook provide operating system recovery software and driver recovery software. Application recovery software is included with all of these applications. ■ The software applications packaged in case you ever need to repair or reinstall this software. ❏ Additional discs packaged with select notebook models. ❏ The User Guides CD contains Adobe...
Hardware and Software Guide
Page 52
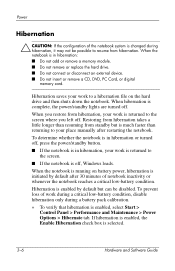
... then shuts down the notebook. If hibernation is enabled, the Enable Hibernation check box is complete, the power/standby lights are turned off , press the power/standby button. ■ If the notebook is in hibernation: ■ Do not add or remove a memory module. ■ Do not remove or replace the hard drive. ■ Do not connect or disconnect an external device. ■ Do not insert or remove a CD, DVD, PC Card, or digital memory card.
... then shuts down the notebook. If hibernation is enabled, the Enable Hibernation check box is complete, the power/standby lights are turned off , press the power/standby button. ■ If the notebook is in hibernation: ■ Do not add or remove a memory module. ■ Do not remove or replace the hard drive. ■ Do not connect or disconnect an external device. ■ Do not insert or remove a CD, DVD, PC Card, or digital memory card.
Hardware and Software Guide
Page 55
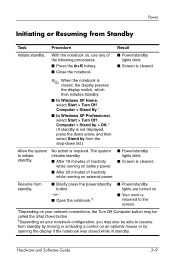
... button. -or- ■ Open the notebook.† ■ Power/standby lights are turned on. ■ Your work is returned to the screen. *Depending on your network connections, the Turn Off Computer button may be called the Shut Down button. †Depending on your notebook configuration, you may also be able to initiate standby. With the notebook on external power. ■ Power/standby lights blink. ■ Screen is required. No action is cleared. Hardware and Software Guide...
... button. -or- ■ Open the notebook.† ■ Power/standby lights are turned on. ■ Your work is returned to the screen. *Depending on your network connections, the Turn Off Computer button may be called the Shut Down button. †Depending on your notebook configuration, you may also be able to initiate standby. With the notebook on external power. ■ Power/standby lights blink. ■ Screen is required. No action is cleared. Hardware and Software Guide...
Hardware and Software Guide
Page 57
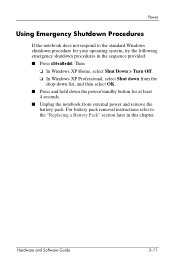
... battery pack removal instructions refer to the standard Windows shutdown procedure for at least 4 seconds. ■ Unplug the notebook from external power and remove the battery pack. Hardware and Software Guide 3-11 Power Using Emergency Shutdown Procedures If the notebook does not respond to the "Replacing a Battery Pack" section later in the sequence provided: ■ Press ctrl+alt+del. Then ❏ In Windows XP Home, select Shut Down > Turn...
... battery pack removal instructions refer to the standard Windows shutdown procedure for at least 4 seconds. ■ Unplug the notebook from external power and remove the battery pack. Hardware and Software Guide 3-11 Power Using Emergency Shutdown Procedures If the notebook does not respond to the "Replacing a Battery Pack" section later in the sequence provided: ■ Press ctrl+alt+del. Then ❏ In Windows XP Home, select Shut Down > Turn...

Hardware and Software Guide
Page 66
... notebook connected to external power through the AC adapter or an optional combination power adapter. (The notebook battery light is on . Power How to Calibrate To calibrate a battery pack, you are using the notebook, but the battery pack will discharge faster if the notebook is in use. 3-20 Hardware and Software Guide Connect the notebook to external power until the battery pack is fully charged. (The notebook battery light is turned off.) Discharging the Battery Pack Ä CAUTION: To prevent loss of work...
... notebook connected to external power through the AC adapter or an optional combination power adapter. (The notebook battery light is on . Power How to Calibrate To calibrate a battery pack, you are using the notebook, but the battery pack will discharge faster if the notebook is in use. 3-20 Hardware and Software Guide Connect the notebook to external power until the battery pack is fully charged. (The notebook battery light is turned off.) Discharging the Battery Pack Ä CAUTION: To prevent loss of work...
Hardware and Software Guide
Page 69
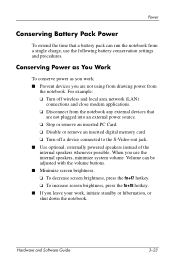
...; Disable or remove an inserted digital memory card. ❏ Turn off wireless and local area network (LAN) connections and close modem applications. ❏ Disconnect from the notebook any external devices that a battery pack can run the notebook from the notebook. Hardware and Software Guide 3-23 Power Conserving Battery Pack Power To extend the time that are not using from drawing power from a single charge, use the internal speakers, minimize system volume. For example: ❏ Turn off a device connected to the S-Video...
...; Disable or remove an inserted digital memory card. ❏ Turn off wireless and local area network (LAN) connections and close modem applications. ❏ Disconnect from the notebook any external devices that a battery pack can run the notebook from the notebook. Hardware and Software Guide 3-23 Power Conserving Battery Pack Power To extend the time that are not using from drawing power from a single charge, use the internal speakers, minimize system volume. For example: ❏ Turn off a device connected to the S-Video...
Hardware and Software Guide
Page 128
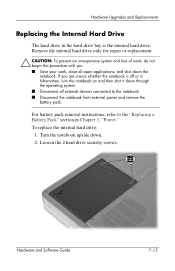
... internal hard drive: 1. Hardware and Software Guide 7-13 Remove the internal hard drive only for repair or replacement. Ä CAUTION: To prevent an unresponsive system and loss of work , close all external devices connected to the "Replacing a Battery Pack" section in hibernation, turn the notebook on and then shut it down through the operating system. ■ Disconnect all open applications, and shut down . 2. For battery pack removal instructions, refer to the notebook. ■ Disconnect the notebook from external power...
... internal hard drive: 1. Hardware and Software Guide 7-13 Remove the internal hard drive only for repair or replacement. Ä CAUTION: To prevent an unresponsive system and loss of work , close all external devices connected to the "Replacing a Battery Pack" section in hibernation, turn the notebook on and then shut it down through the operating system. ■ Disconnect all open applications, and shut down . 2. For battery pack removal instructions, refer to the notebook. ■ Disconnect the notebook from external power...
Hardware and Software Guide
Page 133
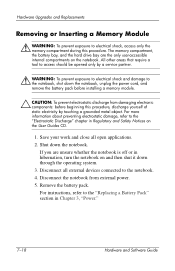
... the only user-accessible internal compartments on the notebook. For instructions, refer to the "Replacing a Battery Pack" section in Regulatory and Safety Notices on and then shut it down through the operating system. 3. Save your work and close all external devices connected to the notebook. 4. Remove the battery pack. Disconnect all open applications. 2. All other areas that require a tool to access should be opened only by touching a grounded metal...
... the only user-accessible internal compartments on the notebook. For instructions, refer to the "Replacing a Battery Pack" section in Regulatory and Safety Notices on and then shut it down through the operating system. 3. Save your work and close all external devices connected to the notebook. 4. Remove the battery pack. Disconnect all open applications. 2. All other areas that require a tool to access should be opened only by touching a grounded metal...
Hardware and Software Guide
Page 135
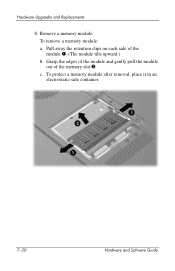
Hardware Upgrades and Replacements 8. To protect a memory module after removal, place it in an electrostatic-safe container. 7-20 Hardware and Software Guide To remove a memory module: a. Remove a memory module. Pull away the retention clips on each side of the memory slot 2. c. Grasp the edges of the module and gently pull the module out of the module 1. (The module tilts upward.) b.
Hardware Upgrades and Replacements 8. To protect a memory module after removal, place it in an electrostatic-safe container. 7-20 Hardware and Software Guide To remove a memory module: a. Remove a memory module. Pull away the retention clips on each side of the memory slot 2. c. Grasp the edges of the module and gently pull the module out of the module 1. (The module tilts upward.) b.

Hardware and Software Guide
Page 150
The Setup utility features available for advanced users include a hard drive self-test, a Network Service Boot, and settings for all users. Hardware and Software Guide 8-13 Software Updates and Recoveries and System Software Using Advanced Setup Utility Features This guide describes the Setup utility features recommended for boot order preferences. The "Press to change the boot order. The " to boot from LAN" message that is displayed in the lower-left corner of the screen each time the notebook is started or restarted in Windows or restored from...
The Setup utility features available for advanced users include a hard drive self-test, a Network Service Boot, and settings for all users. Hardware and Software Guide 8-13 Software Updates and Recoveries and System Software Using Advanced Setup Utility Features This guide describes the Setup utility features recommended for boot order preferences. The "Press to change the boot order. The " to boot from LAN" message that is displayed in the lower-left corner of the screen each time the notebook is started or restarted in Windows or restored from...

Hardware and Software Guide
Page 163
... 8-3 downloading and installing 8-4 obtaining updates 8-4 ROMPaq 8-4 S scanner 7-3 screen saver 3-23 scroll lock key 2-7 scrolling regions, TouchPad 1-3, 2-2 Secure Digital Memory Card (SD Card) 7-4 security cable lock, connecting 6-14 security cable slot 1-15 security features 6-1 serial number, notebook 1-20, 2-8 series, notebook 8-2 Service Tag 1-20 Setup 6-4 Setup utility changing language 8-10 displaying system information 8-11 navigation and selection 8-10 Network Service Boot 7-4, 8-13 opening 8-9 restoring default settings 8-10, 8-12 Setup utility password 6-3 Setup utility passwords...
... 8-3 downloading and installing 8-4 obtaining updates 8-4 ROMPaq 8-4 S scanner 7-3 screen saver 3-23 scroll lock key 2-7 scrolling regions, TouchPad 1-3, 2-2 Secure Digital Memory Card (SD Card) 7-4 security cable lock, connecting 6-14 security cable slot 1-15 security features 6-1 serial number, notebook 1-20, 2-8 series, notebook 8-2 Service Tag 1-20 Setup 6-4 Setup utility changing language 8-10 displaying system information 8-11 navigation and selection 8-10 Network Service Boot 7-4, 8-13 opening 8-9 restoring default settings 8-10, 8-12 Setup utility password 6-3 Setup utility passwords...


