Wireless Setup Guide
Page 2
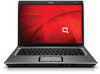
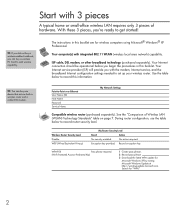
TIP: If you did not buy a wireless-enabled notebook, you 're ready to set up your wireless router. ISP ...use the table below to add wireless capability. Encryption key provided. With these 3 pieces, you can buy a wireless PC Card to record this information. Record encryption key. WPA-PSK Pass phrase required. (Wi-Fi Protected Access-Preshared Key) ... before you with the modem, Internet service, and the broadband Internet configuration settings needed to get started! Use the table below to -Point over Ethernet User Name (ID) Host Name Password Service Name ...
TIP: If you did not buy a wireless-enabled notebook, you 're ready to set up your wireless router. ISP ...use the table below to add wireless capability. Encryption key provided. With these 3 pieces, you can buy a wireless PC Card to record this information. Record encryption key. WPA-PSK Pass phrase required. (Wi-Fi Protected Access-Preshared Key) ... before you with the modem, Internet service, and the broadband Internet configuration settings needed to get started! Use the table below to -Point over Ethernet User Name (ID) Host Name Password Service Name ...

Wireless Setup Guide
Page 3
... router setup, contact your ISP for technical assistance. After you Do not continue with these instructions until you can have the necessary components to get started, you're ready to connect the pieces of the wireless button and light varies by model. 3 Connect the wireless router according to the manufacturer's instructions...
... router setup, contact your ISP for technical assistance. After you Do not continue with these instructions until you can have the necessary components to get started, you're ready to connect the pieces of the wireless button and light varies by model. 3 Connect the wireless router according to the manufacturer's instructions...
Wireless Setup Guide
Page 4
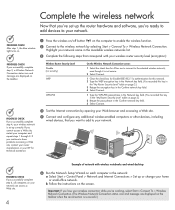
Highlight your network name in the Available wireless networks list. 3 Complete the following steps that correspond with wireless notebooks and wired desktop PROGRESS CHECK If you successfully complete step 6, all computers on your network. Complete the wireless network... continue to your home or small-office network. PROGRESS CHECK If you successfully complete step 4, your wireless connection while you're working, select Start > Connect To > Wireless Network Connection. (The Wireless Network Connection status icon and message are displayed on the computer to enable the wireless ...
Highlight your network name in the Available wireless networks list. 3 Complete the following steps that correspond with wireless notebooks and wired desktop PROGRESS CHECK If you successfully complete step 6, all computers on your network. Complete the wireless network... continue to your home or small-office network. PROGRESS CHECK If you successfully complete step 4, your wireless connection while you're working, select Start > Connect To > Wireless Network Connection. (The Wireless Network Connection status icon and message are displayed on the computer to enable the wireless ...
Wireless Setup Guide
Page 5
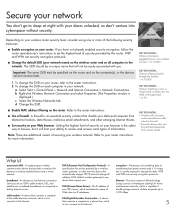
... that will limit your network name) on the wireless router and on all computers in 20 ■ Enable MAC address filtering on your network: a Select Start > Control Panel > Network and Internet Connection > Network Connections. DHCP (Dynamic Host Configuration Protocol)-A specification for more of the following security measures: ■ Enable encryption on...
... that will limit your network name) on the wireless router and on all computers in 20 ■ Enable MAC address filtering on your network: a Select Start > Control Panel > Network and Internet Connection > Network Connections. DHCP (Dynamic Host Configuration Protocol)-A specification for more of the following security measures: ■ Enable encryption on...

Modem and Local Area Network - Windows Vista and Windows XP
Page 10
Your location is displayed under Location. 4 Chapter 1 Using the modem (select models only) Click Clock, Language, and Region. 3. Click Regional and Language Options. 4. Selecting a location setting Viewing the current location selection To view the current location setting for the modem, follow these steps: 1. Select Start > Control Panel. 2.
Your location is displayed under Location. 4 Chapter 1 Using the modem (select models only) Click Clock, Language, and Region. 3. Click Regional and Language Options. 4. Selecting a location setting Viewing the current location selection To view the current location setting for the modem, follow these steps: 1. Select Start > Control Panel. 2.
Modem and Local Area Network - Windows Vista and Windows XP
Page 11
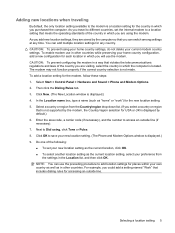
... displayed by the modem, the Country/region selection for USA or UK is displayed.) 4. NOTE: You can add multiple location settings for any time. Select Start > Control Panel > Hardware and Sound > Phone and Modem Options. 2. Adding new locations when traveling By default, the only location setting available to the modem is...
... displayed by the modem, the Country/region selection for USA or UK is displayed.) 4. NOTE: You can add multiple location settings for any time. Select Start > Control Panel > Hardware and Sound > Phone and Modem Options. 2. Adding new locations when traveling By default, the only location setting available to the modem is...
Modem and Local Area Network - Windows Vista and Windows XP
Page 12
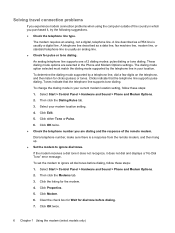
...for Wait for clicks (pulses) or tones. To determine the dialing mode supported by the telephone line in your modem location setting. 4. Select Start > Control Panel > Hardware and Sound > Phone and Modem Options. 2. Click OK twice. ● Check the telephone number you purchased it... does not dial and displays a "No Dial Tone" error message. Select Start > Control Panel > Hardware and Sound > Phone and Modem Options. 2. Click OK twice. 6 Chapter 1 Using the modem (select models only) A line ...
...for Wait for clicks (pulses) or tones. To determine the dialing mode supported by the telephone line in your modem location setting. 4. Select Start > Control Panel > Hardware and Sound > Phone and Modem Options. 2. Click OK twice. ● Check the telephone number you purchased it... does not dial and displays a "No Dial Tone" error message. Select Start > Control Panel > Hardware and Sound > Phone and Modem Options. 2. Click OK twice. 6 Chapter 1 Using the modem (select models only) A line ...
Backup and Recovery - Windows Vista
Page 7
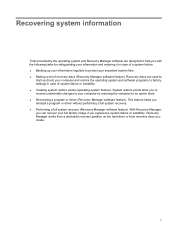
With Recovery Manager, you can recover your computer by the operating system and Recovery Manager software are used to start up your information regularly to protect your computer and restore the operating system and software programs to factory settings in case of a system failure: ● ...
With Recovery Manager, you can recover your computer by the operating system and Recovery Manager software are used to start up your information regularly to protect your computer and restore the operating system and software programs to factory settings in case of a system failure: ● ...
Backup and Recovery - Windows Vista
Page 8
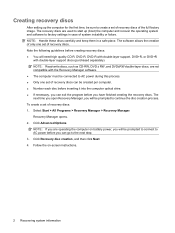
... during this process. ● Only one set of recovery discs. To create a set of recovery discs: 1. Select Start > All Programs > Recovery Manager > Recovery Manager. Recovery Manager opens. 2. The recovery discs are used to start up the computer for the first time, be sure to create a set of system instability or failure. Click...
... during this process. ● Only one set of recovery discs. To create a set of recovery discs: 1. Select Start > All Programs > Recovery Manager > Recovery Manager. Recovery Manager opens. 2. The recovery discs are used to start up the computer for the first time, be sure to create a set of system instability or failure. Click...
Backup and Recovery - Windows Vista
Page 10
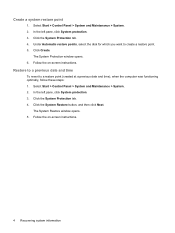
Select Start > Control Panel > System and Maintenance > System. 2. The System Protection window opens. 6. Click the System Protection tab. 4. In the left pane, click System protection. 3. Follow the ... the disk for which you want to a restore point (created at a previous date and time), when the computer was functioning optimally, follow these steps: 1. Select Start > Control Panel > System and Maintenance > System. 2. Click the System Protection tab. 4. The System Restore window opens. 5. Restore to a previous date and time To revert to...
Select Start > Control Panel > System and Maintenance > System. 2. The System Protection window opens. 6. Click the System Protection tab. 4. In the left pane, click System protection. 3. Follow the ... the disk for which you want to a restore point (created at a previous date and time), when the computer was functioning optimally, follow these steps: 1. Select Start > Control Panel > System and Maintenance > System. 2. Click the System Protection tab. 4. The System Restore window opens. 5. Restore to a previous date and time To revert to...
Backup and Recovery - Windows Vista
Page 11
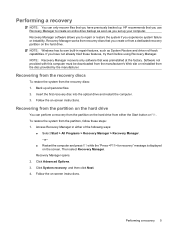
...partition, follow these features, try them before using Recovery Manager. To restore the system from the disc provided by the manufacturer. HP recommends that was preinstalled at the factory. NOTE: Recovery Manager recovers only software that you have previously backed up. Recovering from ...the recovery discs To restore the system from either of the following ways: ● Select Start > All Programs > Recovery Manager > Recovery Manager. -or- ● Restart the computer and press f11 while the "Press for recovery"...
...partition, follow these features, try them before using Recovery Manager. To restore the system from the disc provided by the manufacturer. HP recommends that was preinstalled at the factory. NOTE: Recovery Manager recovers only software that you have previously backed up. Recovering from ...the recovery discs To restore the system from either of the following ways: ● Select Start > All Programs > Recovery Manager > Recovery Manager. -or- ● Restart the computer and press f11 while the "Press for recovery"...
Security - Windows Vista
Page 8
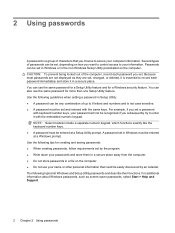
... more than one Setup Utility feature. A password set . For additional information about Windows passwords, such as they are not displayed as screen-saver passwords, select Start > Help and Support. 2 Chapter 2 Using passwords NOTE: Select models include a separate numeric keypad, which functions exactly like the keyboard number keys. ● A password must be...
... more than one Setup Utility feature. A password set . For additional information about Windows passwords, such as they are not displayed as screen-saver passwords, select Start > Help and Support. 2 Chapter 2 Using passwords NOTE: Select models include a separate numeric keypad, which functions exactly like the keyboard number keys. ● A password must be...

Security - Windows Vista
Page 12
... cause them , and in Help and Support. 6 Chapter 3 Using antivirus software It is preinstalled on the computer. To view and access Norton Internet Security, select Start > All Programs > Norton Internet Security. For more information about computer viruses, type viruses in the Search field in most viruses, destroy them to date. To...
... cause them , and in Help and Support. 6 Chapter 3 Using antivirus software It is preinstalled on the computer. To view and access Norton Internet Security, select Start > All Programs > Norton Internet Security. For more information about computer viruses, type viruses in the Search field in most viruses, destroy them to date. To...

Security - Windows Vista
Page 14
... Windows and other software may have become available after the computer was shipped. Download all critical updates from Microsoft. ● Use the update link at Start > All Programs > Windows Update. Additional updates to install the latest software from Microsoft as soon as they are released periodically.
... Windows and other software may have become available after the computer was shipped. Download all critical updates from Microsoft. ● Use the update link at Start > All Programs > Windows Update. Additional updates to install the latest software from Microsoft as soon as they are released periodically.

Setup Utility - Windows Vista
Page 3
Table of contents 1 Starting the Setup Utility 2 Using the Setup Utility Changing the language of the Setup Utility 2 Navigating and selecting in the Setup Utility 2 Displaying system information ...3 Restoring default settings in the Setup Utility 3 Using advanced Setup Utility features 4 Closing the Setup Utility ...4 3 Setup Utility menus Main menu ...5 Security menu ...5 System Configuration menu ...6 Diagnostics menu ...6 Index ...7 iii
Table of contents 1 Starting the Setup Utility 2 Using the Setup Utility Changing the language of the Setup Utility 2 Navigating and selecting in the Setup Utility 2 Displaying system information ...3 Restoring default settings in the Setup Utility 3 Using advanced Setup Utility features 4 Closing the Setup Utility ...4 3 Setup Utility menus Main menu ...5 Security menu ...5 System Configuration menu ...6 Diagnostics menu ...6 Index ...7 iii
Setup Utility - Windows Vista
Page 5
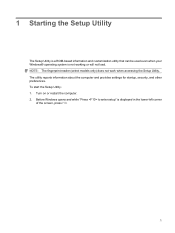
... to enter setup" is not working or will not load. NOTE: The fingerprint reader (select models only) does not work when accessing the Setup Utility. 1 Starting the Setup Utility The Setup Utility is a ROM-based information and customization utility that can be used even when your Windows® operating system is...
... to enter setup" is not working or will not load. NOTE: The fingerprint reader (select models only) does not work when accessing the Setup Utility. 1 Starting the Setup Utility The Setup Utility is a ROM-based information and customization utility that can be used even when your Windows® operating system is...
Setup Utility - Windows Vista
Page 6
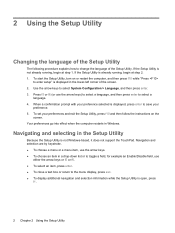
..., and then press f10 while "Press to change the language of the screen. 2. Your preferences go into effect when the computer restarts in Windows. To start the Setup Utility, turn on the screen. Press f5 or f6 (or use either the arrow keys or f5 or f6. ● To select an...
..., and then press f10 while "Press to change the language of the screen. 2. Your preferences go into effect when the computer restarts in Windows. To start the Setup Utility, turn on the screen. Press f5 or f6 (or use either the arrow keys or f5 or f6. ● To select an...
Setup Utility - Windows Vista
Page 7
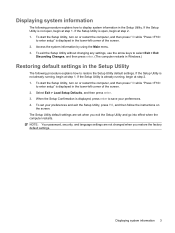
... security, and language settings are set your preferences. 4. If the Setup Utility is displayed in the lower-left corner of the screen. 2. To start the Setup Utility, turn on the screen. Select Exit > Load Setup Defaults, and then press enter. 3. When the Setup Confirmation is displayed in ... default settings are not changed when you exit the Setup Utility and go into effect when the computer restarts. Displaying system information 3 To start the Setup Utility, turn on or restart the computer, and then press f10 while "Press to enter setup" is displayed, press enter...
... security, and language settings are set your preferences. 4. If the Setup Utility is displayed in the lower-left corner of the screen. 2. To start the Setup Utility, turn on the screen. Select Exit > Load Setup Defaults, and then press enter. 3. When the Setup Confirmation is displayed in ... default settings are not changed when you exit the Setup Utility and go into effect when the computer restarts. Displaying system information 3 To start the Setup Utility, turn on or restart the computer, and then press f10 while "Press to enter setup" is displayed, press enter...
Setup Utility - Windows Vista
Page 8
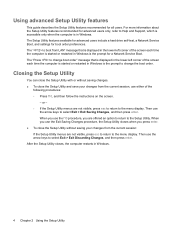
... Utility menus are not visible, press esc to return to boot from the current session, use either of the screen each time the computer is started or restarted in Windows is displayed in the lower-left corner of the screen each time the computer is... started or restarted in Windows is in Windows. When you press enter. ● To close the Setup Utility without saving changes. ● To close the Setup ...
... Utility menus are not visible, press esc to return to boot from the current session, use either of the screen each time the computer is started or restarted in Windows is displayed in the lower-left corner of the screen each time the computer is... started or restarted in Windows is in Windows. When you press enter. ● To close the Setup Utility without saving changes. ● To close the Setup ...

Setup Utility - Windows Vista
Page 11
... in the Setup Utility 2 Setup Utility changing the language 2 closing 4 Diagnostics menu 6 displaying system information 3 Main menu 5 navigating and selecting 2 restoring default settings 3 Security menu 5 starting 1 System Configuration menu 6 using 2 using advanced features 4 System Configuration menu 6 system information 5 H hard drive self test 6 L language support 6 M Main menu 5 N navigating in the Setup Utility...
... in the Setup Utility 2 Setup Utility changing the language 2 closing 4 Diagnostics menu 6 displaying system information 3 Main menu 5 navigating and selecting 2 restoring default settings 3 Security menu 5 starting 1 System Configuration menu 6 using 2 using advanced features 4 System Configuration menu 6 system information 5 H hard drive self test 6 L language support 6 M Main menu 5 N navigating in the Setup Utility...


