
Setup Utility - Windows Vista and Windows 7
Page 10
... 3 Setup Utility menus When enabled, the computer fan will always be on a secondary hard drive. Enable/disable Card Reader/1394 Power Saving. Enable/disable LAN Power Saving. NOTE: On models with two hard drives, this Change the Setup Utility language. Set the following boot options: ● f9...: ◦ USB Floppy ◦ Internal CD/DVD ROM drive ◦ USB CD/DVD ROM drive ◦ Hard drive ◦ USB Diskette on Key ◦ USB Hard drive ◦ Network adapter Diagnostics menu Select Hard Disk Self Test Secondary Hard Disk Self Test (select models only) Memory Test To do...
... 3 Setup Utility menus When enabled, the computer fan will always be on a secondary hard drive. Enable/disable Card Reader/1394 Power Saving. Enable/disable LAN Power Saving. NOTE: On models with two hard drives, this Change the Setup Utility language. Set the following boot options: ● f9...: ◦ USB Floppy ◦ Internal CD/DVD ROM drive ◦ USB CD/DVD ROM drive ◦ Hard drive ◦ USB Diskette on Key ◦ USB Hard drive ◦ Network adapter Diagnostics menu Select Hard Disk Self Test Secondary Hard Disk Self Test (select models only) Memory Test To do...
Setup Utility - Windows Vista and Windows 7
Page 11
... Reader Power Saving 6 changing the Setup Utility language 2 D Diagnostics menu 6 displaying system information 3 drives, boot order 6 E exiting the Setup Utility 4 F fan always on 6 fingerprint reader 1 H hard drive self test 6 L LAN Power Saving 6 language support 6 M Main menu 5 memory test 6 ...N navigating in the Setup Utility 2 P passwords 5 power-on password 5 Processor C6 State 6 R restoring default settings 3 S secondary hard drive self test 6 Security menu 5 selecting in the Setup Utility 2 starting the Setup Utility 1 System Configuration menu 6 system information 5 U using ...
... Reader Power Saving 6 changing the Setup Utility language 2 D Diagnostics menu 6 displaying system information 3 drives, boot order 6 E exiting the Setup Utility 4 F fan always on 6 fingerprint reader 1 H hard drive self test 6 L LAN Power Saving 6 language support 6 M Main menu 5 memory test 6 ...N navigating in the Setup Utility 2 P passwords 5 power-on password 5 Processor C6 State 6 R restoring default settings 3 S secondary hard drive self test 6 Security menu 5 selecting in the Setup Utility 2 starting the Setup Utility 1 System Configuration menu 6 system information 5 U using ...

Software Update - Windows Vista and Windows 7
Page 6
... is displayed. 3. Do not shut down the computer or initiate Sleep or Hibernation. Access the page on the computer, you want to your hard drive. To use the arrow keys to select the Main menu. Downloading a BIOS update CAUTION: To prevent damage to the computer or an unsuccessful ...installation, download and install a BIOS update only when the computer is later than those currently installed on the HP Web site that is connected to know the version of the system BIOS currently installed. Do not insert, remove, connect, or disconnect any...
... is displayed. 3. Do not shut down the computer or initiate Sleep or Hibernation. Access the page on the computer, you want to your hard drive. To use the arrow keys to select the Main menu. Downloading a BIOS update CAUTION: To prevent damage to the computer or an unsuccessful ...installation, download and install a BIOS update only when the computer is later than those currently installed on the HP Web site that is connected to know the version of the system BIOS currently installed. Do not insert, remove, connect, or disconnect any...
Software Update - Windows Vista and Windows 7
Page 7
... selecting Start > Computer. 2. If no instructions are displayed on the screen. Using the hard drive path you recorded earlier, open the folder on your hard drive where the BIOS update will need to access this path when you connect your hard drive. The system automatically shuts down after the download is typically Local Disk (C:). 3. Updating the...
... selecting Start > Computer. 2. If no instructions are displayed on the screen. Using the hard drive path you recorded earlier, open the folder on your hard drive where the BIOS update will need to access this path when you connect your hard drive. The system automatically shuts down after the download is typically Local Disk (C:). 3. Updating the...
Software Update - Windows Vista and Windows 7
Page 8
Open your country or region. 2. Click your hard drive. When the list of the device. 4 Updating software To do so, restart your computer. If prompted to do...enter. - After the file is complete, and then verify the operation of drivers is displayed, click an updated driver to http://www.hp.com/support, and select your Internet browser, go to open a window containing additional information. 6. Updating programs and drivers To download and...install. 7. Select your computer model number in the Search box, press enter, and follow these steps: To use the HP Web site: 1.
Open your country or region. 2. Click your hard drive. When the list of the device. 4 Updating software To do so, restart your computer. If prompted to do...enter. - After the file is complete, and then verify the operation of drivers is displayed, click an updated driver to http://www.hp.com/support, and select your Internet browser, go to open a window containing additional information. 6. Updating programs and drivers To download and...install. 7. Select your computer model number in the Search box, press enter, and follow these steps: To use the HP Web site: 1.
Drives - Windows 7
Page 3
... or DVD ...7 Creating or "burning" a CD or DVD ...7 Removing an optical disc (CD or DVD 8 3 Improving hard drive performance Using Disk Defragmenter ...9 Using Disk Cleanup ...9 4 Replacing the hard drive 5 Troubleshooting The optical disc tray does not open for removal of a CD or DVD 13 The computer does not detect the... optical drive 14 A disc does not play ...15 A disc does not play automatically ...16 The process of burning a disc does not begin, or it stops before completion 16 A device driver must be reinstalled ...17 Obtaining the latest HP device drivers 17 Obtaining ...
... or DVD ...7 Creating or "burning" a CD or DVD ...7 Removing an optical disc (CD or DVD 8 3 Improving hard drive performance Using Disk Defragmenter ...9 Using Disk Cleanup ...9 4 Replacing the hard drive 5 Troubleshooting The optical disc tray does not open for removal of a CD or DVD 13 The computer does not detect the... optical drive 14 A disc does not play ...15 A disc does not play automatically ...16 The process of burning a disc does not begin, or it stops before completion 16 A device driver must be reinstalled ...17 Obtaining the latest HP device drivers 17 Obtaining ...

Drives - Windows 7
Page 8
... permanent archives and to permanently store large amounts of computer files and scanned home records ● Offloading files from your hard drive to store digital data, are convenient for movies, software, and data backup purposes. Selecting the right disc An optical...● Transporting work files ● Making weekly backups of the disc. 4 Chapter 2 Using an optical drive With a LightScribe-enabled drive and LightScribe software, you burn them to the outside of hard drive files ● Updating photos, video, audio, and data continuously DVD±R discs Use blank DVD±R...
... permanent archives and to permanently store large amounts of computer files and scanned home records ● Offloading files from your hard drive to store digital data, are convenient for movies, software, and data backup purposes. Selecting the right disc An optical...● Transporting work files ● Making weekly backups of the disc. 4 Chapter 2 Using an optical drive With a LightScribe-enabled drive and LightScribe software, you burn them to the outside of hard drive files ● Updating photos, video, audio, and data continuously DVD±R discs Use blank DVD±R...
Drives - Windows 7
Page 11
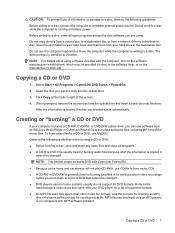
...disc, close all open files and close any open programs except the disc software you can be changed . Save the information to your hard drive to a reliable external power source. After the information is usually best for creating a data file. MP3 files can use CD-Rs to... are using software included with MP3 software installed. When prompted, remove the source disc from your hard drive, and then burn from the optical drive and insert a blank disc into the optical drive. 3. Refer to the manufacturer's instructions that cannot be played only on MP3 players or on the...
...disc, close all open files and close any open programs except the disc software you can be changed . Save the information to your hard drive to a reliable external power source. After the information is usually best for creating a data file. MP3 files can use CD-Rs to... are using software included with MP3 software installed. When prompted, remove the source disc from your hard drive, and then burn from the optical drive and insert a blank disc into the optical drive. 3. Refer to the manufacturer's instructions that cannot be played only on MP3 players or on the...
Drives - Windows 7
Page 12
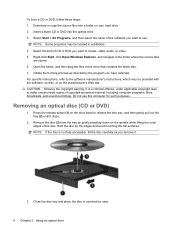
...copyright warning. Close the disc tray and place the disc in subfolders. 4. NOTE: Some programs may be located in a protective case. 8 Chapter 2 Using an optical drive For specific instructions, refer to create-data, audio, or video. 5. It is not fully accessible, tilt the disc carefully as directed by the program you... to the folder where the source files are stored. 6. Hold the disc by gently pressing down on your hard drive. 2. Insert a blank CD or DVD into a folder on the spindle while lifting the outer edges of the software you have selected. Remove the disc (3) from...
...copyright warning. Close the disc tray and place the disc in subfolders. 4. NOTE: Some programs may be located in a protective case. 8 Chapter 2 Using an optical drive For specific instructions, refer to create-data, audio, or video. 5. It is not fully accessible, tilt the disc carefully as directed by the program you... to the folder where the source files are stored. 6. Hold the disc by gently pressing down on your hard drive. 2. Insert a blank CD or DVD into a folder on the spindle while lifting the outer edges of the software you have selected. Remove the disc (3) from...

Drives - Windows 7
Page 13
... Defragmenter As you start it, it works without supervision. Refer to use the computer, files on -screen instructions. Follow the on the hard drive become fragmented. Disk Defragmenter is easy to Help and Support for unnecessary files that the system can safely delete to free up disk space ... folders on the size of fragmented files, it may want to set Disk Defragmenter to run more than an hour to your hard drive at any time. HP recommends defragmenting your computer. Click Defragment disk. Using Disk Defragmenter 9 After you use . You may take more efficiently.
... Defragmenter As you start it, it works without supervision. Refer to use the computer, files on -screen instructions. Follow the on the hard drive become fragmented. Disk Defragmenter is easy to Help and Support for unnecessary files that the system can safely delete to free up disk space ... folders on the size of fragmented files, it may want to set Disk Defragmenter to run more than an hour to your hard drive at any time. HP recommends defragmenting your computer. Click Defragment disk. Using Disk Defragmenter 9 After you use . You may take more efficiently.

Drives - Windows 7
Page 14
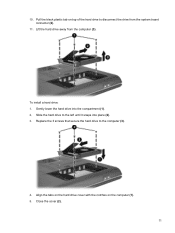
... computer upside down the computer and close the display. 3. If you , loosen the 2 hard drive cover screws (1). 8. Shut down on a flat surface. 6. Remove the 3 screws that secure the hard drive to the computer. 4. Then shut down the computer before removing the hard drive from the computer (2). 9. Disconnect all external devices connected to the computer (1). 10 Chapter...
... computer upside down the computer and close the display. 3. If you , loosen the 2 hard drive cover screws (1). 8. Shut down on a flat surface. 6. Remove the 3 screws that secure the hard drive to the computer. 4. Then shut down the computer before removing the hard drive from the computer (2). 9. Disconnect all external devices connected to the computer (1). 10 Chapter...
Drives - Windows 7
Page 15
10. Gently lower the hard drive into place (2). 3. Slide the hard drive to the left until it snaps into the compartment (1). 2. Align the tabs on the hard drive cover with the notches on top of the hard drive to the computer (3). 4. Replace the 3 screws that secure the hard drive to disconnect the drive from the computer (3). Close the cover (2). 11 Lift the hard drive away from the system board connector (2). 11. Pull the black plastic tab on the computer (1). 5. To install a hard drive: 1.
10. Gently lower the hard drive into place (2). 3. Slide the hard drive to the left until it snaps into the compartment (1). 2. Align the tabs on the hard drive cover with the notches on top of the hard drive to the computer (3). 4. Replace the 3 screws that secure the hard drive to disconnect the drive from the computer (3). Close the cover (2). 11 Lift the hard drive away from the system board connector (2). 11. Pull the black plastic tab on the computer (1). 5. To install a hard drive: 1.
Drives - Windows 7
Page 16
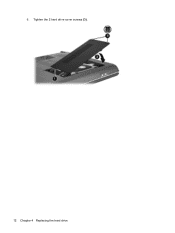
Tighten the 2 hard drive cover screws (3). 12 Chapter 4 Replacing the hard drive 6.
Tighten the 2 hard drive cover screws (3). 12 Chapter 4 Replacing the hard drive 6.
Drives - Windows 7
Page 20
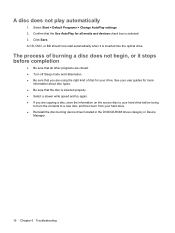
The process of disc for your hard drive. ● Reinstall the disc-burning device driver located in the DVD/CD-ROM drives category in Device Manager. 16 Chapter 5 Troubleshooting See your user guides for all other programs are closed. ● Turn off Sleep mode and... write speed and try again. ● If you are copying a disc, save the information on the source disc to your hard drive before trying to burn the contents to a new disc, and then burn from your drive. Select Start > Default Programs > Change AutoPlay settings. 2. Click Save. A disc does not play automatically 1.
The process of disc for your hard drive. ● Reinstall the disc-burning device driver located in the DVD/CD-ROM drives category in Device Manager. 16 Chapter 5 Troubleshooting See your user guides for all other programs are closed. ● Turn off Sleep mode and... write speed and try again. ● If you are copying a disc, save the information on the source disc to your hard drive before trying to burn the contents to a new disc, and then burn from your drive. Select Start > Default Programs > Change AutoPlay settings. 2. Click Save. A disc does not play automatically 1.
Drives - Windows 7
Page 22
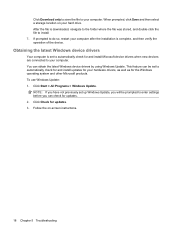
... updates. 3. When prompted, click Save and then select a storage location on -screen instructions. 18 Chapter 5 Troubleshooting NOTE: If you have not previously set to your hard drive.
... updates. 3. When prompted, click Save and then select a storage location on -screen instructions. 18 Chapter 5 Troubleshooting NOTE: If you have not previously set to your hard drive.
Drives - Windows 7
Page 23
... copying 7 playing 5 removing 8 CD drive 3 CD, drive 2 copyright warning 6 D device drivers HP drivers 17 Windows drivers 18 Disk Cleanup software 9 Disk Defragmenter software 9 disk performance 9 drives caring for 1 hard 10, 11 optical 2 drives, optical drive 3 DVD burning 7, 16 changing region setting 6 copying 7 drive 2 playing 5 removing 8 DVD drive 3 H hard disk drive installing 11 removing 10 replacing 10 hard drive installing 11 removing 10 replacing...
... copying 7 playing 5 removing 8 CD drive 3 CD, drive 2 copyright warning 6 D device drivers HP drivers 17 Windows drivers 18 Disk Cleanup software 9 Disk Defragmenter software 9 disk performance 9 drives caring for 1 hard 10, 11 optical 2 drives, optical drive 3 DVD burning 7, 16 changing region setting 6 copying 7 drive 2 playing 5 removing 8 DVD drive 3 H hard disk drive installing 11 removing 10 replacing 10 hard drive installing 11 removing 10 replacing...

Notebook Tour - Windows 7
Page 11
.... ● Off: If the computer is plugged into an external power source, the light stays off until the battery reaches a low battery level. (3) Drive light Blinking: The hard drive or optical drive is being accessed. (4) Audio-in Hibernation. ● On: A battery is charging. ● Blinking: A battery that is the only available power source has...
.... ● Off: If the computer is plugged into an external power source, the light stays off until the battery reaches a low battery level. (3) Drive light Blinking: The hard drive or optical drive is being accessed. (4) Audio-in Hibernation. ● On: A battery is charging. ● Blinking: A battery that is the only available power source has...

Notebook Tour - Windows 7
Page 15
... contact technical support through Help and Support. Contains the memory module slots. Bottom components Component (1) Battery bay (2) Battery release latch (3) WLAN module compartment (4) Hard drive bay (5) Vents (4) (6) Memory module compartment Description Holds the battery. Holds the hard drive. Enable airflow to cycle on and off during routine operation. Holds the WLAN module. Bottom components 9
... contact technical support through Help and Support. Contains the memory module slots. Bottom components Component (1) Battery bay (2) Battery release latch (3) WLAN module compartment (4) Hard drive bay (5) Vents (4) (6) Memory module compartment Description Holds the battery. Holds the hard drive. Enable airflow to cycle on and off during routine operation. Holds the WLAN module. Bottom components 9

Notebook Tour - Windows 7
Page 18
Component Description (6) Drive light Blinking: The hard drive or optical drive is being accessed. (7) TouchPad light White: TouchPad is open . If the screen requires additional cleaning, use premoistened antistatic wipes or an antistatic screen cleaner. The ...
Component Description (6) Drive light Blinking: The hard drive or optical drive is being accessed. (7) TouchPad light White: TouchPad is open . If the screen requires additional cleaning, use premoistened antistatic wipes or an antistatic screen cleaner. The ...
Notebook Tour - Windows 7
Page 21
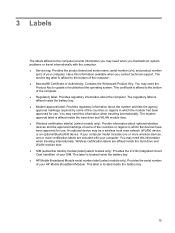
... the computer. ● Service tag: Provides the product brand and series name, serial number (s/n), and product number (p/n) of your HP Mobile Broadband Module. This label is affixed inside the battery bay. ● Modem approval label: Provides regulatory information about the modem and...wireless devices and the approval markings of some of Authenticity: Contains the Windows® Product Key. This certificate is affixed inside the hard drive and WLAN module door. ● Wireless certification label(s) (select models only): Provide information about the computer. If your computer ...
... the computer. ● Service tag: Provides the product brand and series name, serial number (s/n), and product number (p/n) of your HP Mobile Broadband Module. This label is affixed inside the battery bay. ● Modem approval label: Provides regulatory information about the modem and...wireless devices and the approval markings of some of Authenticity: Contains the Windows® Product Key. This certificate is affixed inside the hard drive and WLAN module door. ● Wireless certification label(s) (select models only): Provide information about the computer. If your computer ...

