Security - Windows Vista
Page 5
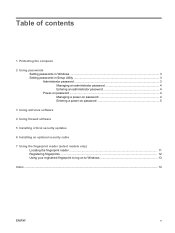
... computer 2 Using passwords Setting passwords in Windows ...3 Setting passwords in Setup Utility ...3 Administrator password ...3 Managing an administrator password 4 Entering an administrator password 4 Power-on password ...4 Managing a power-on password 4 Entering a power-on password 5 3 Using antivirus software 4 Using firewall software 5 Installing critical security updates 6 Installing an optional security cable 7 Using the fingerprint reader (select...
... computer 2 Using passwords Setting passwords in Windows ...3 Setting passwords in Setup Utility ...3 Administrator password ...3 Managing an administrator password 4 Entering an administrator password 4 Power-on password ...4 Managing a power-on password 4 Entering a power-on password 5 3 Using antivirus software 4 Using firewall software 5 Installing critical security updates 6 Installing an optional security cable 7 Using the fingerprint reader (select...
Security - Windows Vista
Page 7
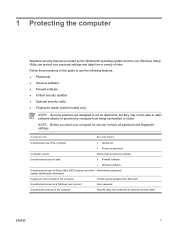
... protect your computer for service, remove all password and fingerprint settings. Follow the procedures in this guide to use of the computer ● QuickLock ● Power-on password Computer viruses Unauthorized access to data Norton Internet Security software ● Firewall software ● Windows updates Unauthorized access to Setup Utility, BIOS settings...
... protect your computer for service, remove all password and fingerprint settings. Follow the procedures in this guide to use of the computer ● QuickLock ● Power-on password Computer viruses Unauthorized access to data Norton Internet Security software ● Firewall software ● Windows updates Unauthorized access to Setup Utility, BIOS settings...
Security - Windows Vista
Page 9
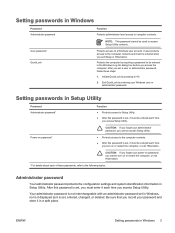
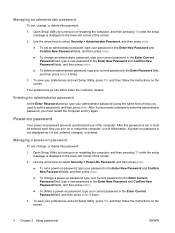
...access Setup Utility contents. It also protects access to computer contents. ENWW Setting passwords in Setup Utility. Be sure that you record your power-on password, you set a user or administrator password, follow these passwords, refer to be entered when you exit Sleep or Hibernation....● Protects access to the computer contents. ● After this password is set, you must be used to a Windows user account. Power-on password* CAUTION: If you forget your Windows user or administrator password. NOTE: This password cannot be entered each time you access Setup ...
...access Setup Utility contents. It also protects access to computer contents. ENWW Setting passwords in Setup Utility. Be sure that you record your power-on password, you set a user or administrator password, follow these passwords, refer to be entered when you exit Sleep or Hibernation....● Protects access to the computer contents. ● After this password is set, you must be used to a Windows user account. Power-on password* CAUTION: If you forget your Windows user or administrator password. NOTE: This password cannot be entered each time you access Setup ...
Security - Windows Vista
Page 10
... To save your administrator password (using the same kind of the screen. 2. Your preferences go into effect when the computer restarts. Power-on password Your power-on or restarting the computer, and then pressing f10 while the setup message is displayed in the lower-left corner of keys you turn... Password field, type a new password in the Enter New Password and Confirm New Password fields, and then press enter. ● To delete a power-on or restarting the computer, and then pressing f10 while the setup message is displayed in the lower-left corner of the computer. Use the...
... To save your administrator password (using the same kind of the screen. 2. Your preferences go into effect when the computer restarts. Power-on password Your power-on or restarting the computer, and then pressing f10 while the setup message is displayed in the lower-left corner of keys you turn... Password field, type a new password in the Enter New Password and Confirm New Password fields, and then press enter. ● To delete a power-on or restarting the computer, and then pressing f10 while the setup message is displayed in the lower-left corner of the computer. Use the...

Security - Windows Vista
Page 11
ENWW Setting passwords in Setup Utility 5 Entering a power-on password At the Enter Password prompt, type your password (using the same keys you used to enter the password, you must restart the computer and try again. After 3 unsuccessful attempts to set the password), and then press enter. Your preferences go into effect when the computer restarts.
ENWW Setting passwords in Setup Utility 5 Entering a power-on password At the Enter Password prompt, type your password (using the same keys you used to enter the password, you must restart the computer and try again. After 3 unsuccessful attempts to set the password), and then press enter. Your preferences go into effect when the computer restarts.
Security - Windows Vista
Page 20
... password 5 entering an administrator password 4 F fingerprint reader 10 fingerprint reader location 11 firewall software 7 M managing a power-on password 4 managing an administrator password 4 P passwords administrator 3 power-on 4 set in Setup Utility 3 set in Windows 3 power-on password entering 5 managing 4 Q QuickLock 3 R registering fingerprints 12 S security features 1 passwords 2 security cable 9 Setup Utility passwords set in 3 software...
... password 5 entering an administrator password 4 F fingerprint reader 10 fingerprint reader location 11 firewall software 7 M managing a power-on password 4 managing an administrator password 4 P passwords administrator 3 power-on 4 set in Setup Utility 3 set in Windows 3 power-on password entering 5 managing 4 Q QuickLock 3 R registering fingerprints 12 S security features 1 passwords 2 security cable 9 Setup Utility passwords set in 3 software...

Wireless Setup Guide
Page 3
... your router is set to Disable, WEP, through 5, or contact your Web browser and accessing a Web site. Ensure that the computer is connected to AC power during the router setup, contact your setup with the router. Important: If you successfully complete step 6, your computer is temporarily connected to the router using...
... your router is set to Disable, WEP, through 5, or contact your Web browser and accessing a Web site. Ensure that the computer is connected to AC power during the router setup, contact your setup with the router. Important: If you successfully complete step 6, your computer is temporarily connected to the router using...
Backup and Recovery - Windows Vista
Page 8
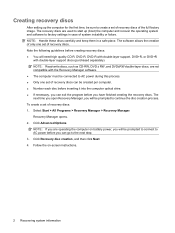
Creating recovery discs After setting up (boot) the computer and recover the operating system and software to AC power during this process. ● Only one set of the full factory image. NOTE: Handle these discs carefully and keep them in case of ... with double-layer support discs (purchased separately). Select Start > All Programs > Recovery Manager > Recovery Manager. Follow the on battery power, you will be prompted to connect to AC power before you will need high quality CD-R, DVD-R, DVD-R with double-layer support, DVD+R, or DVD+R with the Recovery Manager software...
Creating recovery discs After setting up (boot) the computer and recover the operating system and software to AC power during this process. ● Only one set of the full factory image. NOTE: Handle these discs carefully and keep them in case of ... with double-layer support discs (purchased separately). Select Start > All Programs > Recovery Manager > Recovery Manager. Follow the on battery power, you will be prompted to connect to AC power before you will need high quality CD-R, DVD-R, DVD-R with double-layer support, DVD+R, or DVD+R with the Recovery Manager software...
Setup Utility - Windows Vista and XP
Page 9
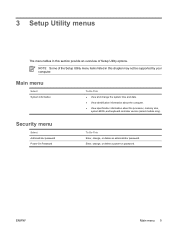
... models only). NOTE Some of Setup Utility options. ENWW Main menu 5 Main menu Select System information To Do This ● View and change , or delete a power-on password. Security menu Select Administrator password Power-On Password To Do This Enter, change, or delete an administrator password.
... models only). NOTE Some of Setup Utility options. ENWW Main menu 5 Main menu Select System information To Do This ● View and change , or delete a power-on password. Security menu Select Administrator password Power-On Password To Do This Enter, change, or delete an administrator password.
Setup Utility - Windows Vista and XP
Page 11
... 5 starting 1 System Configuration menu 6 using 2 using advanced features 4 System Configuration menu 6 system information 5 V video memory 6 L language support 6 M Main menu 5 N navigating in the Setup Utility 2 P passwords 5 power-on password 5 ENWW Index 7
... 5 starting 1 System Configuration menu 6 using 2 using advanced features 4 System Configuration menu 6 system information 5 V video memory 6 L language support 6 M Main menu 5 N navigating in the Setup Utility 2 P passwords 5 power-on password 5 ENWW Index 7

Software Updates - Windows Vista
Page 8
...currently installed on or restarting the computer, and then pressing f10 while the "Press to enter Setup" message is connected to reliable external power using the AC adapter. Downloading a BIOS update CAUTION: To prevent damage to the computer or an unsuccessful installation, download and install ...2. Determining the BIOS version To determine whether available BIOS updates contain later BIOS versions than the BIOS version currently installed on the HP Web site that is displayed. 3. Follow the instructions on the screen to download your computer and access the BIOS update you ...
...currently installed on or restarting the computer, and then pressing f10 while the "Press to enter Setup" message is connected to reliable external power using the AC adapter. Downloading a BIOS update CAUTION: To prevent damage to the computer or an unsuccessful installation, download and install ...2. Determining the BIOS version To determine whether available BIOS updates contain later BIOS versions than the BIOS version currently installed on the HP Web site that is displayed. 3. Follow the instructions on the screen to download your computer and access the BIOS update you ...
Drives - Windows Vista
Page 8
..., observe these precautions: Before you are included with the procedures to clear. Before handling a drive, discharge static electricity by touching the unpainted metal surface of power, be sure that must be handled with , shipping, or storing a drive. The write process is sensitive to liquids. Additional cautions are unsure whether the computer...
..., observe these precautions: Before you are included with the procedures to clear. Before handling a drive, discharge static electricity by touching the unpainted metal surface of power, be sure that must be handled with , shipping, or storing a drive. The write process is sensitive to liquids. Additional cautions are unsure whether the computer...

Drives - Windows Vista
Page 14
...removing the hard drive from the computer (2). 9. Remove the battery from the AC outlet. 5. Then shut down on by pressing the power button. Turn the computer upside down the computer through the operating system. With the hard drive bay toward you are not sure whether ...or in Hibernation, turn the computer on a flat surface. 6. Remove the 2 hard drive screws (1). 8 Chapter 5 Replacing the hard drive Unplug the power cord from the computer. 7. Lift the hard drive cover away from the hard drive bay. Disconnect all external devices connected to the computer. 4. To ...
...removing the hard drive from the computer (2). 9. Remove the battery from the AC outlet. 5. Then shut down on by pressing the power button. Turn the computer upside down the computer through the operating system. With the hard drive bay toward you are not sure whether ...or in Hibernation, turn the computer on a flat surface. 6. Remove the 2 hard drive screws (1). 8 Chapter 5 Replacing the hard drive Unplug the power cord from the computer. 7. Lift the hard drive cover away from the hard drive bay. Disconnect all external devices connected to the computer. 4. To ...
Memory Modules - Windows Vista
Page 7
... CAUTION: Electrostatic discharge (ESD) can be sure both memory modules are discharged of electric shock and damage to the equipment, unplug the power cord and remove all external devices connected to the vacant expansion memory module slot or by touching a grounded metal object. Save your work.... 2. Turn the computer upside down on by pressing the power button. Remove the battery from the AC outlet. 5. The memory capacity of the computer. Unplug the power cord from the computer. 7. Before beginning any procedure, ensure that you are not sure...
... CAUTION: Electrostatic discharge (ESD) can be sure both memory modules are discharged of electric shock and damage to the equipment, unplug the power cord and remove all external devices connected to the vacant expansion memory module slot or by touching a grounded metal object. Save your work.... 2. Turn the computer upside down on by pressing the power button. Remove the battery from the AC outlet. 5. The memory capacity of the computer. Unplug the power cord from the computer. 7. Before beginning any procedure, ensure that you are not sure...
Memory Modules - Windows Vista
Page 10
Replace the battery. 15. Turn on the computer. 4 Adding or replacing a memory module 14. Reconnect external power and external devices. 16.
Replace the battery. 15. Turn on the computer. 4 Adding or replacing a memory module 14. Reconnect external power and external devices. 16.

Notebook Tour - Windows Vista
Page 10
...9679; When the computer is off the computer. Turns the wireless feature on or off, but does not create a wireless connection. (3) Power button* NOTE: To establish a wireless connection, a wireless network must already be set up to increase speaker volume. (6) Volume down hotkey... changing factory settings, refer to decrease speaker volume. *This table describes factory settings. For information about your power settings, select Start > Control Panel > System and Maintenance > Power Options. (4) Volume mute hotkey Press fn+home to mute and restore speaker sound. (5) Volume up hotkey...
...9679; When the computer is off the computer. Turns the wireless feature on or off, but does not create a wireless connection. (3) Power button* NOTE: To establish a wireless connection, a wireless network must already be set up to increase speaker volume. (6) Volume down hotkey... changing factory settings, refer to decrease speaker volume. *This table describes factory settings. For information about your power settings, select Start > Control Panel > System and Maintenance > Power Options. (4) Volume mute hotkey Press fn+home to mute and restore speaker sound. (5) Volume up hotkey...
Notebook Tour - Windows Vista
Page 11
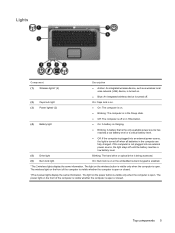
... light on the front of the computer is visible whether the computer is open or closed . If the computer is not plugged into an external power source, the light is enabled. *The 2 wireless lights display the same information. The light on or the embedded numeric keypad is turned off when all... batteries in Hibernation. ● On: A battery is charging. ● Blinking: A battery that is the only available power source has reached a low battery level or a critical battery level. ● Off: If the computer is plugged into an external...
... light on the front of the computer is visible whether the computer is open or closed . If the computer is not plugged into an external power source, the light is enabled. *The 2 wireless lights display the same information. The light on or the embedded numeric keypad is turned off when all... batteries in Hibernation. ● On: A battery is charging. ● Blinking: A battery that is the only available power source has reached a low battery level or a critical battery level. ● Off: If the computer is plugged into an external...

Notebook Tour - Windows Vista
Page 13
Front components 7 Front components Component (1) Audio-out (headphone) jack (2) Audio-in (microphone) jack Description Produces system sound when connected to optional powered stereo speakers, headphones, ear buds, a headset, or television audio. Connects an optional computer headset microphone, stereo array microphone, or monaural microphone.
Front components 7 Front components Component (1) Audio-out (headphone) jack (2) Audio-in (microphone) jack Description Produces system sound when connected to optional powered stereo speakers, headphones, ear buds, a headset, or television audio. Connects an optional computer headset microphone, stereo array microphone, or monaural microphone.
Notebook Tour - Windows Vista
Page 15
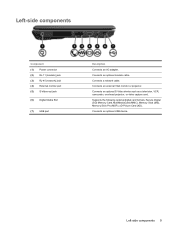
... digital card formats: Secure Digital (SD) Memory Card, MultiMediaCard (MMC), Memory Stick (MS), Memory Stick Pro (MSP), xD-Picture Card (XD). Left-side components Component (1) Power connector (2) RJ-11 (modem) jack (3) RJ-45 (network) jack (4) External monitor port (5) S-Video-out jack (6) Digital Media Slot (7) USB port Description Connects an AC adapter...
... digital card formats: Secure Digital (SD) Memory Card, MultiMediaCard (MMC), Memory Stick (MS), Memory Stick Pro (MSP), xD-Picture Card (XD). Left-side components Component (1) Power connector (2) RJ-11 (modem) jack (3) RJ-45 (network) jack (4) External monitor port (5) S-Video-out jack (6) Digital Media Slot (7) USB port Description Connects an AC adapter...

Notebook Tour - Windows Vista
Page 18
Additional hardware components Component Description (1) Power cord* Connects an AC adapter to an AC outlet. (2) AC adapter Converts AC power to DC power. (3) Battery* Powers the computer when the computer is not plugged into external power. *Batteries and power cords vary in appearance by region and country. 12 Chapter 2 Components
Additional hardware components Component Description (1) Power cord* Connects an AC adapter to an AC outlet. (2) AC adapter Converts AC power to DC power. (3) Battery* Powers the computer when the computer is not plugged into external power. *Batteries and power cords vary in appearance by region and country. 12 Chapter 2 Components


