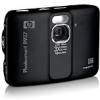

User Guide
Page 3
... software...8 Using your camera...8 Using the Touch Screen interface 8 Related information...9 2 Taking pictures and recording video clips Taking pictures...12 Recording video clips...12 Instant Review...12 Auto focus and exposure...12 Optimizing focus...13 Using Focus Lock...13 Optimizing exposure...14 Using zoom...14 Optical zoom...14 Digital zoom...15...
... software...8 Using your camera...8 Using the Touch Screen interface 8 Related information...9 2 Taking pictures and recording video clips Taking pictures...12 Recording video clips...12 Instant Review...12 Auto focus and exposure...12 Optimizing focus...13 Using Focus Lock...13 Optimizing exposure...14 Using zoom...14 Optical zoom...14 Digital zoom...15...
User Guide
Page 4
... video clips Using Playback...24 Reviewing videos...25 Deleting images...25 Viewing thumbnails...26 Magnifying images...26 Using the Playback Menu...26 Viewing slideshows...27 Tagging images ...27 Stitching ... Cropping images...33 6 Transferring and printing images Transferring images with HP Photosmart Software 34 Transferring images without HP Photosmart Software 35 Connecting to the computer 35 Using a memory card reader 36 Printing directly to a printer...36 7 Using HP Photosmart Express Using the Photosmart Express Menu 38 Marking images for printing...39 Buying prints online......
... video clips Using Playback...24 Reviewing videos...25 Deleting images...25 Viewing thumbnails...26 Magnifying images...26 Using the Playback Menu...26 Viewing slideshows...27 Tagging images ...27 Stitching ... Cropping images...33 6 Transferring and printing images Transferring images with HP Photosmart Software 34 Transferring images without HP Photosmart Software 35 Connecting to the computer 35 Using a memory card reader 36 Printing directly to a printer...36 7 Using HP Photosmart Express Using the Photosmart Express Menu 38 Marking images for printing...39 Buying prints online......

User Guide
Page 6
...light. 4 selector-Switches between Picture Capture, Video Record, and Playback (see "Taking pictures" on page 12, "Recording video clips" on page 12, and "Reviewing images and video clips" on page 24). 5 Shutter button. 6 Zoom lever-Accesses / Zoom (see "Using zoom" on page 14), Thumbnails (see "...(see "Using the Touch Screen interface" on page 8). 11 Touch Screen Image Display- Frames images when in Picture Capture or Video Record, reviews images when in Playback, and provides a Touch Screen interface for camera operations (see "Using the Touch Screen interface" on page 8). 4 ...
...light. 4 selector-Switches between Picture Capture, Video Record, and Playback (see "Taking pictures" on page 12, "Recording video clips" on page 12, and "Reviewing images and video clips" on page 24). 5 Shutter button. 6 Zoom lever-Accesses / Zoom (see "Using zoom" on page 14), Thumbnails (see "...(see "Using the Touch Screen interface" on page 8). 11 Touch Screen Image Display- Frames images when in Picture Capture or Video Record, reviews images when in Playback, and provides a Touch Screen interface for camera operations (see "Using the Touch Screen interface" on page 8). 4 ...
User Guide
Page 10
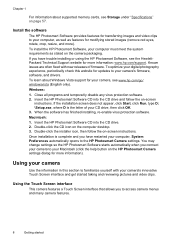
... (click the help button on -screen instructions. You may change settings so the HP Photosmart Software starts automatically when you have trouble installing or using the HP Photosmart Software, see www.hp.com/go/ windowsvista (English only). Using your camera Use the information in this ...computer, System Preferences automatically opens to access camera menus and many camera features. 8 Getting started taking and reviewing pictures and video clips. Insert the HP Photosmart Software CD into the CD drive and follow the on the camera packaging. Once installation is the letter of...
... (click the help button on -screen instructions. You may change settings so the HP Photosmart Software starts automatically when you have trouble installing or using the HP Photosmart Software, see www.hp.com/go/ windowsvista (English only). Using your camera Use the information in this ...computer, System Preferences automatically opens to access camera menus and many camera features. 8 Getting started taking and reviewing pictures and video clips. Insert the HP Photosmart Software CD into the CD drive and follow the on the camera packaging. Once installation is the letter of...

User Guide
Page 11
Press to turn off the touch buttons. Tips on page 24. For information on reviewing and tagging images and video clips on the camera See "Reviewing images and video clips" on using the stylus. For information on setting picture capture and See "Setting options for the Touch ... online destinations See "Sharing images" on page 16. For information on setting up and sending images to a computer See "Transferring images with HP Photosmart Software" on the task you are framing an image or video clip, you have unexpected results, try using the Touch Screen: • ...
Press to turn off the touch buttons. Tips on page 24. For information on reviewing and tagging images and video clips on the camera See "Reviewing images and video clips" on using the stylus. For information on setting picture capture and See "Setting options for the Touch ... online destinations See "Sharing images" on page 16. For information on setting up and sending images to a computer See "Transferring images with HP Photosmart Software" on the task you are framing an image or video clip, you have unexpected results, try using the Touch Screen: • ...
User Guide
Page 14
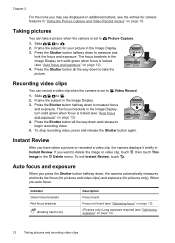
... the Delete menu. When you want to begin recording video. 5. Press the Shutter button halfway down to measure focus and exposure. Instant Review After you press the Shutter button halfway down, the camera automatically measures and locks the focus (for pictures and video clips) and exposure ...(for pictures only). Auto focus and exposure When you have taken a picture or recorded a video clip, the camera displays it briefly in Instant Review. Taking pictures You can record a video clip when the camera is locked (see "Auto focus and exposure" on page 12). 4. To stop ...
... the Delete menu. When you want to begin recording video. 5. Press the Shutter button halfway down to measure focus and exposure. Instant Review After you press the Shutter button halfway down, the camera automatically measures and locks the focus (for pictures and video clips) and exposure ...(for pictures only). Auto focus and exposure When you have taken a picture or recorded a video clip, the camera displays it briefly in Instant Review. Taking pictures You can record a video clip when the camera is locked (see "Auto focus and exposure" on page 12). 4. To stop ...

User Guide
Page 20
...otherwise noted, the setting remains in the panoramic sequence. 3. Touch or if necessary to display the option you turn off the camera (see "Instant Review" on page 12), each image in Picture Capture, touch the icon corresponding to the current shooting mode ( by default). TIP: If a button...left), touch OK, then touch to return to end the panoramic sequence. Position the camera to take the second picture. 5. During Instant Review (see "Setting Remembered Settings" on page 43). 18 Setting options for taking pictures while the Video Record Menu displays only features available for...
...otherwise noted, the setting remains in the panoramic sequence. 3. Touch or if necessary to display the option you turn off the camera (see "Instant Review" on page 12), each image in Picture Capture, touch the icon corresponding to the current shooting mode ( by default). TIP: If a button...left), touch OK, then touch to return to end the panoramic sequence. Position the camera to take the second picture. 5. During Instant Review (see "Setting Remembered Settings" on page 43). 18 Setting options for taking pictures while the Video Record Menu displays only features available for...
User Guide
Page 22
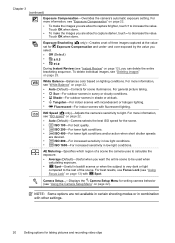
...; to increase the value. For more information, see "Deleting images" on lighting conditions. For best results, use Focus Lock (see "Instant Review" on page 13) with fluorescent lighting. Chapter 3 (continued) Exposure Compensation-Overrides the camera's automatic exposure setting. ISO Speed ( only)-Adjusts ... Spot. and over-exposed by the value you select. • Off (Default) • ± 0.5 • ±1.0 During Instant Review (see "Using Focus Lock" on page 12), you want the entire scene to be used when calculating exposure. • Spot-Useful in low...
...; to increase the value. For more information, see "Deleting images" on lighting conditions. For best results, use Focus Lock (see "Instant Review" on page 13) with fluorescent lighting. Chapter 3 (continued) Exposure Compensation-Overrides the camera's automatic exposure setting. ISO Speed ( only)-Adjusts ... Spot. and over-exposed by the value you select. • Off (Default) • ± 0.5 • ±1.0 During Instant Review (see "Using Focus Lock" on page 12), you want the entire scene to be used when calculating exposure. • Spot-Useful in low...
User Guide
Page 23
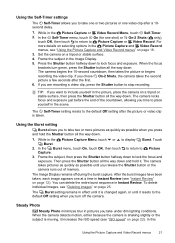
... hold the Shutter button all the way down . 1. The Image Display remains off the camera. Steady Photo Steady Photo minimizes blur in Instant Review (see "Using the Picture Capture and Video Record menus" on a tripod or stable surface, then press the Shutter button all the way down...images" on a tripod or stable surface. 4. To delete individual images, see "ISO speed" on page 12). The Burst setting remains in Instant Review. When the camera detects motion, either because the camera is shaking slightly or the subject is taken. In this Using the Picture Capture and Video...
... hold the Shutter button all the way down . 1. The Image Display remains off the camera. Steady Photo Steady Photo minimizes blur in Instant Review (see "Using the Picture Capture and Video Record menus" on a tripod or stable surface, then press the Shutter button all the way down...images" on a tripod or stable surface. 4. To delete individual images, see "ISO speed" on page 12). The Burst setting remains in Instant Review. When the camera detects motion, either because the camera is shaking slightly or the subject is taken. In this Using the Picture Capture and Video...
User Guide
Page 26
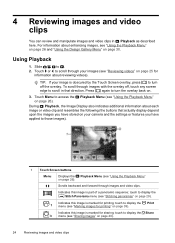
...in Playback as described here. Indicates this image is marked for information about reviewing videos). touch to those images). 1 Touch Screen buttons Menu Displays the Playback Menu (see "Reviewing videos" on page 40). 24 Reviewing images and video clips Using Playback 1. During Playback, the Image Display ...(see "Sharing images" on page 25 for sharing; touch to turn the overlay back on page 29). 4 Reviewing images and video clips You can review and manipulate images and video clips in that actually display depend upon the images you have stored on your camera ...
...in Playback as described here. Indicates this image is marked for information about reviewing videos). touch to those images). 1 Touch Screen buttons Menu Displays the Playback Menu (see "Reviewing videos" on page 40). 24 Reviewing images and video clips Using Playback 1. During Playback, the Image Display ...(see "Sharing images" on page 25 for sharing; touch to turn the overlay back on page 29). 4 Reviewing images and video clips You can review and manipulate images and video clips in that actually display depend upon the images you have stored on your camera ...
User Guide
Page 27
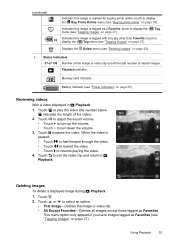
.... touch to display the Tag menu (see "Tagging images" on page 55). Memory card indicator. When the video is tagged as Favorites. Using Playback 25 Reviewing videos With a video displayed in Playback: 1. touch to display the Buy Prints Online menu (see "Tagging images" on page 39). Touch or to turn down...
.... touch to display the Tag menu (see "Tagging images" on page 55). Memory card indicator. When the video is tagged as Favorites. Using Playback 25 Reviewing videos With a video displayed in Playback: 1. touch to display the Buy Prints Online menu (see "Tagging images" on page 39). Touch or to turn down...

User Guide
Page 28
... all stored files, then formats the internal memory or memory card. 3. The currently displayed image is for viewing purposes only; Use and to Playback. 26 Reviewing images and video clips Touch or to Playback. Touch any option to select the option, or touch to exit without deleting and return to scroll...
... all stored files, then formats the internal memory or memory card. 3. The currently displayed image is for viewing purposes only; Use and to Playback. 26 Reviewing images and video clips Touch or to Playback. Touch any option to select the option, or touch to exit without deleting and return to scroll...
User Guide
Page 30
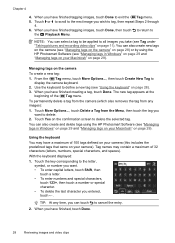
..., numbers, special characters, and spaces). Tag names may have finished tagging images, touch Done to the next image you have finished, touch Done. 28 Reviewing images and video clips From the Tag menu, touch More Options..., then touch Create New Tag to the Playback Menu. The new tag appears at...the Tag menu. You can also create new tags on the camera (see "Managing tags on the camera" on page 28) or by using the HP Photosmart Software (see Tag under "Taking pictures and recording video clips" on page 11). When you have finished tagging images, touch Done, then touch to ...
..., numbers, special characters, and spaces). Tag names may have finished tagging images, touch Done to the next image you have finished, touch Done. 28 Reviewing images and video clips From the Tag menu, touch More Options..., then touch Create New Tag to the Playback Menu. The new tag appears at...the Tag menu. You can also create new tags on the camera (see "Managing tags on the camera" on page 28) or by using the HP Photosmart Software (see Tag under "Taking pictures and recording video clips" on page 11). When you have finished tagging images, touch Done, then touch to ...
User Guide
Page 36
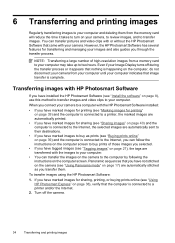
...is happening on the computer, do not disconnect your camera from a memory card to a printer and/or the Internet. 2. However, the HP Photosmart Software has several features for transferring and managing your computer may take up to two hours. NOTE: Transferring a large number of those images...8226; If you have marked images to buy prints of high-resolution images from your computer until your camera, to review images, and to transfer images. When you connect your camera to a computer with the HP Photosmart Software installed: • If you through the transfer process.
...is happening on the computer, do not disconnect your camera from a memory card to a printer and/or the Internet. 2. However, the HP Photosmart Software has several features for transferring and managing your computer may take up to two hours. NOTE: Transferring a large number of those images...8226; If you have marked images to buy prints of high-resolution images from your computer until your camera, to review images, and to transfer images. When you connect your camera to a computer with the HP Photosmart Software installed: • If you through the transfer process.

User Guide
Page 48
... a large number of the camera buttons do not respond when the camera is connected to your computer (see "Resetting the camera" on page 34) and review them there. Transfer stored files to your computer, then format the internal memory or the memory card (see "Install and format an optional memory card...
... a large number of the camera buttons do not respond when the camera is connected to your computer (see "Resetting the camera" on page 34) and review them there. Transfer stored files to your computer, then format the internal memory or the memory card (see "Install and format an optional memory card...
User Guide
Page 51
...the camera" on page 44). • If the problem persists, contact Hewlett-Packard Technical Support (see "Transferring and printing images" on page 34) and review them there. • See "Storage" on page 58 and "Memory capacity" on page 58 for signs of images stored on your memory card. The ...camera gets warm (or even hot) to review images. 49 For best image quality, turn off the camera when not using Better or Good ; Video recording terminates abruptly. Video recording terminates ...
...the camera" on page 44). • If the problem persists, contact Hewlett-Packard Technical Support (see "Transferring and printing images" on page 34) and review them there. • See "Storage" on page 58 and "Memory capacity" on page 58 for signs of images stored on your memory card. The ...camera gets warm (or even hot) to review images. 49 For best image quality, turn off the camera when not using Better or Good ; Video recording terminates abruptly. Video recording terminates ...
User Guide
Page 54
...'s Help screens. 2. Camera tips, product registration, newsletter subscriptions, driver and software updates, purchase HP supplies and accessories Customers with disabilities Hewlett-Packard Technical Support; Consult the product documentation. • Review "Troubleshooting" on page 44 in this document. • Review the electronic Help section within the software. • Refer to your camera's software, drivers...
...'s Help screens. 2. Camera tips, product registration, newsletter subscriptions, driver and software updates, purchase HP supplies and accessories Customers with disabilities Hewlett-Packard Technical Support; Consult the product documentation. • Review "Troubleshooting" on page 44 in this document. • Review the electronic Help section within the software. • Refer to your camera's software, drivers...
User Guide
Page 57
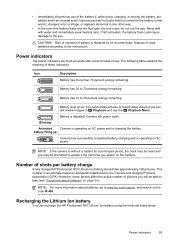
.... battery filling up Camera has successfully completed battery charging and is an estimate based on AC power. Recharging the Lithium Ion battery You can still review images in any other way. • In the event the battery leaks and the fluid gets into one's eye, do not rub the eye... charging, or storing the battery, the battery emits an unusual smell, feels excessively hot (note that it the next time you can recharge the HP Photosmart R07 Lithium Ion battery using the methods listed below. If left untreated, the battery fluid could cause damage to feel warm), changes color or shape...
.... battery filling up Camera has successfully completed battery charging and is an estimate based on AC power. Recharging the Lithium Ion battery You can still review images in any other way. • In the event the battery leaks and the fluid gets into one's eye, do not rub the eye... charging, or storing the battery, the battery emits an unusual smell, feels excessively hot (note that it the next time you can recharge the HP Photosmart R07 Lithium Ion battery using the methods listed below. If left untreated, the battery fluid could cause damage to feel warm), changes color or shape...
User Guide
Page 62
...Instant Review 12, 18, 21 internal memory 11, 58 ISO Speed 20, 22 K keyboard 28 F F-number 57 flash settings 16 working range 57 focal length 57 focus auto focus 12 brackets 12 focus lock 13 optimizing 13 settings 57 format memory card 7 G getting assistance 52 H HP Photosmart Express 38, 39 HP Photosmart ... Magnify control 4 magnifying images 26 memory capacity 58 card 11 card door 5 memory card 7, 58 menus Camera Setup 42 Design Gallery 30 Photosmart Express 38 Picture Capture 18 Playback 26 Video Record 18 microphone 5 modifying colors 32 Move Images to Card 27 N Night Portrait mode 17 ...
...Instant Review 12, 18, 21 internal memory 11, 58 ISO Speed 20, 22 K keyboard 28 F F-number 57 flash settings 16 working range 57 focal length 57 focus auto focus 12 brackets 12 focus lock 13 optimizing 13 settings 57 format memory card 7 G getting assistance 52 H HP Photosmart Express 38, 39 HP Photosmart ... Magnify control 4 magnifying images 26 memory capacity 58 card 11 card door 5 memory card 7, 58 menus Camera Setup 42 Design Gallery 30 Photosmart Express 38 Picture Capture 18 Playback 26 Video Record 18 microphone 5 modifying colors 32 Move Images to Card 27 N Night Portrait mode 17 ...

User Guide
Page 63
Index O on/off 6 online destinations 40 print buying 39 optical zoom 14 P Panorama mode 17, 29 parts of camera 4, 5 Photosmart Express Menu buying prints online 39 marking images for printing 39 sharing images 40 Picture Capture Menu 18 pictures 12, 21 Playback 24 Playback ...clips 12 red-eye removal 16, 30 Region 6 remaining pictures count 11 Remembered Settings 42 removing red eyes 30 reset camera 44 resolution 57 reviewing images 24 reviewing videos 25 rotating images 31 S safety precautions for batteries 54, 56 selecting images for destinations 40, 41 selecting images for printing 39 Self-...
Index O on/off 6 online destinations 40 print buying 39 optical zoom 14 P Panorama mode 17, 29 parts of camera 4, 5 Photosmart Express Menu buying prints online 39 marking images for printing 39 sharing images 40 Picture Capture Menu 18 pictures 12, 21 Playback 24 Playback ...clips 12 red-eye removal 16, 30 Region 6 remaining pictures count 11 Remembered Settings 42 removing red eyes 30 reset camera 44 resolution 57 reviewing images 24 reviewing videos 25 rotating images 31 S safety precautions for batteries 54, 56 selecting images for destinations 40, 41 selecting images for printing 39 Self-...
