User Guide
Page 4
... images with HP Photosmart Software 34 Transferring images without HP Photosmart Software 35 Connecting to the computer 35 Using a memory card reader 36 Printing directly to a printer...36 7 Using HP Photosmart Express Using the Photosmart Express Menu ...38 Marking images for printing...39 Buying prints online...39 Sharing images...40 Setting up online destinations in the camera 40 Sending images to online destinations 41 8 Using the Camera Setup Menu Setting Remembered Settings 43 Modifying Date and Time...43 9 Troubleshooting...
... images with HP Photosmart Software 34 Transferring images without HP Photosmart Software 35 Connecting to the computer 35 Using a memory card reader 36 Printing directly to a printer...36 7 Using HP Photosmart Express Using the Photosmart Express Menu ...38 Marking images for printing...39 Buying prints online...39 Sharing images...40 Setting up online destinations in the camera 40 Sending images to online destinations 41 8 Using the Camera Setup Menu Setting Remembered Settings 43 Modifying Date and Time...43 9 Troubleshooting...
User Guide
Page 15
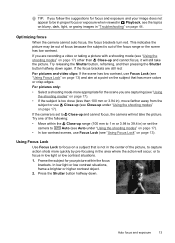
... indicates the picture may be in proper focus or exposure when viewed in Playback, see the topics on blurry, dark, light, or grainy images in "Troubleshooting" on page 17) other than 100 mm or 3.94 in low light or low contrast situations. 1. If you are still red: For pictures and video...
... indicates the picture may be in proper focus or exposure when viewed in Playback, see the topics on blurry, dark, light, or grainy images in "Troubleshooting" on page 17) other than 100 mm or 3.94 in low light or low contrast situations. 1. If you are still red: For pictures and video...
User Guide
Page 46
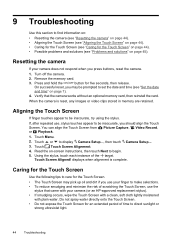
Verify that came with your camera (or an HP-approved replacement stylus). • If smudging occurs, wipe the Touch Screen with a clean, soft cloth lightly moistened with plain water. You can align the Touch ... set the date and time (see "Set the date and time" on -screen instructions, then touch Next to direct sunlight or strong ultraviolet light. 44 Troubleshooting Press and hold the button for the Touch Screen" on page 45). Aligning the Touch Screen If finger touches appear to display Camera Setup..., then...
Verify that came with your camera (or an HP-approved replacement stylus). • If smudging occurs, wipe the Touch Screen with a clean, soft cloth lightly moistened with plain water. You can align the Touch ... set the date and time (see "Set the date and time" on -screen instructions, then touch Next to direct sunlight or strong ultraviolet light. 44 Troubleshooting Press and hold the button for the Touch Screen" on page 45). Aligning the Touch Screen If finger touches appear to display Camera Setup..., then...

User Guide
Page 48
... seconds for the camera to your computer, then format the internal memory or the memory card (see "Transferring and printing images" on page 44). 46 Troubleshooting Press to a computer. • Replace or recharge the battery. • Reset the camera (see "Resetting the camera" on page 34) and review them there. When...
... seconds for the camera to your computer, then format the internal memory or the memory card (see "Transferring and printing images" on page 44). 46 Troubleshooting Press to a computer. • Replace or recharge the battery. • Reset the camera (see "Resetting the camera" on page 34) and review them there. When...
User Guide
Page 50
... images regardless of images stored on a memory card increases the time the camera takes to a different position or press any data on page 44 ). 48 Troubleshooting I can put on a memory card. Remove the memory card and see "Resetting the camera" on the memory card that does not support 4GB or larger...
... images regardless of images stored on a memory card increases the time the camera takes to a different position or press any data on page 44 ). 48 Troubleshooting I can put on a memory card. Remove the memory card and see "Resetting the camera" on the memory card that does not support 4GB or larger...

User Guide
Page 52
...make changes, or to view the camera software help system. • Refer to the Hewlett-Packard Technical Support website: www.hp.com/support. 50 Troubleshooting Close the HP Photosmart Software, disconnect the camera from the computer, and reset the camera (see "Resetting the camera" on page 44). For ...my camera. Having a large number of time it is ready to transfer images from the camera to my computer. • Either install the HP Photosmart Software (see "Install the software" on page 8), or see "Install and format an optional memory card" on page 7). Then restart the ...
...make changes, or to view the camera software help system. • Refer to the Hewlett-Packard Technical Support website: www.hp.com/support. 50 Troubleshooting Close the HP Photosmart Software, disconnect the camera from the computer, and reset the camera (see "Resetting the camera" on page 44). For ...my camera. Having a large number of time it is ready to transfer images from the camera to my computer. • Either install the HP Photosmart Software (see "Install the software" on page 8), or see "Install and format an optional memory card" on page 7). Then restart the ...
User Guide
Page 54
... in this section to find support information for your camera. • Valuable product and troubleshooting information for your digital camera, including links to all HP customers. Camera tips, product registration, newsletter subscriptions, driver and software updates, purchase HP supplies and accessories Customers with disabilities Hewlett-Packard Technical Support; support information Windows Vista support...
... in this section to find support information for your camera. • Valuable product and troubleshooting information for your digital camera, including links to all HP customers. Camera tips, product registration, newsletter subscriptions, driver and software updates, purchase HP supplies and accessories Customers with disabilities Hewlett-Packard Technical Support; support information Windows Vista support...

User Guide
Page 63
Index O on/off 6 online destinations 40 print buying 39 optical zoom 14 P Panorama mode 17, 29 parts of camera 4, 5 Photosmart Express Menu buying prints online 39 marking images for printing 39 sharing images 40 Picture Capture Menu 18 pictures 12, 21 Playback 24 Playback Menu ... Theatre mode 17 Thumbnails 26 Thumbnails control 4 Time & Date 7, 42 Touch Screen aligning 44 caring for 44 Touch Screen Alignment 42 transfer images 34, 35 troubleshooting 44 turn on/off power 6 U USB configuration 35, 42 V video clips 12, 19, 59 Video Quality 19, 59 Video Record Menu 18 videos, reviewing 25...
Index O on/off 6 online destinations 40 print buying 39 optical zoom 14 P Panorama mode 17, 29 parts of camera 4, 5 Photosmart Express Menu buying prints online 39 marking images for printing 39 sharing images 40 Picture Capture Menu 18 pictures 12, 21 Playback 24 Playback Menu ... Theatre mode 17 Thumbnails 26 Thumbnails control 4 Time & Date 7, 42 Touch Screen aligning 44 caring for 44 Touch Screen Alignment 42 transfer images 34, 35 troubleshooting 44 turn on/off power 6 U USB configuration 35, 42 V video clips 12, 19, 59 Video Quality 19, 59 Video Record Menu 18 videos, reviewing 25...
Quick Start Guide
Page 4
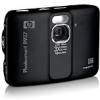
...; Descriptions of the power indicator icons • Troubleshooting • Getting assistance from HP • Camera specifications Accessing the electronic User Guide The electronic User Guide is on page 4). For detailed information about camera features, see the electronic User Guide (see Accessing the electronic User Guide on the HP Photosmart Software CD. 4 HP Photosmart R930 series Digital Camera
...; Descriptions of the power indicator icons • Troubleshooting • Getting assistance from HP • Camera specifications Accessing the electronic User Guide The electronic User Guide is on page 4). For detailed information about camera features, see the electronic User Guide (see Accessing the electronic User Guide on the HP Photosmart Software CD. 4 HP Photosmart R930 series Digital Camera