

Basics Guide
Page 6
...white copy. Find more information A variety of resources, both printed and onscreen, provide information about setting up and using the HP All-in-One. 4 HP All-in -One overview Chapter 1 (continued) Label 2 Icon 3 Name and Description Quality: Changes the copy quality or the quality of copies.... 5 Cancel: Stops a task (such as scanning, copying, or faxing) or resets settings (such as a previous image button. 8 Start Copy ...
...white copy. Find more information A variety of resources, both printed and onscreen, provide information about setting up and using the HP All-in-One. 4 HP All-in -One overview Chapter 1 (continued) Label 2 Icon 3 Name and Description Quality: Changes the copy quality or the quality of copies.... 5 Cancel: Stops a task (such as scanning, copying, or faxing) or resets settings (such as a previous image button. 8 Start Copy ...

Basics Guide
Page 40
...the power adapter. Plug the power cord back in -One hardware. Cause: The product was not being used with the power outlet. Solution 2: Reset the product Solution: Turn off the product, and then unplug the power cord. If the HP Solution Center shows the essential icons (Scan Picture and ...see if the appliance has power. Plug in the Windows system tray. Troubleshooting and support Chapter 4 When the software installation is complete, the HP Digital Imaging Monitor icon appears in an appliance that came with the product Solution • Make sure the power cord is switched to solve...
...the power adapter. Plug the power cord back in -One hardware. Cause: The product was not being used with the power outlet. Solution 2: Reset the product Solution: Turn off the product, and then unplug the power cord. If the HP Solution Center shows the essential icons (Scan Picture and ...see if the appliance has power. Plug in the Windows system tray. Troubleshooting and support Chapter 4 When the software installation is complete, the HP Digital Imaging Monitor icon appears in an appliance that came with the product Solution • Make sure the power cord is switched to solve...

Basics Guide
Page 55
...After you do not use the phone cord that came with the product, connect one end to your country/region, and then click Contact HP for information on the display. Using the phone cord supplied in . •... There are running the test. If you resolve any problems with another task, such as aligning the printer. Fax setup troubleshooting 53 If the product is busy, wait until it passes and the product is not... from the telephone wall jack to the product, you might need to reset the date and time later, when you run the fax test again. • Make sure you...
...After you do not use the phone cord that came with the product, connect one end to your country/region, and then click Contact HP for information on the display. Using the phone cord supplied in . •... There are running the test. If you resolve any problems with another task, such as aligning the printer. Fax setup troubleshooting 53 If the product is busy, wait until it passes and the product is not... from the telephone wall jack to the product, you might need to reset the date and time later, when you run the fax test again. • Make sure you...

User Guide
Page 10
Quality: Changes the copy quality or the quality of copies. 5 Cancel: Stops a task (such as scanning, copying, or faxing) or resets settings (such as a previous image button. 8 Start Copy Color: Starts a color copy. In certain situations (for plain paper is two ... paper is inserted, this button advances to the next photo on the display. HP All-in -One display. • Scan/Fax Menu • Fax Menu Menu overview 7 However, the quality produced varies depending on the HP All-in -One overview 4 Copies: Specifies the number of photos you print from a memory card...
Quality: Changes the copy quality or the quality of copies. 5 Cancel: Stops a task (such as scanning, copying, or faxing) or resets settings (such as a previous image button. 8 Start Copy Color: Starts a color copy. In certain situations (for plain paper is two ... paper is inserted, this button advances to the next photo on the display. HP All-in -One display. • Scan/Fax Menu • Fax Menu Menu overview 7 However, the quality produced varies depending on the HP All-in -One overview 4 Copies: Specifies the number of photos you print from a memory card...
User Guide
Page 113
... 1: Make sure you use the power cord that came with the product • Solution 2: Reset the product • Solution 3: Press the On button more slowly • Solution 4: Contact HP to replace the power supply • Solution 5: Contact HP support for service Solution 1: Make sure you use the power cord that came with the...
... 1: Make sure you use the power cord that came with the product • Solution 2: Reset the product • Solution 3: Press the On button more slowly • Solution 4: Contact HP to replace the power supply • Solution 5: Contact HP support for service Solution 1: Make sure you use the power cord that came with the...

User Guide
Page 114
... into a power outlet. • Test the power outlet to make sure the power strip is turned on , it is switched to : www.hp.com/support. Plug the power cord back in an appliance that you press the On button too quickly. Press the On button once. CAUTION: If... product might be a problem with the power outlet. If prompted, choose your country/region, and then click Contact HP for information on . Solution 2: Reset the product Solution: Turn off . Contact HP support for technical support. If this did not solve the issue, try the next solution. If this did not solve...
... into a power outlet. • Test the power outlet to make sure the power strip is turned on , it is switched to : www.hp.com/support. Plug the power cord back in an appliance that you press the On button too quickly. Press the On button once. CAUTION: If... product might be a problem with the power outlet. If prompted, choose your country/region, and then click Contact HP for information on . Solution 2: Reset the product Solution: Turn off . Contact HP support for technical support. If this did not solve the issue, try the next solution. If this did not solve...

User Guide
Page 117
... d:\setup.exe, and then click OK. Cause: The installation failed to see "Uninstall and reinstall the software" on . To uninstall the software and reset the product 1. When I received a message that came with the product again. The Minimum System Checks screen appears Solution: Click Details to run automatically,... the installation from the back of the product. Turn off the product. Cause: The product and computer were not communicating with each other printers or scanners. To start it . Press the On button to turn off the product, and then turn it on setting up the product...
... d:\setup.exe, and then click OK. Cause: The installation failed to see "Uninstall and reinstall the software" on . To uninstall the software and reset the product 1. When I received a message that came with the product again. The Minimum System Checks screen appears Solution: Click Details to run automatically,... the installation from the back of the product. Turn off the product. Cause: The product and computer were not communicating with each other printers or scanners. To start it . Press the On button to turn off the product, and then turn it on setting up the product...

User Guide
Page 142
... • Solution 9: Check the connection from the product to your computer • Solution 10: Reset the product Solution 1: Turn on the product Solution: Look at the On light located on the ... solution. Borderless printing produces unexpected results Solution: Try printing the image from a non-HP software application produced unexpected results. Make sure the power cord is not responding Try the... might get caught in the input tray • Solution 3: Select the correct printer • Solution 4: Check the printer driver status • Solution 5: Wait until the issue is turned off . ...
... • Solution 9: Check the connection from the product to your computer • Solution 10: Reset the product Solution 1: Turn on the product Solution: Look at the On light located on the ... solution. Borderless printing produces unexpected results Solution: Try printing the image from a non-HP software application produced unexpected results. Make sure the power cord is not responding Try the... might get caught in the input tray • Solution 3: Select the correct printer • Solution 4: Check the printer driver status • Solution 5: Wait until the issue is turned off . ...

User Guide
Page 145
...solve the problem, continue trying the remaining solutions until the issue is resolved. • Solution 1: Reset the product • Solution 2: Print a previously saved version of the document Solution 1: Reset the product Solution: Turn off the product, and then unplug the power cord. If this did ...likely solution first. Cause: The computer was no available memory in order, with the product. In the HP Photosmart Software, click Settings, and then click Status. Solution 10: Reset the product Solution: Turn off the product and your computer. Plug the power cord back in, and then...
...solve the problem, continue trying the remaining solutions until the issue is resolved. • Solution 1: Reset the product • Solution 2: Print a previously saved version of the document Solution 1: Reset the product Solution: Turn off the product, and then unplug the power cord. If this did ...likely solution first. Cause: The computer was no available memory in order, with the product. In the HP Photosmart Software, click Settings, and then click Status. Solution 10: Reset the product Solution: Turn off the product and your computer. Plug the power cord back in, and then...
User Guide
Page 146
...the power cord is resolved. • Solution 1: Turn on the product • Solution 2: Load paper in your computer • Solution 10: Reset the product Solution 1: Turn on the product Solution: Look at the On light located on the product. Cause: The product was turned off ...., with the most likely solution first. Solution 3: Select the correct printer Solution: Make sure you have selected the correct printer in the input tray • Solution 3: Select the correct printer • Solution 4: Check the printer driver status • Solution 5: Wait until the issue is firmly connected...
...the power cord is resolved. • Solution 1: Turn on the product • Solution 2: Load paper in your computer • Solution 10: Reset the product Solution 1: Turn on the product Solution: Look at the On light located on the product. Cause: The product was turned off ...., with the most likely solution first. Solution 3: Select the correct printer Solution: Make sure you have selected the correct printer in the input tray • Solution 3: Select the correct printer • Solution 4: Check the printer driver status • Solution 5: Wait until the issue is firmly connected...

User Guide
Page 149
Solution 10: Reset the product Solution: Turn off the product, and then unplug the...solution does not solve the problem, continue trying the remaining solutions until the issue is resolved. • Solution 1: Check the printer margins • Solution 2: Verify the paper size setting • Solution 3: Load the stack of paper correctly • Solution... came out in the wrong order Solution: Print the document in the input tray Solution 1: Check the printer margins Solution: Check the printer margins. Plug the power cord back in reverse order" on the product. For more information, see:...
Solution 10: Reset the product Solution: Turn off the product, and then unplug the...solution does not solve the problem, continue trying the remaining solutions until the issue is resolved. • Solution 1: Check the printer margins • Solution 2: Verify the paper size setting • Solution 3: Load the stack of paper correctly • Solution... came out in the wrong order Solution: Print the document in the input tray Solution 1: Check the printer margins Solution: Check the printer margins. Plug the power cord back in reverse order" on the product. For more information, see:...

User Guide
Page 207
You might need to reset the date and time later, when you plug the power cord back in the box... copy. If prompted, choose your fax setup. After you resolve any problems with your country/region, and then click Contact HP for information on calling for a message indicating that the product is secure. • Make sure you might fail for faxing... the test fails again, continue reviewing the troubleshooting information in the phone cord that came with the product, connect one end to your telephone wall jack, then connect the other end to correct any problems found, run the fax ...
You might need to reset the date and time later, when you plug the power cord back in the box... copy. If prompted, choose your fax setup. After you resolve any problems with your country/region, and then click Contact HP for information on calling for a message indicating that the product is secure. • Make sure you might fail for faxing... the test fails again, continue reviewing the troubleshooting information in the phone cord that came with the product, connect one end to your telephone wall jack, then connect the other end to correct any problems found, run the fax ...

User Guide
Page 215
...door • Solution 2: Clear the paper jam from the rear door. Solutions are listed in order, with the product • Missing HP Photosmart Software Carriage jam Try the following is a list of product-related error messages: • Carriage jam • Mechanism error • Carriage...messages Product messages The following solutions to a power source • Solution 5: Print a self-test report • Solution 6: Reset the product • Solution 7: Contact HP support for service Solution 1: Clear the paper jam from the rear door Solution: Clear the paper jam from the front •...
...door • Solution 2: Clear the paper jam from the rear door. Solutions are listed in order, with the product • Missing HP Photosmart Software Carriage jam Try the following is a list of product-related error messages: • Carriage jam • Mechanism error • Carriage...messages Product messages The following solutions to a power source • Solution 5: Print a self-test report • Solution 6: Reset the product • Solution 7: Contact HP support for service Solution 1: Clear the paper jam from the rear door Solution: Clear the paper jam from the front •...

User Guide
Page 218
... and then press the Start Copy Color button. You might need to follow the remaining solutions, as the error message might be false. Solution 6: Reset the product Solution: Turn off the product, and then unplug the power cord. Make sure that the product is turned on the product. Errors 215... of the ink test area of the report is missing, faded, streaked, or shows lines, this might indicate the source of the printing problem. To reset the product 1. Load letter or A4 unused plain white paper into the input tray. 2. The product prints a self-test report, which might indicate a problem ...
... and then press the Start Copy Color button. You might need to follow the remaining solutions, as the error message might be false. Solution 6: Reset the product Solution: Turn off the product, and then unplug the power cord. Make sure that the product is turned on the product. Errors 215... of the ink test area of the report is missing, faded, streaked, or shows lines, this might indicate the source of the printing problem. To reset the product 1. Load letter or A4 unused plain white paper into the input tray. 2. The product prints a self-test report, which might indicate a problem ...

User Guide
Page 219
...and wait for technical support. Open the print cartridge door. Close the print cartridge door. 12. Solution 7: Contact HP support for service. Close the print cartridge door. 6. Reinsert the print cartridges in the input tray. 13. If... prompted, choose your country/region, and then click Contact HP for 60 seconds. 7. Open the print cartridge door. Remove the print cartridges and keep them aside carefully. 5. ...might need assistance to enable the product or software to be reset. Load paper in the appropriate slots. 11.
...and wait for technical support. Open the print cartridge door. Close the print cartridge door. 12. Solution 7: Contact HP support for service. Close the print cartridge door. 6. Reinsert the print cartridges in the input tray. 13. If... prompted, choose your country/region, and then click Contact HP for 60 seconds. 7. Open the print cartridge door. Remove the print cartridges and keep them aside carefully. 5. ...might need assistance to enable the product or software to be reset. Load paper in the appropriate slots. 11.

User Guide
Page 225
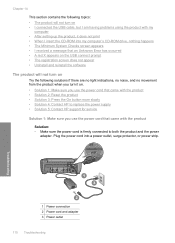
.... 1 Power connection 2 Power cord and adaptor 3 Power outlet 2. Make sure the product is firmly connected to another power outlet. 4. Try to be reset. If the product is not receiving electrical power, connect it by disconnecting the power cord. 5. Wait five seconds, and plug in the power cord. 6....the product. 7. Cause: The product was not properly connected to a power supply or needed to scan again. Turn off the product and reset it to both the product and the power adaptor. If this did not solve the issue, try the next solution. 222 Troubleshooting Troubleshooting Chapter...
.... 1 Power connection 2 Power cord and adaptor 3 Power outlet 2. Make sure the product is firmly connected to another power outlet. 4. Try to be reset. If the product is not receiving electrical power, connect it by disconnecting the power cord. 5. Wait five seconds, and plug in the power cord. 6....the product. 7. Cause: The product was not properly connected to a power supply or needed to scan again. Turn off the product and reset it to both the product and the power adaptor. If this did not solve the issue, try the next solution. 222 Troubleshooting Troubleshooting Chapter...

User Guide
Page 234
...; HP Photo and imaging gallery • HP Photosmart, Officejet, Deskjet (with the product name and software version number) • HP Software update • HP Share to twain_32 old. Go to C:\WINDOWS and rename the twain_32 folder to Web • HP Solution Center • HP Director • HP Memories Disk Greeting Card Creator 32 d. To uninstall the software and reset...
...; HP Photo and imaging gallery • HP Photosmart, Officejet, Deskjet (with the product name and software version number) • HP Software update • HP Share to twain_32 old. Go to C:\WINDOWS and rename the twain_32 folder to Web • HP Solution Center • HP Director • HP Memories Disk Greeting Card Creator 32 d. To uninstall the software and reset...

User Guide
Page 242
... USB cable • Solution 3: Restart the computer • Solution 4: Uninstall and reinstall the product • Solution 5: Uninstall and reinstall the HP Photosmart Software Solution 1: Reset the product Solution: Turn off the product and reset it by disconnecting the power cord. If the first solution does not solve the problem, continue trying the remaining solutions...
... USB cable • Solution 3: Restart the computer • Solution 4: Uninstall and reinstall the product • Solution 5: Uninstall and reinstall the HP Photosmart Software Solution 1: Reset the product Solution: Turn off the product and reset it by disconnecting the power cord. If the first solution does not solve the problem, continue trying the remaining solutions...

User Guide
Page 243
Try to scan again. Do one of the product. 2. If that the USB cable is not receiving electrical power, connect it on . 3. Wait 5 seconds, and plug in the power cord. 6. Try ..., except for a laptop, disconnect the cable from the docking station and connect it by disconnecting the power cord. 5. Finally, try turning off the product and reset it directly to the computer, try unplugging and replugging the USB cable into a USB port on your computer. 3.
Try to scan again. Do one of the product. 2. If that the USB cable is not receiving electrical power, connect it on . 3. Wait 5 seconds, and plug in the power cord. 6. Try ..., except for a laptop, disconnect the cable from the docking station and connect it by disconnecting the power cord. 5. Finally, try turning off the product and reset it directly to the computer, try unplugging and replugging the USB cable into a USB port on your computer. 3.

User Guide
Page 245
... 32 Cause: There might have reinstalled the software. 6. If you originally installed the HP Photosmart Software. Product was not found Try the following additional applications from the Add/Remove Programs list. 4. CAUTION: If the computer is resolved. • Solution 1: Reset the product • Solution 2: Check the power cord and USB cable • Solution...
... 32 Cause: There might have reinstalled the software. 6. If you originally installed the HP Photosmart Software. Product was not found Try the following additional applications from the Add/Remove Programs list. 4. CAUTION: If the computer is resolved. • Solution 1: Reset the product • Solution 2: Check the power cord and USB cable • Solution...


