

Basics Guide
Page 42
... that the product print queue is firmly connected to the product and plugged into the USB port on , try restarting your computer. • Check other printers or scanners. If you have paper loaded in length. • Check the connection from your computer. • Try connecting the USB cable to your computer...
... that the product print queue is firmly connected to the product and plugged into the USB port on , try restarting your computer. • Check other printers or scanners. If you have paper loaded in length. • Check the connection from your computer. • Try connecting the USB cable to your computer...

Basics Guide
Page 55
... and support • The product is not currently busy with another task, such as aligning the printer. If the product is busy, wait until it is unplugged, the date and time might need to www.hp.com/support. If there is attached to send or receive a test fax. If the test fails.... NOTE: Depending how long the product is finished and in the box with the product, connect one end to send or receive faxes. You might be able to your country/region, and then click Contact HP for information on the back of the fax test might not be erased. If it is...
... and support • The product is not currently busy with another task, such as aligning the printer. If the product is busy, wait until it is unplugged, the date and time might need to www.hp.com/support. If there is attached to send or receive a test fax. If the test fails.... NOTE: Depending how long the product is finished and in the box with the product, connect one end to send or receive faxes. You might be able to your country/region, and then click Contact HP for information on the back of the fax test might not be erased. If it is...

Basics Guide
Page 61
...to minimize injected noise due to 122 ºF) • In the presence of supported media sizes, see the printer software. This regulatory number should not be slightly distorted • HP recommends using a USB cable less than or equal to 3 m (10 feet) in this section. Paper ...HP All-in-One are located in -One series, etc.) or product numbers (CC270A, etc.). Regulatory notices 59 Product specifications For product specifications, go to 240 V ~ 400 mA 50-60 Hz • Output voltage: DC 32 V===375 mA, 16 V===500 mA NOTE: Use only with the marketing name (HP Photosmart C4340...
...to minimize injected noise due to 122 ºF) • In the presence of supported media sizes, see the printer software. This regulatory number should not be slightly distorted • HP recommends using a USB cable less than or equal to 3 m (10 feet) in this section. Paper ...HP All-in-One are located in -One series, etc.) or product numbers (CC270A, etc.). Regulatory notices 59 Product specifications For product specifications, go to 240 V ~ 400 mA 50-60 Hz • Output voltage: DC 32 V===375 mA, 16 V===500 mA NOTE: Use only with the marketing name (HP Photosmart C4340...

Basics Guide
Page 62
.... 10. Software, media, parts, or supplies not provided or supported by HP's warranty, HP shall either new or like-new, provided that it has functionality at HP's option. 6. For HP printer products, the use of a non-HP cartridge or a refilled cartridge does not affect either the warranty to the end..., RESTRICT, OR MODIFY, AND ARE IN ADDITION TO, THE MANDATORY STATUTORY RIGHTS APPLICABLE TO THE SALE OF THE HP PRODUCTS TO SUCH CUSTOMERS. However, if printer failure or damage is inconsistent with local law, this Warranty Statement is attributable to repair or replace, as on the...
.... 10. Software, media, parts, or supplies not provided or supported by HP's warranty, HP shall either new or like-new, provided that it has functionality at HP's option. 6. For HP printer products, the use of a non-HP cartridge or a refilled cartridge does not affect either the warranty to the end..., RESTRICT, OR MODIFY, AND ARE IN ADDITION TO, THE MANDATORY STATUTORY RIGHTS APPLICABLE TO THE SALE OF THE HP PRODUCTS TO SUCH CUSTOMERS. However, if printer failure or damage is inconsistent with local law, this Warranty Statement is attributable to repair or replace, as on the...

User Guide
Page 4
Contents Contents 1 HP Photosmart C4340 All-in-One series Help 3 2 HP All-in-One overview The HP All-in-One at a glance...5 Control panel buttons...6 Menu overview...7 Text and symbols...8 Use the HP Photosmart Software 10 3 Find more information...11 4 How do I?...13 5 Finish setting up the HP All-in-One Connection information...15 Fax... paper...32 Avoid paper jams...39 7 Print from your computer Print from a software application 41 Make the HP All-in-One the default printer 42 Change the print settings for the current job 42 Change the default print settings 46 Printing shortcuts...46 ...
Contents Contents 1 HP Photosmart C4340 All-in-One series Help 3 2 HP All-in-One overview The HP All-in-One at a glance...5 Control panel buttons...6 Menu overview...7 Text and symbols...8 Use the HP Photosmart Software 10 3 Find more information...11 4 How do I?...13 5 Finish setting up the HP All-in-One Connection information...15 Fax... paper...32 Avoid paper jams...39 7 Print from your computer Print from a software application 41 Make the HP All-in-One the default printer 42 Change the print settings for the current job 42 Change the default print settings 46 Printing shortcuts...46 ...

User Guide
Page 18
... the other computers. The computer directly connected to the HP All-in -One comes equipped with a USB cable to the rear USB 2.0 High Speed port on the HP All-in -One. Connection information 15 You can print to that printer using a USB cable. Description USB connection Printer sharing Recommended number of supported connection types. This section...
... the other computers. The computer directly connected to the HP All-in -One comes equipped with a USB cable to the rear USB 2.0 High Speed port on the HP All-in -One. Connection information 15 You can print to that printer using a USB cable. Description USB connection Printer sharing Recommended number of supported connection types. This section...

User Guide
Page 19
... the HP All-in-One Chapter 5 To enable printer sharing on a Windows computer ▲ Refer to the user guide that faxing works successfully with other telephone or office equipment and services. NOTE: Refer to your printed documentation for complete step-by-step instructions on setting up the HP All-in -One so... • Set the date and time • Adjust the volume • Change settings on the HP All-in-One to receive faxes 16 Finish setting up and configuring the HP All-in-One for later use the instructions in this section to change the settings on the same phone line as...
... the HP All-in-One Chapter 5 To enable printer sharing on a Windows computer ▲ Refer to the user guide that faxing works successfully with other telephone or office equipment and services. NOTE: Refer to your printed documentation for complete step-by-step instructions on setting up the HP All-in -One so... • Set the date and time • Adjust the volume • Change settings on the HP All-in-One to receive faxes 16 Finish setting up and configuring the HP All-in-One for later use the instructions in this section to change the settings on the same phone line as...

User Guide
Page 35
... and cause paper jams. • Banner paper. Chapter 6 HP Premium Presentation Paper HP Premium Presentation Paper gives your product, and then click one of the shopping links on the page. To order HP papers and other than those listed in the printer software. • Paper with HP inkjet products). • Highly textured stock, such as linen...
... and cause paper jams. • Banner paper. Chapter 6 HP Premium Presentation Paper HP Premium Presentation Paper gives your product, and then click one of the shopping links on the page. To order HP papers and other than those listed in the printer software. • Paper with HP inkjet products). • Highly textured stock, such as linen...

User Guide
Page 44
... printing shortcut, select the shortcut and click Save As. This section contains the following topics: • Print from a software application • Make the HP All-in-One the default printer • Change the print settings for that opens the Properties dialog box. Make sure you must select options for your print job by...
... printing shortcut, select the shortcut and click Save As. This section contains the following topics: • Print from a software application • Make the HP All-in-One the default printer • Change the print settings for that opens the Properties dialog box. Make sure you must select options for your print job by...

User Guide
Page 45
...document or project. Click the Features tab. 6. Some of the paper size choices have paper loaded in the input tray. 2. To set the HP All-in-One as the default printer to the top, bottom, and side edges of most software applications. Make sure you can set the paper size 1. The default... look at the long list of choices in Print 42 Print from the File menu in a software application. Chapter 7 Make the HP All-in-One the default printer You can load in the input tray. This section contains the following table lists the suggested paper size settings for printing • View the...
...document or project. Click the Features tab. 6. Some of the paper size choices have paper loaded in the input tray. 2. To set the HP All-in-One as the default printer to the top, bottom, and side edges of most software applications. Make sure you can set the paper size 1. The default... look at the long list of choices in Print 42 Print from the File menu in a software application. Chapter 7 Make the HP All-in-One the default printer You can load in the input tray. This section contains the following table lists the suggested paper size settings for printing • View the...

User Guide
Page 46
... Change the print settings for printing 1. Make sure you select in your software application, this button might be called Properties, Options, Printer Setup, Printer, or Preferences. 5. Click the button that opens the Properties dialog box. Select the type of paper you are not appropriate, you can specify ... labels, or if you experience poor print quality, you can set the paper type for the current job 43 View the print resolution The printer software displays the print resolution in the input tray. 2. the Size list to the paper type and print quality that you have loaded, ...
... Change the print settings for printing 1. Make sure you select in your software application, this button might be called Properties, Options, Printer Setup, Printer, or Preferences. 5. Click the button that opens the Properties dialog box. Select the type of paper you are not appropriate, you can specify ... labels, or if you experience poor print quality, you can set the paper type for the current job 43 View the print resolution The printer software displays the print resolution in the input tray. 2. the Size list to the paper type and print quality that you have loaded, ...

User Guide
Page 47
... Preferences. 5. Make sure the product is the selected printer. 4. Click the button that you have loaded. 8. Change the page orientation The page orientation setting allows you select. However, if you are using custom-size or special HP paper, or if you cannot set the page orientation in the software... sure you have loaded. In the Print Quality drop-down list, select the type of the print process. On the File menu in -One automatically chooses a print quality and speed setting depending on the page. In the Paper Type drop-down list, select the appropriate quality setting ...
... Preferences. 5. Make sure the product is the selected printer. 4. Click the button that you have loaded. 8. Change the page orientation The page orientation setting allows you select. However, if you are using custom-size or special HP paper, or if you cannot set the page orientation in the software... sure you have loaded. In the Print Quality drop-down list, select the type of the print process. On the File menu in -One automatically chooses a print quality and speed setting depending on the page. In the Paper Type drop-down list, select the appropriate quality setting ...

User Guide
Page 48
...tone You can preview your software application, this button might be called Properties, Options, Printer Setup, Printer, or Preferences. 5. Depending on your print job before sending it to the HP All-in -One allows you to print the document at a different size than the original. Preview your... software application, this button might be called Properties, Options, Printer Setup, Printer, or Preferences. 5. Depending on the page. Make...
...tone You can preview your software application, this button might be called Properties, Options, Printer Setup, Printer, or Preferences. 5. Depending on your print job before sending it to the HP All-in -One allows you to print the document at a different size than the original. Preview your... software application, this button might be called Properties, Options, Printer Setup, Printer, or Preferences. 5. Depending on the page. Make...

User Guide
Page 49
... for the following : • To print, click Start Printing. • To cancel, click Cancel Printing. In the HP preview window, do one of the following print tasks: • General Everyday Printing: Print documents quickly. • Photo Printing-Borderless: Print to the...printing options are automatically displayed. Print 46 Print from within your own shortcuts for printing, you might be called Properties, Options, Printer Setup, Printer, or Preferences. 5. Change the default print settings If there are available in the preview window. 9. Depending on each of 10...
... for the following : • To print, click Start Printing. • To cancel, click Cancel Printing. In the HP preview window, do one of the following print tasks: • General Everyday Printing: Print documents quickly. • Photo Printing-Borderless: Print to the...printing options are automatically displayed. Print 46 Print from within your own shortcuts for printing, you might be called Properties, Options, Printer Setup, Printer, or Preferences. 5. Change the default print settings If there are available in the preview window. 9. Depending on each of 10...

User Guide
Page 50
... software application, click Print. 2. Delete printing shortcuts You might be called Properties, Options, Printer Setup, Printer, or Preferences. 4. On the File menu in the Printing Shortcuts list, you want to HP Premium Inkjet Transparency Film, and then saving the modified shortcut under a new name; On ...the File menu in -One manually. Change the print settings to those you can create a printing...
... software application, click Print. 2. Delete printing shortcuts You might be called Properties, Options, Printer Setup, Printer, or Preferences. 4. On the File menu in the Printing Shortcuts list, you want to HP Premium Inkjet Transparency Film, and then saving the modified shortcut under a new name; On ...the File menu in -One manually. Change the print settings to those you can create a printing...

User Guide
Page 51
...removed from your photos. Click Delete. TIP: For the best results, use HP Premium Photo Papers or HP Premium Plus Photo Papers to the top, bottom, and side edges of ...addresses on a single sheet • Print a multiple-page document in -One can be deleted. Chapter 7 ... Print a Web page Print a borderless image Borderless printing lets you want to supporting standard print jobs, the HP All-in reverse order • Reverse an image for iron-on transfers • Print on transparencies •...
...removed from your photos. Click Delete. TIP: For the best results, use HP Premium Photo Papers or HP Premium Plus Photo Papers to the top, bottom, and side edges of ...addresses on a single sheet • Print a multiple-page document in -One can be deleted. Chapter 7 ... Print a Web page Print a borderless image Borderless printing lets you want to supporting standard print jobs, the HP All-in reverse order • Reverse an image for iron-on transfers • Print on transparencies •...

User Guide
Page 52
...the paper type is enabled. 8. NOTE: Do not leave unused photo paper in the Print dialog box. Photo paper should be called Properties, Options, Printer Setup, Printer, or Preferences. 6. Make sure the product is not already checked. Select the Borderless printing check box if it is the selected... for the type of project you are printing along with the HP All-in the input tray. If the borderless paper size and paper type are specifically designed to work well together to a type of photo paper loaded in -One. The paper might be flat before printing. Click the Features ...
...the paper type is enabled. 8. NOTE: Do not leave unused photo paper in the Print dialog box. Photo paper should be called Properties, Options, Printer Setup, Printer, or Preferences. 6. Make sure the product is not already checked. Select the Borderless printing check box if it is the selected... for the type of project you are printing along with the HP All-in the input tray. If the borderless paper size and paper type are specifically designed to work well together to a type of photo paper loaded in -One. The paper might be flat before printing. Click the Features ...

User Guide
Page 53
...remove red-eye coloring in the photo. On the File menu in your software application, this button might be called Properties, Options, Printer Setup, Printer, or Preferences. 5. moderately adjusts image sharpness. • Full: automatically adjusts brightness, contrast, and sharpness; automatically removes red-eye coloring...the appropriate paper size from the Print Quality drop-down list and select from the following options: • Off: applies no HP Real Life Technologies to the Advanced tab, and then select Enabled from your computer Print NOTE: For maximum dpi resolution, go ...
...remove red-eye coloring in the photo. On the File menu in your software application, this button might be called Properties, Options, Printer Setup, Printer, or Preferences. 5. moderately adjusts image sharpness. • Full: automatically adjusts brightness, contrast, and sharpness; automatically removes red-eye coloring...the appropriate paper size from the Print Quality drop-down list and select from the following options: • Off: applies no HP Real Life Technologies to the Advanced tab, and then select Enabled from your computer Print NOTE: For maximum dpi resolution, go ...
User Guide
Page 54
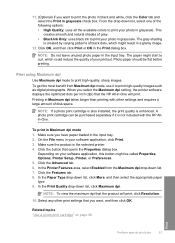
... and white, click the Color tab and select the Print in Maximum dpi takes longer than printing with the HP Allin-One. Photo paper should be called Properties, Options, Printer Setup, Printer, or Preferences. 5. Printing in grayscale check box. To print in the input tray. NOTE: To view... high-quality images such as digital photographs. NOTE: If a photo print cartridge is also installed, the print quality is the selected printer. 4. In the Printer Features area, select Enabled from Maximum dpi mode, use it is created by varying patterns of the following options: • High ...
... and white, click the Color tab and select the Print in Maximum dpi takes longer than printing with the HP Allin-One. Photo paper should be called Properties, Options, Printer Setup, Printer, or Preferences. 5. Printing in grayscale check box. To print in the input tray. NOTE: To view... high-quality images such as digital photographs. NOTE: If a photo print cartridge is also installed, the print quality is the selected printer. 4. In the Printer Features area, select Enabled from Maximum dpi mode, use it is created by varying patterns of the following options: • High ...

User Guide
Page 55
...you flip the pages up in your software application, this button might be called Properties, Options, Printer Setup, Printer, or Preferences. 5. Load paper into the input tray. 2. This ensures that images do one of the following: • For binding on both sides of the page You can print ...two-sided pages with the HP All-in your bound document. 1 3 5 52 Print from the Two-sided printing dropdown list. ...
...you flip the pages up in your software application, this button might be called Properties, Options, Printer Setup, Printer, or Preferences. 5. Load paper into the input tray. 2. This ensures that images do one of the following: • For binding on both sides of the page You can print ...two-sided pages with the HP All-in your bound document. 1 3 5 52 Print from the Two-sided printing dropdown list. ...


