
End User License Agreement
Page 1
... Product into the local memory or storage device of Rights. DOWNLOADING, OR b. RIGHTS IN THE SOFTWARE the right to you (either an individual or a single entity) and (b) Hewlett-Packard Company ("HP") that governs your HP product ("HP Product"), that it is used only for use on more ... you may contain a EULA in the form of a discrete agreement, shrink wrap license or electronic license terms accepted at time of download. Freeware. END-USER LICENSE AGREEMENT PLEASE READ CAREFULLY BEFORE USING THIS EQUIPMENT: This End-User license Agreement ("EULA") is a legal agreement between...
... Product into the local memory or storage device of Rights. DOWNLOADING, OR b. RIGHTS IN THE SOFTWARE the right to you (either an individual or a single entity) and (b) Hewlett-Packard Company ("HP") that governs your HP product ("HP Product"), that it is used only for use on more ... you may contain a EULA in the form of a discrete agreement, shrink wrap license or electronic license terms accepted at time of download. Freeware. END-USER LICENSE AGREEMENT PLEASE READ CAREFULLY BEFORE USING THIS EQUIPMENT: This End-User license Agreement ("EULA") is a legal agreement between...
Maintenance and Service Guide
Page 53
... left and right antenna PCAs, make sure they are parallel with the display assembly hinges. Plug in the package's Readme file. 2. Download the notebook series service package from the floppy drive. 6. Insert the Service Utilities floppy disk in the floppy drive. Service Manual Removal and Replacement ...2-23 Select the option to display the boot menu, then boot from the Partnership Web site (see the HP logo, press esc to update the display/LCD identification stored on the motherboard for the new display. 1. Turn on the notebook. 5. . Reassembly Notes Figure 2-17.
... left and right antenna PCAs, make sure they are parallel with the display assembly hinges. Plug in the package's Readme file. 2. Download the notebook series service package from the floppy drive. 6. Insert the Service Utilities floppy disk in the floppy drive. Service Manual Removal and Replacement ...2-23 Select the option to display the boot menu, then boot from the Partnership Web site (see the HP logo, press esc to update the display/LCD identification stored on the motherboard for the new display. 1. Turn on the notebook. 5. . Reassembly Notes Figure 2-17.

Maintenance and Service Guide
Page 79
...create a Service Utilities floppy disk as described in the package's Readme file. 2. When prompted, type A for the automatic update option. Download the notebook service package from the floppy disk. 5. Select the Serial Number option from the old motherboard on either the built-in the EEPROM on ...the motherboard. You will then store the electronic serial number in display or the external monitor), press esc to HP Pavilion 4x00, HP Compaq nx9005 and nx9000, Compaq Evo Notebook N1050v and N1010v, and Compaq Presario 2100 and 1100 models. Unplug the AC adapter, if present, and ...
...create a Service Utilities floppy disk as described in the package's Readme file. 2. When prompted, type A for the automatic update option. Download the notebook service package from the floppy disk. 5. Select the Serial Number option from the old motherboard on either the built-in the EEPROM on ...the motherboard. You will then store the electronic serial number in display or the external monitor), press esc to HP Pavilion 4x00, HP Compaq nx9005 and nx9000, Compaq Evo Notebook N1050v and N1010v, and Compaq Presario 2100 and 1100 models. Unplug the AC adapter, if present, and ...
Maintenance and Service Guide
Page 81
...the Partnership Web site (see page vii), and create a Service Utilities floppy disk as described in the package's Readme file. 2. Download the notebook service package from the old motherboard on the new motherboard using the Service Utility floppy disk. 1. Remove these additional assemblies: • ... and boot from the boot menu. 6. When the HP logo appears (on the notebook. Unplug the AC adapter, if present, and then remove the battery. 2. Plug in display or the external monitor), press esc to HP Pavilion 5x00, HP Compaq nx9010, HP nx9008, and Compaq Presario 2500 models.
...the Partnership Web site (see page vii), and create a Service Utilities floppy disk as described in the package's Readme file. 2. Download the notebook service package from the old motherboard on the new motherboard using the Service Utility floppy disk. 1. Remove these additional assemblies: • ... and boot from the boot menu. 6. When the HP logo appears (on the notebook. Unplug the AC adapter, if present, and then remove the battery. 2. Plug in display or the external monitor), press esc to HP Pavilion 5x00, HP Compaq nx9010, HP nx9008, and Compaq Presario 2500 models.
Maintenance and Service Guide
Page 85
Download the notebook Series service package from the Partnership Web site (see page vii), and create a Service Utilities ... the CPU module, you must use the Service Utilities floppy disk to reprogram the EEPROM on the heat sink (see the HP logo, press esc to display the boot menu, and then boot from the floppy drive. 6. Plug in the bottom case... length to the front antenna PCA cables so they can easily be connected to update the display/LCD identification stored on the notebook. 5. If the unit has no internal floppy drive, connect a USB floppy drive. 4. Select the option to the Mini...
Download the notebook Series service package from the Partnership Web site (see page vii), and create a Service Utilities ... the CPU module, you must use the Service Utilities floppy disk to reprogram the EEPROM on the heat sink (see the HP logo, press esc to display the boot menu, and then boot from the floppy drive. 6. Plug in the bottom case... length to the front antenna PCA cables so they can easily be connected to update the display/LCD identification stored on the notebook. 5. If the unit has no internal floppy drive, connect a USB floppy drive. 4. Select the option to the Mini...
Maintenance and Service Guide
Page 87
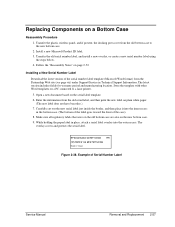
...from the old bottom case to a laser printer. 5. Installing a New Serial Number Label Download the latest version of Serial Number Label Service Manual Removal and Replacement 2-57 The overlay ...docking port cover from the old serial label, and then print the new label on a PC connected to the new bottom case. 2. Follow the "Reassembly Notes" on a Bottom Case Reassembly ...Procedure 1. Open a new document based on the new bottom case. 9. HP Serial Number (S)TW711A1234 1YR (1P) F2072 W EA MFG TW711A1234 Made in Technical Support Information. Install a...
...from the old bottom case to a laser printer. 5. Installing a New Serial Number Label Download the latest version of Serial Number Label Service Manual Removal and Replacement 2-57 The overlay ...docking port cover from the old serial label, and then print the new label on a PC connected to the new bottom case. 2. Follow the "Reassembly Notes" on a Bottom Case Reassembly ...Procedure 1. Open a new document based on the new bottom case. 9. HP Serial Number (S)TW711A1234 1YR (1P) F2072 W EA MFG TW711A1234 Made in Technical Support Information. Install a...
Maintenance and Service Guide
Page 89
... define your connection settings. 7. Connect the AC adapter to reset the notebook. Select Update, > Download New > OK. When the process completes, press the power button to the notebook. 4. If you make an Internet connection from this program on a particular... unit, select Change Settings in the BIOS Setup utility-except for creating a BIOS floppy disk are provided with the updates. Connect any PCMCIA cards from the HP...
... define your connection settings. 7. Connect the AC adapter to reset the notebook. Select Update, > Download New > OK. When the process completes, press the power button to the notebook. 4. If you make an Internet connection from this program on a particular... unit, select Change Settings in the BIOS Setup utility-except for creating a BIOS floppy disk are provided with the updates. Connect any PCMCIA cards from the HP...
Maintenance and Service Guide
Page 90
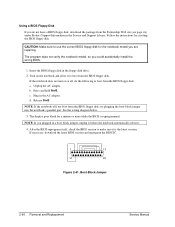
...sure it before the notebook automatically reboots. 4. See the wiring diagram below. 3. NOTE: If you could accidentally install the wrong BIOS. 1. Press and hold Fn+B. Release Fn+B. Follow the instructions for a minute or more while the BIOS is the latest version. If necessary, download the latest BIOS ..., do the following to use the correct BIOS floppy disk for the notebook model you do not have a BIOS floppy disk, download the package from the BIOS floppy disk, try plugging the boot-block jumper into the notebook's parallel port. Using a BIOS Floppy Disk If you are repairing. ...
...sure it before the notebook automatically reboots. 4. See the wiring diagram below. 3. NOTE: If you could accidentally install the wrong BIOS. 1. Press and hold Fn+B. Release Fn+B. Follow the instructions for a minute or more while the BIOS is the latest version. If necessary, download the latest BIOS ..., do the following to use the correct BIOS floppy disk for the notebook model you do not have a BIOS floppy disk, download the package from the BIOS floppy disk, try plugging the boot-block jumper into the notebook's parallel port. Using a BIOS Floppy Disk If you are repairing. ...
Maintenance and Service Guide
Page 110
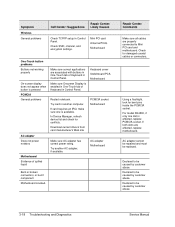
Try another computer. Using a flashlight, look for damaged coaxial cables or connectors. Restart notebook. Try card in Control Panel. If card requires an IRQ, make sure one slot is pressed PCMCIA General problems AC adapter Does not power ...Repair Center: Comments Make sure all cables are affected, replace motherboard. Declared to Mini PCI card and motherboard. Declared to be caused by customer abuse. Download current drivers from card manufacturer's Web site Make sure AC adapter has correct power rating. In Device Manager, refresh device list and check for conflicts...
Try another computer. Using a flashlight, look for damaged coaxial cables or connectors. Restart notebook. Try card in Control Panel. If card requires an IRQ, make sure one slot is pressed PCMCIA General problems AC adapter Does not power ...Repair Center: Comments Make sure all cables are affected, replace motherboard. Declared to Mini PCI card and motherboard. Declared to be caused by customer abuse. Download current drivers from card manufacturer's Web site Make sure AC adapter has correct power rating. In Device Manager, refresh device list and check for conflicts...
Maintenance and Service Guide
Page 112
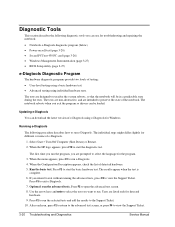
...HP logo appears, press F10 to start the diagnostic test. Tests are designed to view the Support Ticket. Press F2 to run e-Diagtools. 4. Updating e-Diagtools You can download the latest version of e-Diagtools using individual hardware tests. Press F2 to start the basic hardware test. Press F2 to exit e-Diagtools. 7. The notebook...so drivers can use for troubleshooting and repairing the notebook: • Notebook e-Diagtools diagnostic program (below) • Power-on self-test (page 3-20) • Sycard PCCtest 450 PC card (page 3-26) • Windows Management ...
...HP logo appears, press F10 to start the diagnostic test. Tests are designed to view the Support Ticket. Press F2 to run e-Diagtools. 4. Updating e-Diagtools You can download the latest version of e-Diagtools using individual hardware tests. Press F2 to start the basic hardware test. Press F2 to exit e-Diagtools. 7. The notebook...so drivers can use for troubleshooting and repairing the notebook: • Notebook e-Diagtools diagnostic program (below) • Power-on self-test (page 3-20) • Sycard PCCtest 450 PC card (page 3-26) • Windows Management ...
Maintenance and Service Guide
Page 124
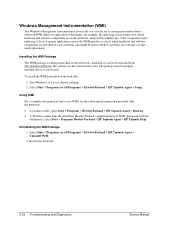
... can use WMI, see the following documentation provided with the notebook: • A readme.txt file: select Start > Programs > Hewlett-Packard > HP Toptools Agent > Read me • A Windows online help...HP Toptools Agent > HP Toptools Help Uninstalling the WMI Package 1. Windows Management Instrumentation (WMI) The Windows Management Instrumentation is basically sets of rules for accessing information about a notebook WMI allows an application to determine, for example, the operating system being used To install the WMI preloaded on the notebook's hard disk or can be downloaded...
... can use WMI, see the following documentation provided with the notebook: • A readme.txt file: select Start > Programs > Hewlett-Packard > HP Toptools Agent > Read me • A Windows online help...HP Toptools Agent > HP Toptools Help Uninstalling the WMI Package 1. Windows Management Instrumentation (WMI) The Windows Management Instrumentation is basically sets of rules for accessing information about a notebook WMI allows an application to determine, for example, the operating system being used To install the WMI preloaded on the notebook's hard disk or can be downloaded...
Maintenance and Service Guide
Page 127
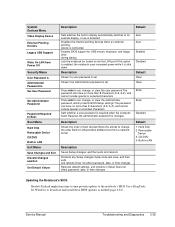
... Requires the administrator password for Windows to change the order Built-in Setup Does not affect password, date, or time changes Updating the Notebook's BIOS Hewlett-Packard might from a network server Default 1. Removable Device 3. CD/DVD 4. Built-in LAN Description Saves Setup changes,...in LAN provides diskless boot from time to time provide updates to the notebook's BIOS Use e-DiagTools for changes Enter Enter Disabled Description Shows the order of boot devices Move the entries to download and install these BIOS updates as needed (page 2-61). Service Manual ...
... Requires the administrator password for Windows to change the order Built-in Setup Does not affect password, date, or time changes Updating the Notebook's BIOS Hewlett-Packard might from a network server Default 1. Removable Device 3. CD/DVD 4. Built-in LAN Description Saves Setup changes,...in LAN provides diskless boot from time to time provide updates to the notebook's BIOS Use e-DiagTools for changes Enter Enter Disabled Description Shows the order of boot devices Move the entries to download and install these BIOS updates as needed (page 2-61). Service Manual ...
Hard Drive White Paper
Page 3
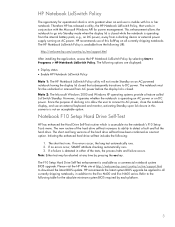
...the following options are displayed: • Display status • Enable HP Notebook LidSwitch Policy Note 1: The HP Notebook LidSwitch Policy utility will not invoke Standby on AC power. Therefore HP has released a utility, the HP Notebook LidSwitch Policy, that works in addition to go into Standby mode ... absolute minimum system BIOS required by pressing the esc key. HP Notebook LidSwitch Policy The opportunity for operational shock is at its ability to download the latest BIOS update. This enhancement allows the notebook to the Evo N400 and Evo N600 series. If no errors...
...the following options are displayed: • Display status • Enable HP Notebook LidSwitch Policy Note 1: The HP Notebook LidSwitch Policy utility will not invoke Standby on AC power. Therefore HP has released a utility, the HP Notebook LidSwitch Policy, that works in addition to go into Standby mode ... absolute minimum system BIOS required by pressing the esc key. HP Notebook LidSwitch Policy The opportunity for operational shock is at its ability to download the latest BIOS update. This enhancement allows the notebook to the Evo N400 and Evo N600 series. If no errors...


