
Maintenance and Service Guide
Page 3
......vii Product Information...1-1 Features ...1-8 Operation...1-14 Specifications ...1-18 Internal Design...1-24 Removal and Replacement 2-1 Disassembly Flowchart ...2-3 Removing the Battery ...2-4 Removing an SDRAM Module...2-5 Removing the Wireless LAN Mini PCI Card 2-7 Removing the Hard Disk Drive...2-9 Recovering the Factory Software...2-11 Replacing Small Parts ...2-12 Removing the Keyboard Cover...2-13 Removing the Speaker Assembly ...2-15...
......vii Product Information...1-1 Features ...1-8 Operation...1-14 Specifications ...1-18 Internal Design...1-24 Removal and Replacement 2-1 Disassembly Flowchart ...2-3 Removing the Battery ...2-4 Removing an SDRAM Module...2-5 Removing the Wireless LAN Mini PCI Card 2-7 Removing the Hard Disk Drive...2-9 Recovering the Factory Software...2-11 Replacing Small Parts ...2-12 Removing the Keyboard Cover...2-13 Removing the Speaker Assembly ...2-15...
Maintenance and Service Guide
Page 4
...41 Figure 2-27. Removing the RJ11/1394 Connector Module 2-49 Figure 2-34. Back View ...1-12 Figure 1-6. Replaceable Module Diagram 1-24 Figure 2-1. Removing the Hard Disk Drive 2-9 Figure 2-8. Removing the Switchboard PCA 2-18 Figure 2-14. Removing the Top Case...2-27 Figure 2-19....Removing the I/R PCA...2-37 Figure 2-25. Removing the Motherboard 2-51 Figure 2-35. Resetting the Notebook ...1-17 Figure 1-8. Removing an SDRAM Module 2-6 Figure 2-5. Removing the Floppy Drive 2-35 Figure 2-24. Removing the Keyboard Cover 2-14 Figure 2-10. Removing the Top Case...2-...
...41 Figure 2-27. Removing the RJ11/1394 Connector Module 2-49 Figure 2-34. Back View ...1-12 Figure 1-6. Replaceable Module Diagram 1-24 Figure 2-1. Removing the Hard Disk Drive 2-9 Figure 2-8. Removing the Switchboard PCA 2-18 Figure 2-14. Removing the Top Case...2-27 Figure 2-19....Removing the I/R PCA...2-37 Figure 2-25. Removing the Motherboard 2-51 Figure 2-35. Resetting the Notebook ...1-17 Figure 1-8. Removing an SDRAM Module 2-6 Figure 2-5. Removing the Floppy Drive 2-35 Figure 2-24. Removing the Keyboard Cover 2-14 Figure 2-10. Removing the Top Case...2-...
Maintenance and Service Guide
Page 31
...Cover, keyboard (page 2-16) • Door, Mini PCI (page 2-7) • Door, SDRAM (page 2-5) Doors, PCMCIA (page 2-60) Drive, CD/DVD (page 2-20) Drive, floppy (page 2-32) • Drive, hard disk (page 2-9) • Feet, rubber (page 2-12) Heat sink (with fan) (page 2-40) • Keyboard (page 2-16)... the reverse of each section below. Service Manual Removal and Replacement 2-1 Installing a wrong-size screw can damage the notebook and its components. Without proper grounding, an electrostatic discharge can damage the notebook. (The symbol at the end of the removal steps. The...
...Cover, keyboard (page 2-16) • Door, Mini PCI (page 2-7) • Door, SDRAM (page 2-5) Doors, PCMCIA (page 2-60) Drive, CD/DVD (page 2-20) Drive, floppy (page 2-32) • Drive, hard disk (page 2-9) • Feet, rubber (page 2-12) Heat sink (with fan) (page 2-40) • Keyboard (page 2-16)... the reverse of each section below. Service Manual Removal and Replacement 2-1 Installing a wrong-size screw can damage the notebook and its components. Without proper grounding, an electrostatic discharge can damage the notebook. (The symbol at the end of the removal steps. The...
Maintenance and Service Guide
Page 39
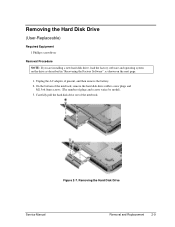
... the Factory Software", as shown on the next page. 1. Figure 2-7. Removing the Hard Disk Drive Service Manual Removal and Replacement 2-9 On the bottom of the notebook, remove the hard disk drive rubber screw plugs and M2.5×6.0mm screws. (The number of the notebook. Unplug the AC adapter, if present, and then remove the battery. 2. Carefully pull...
... the Factory Software", as shown on the next page. 1. Figure 2-7. Removing the Hard Disk Drive Service Manual Removal and Replacement 2-9 On the bottom of the notebook, remove the hard disk drive rubber screw plugs and M2.5×6.0mm screws. (The number of the notebook. Unplug the AC adapter, if present, and then remove the battery. 2. Carefully pull...
Maintenance and Service Guide
Page 40
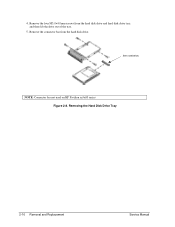
See note below NOTE: Connector bar not used on HP Pavilion ze5x00 series Figure 2-8. Remove the connector bar from the hard disk drive and hard disk drive tray, and then lift the drive out of the tray. 5. Removing the Hard Disk Drive Tray 2-10 Removal and Replacement Service Manual Remove the four M3.0×4.0mm screws from the hard disk drive. 4.
See note below NOTE: Connector bar not used on HP Pavilion ze5x00 series Figure 2-8. Remove the connector bar from the hard disk drive and hard disk drive tray, and then lift the drive out of the tray. 5. Removing the Hard Disk Drive Tray 2-10 Removal and Replacement Service Manual Remove the four M3.0×4.0mm screws from the hard disk drive. 4.
Maintenance and Service Guide
Page 41
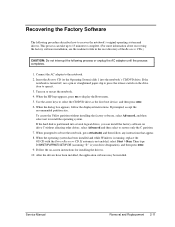
...the Recovery CDs.) CAUTION: Do not interrupt the following procedure describes how to the notebook. 2. When the HP logo appears, press esc to restore only the C partition. 7. If autorun is your drive designation), and then press enter. 9. Then type D:\SWSETUP\APPINSTL\SETUP.EXE (assuming...the application software may be installed. Service Manual Removal and Replacement 2-11 Connect the AC adapter to recover the notebook's original operating system and drivers. If the hard disk is partitioned into the notebook's CD/DVD drive. When the dialog box appears, follow any instructions that ...
...the Recovery CDs.) CAUTION: Do not interrupt the following procedure describes how to the notebook. 2. When the HP logo appears, press esc to restore only the C partition. 7. If autorun is your drive designation), and then press enter. 9. Then type D:\SWSETUP\APPINSTL\SETUP.EXE (assuming...the application software may be installed. Service Manual Removal and Replacement 2-11 Connect the AC adapter to recover the notebook's original operating system and drivers. If the hard disk is partitioned into the notebook's CD/DVD drive. When the dialog box appears, follow any instructions that ...
Maintenance and Service Guide
Page 54
...Replacement Service Manual Unplug the AC adapter, if present, and remove the battery. 2. Remove these additional assemblies: • Hard disk drive (page 2-9) • Keyboard cover (page 2-13) • Speaker assembly (page 2-23) • Keyboard (page 2-16) • Switchboard PCA (page 2-19) • CD/DVD drive... (page 2-20) • Display assembly (page 2-23) 3. Removing the Top Case (Service Partners Only) NOTE: This section applies only to HP Pavilion 4x00, HP Compaq nx9005 and nx9000, Compaq Evo Notebook N1050v and N1010v, and Compaq Presario 2100...
...Replacement Service Manual Unplug the AC adapter, if present, and remove the battery. 2. Remove these additional assemblies: • Hard disk drive (page 2-9) • Keyboard cover (page 2-13) • Speaker assembly (page 2-23) • Keyboard (page 2-16) • Switchboard PCA (page 2-19) • CD/DVD drive... (page 2-20) • Display assembly (page 2-23) 3. Removing the Top Case (Service Partners Only) NOTE: This section applies only to HP Pavilion 4x00, HP Compaq nx9005 and nx9000, Compaq Evo Notebook N1050v and N1010v, and Compaq Presario 2100...
Maintenance and Service Guide
Page 56
...Hard disk drive (page 2-9) • Keyboard cover (page 2-13) • Speaker assembly (page 2-15) • Keyboard (page 2-16) • Switchboard PCA (page 2-19) • CD/DVD drive (page 2-20) • Display assembly (page 2-23) 3. Unplug the AC adapter, if present, and then remove the battery. 2. Failure to the notebook. 2-26 Removal and Replacement...can result in step 4 are 3 different lengths. Turn the notebook bottom side up with the front facing forward. 4. Be sure to HP Pavilion 5x00, HP Compaq nx9010 and HP nx9008, and Compaq Presario 2500 models. NOTE: This section ...
...Hard disk drive (page 2-9) • Keyboard cover (page 2-13) • Speaker assembly (page 2-15) • Keyboard (page 2-16) • Switchboard PCA (page 2-19) • CD/DVD drive (page 2-20) • Display assembly (page 2-23) 3. Unplug the AC adapter, if present, and then remove the battery. 2. Failure to the notebook. 2-26 Removal and Replacement...can result in step 4 are 3 different lengths. Turn the notebook bottom side up with the front facing forward. 4. Be sure to HP Pavilion 5x00, HP Compaq nx9010 and HP nx9008, and Compaq Presario 2500 models. NOTE: This section ...
Maintenance and Service Guide
Page 59
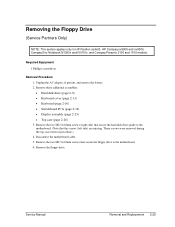
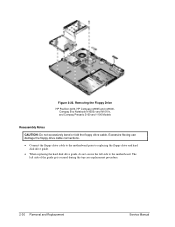
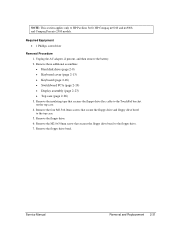
...) that secure the hard disk drive guide to the motherboard. (Note that secure the floppy drive to HP Pavilion ze4x00, HP Compaq nx9005 and nx9000, Compaq Evo Notebook N1050v and N1010v, and Compaq Presario 2100 and 1100 models. Service Manual Removal and Replacement 2-29 Remove these additional assemblies: • Hard disk drive (page 2-9) •...screws (left side) are missing. Disconnect the motherboard cable. 5. Required Equipment 1 Phillips screwdriver Removal Procedure 1. Removing the Floppy Drive (Service Partners Only) NOTE: This section applies only to the motherboard. 6.
...) that secure the hard disk drive guide to the motherboard. (Note that secure the floppy drive to HP Pavilion ze4x00, HP Compaq nx9005 and nx9000, Compaq Evo Notebook N1050v and N1010v, and Compaq Presario 2100 and 1100 models. Service Manual Removal and Replacement 2-29 Remove these additional assemblies: • Hard disk drive (page 2-9) •...screws (left side) are missing. Disconnect the motherboard cable. 5. Required Equipment 1 Phillips screwdriver Removal Procedure 1. Removing the Floppy Drive (Service Partners Only) NOTE: This section applies only to the motherboard. 6.
Maintenance and Service Guide
Page 60
... motherboard. The left side to replacing the floppy drive and hard disk drive guide. • When replacing the hard disk drive guide, do not secure the left side of the guide gets secured during the top case replacement procedure. 2-30 Removal and Replacement Service Manual Removing the Floppy Drive HP Pavilion 4x00, HP Compaq nx9005 and nx9000, Compaq Evo Notebook N1050v and N1010v, and...
... motherboard. The left side to replacing the floppy drive and hard disk drive guide. • When replacing the hard disk drive guide, do not secure the left side of the guide gets secured during the top case replacement procedure. 2-30 Removal and Replacement Service Manual Removing the Floppy Drive HP Pavilion 4x00, HP Compaq nx9005 and nx9000, Compaq Evo Notebook N1050v and N1010v, and...
Maintenance and Service Guide
Page 61
... the four M2.5×6.0mm screws that secures the floppy drive flex cable to the top case. 5. Remove these additional assemblies: • Hard disk drive (page 2-9) • Keyboard cover (page 2-13) • Keyboard (page 2-16) • Switchboard PCA (page 2-19) • Display assembly (page...the floppy drive bezel. Remove the insulating tape that secure the floppy drive and floppy drive bezel to the TouchPad bracket on the top case. 4. Service Manual Removal and Replacement 2-31 Remove the M2.0×3.0mm screw that secures the floppy drive bezel to HP Pavilion 5x00, HP Compaq ...
... the four M2.5×6.0mm screws that secures the floppy drive flex cable to the top case. 5. Remove these additional assemblies: • Hard disk drive (page 2-9) • Keyboard cover (page 2-13) • Keyboard (page 2-16) • Switchboard PCA (page 2-19) • Display assembly (page...the floppy drive bezel. Remove the insulating tape that secure the floppy drive and floppy drive bezel to the TouchPad bracket on the top case. 4. Service Manual Removal and Replacement 2-31 Remove the M2.0×3.0mm screw that secures the floppy drive bezel to HP Pavilion 5x00, HP Compaq ...
Maintenance and Service Guide
Page 100
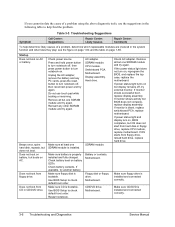
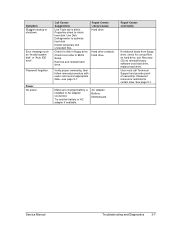
Table 3-3. SDRAM module Check AC adapter. If monitor shows activity but OS does not start from floppy drive, reload hard drive, replace hard drive. 3-8 Troubleshooting and Diagnostics Service Manual If power status light and display turn notebook off, and reconnect power and try again. Reinsert any PC cards, press the reset button to turn on , reprogram the BIOS, and...
Table 3-3. SDRAM module Check AC adapter. If monitor shows activity but OS does not start from floppy drive, reload hard drive, replace hard drive. 3-8 Troubleshooting and Diagnostics Service Manual If power status light and display turn notebook off, and reconnect power and try again. Reinsert any PC cards, press the reset button to turn on , reprogram the BIOS, and...
Maintenance and Service Guide
Page 101
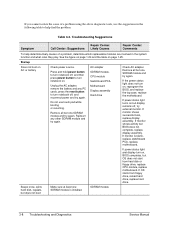
... correctly. Use BIOS Setup to check hard disk. Check boot order in BIOS Setup. Repair Center: Likely Causes Battery or contacts Motherboard Floppy disk or floppy drive Motherboard. If notebook boots from CD in CD/DVD drive Sluggish startup or shutdown Error message such...system disk" or "Auto IDE error" Call Center: Suggestions Make sure battery is restricted to reinstall factory software onto hard drive, replace hard drive. See page 5-2. Restart notebook. Use Tools tab in disk's Properties sheet to check default boot order. Delete temporary and unneeded files. Power Service ...
... correctly. Use BIOS Setup to check hard disk. Check boot order in BIOS Setup. Repair Center: Likely Causes Battery or contacts Motherboard Floppy disk or floppy drive Motherboard. If notebook boots from CD in CD/DVD drive Sluggish startup or shutdown Error message such...system disk" or "Auto IDE error" Call Center: Suggestions Make sure battery is restricted to reinstall factory software onto hard drive, replace hard drive. See page 5-2. Restart notebook. Use Tools tab in disk's Properties sheet to check default boot order. Delete temporary and unneeded files. Power Service ...
Maintenance and Service Guide
Page 105
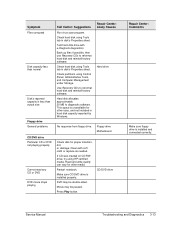
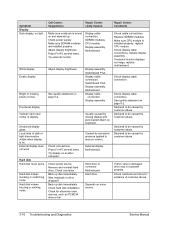
...hard disk drive with soft cloth or replace as needed. Check hard disk using Tools tab in disk's Properties sheet. Clean with e-Diagtools diagnostics. CD/DVD drive Repair Center: Comments Make sure floppy drive is less than actual size Floppy drive General problems CD/DVD drive...Causes Hard drive No response from floppy drive. Check hard disk using Tools tab in hard disk capacity reported by Windows. Back up files if possible, then use Recovery CDs to reformat hard disk and reinstall factory software. Check partitions using HP certified media. Restart notebook. If...
...hard disk drive with soft cloth or replace as needed. Check hard disk using Tools tab in disk's Properties sheet. Clean with e-Diagtools diagnostics. CD/DVD drive Repair Center: Comments Make sure floppy drive is less than actual size Floppy drive General problems CD/DVD drive...Causes Hard drive No response from floppy drive. Check hard disk using Tools tab in hard disk capacity reported by Windows. Back up files if possible, then use Recovery CDs to reformat hard disk and reinstall factory software. Check partitions using HP certified media. Restart notebook. If...
Maintenance and Service Guide
Page 111
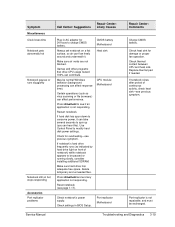
...sure hard drive has adequate free space. Check heat sink for overheating-see if an application is not repairable, and must be normal Windows behavior (background processing can hear this). Replace thermal pad if needed. If notebook slows after period of notebook) while notebook appears... and Diagnostics 3-19 Check settings in AC adapter for 24 hours to modify hard disk power settings. Port replicator Motherboard Repair Center: Comments Charge CMOS battery. If notebook's hard drive frequently runs (as virus scanning or file browsers) can contribute. Make sure ...
...sure hard drive has adequate free space. Check heat sink for overheating-see if an application is not repairable, and must be normal Windows behavior (background processing can hear this). Replace thermal pad if needed. If notebook slows after period of notebook) while notebook appears... and Diagnostics 3-19 Check settings in AC adapter for 24 hours to modify hard disk power settings. Port replicator Motherboard Repair Center: Comments Charge CMOS battery. If notebook's hard drive frequently runs (as virus scanning or file browsers) can contribute. Make sure ...
Service Manual
Page 141
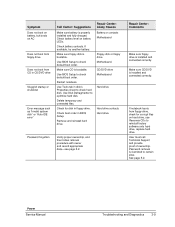
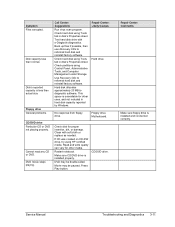
.... Check power source. Motherboard. Display assembly. Hard drive. Make sure floppy drive is blank, replace switchboard PCA, replace motherboard. If you cannot isolate the cause of a problem using the above diagnostic tools, use touch pad while booting or resuming. Reinsert any PC cards, press the reset button to turn notebook off, then reconnect power and try again...
.... Check power source. Motherboard. Display assembly. Hard drive. Make sure floppy drive is blank, replace switchboard PCA, replace motherboard. If you cannot isolate the cause of a problem using the above diagnostic tools, use touch pad while booting or resuming. Reinsert any PC cards, press the reset button to turn notebook off, then reconnect power and try again...
Service Manual
Page 142
... adapter. Password forgotten. Power No power. Check for corrupt files on hard drive, use Recovery CDs to check hard disk. Remove and reinstall hard drive. Repair Center: Comments If notebook boots from floppy drive, check for disk in disk's Properties sheet to reinstall factory software onto hard drive, replace hard drive. Service Manual Troubleshooting and Diagnostics 3-7 Check boot order in BIOS Setup...
... adapter. Password forgotten. Power No power. Check for corrupt files on hard drive, use Recovery CDs to check hard disk. Remove and reinstall hard drive. Repair Center: Comments If notebook boots from floppy drive, check for disk in disk's Properties sheet to reinstall factory software onto hard drive, replace hard drive. Service Manual Troubleshooting and Diagnostics 3-7 Check boot order in BIOS Setup...
Service Manual
Page 145
... makes clunking or scratching noise. Check power source. Was notebook or drive dropped? Usually caused by customer abuse. Replace SDRAM modules. Check display cable connection. Bright or missing pixels or lines. Switchboard PCA. Try display on page 5-2. External display. Hard drive or connector. Make sure SDRAM modules are installed properly. Display assembly. See quality statement...
... makes clunking or scratching noise. Check power source. Was notebook or drive dropped? Usually caused by customer abuse. Replace SDRAM modules. Check display cable connection. Bright or missing pixels or lines. Switchboard PCA. Try display on page 5-2. External display. Hard drive or connector. Make sure SDRAM modules are installed properly. Display assembly. See quality statement...
Service Manual
Page 146
...: Likely Causes Hard drive. No response from floppy drive. CD/DVD drive Particular CD or DVD not playing properly. Clean with e-Diagtools diagnostics. Make sure CD/DVD drive is installed and connected correctly. Check partitions using HP certified media. Check disk for other media. CD/DVD drive. Cannot read any CD or DVD. Restart notebook. Check hard disk using...
...: Likely Causes Hard drive. No response from floppy drive. CD/DVD drive Particular CD or DVD not playing properly. Clean with e-Diagtools diagnostics. Make sure CD/DVD drive is installed and connected correctly. Check partitions using HP certified media. Check disk for other media. CD/DVD drive. Cannot read any CD or DVD. Restart notebook. Check hard disk using...
Hard Drive White Paper
Page 4
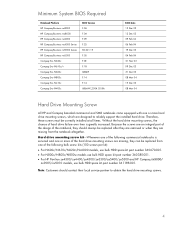
... All HP and Compaq branded commercial and SMB notebooks come equipped with one of the following commercial notebooks is greatly increased. Without the hard drive mounting screws, the chance of hard drive failure over time is serviced and one or more of the hard drive mounting screws are an integral part of the design of the notebook, they can be replaced...
... All HP and Compaq branded commercial and SMB notebooks come equipped with one of the following commercial notebooks is greatly increased. Without the hard drive mounting screws, the chance of hard drive failure over time is serviced and one or more of the hard drive mounting screws are an integral part of the design of the notebook, they can be replaced...


