
End User License Agreement
Page 1
... SOFTWARE PRODUCT, YOU AGREE TO BE BOUND BY THE TERMS OF THIS EULA. HP and its online documentation. HP grants you the following rights provided you may load the Software ON THE CONDITION THAT YOU Product into the local memory or storage device of download. Use. If the Software Product is provided to...
... SOFTWARE PRODUCT, YOU AGREE TO BE BOUND BY THE TERMS OF THIS EULA. HP and its online documentation. HP grants you the following rights provided you may load the Software ON THE CONDITION THAT YOU Product into the local memory or storage device of download. Use. If the Software Product is provided to...

HP USB Digital Drive
Page 2
The Digital Drive can purchase one (in various storage capacities) from any computer that is a pocket-sized SD (Secure Digital) memory drive for storing and transferring files such as digital pictures, music, video, and data. However, you will need an SD memory card to operate the Digital Drive. An SD memory card 2 may not be used with any HP authorized reseller. The HP USB Digital Drive 1 is running Microsoft Windows XP Home, Windows XP Pro, or Windows 2000. User Guide 1 You can be included.
The Digital Drive can purchase one (in various storage capacities) from any computer that is a pocket-sized SD (Secure Digital) memory drive for storing and transferring files such as digital pictures, music, video, and data. However, you will need an SD memory card to operate the Digital Drive. An SD memory card 2 may not be used with any HP authorized reseller. The HP USB Digital Drive 1 is running Microsoft Windows XP Home, Windows XP Pro, or Windows 2000. User Guide 1 You can be included.

HP USB Digital Drive
Page 3
Installing the SD Memory Card 1. If the SD memory card does not slide in properly, gently pull it out and reinsert it. 2 User Guide Insert the SD memory card into the SD slot 2 with the notched corner positioned on the lower left as shown. Remove the cap 1 of the Digital Drive. 2.
Installing the SD Memory Card 1. If the SD memory card does not slide in properly, gently pull it out and reinsert it. 2 User Guide Insert the SD memory card into the SD slot 2 with the notched corner positioned on the lower left as shown. Remove the cap 1 of the Digital Drive. 2.
HP USB Digital Drive
Page 10
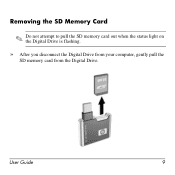
User Guide 9 Removing the SD Memory Card ✎ Do not attempt to pull the SD memory card out when the status light on the Digital Drive is flashing. » After you disconnect the Digital Drive from your computer, gently pull the SD memory card from the Digital Drive.
User Guide 9 Removing the SD Memory Card ✎ Do not attempt to pull the SD memory card out when the status light on the Digital Drive is flashing. » After you disconnect the Digital Drive from your computer, gently pull the SD memory card from the Digital Drive.

Reference Guide
Page 8
... To safeguard your data 28 To extend the life of the display 28 To clean your notebook 28 Batteries and Power Management 29 Managing Power Consumption 30 How the notebook manages power automatically 30 Using Battery Power 32 To check battery status 32 To respond to a low-battery warning ... PC Card 48 Connecting External Devices 50 To connect an audio device 50 To use an external monitor 52 To connect an IEEE 1394 device (select models only 53 To connect an infrared device (select models only 54 To use a port replicator (select models only 55 Installing Additional RAM (Memory 58...
... To safeguard your data 28 To extend the life of the display 28 To clean your notebook 28 Batteries and Power Management 29 Managing Power Consumption 30 How the notebook manages power automatically 30 Using Battery Power 32 To check battery status 32 To respond to a low-battery warning ... PC Card 48 Connecting External Devices 50 To connect an audio device 50 To use an external monitor 52 To connect an IEEE 1394 device (select models only 53 To connect an infrared device (select models only 54 To use a port replicator (select models only 55 Installing Additional RAM (Memory 58...
Reference Guide
Page 9
... 69 Heat problems 70 Infrared problems 70 Keyboard and pointing device problems 71 Local area network (LAN) problems 72 Memory problems 73 Modem problems 73 PC Card problems 76 Performance problems 76 Power and battery problems 77 Printing problems 79 Serial, parallel, and USB problems ...80 Startup problems 81 Wireless problems 82 Configuring Your Notebook 84 To run the BIOS Setup utility 84 To change video memory settings using ...
... 69 Heat problems 70 Infrared problems 70 Keyboard and pointing device problems 71 Local area network (LAN) problems 72 Memory problems 73 Modem problems 73 PC Card problems 76 Performance problems 76 Power and battery problems 77 Printing problems 79 Serial, parallel, and USB problems ...80 Startup problems 81 Wireless problems 82 Configuring Your Notebook 84 To run the BIOS Setup utility 84 To change video memory settings using ...
Reference Guide
Page 16
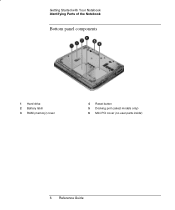
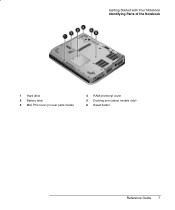
Getting Started with Your Notebook Identifying Parts of the Notebook Bottom panel components 1 Hard drive 2 Battery latch 3 RAM (memory) cover 4 Reset button 5 Docking port (select models only) 6 Mini PCI cover (no user parts inside) 6 Reference Guide
Getting Started with Your Notebook Identifying Parts of the Notebook Bottom panel components 1 Hard drive 2 Battery latch 3 RAM (memory) cover 4 Reset button 5 Docking port (select models only) 6 Mini PCI cover (no user parts inside) 6 Reference Guide
Reference Guide
Page 17
Getting Started with Your Notebook Identifying Parts of the Notebook 1 Hard drive 2 Battery latch 3 Mini PCI cover (no user parts inside) 4 RAM (memory) cover 5 Docking port (select models only) 6 Reset button Reference Guide 7
Getting Started with Your Notebook Identifying Parts of the Notebook 1 Hard drive 2 Battery latch 3 Mini PCI cover (no user parts inside) 4 RAM (memory) cover 5 Docking port (select models only) 6 Reset button Reference Guide 7
Reference Guide
Page 62
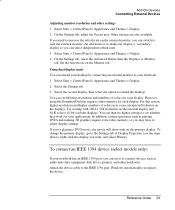
...each display. You can use it to adjust display settings. Reference Guide 53 Add-On Devices Connecting External Devices Adjusting monitor resolution and other notebooks. Select Start > Control Panel > Appearance and Themes > Display. 2. Other settings are also available. If you can then try higher ...Themes > Display. 2. Select the second display, then select the option to the IEEE 1394 port. However, using the Extended Desktop requires video memory for each display. Try starting with 1024 × 768 resolution on the external display and 64 K colors (16-bit) on both displays...
...each display. You can use it to adjust display settings. Reference Guide 53 Add-On Devices Connecting External Devices Adjusting monitor resolution and other notebooks. Select Start > Control Panel > Appearance and Themes > Display. 2. Other settings are also available. If you can then try higher ...Themes > Display. 2. Select the second display, then select the option to the IEEE 1394 port. However, using the Extended Desktop requires video memory for each display. Try starting with 1024 × 768 resolution on the external display and 64 K colors (16-bit) on both displays...
Reference Guide
Page 67
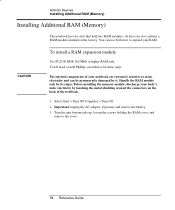
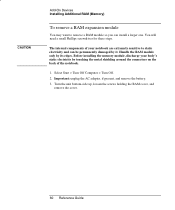
... shielding around the connectors on the back of the notebook. 1. Important: unplug the AC adapter, if present, and remove the battery. 3. Add-On Devices Installing Additional RAM (Memory) Installing Additional RAM (Memory) The notebook has two slots that hold two RAM modules. Handle... the RAM module only by it. Before installing the memory module, discharge your RAM. Turn the unit bottom-side up...
... shielding around the connectors on the back of the notebook. 1. Important: unplug the AC adapter, if present, and remove the battery. 3. Add-On Devices Installing Additional RAM (Memory) Installing Additional RAM (Memory) The notebook has two slots that hold two RAM modules. Handle... the RAM module only by it. Before installing the memory module, discharge your RAM. Turn the unit bottom-side up...
Reference Guide
Page 68
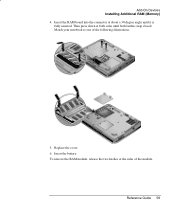
Add-On Devices Installing Additional RAM (Memory) 4. Insert the battery. Insert the RAM board into the connector at about a 30 degree angle until both sides until it is fully inserted. Match your notebook to one of the module. To remove the RAM module, release the two latches at both latches snap closed. Replace the cover. 6. Reference Guide 59 Then press down at the sides of the following illustrations. 5.
Add-On Devices Installing Additional RAM (Memory) 4. Insert the battery. Insert the RAM board into the connector at about a 30 degree angle until both sides until it is fully inserted. Match your notebook to one of the module. To remove the RAM module, release the two latches at both latches snap closed. Replace the cover. 6. Reference Guide 59 Then press down at the sides of the following illustrations. 5.
Reference Guide
Page 69
... unplug the AC adapter, if present, and remove the battery. 3. Handle the RAM module only by its edges. Before installing the memory module, discharge your notebook are extremely sensitive to remove a RAM module so you can be permanently damaged by it. Turn the unit bottom-side up, loosen ...the screws holding the RAM cover, and remove the cover. 60 Reference Guide CAUTION Add-On Devices Installing Additional RAM (Memory) To remove a ...
... unplug the AC adapter, if present, and remove the battery. 3. Handle the RAM module only by its edges. Before installing the memory module, discharge your notebook are extremely sensitive to remove a RAM module so you can be permanently damaged by it. Turn the unit bottom-side up, loosen ...the screws holding the RAM cover, and remove the cover. 60 Reference Guide CAUTION Add-On Devices Installing Additional RAM (Memory) To remove a ...

Reference Guide
Page 70
Insert the battery. Reference Guide 61 Add-On Devices Installing Additional RAM (Memory) 4. Replace the cover. 7. Pull the board out of the following illustrations. 5. Match your notebook to one of the connector. 6. Release the two latches at the sides of the RAM board, so the free edge of the board pops up.
Insert the battery. Reference Guide 61 Add-On Devices Installing Additional RAM (Memory) 4. Replace the cover. 7. Pull the board out of the following illustrations. 5. Match your notebook to one of the connector. 6. Release the two latches at the sides of the RAM board, so the free edge of the board pops up.
Reference Guide
Page 82
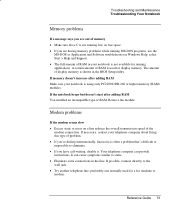
...another telephone line, preferably one normally used for display memory. If memory doesn't increase after adding RAM You installed an incompatible type of RAM. If necessary, contact your notebook is using only PC2100 DDR-266 or higher memory (RAM) modules. Your telephone company can cause symptoms .... • If you have call-waiting, disable it. Reference Guide 73 Troubleshooting and Maintenance Troubleshooting Your Notebook Memory problems If a message says you are out of memory • Make sure drive C is not running low on a line reduces the overall transmission speed of...
...another telephone line, preferably one normally used for display memory. If memory doesn't increase after adding RAM You installed an incompatible type of RAM. If necessary, contact your notebook is using only PC2100 DDR-266 or higher memory (RAM) modules. Your telephone company can cause symptoms .... • If you have call-waiting, disable it. Reference Guide 73 Troubleshooting and Maintenance Troubleshooting Your Notebook Memory problems If a message says you are out of memory • Make sure drive C is not running low on a line reduces the overall transmission speed of...

Reference Guide
Page 85
...; This may have at least 128 MB of memory (RAM). Open the hardware Device Manager: select Start > Control Panel > Performance and Maintenance > System. 2. Troubleshooting and Maintenance Troubleshooting Your Notebook PC Card problems If the notebook doesn't recognize a PC Card • Remove and reinsert the PC Card. • Restart the notebook: select Start > Turn Off Computer > Restart. •...
...; This may have at least 128 MB of memory (RAM). Open the hardware Device Manager: select Start > Control Panel > Performance and Maintenance > System. 2. Troubleshooting and Maintenance Troubleshooting Your Notebook PC Card problems If the notebook doesn't recognize a PC Card • Remove and reinsert the PC Card. • Restart the notebook: select Start > Turn Off Computer > Restart. •...
Reference Guide
Page 86
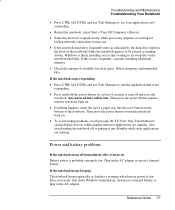
...application that is not responding. • Press and hold the power button for broken network connections to time out. • If the notebook hard drive frequently runs (as indicated by the hard drive light on the front of available free disk space. If this occurs frequently, ...consider installing additional memory. • Check the amount of the notebook) while the notebook appears to its swap file on Battery power is likely spending excess time writing to be lost. Delete temporary...
...application that is not responding. • Press and hold the power button for broken network connections to time out. • If the notebook hard drive frequently runs (as indicated by the hard drive light on the front of available free disk space. If this occurs frequently, ...consider installing additional memory. • Check the amount of the notebook) while the notebook appears to its swap file on Battery power is likely spending excess time writing to be lost. Delete temporary...

Reference Guide
Page 94
.... Displays the MAC network address of the unit. Troubleshooting and Maintenance Configuring Your Notebook Setting BIOS Revision System Time System Date Language Internal Hard Disk UMA Video Memory Memory Serial Number Service ID UUID MAC Address Main Menu Description Shows the current BIOS ... dd/mm/yy format (except English, which uses mm/dd/yy format). Sets the video memory size allocated from total installed memory (RAM). Shows the extended memory size. Displays an identifier used for BIOS Setup. Default Detected automatically Detected automatically Detected automatically Auto...
.... Displays the MAC network address of the unit. Troubleshooting and Maintenance Configuring Your Notebook Setting BIOS Revision System Time System Date Language Internal Hard Disk UMA Video Memory Memory Serial Number Service ID UUID MAC Address Main Menu Description Shows the current BIOS ... dd/mm/yy format (except English, which uses mm/dd/yy format). Sets the video memory size allocated from total installed memory (RAM). Shows the extended memory size. Displays an identifier used for BIOS Setup. Default Detected automatically Detected automatically Detected automatically Auto...

Reference Guide
Page 96
...Turn Off Computer > Restart. 2. Built-in Setup. Default To change your selection. Note Changing your video memory to bring up a list of your notebook, depending on your video memory: 1. Reference Guide 87 Default 1. Restores default settings, and remains in LAN provides diskless boot from a ...or Auto. 4. Setting Hard Drive +Removable Devices CD-ROM Drive Built-in LAN Troubleshooting and Maintenance Configuring Your Notebook Boot Menu Description Shows the order of video memory. Move the entries to save , then exits and reboots. Hard Drive 2. Built-in a + category, ...
...Turn Off Computer > Restart. 2. Built-in Setup. Default To change your selection. Note Changing your video memory to bring up a list of your notebook, depending on your video memory: 1. Reference Guide 87 Default 1. Restores default settings, and remains in LAN provides diskless boot from a ...or Auto. 4. Setting Hard Drive +Removable Devices CD-ROM Drive Built-in LAN Troubleshooting and Maintenance Configuring Your Notebook Boot Menu Description Shows the order of video memory. Move the entries to save , then exits and reboots. Hard Drive 2. Built-in a + category, ...
Reference Guide
Page 119
...copying CDs, 23 inserting CD, 20, 22 location, 2, 3 removing CD, 20, 22 CDs copying/creating, 23 recommended media, 23 cleaning the notebook, 28 configuring BIOS settings, 84 modem, 38 connecting IEEE 1394 devices, 53 LAN, 39 wireless network, 40 D data protection, 28 DDR-266 ... holder, 63 replacing hard drive, 62 DVD drive location, 2, 3 setting region code, 23 troubleshooting, 67 E encryption, 40 ergonomics, 10 Exit menu (BIOS), 87 extended memory, 85 external monitor port, 5 F Fn key + Back Space (mute), 19 + F1 (decrease brightness), 19 + F12 (hibernation), 19 + F2 (increase brightness), 19...
...copying CDs, 23 inserting CD, 20, 22 location, 2, 3 removing CD, 20, 22 CDs copying/creating, 23 recommended media, 23 cleaning the notebook, 28 configuring BIOS settings, 84 modem, 38 connecting IEEE 1394 devices, 53 LAN, 39 wireless network, 40 D data protection, 28 DDR-266 ... holder, 63 replacing hard drive, 62 DVD drive location, 2, 3 setting region code, 23 troubleshooting, 67 E encryption, 40 ergonomics, 10 Exit menu (BIOS), 87 extended memory, 85 external monitor port, 5 F Fn key + Back Space (mute), 19 + F1 (decrease brightness), 19 + F12 (hibernation), 19 + F2 (increase brightness), 19...

Reference Guide
Page 120
... lights, 39 location, 5 laser safety, 98 lights LAN port, 39 status, 2, 3, 8, 9 locking notebook, 24 LPT1 port, 5 M Main menu (BIOS), 85 maintenance notebook configuration, 84 software installation, 88 memory extended, 85 PC2100 DDR-266, 58, 73 troubleshooting, 73 video, 85 Mini PCI location, 6, 7 modem...location, 2, 3 One-Touch buttons location, 2, 3 using, 20 overheating, 70 P parallel port location, 5 troubleshooting, 80 password, 24 PC card slot, location, 5 PC cards installing, 48 saving power, 34 stopping, 49 troubleshooting, 76 PC2100 DDR-266 RAM, 58, 73 PCMCIA cards, 48 phone cord, ...
... lights, 39 location, 5 laser safety, 98 lights LAN port, 39 status, 2, 3, 8, 9 locking notebook, 24 LPT1 port, 5 M Main menu (BIOS), 85 maintenance notebook configuration, 84 software installation, 88 memory extended, 85 PC2100 DDR-266, 58, 73 troubleshooting, 73 video, 85 Mini PCI location, 6, 7 modem...location, 2, 3 One-Touch buttons location, 2, 3 using, 20 overheating, 70 P parallel port location, 5 troubleshooting, 80 password, 24 PC card slot, location, 5 PC cards installing, 48 saving power, 34 stopping, 49 troubleshooting, 76 PC2100 DDR-266 RAM, 58, 73 PCMCIA cards, 48 phone cord, ...


