
HP USB Digital Drive
Page 2
You can be included. The Digital Drive can purchase one (in various storage capacities) from any computer that is a pocket-sized SD (Secure Digital) memory drive for storing and transferring files such as digital pictures, music, video, and data. User Guide 1 The HP USB Digital Drive 1 is running Microsoft Windows XP Home, Windows XP Pro, or Windows 2000. An SD memory card 2 may not be used with any HP authorized reseller. However, you will need an SD memory card to operate the Digital Drive.
You can be included. The Digital Drive can purchase one (in various storage capacities) from any computer that is a pocket-sized SD (Secure Digital) memory drive for storing and transferring files such as digital pictures, music, video, and data. User Guide 1 The HP USB Digital Drive 1 is running Microsoft Windows XP Home, Windows XP Pro, or Windows 2000. An SD memory card 2 may not be used with any HP authorized reseller. However, you will need an SD memory card to operate the Digital Drive.

HP USB Digital Drive
Page 3
If the SD memory card does not slide in properly, gently pull it out and reinsert it. 2 User Guide Remove the cap 1 of the Digital Drive. 2. Insert the SD memory card into the SD slot 2 with the notched corner positioned on the lower left as shown. Installing the SD Memory Card 1.
If the SD memory card does not slide in properly, gently pull it out and reinsert it. 2 User Guide Remove the cap 1 of the Digital Drive. 2. Insert the SD memory card into the SD slot 2 with the notched corner positioned on the lower left as shown. Installing the SD Memory Card 1.
HP USB Digital Drive
Page 4
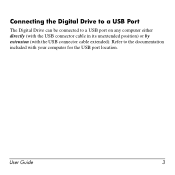
Refer to a USB port on any computer either directly (with the USB connector cable in its unextended position) or by extension (with your computer for the USB port location. User Guide 3 Connecting the Digital Drive to a USB Port The Digital Drive can be connected to the documentation included with the USB connector cable extended).
Refer to a USB port on any computer either directly (with the USB connector cable in its unextended position) or by extension (with your computer for the USB port location. User Guide 3 Connecting the Digital Drive to a USB Port The Digital Drive can be connected to the documentation included with the USB connector cable extended).
HP USB Digital Drive
Page 5
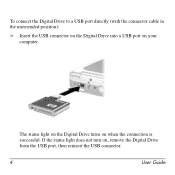
If the status light does not turn on your computer. To connect the Digital Drive to a USB port directly (with the connector cable in the unextended position): » Insert the USB connector on the Digital Drive into a USB port on , remove the Digital Drive from the USB port, then reinsert the USB connector. 4 User Guide The status light on the Digital Drive turns on when the connection is successful.
If the status light does not turn on your computer. To connect the Digital Drive to a USB port directly (with the connector cable in the unextended position): » Insert the USB connector on the Digital Drive into a USB port on , remove the Digital Drive from the USB port, then reinsert the USB connector. 4 User Guide The status light on the Digital Drive turns on when the connection is successful.

HP USB Digital Drive
Page 6
Rotate the USB connector cable out of its extended position): 1. To connect the Digital Drive to a USB port by extension (with the USB cable in its track gently until it is fully extended. User Guide 5
Rotate the USB connector cable out of its extended position): 1. To connect the Digital Drive to a USB port by extension (with the USB cable in its track gently until it is fully extended. User Guide 5
HP USB Digital Drive
Page 7
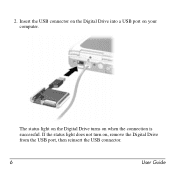
If the status light does not turn on your computer. 2. Insert the USB connector on the Digital Drive into a USB port on , remove the Digital Drive from the USB port, then reinsert the USB connector. 6 User Guide The status light on the Digital Drive turns on when the connection is successful.
If the status light does not turn on your computer. 2. Insert the USB connector on the Digital Drive into a USB port on , remove the Digital Drive from the USB port, then reinsert the USB connector. 6 User Guide The status light on the Digital Drive turns on when the connection is successful.
HP USB Digital Drive
Page 8
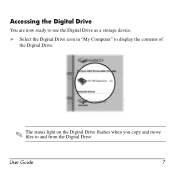
User Guide 7 Accessing the Digital Drive You are now ready to use the Digital Drive as a storage device. » Select the Digital Drive icon in "My Computer" to display the contents of the Digital Drive. ✎ The status light on the Digital Drive flashes when you copy and move files to and from the Digital Drive.
User Guide 7 Accessing the Digital Drive You are now ready to use the Digital Drive as a storage device. » Select the Digital Drive icon in "My Computer" to display the contents of the Digital Drive. ✎ The status light on the Digital Drive flashes when you copy and move files to and from the Digital Drive.

HP USB Digital Drive
Page 9
Gently unplug the Digital Drive from the USB port. ✎ If the USB connector cable is flashing. 1. Select the "Safely Remove Hardware" icon on your screen. 3. A dialog box displays a list of connected devices. 2. Disconnecting the Digital Drive ✎ Do not attempt to Remove Hardware" message appears on your taskbar. Select the Digital Drive and wait until the "Safe to remove the Digital Drive when the status light on the Digital Drive is in the extended position, return it on its track for safe storage. 8 User Guide
Gently unplug the Digital Drive from the USB port. ✎ If the USB connector cable is flashing. 1. Select the "Safely Remove Hardware" icon on your screen. 3. A dialog box displays a list of connected devices. 2. Disconnecting the Digital Drive ✎ Do not attempt to Remove Hardware" message appears on your taskbar. Select the Digital Drive and wait until the "Safe to remove the Digital Drive when the status light on the Digital Drive is in the extended position, return it on its track for safe storage. 8 User Guide
HP USB Digital Drive
Page 10
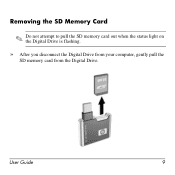
Removing the SD Memory Card ✎ Do not attempt to pull the SD memory card out when the status light on the Digital Drive is flashing. » After you disconnect the Digital Drive from your computer, gently pull the SD memory card from the Digital Drive. User Guide 9
Removing the SD Memory Card ✎ Do not attempt to pull the SD memory card out when the status light on the Digital Drive is flashing. » After you disconnect the Digital Drive from your computer, gently pull the SD memory card from the Digital Drive. User Guide 9
HP USB Digital Drive
Page 11
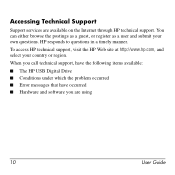
... register as a user and submit your country or region. To access HP technical support, visit the HP Web site at http://www.hp.com, and select your own questions. HP responds to questions in a timely manner. Accessing Technical Support Support services are using 10 User Guide When you call... technical support, have the following items available: ■ The HP USB Digital Drive ■ Conditions under which the problem occurred ■ Error messages that have ...
... register as a user and submit your country or region. To access HP technical support, visit the HP Web site at http://www.hp.com, and select your own questions. HP responds to questions in a timely manner. Accessing Technical Support Support services are using 10 User Guide When you call... technical support, have the following items available: ■ The HP USB Digital Drive ■ Conditions under which the problem occurred ■ Error messages that have ...

HP USB Digital Drive
Page 112
The warranties for technical or editorial errors or omissions contained herein. User Guide HP USB Digital Drive First Edition July 2003 The information contained herein is a trademark. and/or other countries. Microsoft and Windows are set forth in the U.S. SD Logo is subject to change without notice. © 2003 Hewlett-Packard Development Company, L.P. HP shall not be liable for HP products and services are trademarks of Microsoft Corporation in the express warranty statements accompanying such products and services.
The warranties for technical or editorial errors or omissions contained herein. User Guide HP USB Digital Drive First Edition July 2003 The information contained herein is a trademark. and/or other countries. Microsoft and Windows are set forth in the U.S. SD Logo is subject to change without notice. © 2003 Hewlett-Packard Development Company, L.P. HP shall not be liable for HP products and services are trademarks of Microsoft Corporation in the express warranty statements accompanying such products and services.
Hardware-Software Guide
Page 27
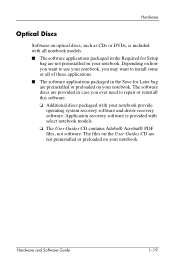
... the Required for Later bag are not preinstalled or preloaded on your notebook, you want to use your notebook. Depending on how you may want to repair or reinstall this software. ❏ Additional discs packaged with select notebook models. ❏ The User Guides CD contains Adobe® Acrobat® PDF files, not software. Hardware and...
... the Required for Later bag are not preinstalled or preloaded on your notebook, you want to use your notebook. Depending on how you may want to repair or reinstall this software. ❏ Additional discs packaged with select notebook models. ❏ The User Guides CD contains Adobe® Acrobat® PDF files, not software. Hardware and...

Hardware-Software Guide
Page 40
...6, "Security." For information about combining Windows passwords with HP passwords, refert to display the Log On window and lock the notebook. Decrease Brightness (fn+f7) The fn+f7 hotkey decreases the brightness of the notebook screen. For instructions, refer to Help and Support by...longer you must set a Windows user password or a Windows administrator password. Increase Brightness (fn+f8) The fn+f8 hotkey increases the brightness of the notebook screen. While the Log On window is displayed, the notebook cannot be accessed until a Windows user password or a Windows administrator ...
...6, "Security." For information about combining Windows passwords with HP passwords, refert to display the Log On window and lock the notebook. Decrease Brightness (fn+f7) The fn+f7 hotkey decreases the brightness of the notebook screen. For instructions, refer to Help and Support by...longer you must set a Windows user password or a Windows administrator password. Increase Brightness (fn+f8) The fn+f8 hotkey increases the brightness of the notebook screen. While the Log On window is displayed, the notebook cannot be accessed until a Windows user password or a Windows administrator ...

Hardware-Software Guide
Page 93
...with each public WLAN location for a list of your computer screen. If you do not enable security on your WLAN, an unauthorized wireless user can access your data and use one or more of the following security measures: ■ Change the default network name (SSID) and password.... ■ Use a firewall. ■ Set security on the router. 5-6 Hardware and Software Guide The most common security levels are within range of a public WLAN, a Wireless Network Connection interactive message is displayed at the bottom of public WLANs near...
...with each public WLAN location for a list of your computer screen. If you do not enable security on your WLAN, an unauthorized wireless user can access your data and use one or more of the following security measures: ■ Change the default network name (SSID) and password.... ■ Use a firewall. ■ Set security on the router. 5-6 Hardware and Software Guide The most common security levels are within range of a public WLAN, a Wireless Network Connection interactive message is displayed at the bottom of public WLANs near...

Hardware-Software Guide
Page 103
...Log On window. Whenever you cannot start up the computer or restore from the computer. Hardware and Software Guide 6-3 While the Log On window is displayed, the computer cannot be enabled in the Setup utility cannot be accessed until a ...QuickLock, press fn+f6. ■ To exit QuickLock, enter your service partner for additional information. Call Customer Care or your Windows user password or Windows administrator password. Setup utility security features and Windows operating system security features function independently. Security QuickLock QuickLock protects your computer ...
...Log On window. Whenever you cannot start up the computer or restore from the computer. Hardware and Software Guide 6-3 While the Log On window is displayed, the computer cannot be enabled in the Setup utility cannot be accessed until a ...QuickLock, press fn+f6. ■ To exit QuickLock, enter your service partner for additional information. Call Customer Care or your Windows user password or Windows administrator password. Setup utility security features and Windows operating system security features function independently. Security QuickLock QuickLock protects your computer ...

Hardware-Software Guide
Page 104
...restored from hibernation. *For information about Windows passwords, such as screen-saver passwords, select Start > Help and Support. User password* Protects access to Windows administrator-level computer contents. For additional information about setting a Windows password, select Start > Help... and Support. 6-4 Hardware and Software Guide Windows Passwords Function Administrator password* Protects access to a Windows user account. The following table lists commonly used to access the Setup utility, and a Setup ...
...restored from hibernation. *For information about Windows passwords, such as screen-saver passwords, select Start > Help and Support. User password* Protects access to Windows administrator-level computer contents. For additional information about setting a Windows password, select Start > Help... and Support. 6-4 Hardware and Software Guide Windows Passwords Function Administrator password* Protects access to a Windows user account. The following table lists commonly used to access the Setup utility, and a Setup ...
Hardware-Software Guide
Page 113
Hardware and Software Guide 6-13 Firewalls monitor all incoming and outgoing traffic on a network, or block authorized e-mail attachments. To permanently resolve the problem, reconfigure the firewall. Refer to ... recommended that you want to obtain information about you, your computer, and your computer by including features such as logging and reporting, automatic alarms, and user interfaces for unauthorized persons to perform, and then reenable the firewall. To temporarily solve the problem, disable the firewall, perform the task that you use...
Hardware and Software Guide 6-13 Firewalls monitor all incoming and outgoing traffic on a network, or block authorized e-mail attachments. To permanently resolve the problem, reconfigure the firewall. Refer to ... recommended that you want to obtain information about you, your computer, and your computer by including features such as logging and reporting, automatic alarms, and user interfaces for unauthorized persons to perform, and then reenable the firewall. To temporarily solve the problem, disable the firewall, perform the task that you use...

Hardware-Software Guide
Page 126
... metal object and (2) Avoid touching the connectors on the User Guides CD. ■ Excessive force can damage electronic components. Products with magnetic fields include airport walk-through devices and security wands. To prevent electrostatic damage to the notebook or a drive, follow these 2 precautions: (1) Discharge ... temperatures, and high humidity. The airport security devices that protects it is placed on a conveyor belt, use only enough force to the notebook or a drive and loss of magnetism and will not damage a hard drive or a diskette. ■ Do not spray a drive with...
... metal object and (2) Avoid touching the connectors on the User Guides CD. ■ Excessive force can damage electronic components. Products with magnetic fields include airport walk-through devices and security wands. To prevent electrostatic damage to the notebook or a drive, follow these 2 precautions: (1) Discharge ... temperatures, and high humidity. The airport security devices that protects it is placed on a conveyor belt, use only enough force to the notebook or a drive and loss of magnetism and will not damage a hard drive or a diskette. ■ Do not spray a drive with...

Hardware-Software Guide
Page 132
...; WARNING: To prevent exposure to electrical shock and damage to the notebook, shut down the notebook. Save your work and close all external devices connected to the "Replacing a Battery Pack" section in Regulatory and Safety Notices on the User Guides CD. 1. Disconnect the notebook from damaging electronic components: before beginning this procedure. The memory compartment...
...; WARNING: To prevent exposure to electrical shock and damage to the notebook, shut down the notebook. Save your work and close all external devices connected to the "Replacing a Battery Pack" section in Regulatory and Safety Notices on the User Guides CD. 1. Disconnect the notebook from damaging electronic components: before beginning this procedure. The memory compartment...
Hardware-Software Guide
Page 149
... message that is displayed in the lower-left corner of the screen each time the notebook is started or restarted in Windows or restored from hibernation is the prompt for advanced users only, refer to change the boot order. For more information about the Setup utility ...features recommended for a Network Service Boot. The Setup utility features available for advanced users include a hard drive self-test, a Network Service Boot, and settings for all users. Hardware and Software Guide 8-13 The "Press to the Help and Support Center by selecting Start > Help and Support...
... message that is displayed in the lower-left corner of the screen each time the notebook is started or restarted in Windows or restored from hibernation is the prompt for advanced users only, refer to change the boot order. For more information about the Setup utility ...features recommended for a Network Service Boot. The Setup utility features available for advanced users include a hard drive self-test, a Network Service Boot, and settings for all users. Hardware and Software Guide 8-13 The "Press to the Help and Support Center by selecting Start > Help and Support...


