
End User License Agreement
Page 2
...expressly provided for in this EULA. 8. LIMITATION ON REVERSE ENGINEERING. You may make a one-time transfer of the HP Product with /for your upgrade eligibility. 3. This EULA will prevail. 4. UPGRADES. To use . In case of this EULA. 7. The initial user of the Software Product may not reverse ... Third Party. CONSENT TO USE OF DATA. f. Recovery Solution. a. You may no longer use the Software Product for the upgrade. You agree that HP and its affiliates may collect and use technical information you may not rent, lease or lend the Software Product or use the...
...expressly provided for in this EULA. 8. LIMITATION ON REVERSE ENGINEERING. You may make a one-time transfer of the HP Product with /for your upgrade eligibility. 3. This EULA will prevail. 4. UPGRADES. To use . In case of this EULA. 7. The initial user of the Software Product may not reverse ... Third Party. CONSENT TO USE OF DATA. f. Recovery Solution. a. You may no longer use the Software Product for the upgrade. You agree that HP and its affiliates may collect and use technical information you may not rent, lease or lend the Software Product or use the...
Using LightScribe (Select Models Only)
Page 4
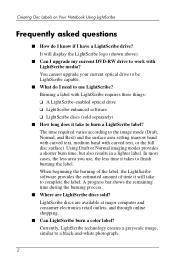
... of time it will display the LightScribe logo (shown above). ■ Can I upgrade my current DVD-RW drive to complete the label. In most cases, the less area you use LightScribe? You ...cannot upgrade your current optical drive to be LightScribe capable. ■ What do I know if I need to ... creates a grayscale image, similar to finish burning the label. Creating Disc Labels on Your Notebook Using LightScribe Frequently asked questions ■ How do I have a LightScribe drive?
... of time it will display the LightScribe logo (shown above). ■ Can I upgrade my current DVD-RW drive to complete the label. In most cases, the less area you use LightScribe? You ...cannot upgrade your current optical drive to be LightScribe capable. ■ What do I know if I need to ... creates a grayscale image, similar to finish burning the label. Creating Disc Labels on Your Notebook Using LightScribe Frequently asked questions ■ How do I have a LightScribe drive?
Hardware-Software Guide
Page 7
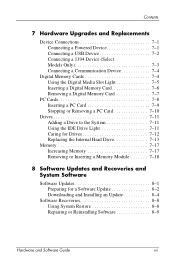
Contents 7 Hardware Upgrades and Replacements Device Connections 7-1 Connecting a Powered Device 7-1 Connecting a USB Device 7-2 Connecting a 1394 Device (Select Models Only 7-3 Connecting a Communication Device 7-4 Digital Memory Cards 7-4 Using the Digital Media Slot Light 7-5 Inserting a Digital Memory Card 7-6 Removing a Digital Memory Card 7-7 PC Cards 7-8 Inserting a PC Card 7-9 Stopping or Removing a PC Card 7-10 Drives 7-11 Adding a Drive to...
Contents 7 Hardware Upgrades and Replacements Device Connections 7-1 Connecting a Powered Device 7-1 Connecting a USB Device 7-2 Connecting a 1394 Device (Select Models Only 7-3 Connecting a Communication Device 7-4 Digital Memory Cards 7-4 Using the Digital Media Slot Light 7-5 Inserting a Digital Memory Card 7-6 Removing a Digital Memory Card 7-7 PC Cards 7-8 Inserting a PC Card 7-9 Stopping or Removing a PC Card 7-10 Drives 7-11 Adding a Drive to...

Hardware-Software Guide
Page 115
.... 3. Be sure the device is turned off the device. 2. Hardware and Software Guide 7-1 7 Hardware Upgrades and Replacements Device Connections Connecting a Powered Device To connect the notebook to the connected device. Turn off . 2. Disconnect the device from the notebook: 1. Plug the device power cord into a grounded AC outlet. 4. Connect the device to the jack... pressing the fn+f4 hotkey to switch the image to an optional external device that has a power cord: 1. To disconnect a powered external device from the notebook.
.... 3. Be sure the device is turned off the device. 2. Hardware and Software Guide 7-1 7 Hardware Upgrades and Replacements Device Connections Connecting a Powered Device To connect the notebook to the connected device. Turn off . 2. Disconnect the device from the notebook: 1. Plug the device power cord into a grounded AC outlet. 4. Connect the device to the jack... pressing the fn+f4 hotkey to switch the image to an optional external device that has a power cord: 1. To disconnect a powered external device from the notebook.

Hardware-Software Guide
Page 116
... to a port on a powered hub. A hub is a hardware interface that can be either to a USB port on the notebook support USB 2.0-compliant, USB 1.1-compliant, and USB 1.0-compliant devices. 7-2 Hardware and Software Guide Hardware Upgrades and Replacements Connecting a USB Device USB (Universal Serial Bus) is a connecting device that can be used to increase...
... to a port on a powered hub. A hub is a hardware interface that can be either to a USB port on the notebook support USB 2.0-compliant, USB 1.1-compliant, and USB 1.0-compliant devices. 7-2 Hardware and Software Guide Hardware Upgrades and Replacements Connecting a USB Device USB (Universal Serial Bus) is a connecting device that can be used to increase...

Hardware-Software Guide
Page 117
The notebook 1394 port, illustrated below, supports IEEE 1394a devices. Hardware and Software Guide 7-3 You may have to the Web site of the device manufacturer or provider. ... information about device-specific software, refer to the device documentation or to load device-specific drivers and other software before using some 1394 devices. Hardware Upgrades and Replacements Connecting a 1394 Device (Select Models Only) IEEE 1394 is a hardware interface that can be used to connect a high-speed multimedia or data storage...
The notebook 1394 port, illustrated below, supports IEEE 1394a devices. Hardware and Software Guide 7-3 You may have to the Web site of the device manufacturer or provider. ... information about device-specific software, refer to the device documentation or to load device-specific drivers and other software before using some 1394 devices. Hardware Upgrades and Replacements Connecting a 1394 Device (Select Models Only) IEEE 1394 is a hardware interface that can be used to connect a high-speed multimedia or data storage...

Hardware-Software Guide
Page 118
... server during startup, refer to the "Using Advanced Setup Utility Features" section in the printed Getting Started guide included with your notebook. For information about modem, wireless, and network connections, select Start > Help and Support. The Help and Support Center provides ...Internet service provider (ISP) are provided in Chapter 8, "Software Updates and Recoveries and System Software." Hardware Upgrades and Replacements Connecting a Communication Device Basic instructions for digital storage on cameras, camcorders, and other handheld devices. 7-4 Hardware and ...
... server during startup, refer to the "Using Advanced Setup Utility Features" section in the printed Getting Started guide included with your notebook. For information about modem, wireless, and network connections, select Start > Help and Support. The Help and Support Center provides ...Internet service provider (ISP) are provided in Chapter 8, "Software Updates and Recoveries and System Software." Hardware Upgrades and Replacements Connecting a Communication Device Basic instructions for digital storage on cameras, camcorders, and other handheld devices. 7-4 Hardware and ...

Hardware-Software Guide
Page 119
... light is turned off when an inserted digital memory card is inactive or when the Digital Media Slot is being accessed. Hardware Upgrades and Replacements You can set the notebook to open the files on a digital memory card in ways you could set a digital memory card to the "Setting AutoPlay Preferences" section...
... light is turned off when an inserted digital memory card is inactive or when the Digital Media Slot is being accessed. Hardware Upgrades and Replacements You can set the notebook to open the files on a digital memory card in ways you could set a digital memory card to the "Setting AutoPlay Preferences" section...
Hardware-Software Guide
Page 120
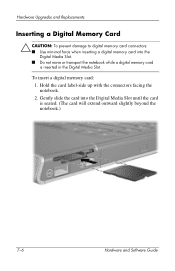
To insert a digital memory card: 1. Hardware Upgrades and Replacements Inserting a Digital Memory Card Ä CAUTION: To prevent damage to digital memory card connectors: ■ Use minimal force when inserting a digital memory card ... the card is inserted in the Digital Media Slot. Hold the card label-side up with the connectors facing the notebook. 2. Gently slide the card into the Digital Media Slot. ■ Do not move or transport the notebook while a digital memory card is seated. (The card will extend outward slightly beyond the...
To insert a digital memory card: 1. Hardware Upgrades and Replacements Inserting a Digital Memory Card Ä CAUTION: To prevent damage to digital memory card connectors: ■ Use minimal force when inserting a digital memory card ... the card is inserted in the Digital Media Slot. Hold the card label-side up with the connectors facing the notebook. 2. Gently slide the card into the Digital Media Slot. ■ Do not move or transport the notebook while a digital memory card is seated. (The card will extend outward slightly beyond the...

Hardware-Software Guide
Page 121
Slide the card out of the slot. Hardware Upgrades and Replacements Removing a Digital Memory Card To remove a digital memory card: 1. Right-click the drive assigned to the card, and then select Eject. (The card is stopped but is not released from the 6-in the Windows Copying window.) 2. Select the My Computer icon on the Windows Desktop. 3. Close all applications and complete all activities that are using the card. (To stop a data transfer, select the cancel button in -1 Digital Media Slot.) 4. Hardware and Software Guide 7-7
Slide the card out of the slot. Hardware Upgrades and Replacements Removing a Digital Memory Card To remove a digital memory card: 1. Right-click the drive assigned to the card, and then select Eject. (The card is stopped but is not released from the 6-in the Windows Copying window.) 2. Select the My Computer icon on the Windows Desktop. 3. Close all applications and complete all activities that are using the card. (To stop a data transfer, select the cancel button in -1 Digital Media Slot.) 4. Hardware and Software Guide 7-7

Hardware-Software Guide
Page 122
... be supplied by the PC Card manufacturer. The notebook PC Card slot supports one Type I or Type II 32-bit (CardBus) or 16-bit PC Card. 7-8 Hardware and Software Guide Hardware Upgrades and Replacements PC Cards Ä CAUTION: To preserve support for your operating system. ■ Do not ... to the standard specifications of the enablers provided by a single PC Card manufacturer. A PC Card is a credit card-sized accessory designed to conform to the notebook. If you are instructed by the documentation included with a PC Card to install device drivers: ■ Install only the device...
... be supplied by the PC Card manufacturer. The notebook PC Card slot supports one Type I or Type II 32-bit (CardBus) or 16-bit PC Card. 7-8 Hardware and Software Guide Hardware Upgrades and Replacements PC Cards Ä CAUTION: To preserve support for your operating system. ■ Do not ... to the standard specifications of the enablers provided by a single PC Card manufacturer. A PC Card is a credit card-sized accessory designed to conform to the notebook. If you are instructed by the documentation included with a PC Card to install device drivers: ■ Install only the device...

Hardware-Software Guide
Page 123
Hardware Upgrades and Replacements Inserting a PC Card Ä CAUTION: To prevent damage to the PC Card connectors: ■ Use minimal force when inserting a PC Card into the slot until the card is inserted. 1. Hardware and Software Guide 7-9 Gently slide the card into a PC Card slot. ■ Do not move or transport the notebook while a PC Card is seated. Hold the PC Card label-side up with the connectors facing the notebook. 2.
Hardware Upgrades and Replacements Inserting a PC Card Ä CAUTION: To prevent damage to the PC Card connectors: ■ Use minimal force when inserting a PC Card into the slot until the card is inserted. 1. Hardware and Software Guide 7-9 Gently slide the card into a PC Card slot. ■ Do not move or transport the notebook while a PC Card is seated. Hold the PC Card label-side up with the connectors facing the notebook. 2.

Hardware-Software Guide
Page 124
... 2. 2. Close all applications and complete all activities that are supported by the PC Card. Hardware Upgrades and Replacements Stopping or Removing a PC Card Ä CAUTION: To prevent loss of work or an unresponsive system, stop a PC Card before removing it. ✎ Stopping a PC Card, even if it is not in the notification area, and then...
... 2. 2. Close all applications and complete all activities that are supported by the PC Card. Hardware Upgrades and Replacements Stopping or Removing a PC Card Ä CAUTION: To prevent loss of work or an unresponsive system, stop a PC Card before removing it. ✎ Stopping a PC Card, even if it is not in the notification area, and then...

Hardware-Software Guide
Page 125
Hardware Upgrades and Replacements Drives Adding a Drive to the System The internal hard drive and optical drive are standard features of optical drive varies by the IDE (Integrated Drive Electronics) light. Hard drive capacity can be added with a microdrive PC Card or a digital memory card such as instructed in the drive documentation, to... optional drive can also be added to the 1394 port. Using the IDE Drive Light Internal hard drive or optical drive activity is indicated by notebook model. The type of the notebook. Hardware and Software Guide 7-11
Hardware Upgrades and Replacements Drives Adding a Drive to the System The internal hard drive and optical drive are standard features of optical drive varies by the IDE (Integrated Drive Electronics) light. Hard drive capacity can be added with a microdrive PC Card or a digital memory card such as instructed in the drive documentation, to... optional drive can also be added to the 1394 port. Using the IDE Drive Light Internal hard drive or optical drive activity is indicated by notebook model. The type of the notebook. Hardware and Software Guide 7-11

Hardware-Software Guide
Page 126
.... ■ Electrostatic discharge can damage drive connectors. Label the package "FRAGILE." 7-12 Hardware and Software Guide Hardware Upgrades and Replacements Caring for Drives Ä CAUTION: To prevent damage to the notebook or a drive and loss of magnetism and will not damage a hard drive or a diskette. ■ Do ... of work: ■ Do not remove the internal hard drive except for repair or replacement. To prevent electrostatic damage to the notebook or a drive, follow these 2 precautions: (1) Discharge yourself from shock, vibration, extreme temperatures, and high humidity.
.... ■ Electrostatic discharge can damage drive connectors. Label the package "FRAGILE." 7-12 Hardware and Software Guide Hardware Upgrades and Replacements Caring for Drives Ä CAUTION: To prevent damage to the notebook or a drive and loss of magnetism and will not damage a hard drive or a diskette. ■ Do ... of work: ■ Do not remove the internal hard drive except for repair or replacement. To prevent electrostatic damage to the notebook or a drive, follow these 2 precautions: (1) Discharge yourself from shock, vibration, extreme temperatures, and high humidity.

Hardware-Software Guide
Page 127
...all open applications, and shut down . 2. To replace the internal hard drive: 1. Hardware and Software Guide 7-13 Turn the notebook upside down the notebook. Loosen the 2 hard drive security screws. Remove the internal hard drive only for repair or replacement. Ä CAUTION: To ... procedure until you are unsure whether the notebook is the internal hard drive. For battery pack removal instructions, refer to the notebook. ■ Disconnect the notebook from external power and remove the battery pack. Hardware Upgrades and Replacements Replacing the Internal Hard Drive The...
...all open applications, and shut down . 2. To replace the internal hard drive: 1. Hardware and Software Guide 7-13 Turn the notebook upside down the notebook. Loosen the 2 hard drive security screws. Remove the internal hard drive only for repair or replacement. Ä CAUTION: To ... procedure until you are unsure whether the notebook is the internal hard drive. For battery pack removal instructions, refer to the notebook. ■ Disconnect the notebook from external power and remove the battery pack. Hardware Upgrades and Replacements Replacing the Internal Hard Drive The...

Hardware-Software Guide
Page 128
Hardware Upgrades and Replacements 3. To remove the hard drive, pull upward on the hard drive tab 1 to release the hard drive, and then lift the hard drive 2 out of the hard drive bay. 7-14 Hardware and Software Guide To remove the hard drive cover and expose the hard drive tab, lift the cover 1 upward and away from the notebook 2. 4.
Hardware Upgrades and Replacements 3. To remove the hard drive, pull upward on the hard drive tab 1 to release the hard drive, and then lift the hard drive 2 out of the hard drive bay. 7-14 Hardware and Software Guide To remove the hard drive cover and expose the hard drive tab, lift the cover 1 upward and away from the notebook 2. 4.

Hardware-Software Guide
Page 129
Hardware Upgrades and Replacements 5. Hardware and Software Guide 7-15 To insert the replacement hard drive, tilt the connector edge of the hard drive 1 downward, and then lower the hard drive into the hard drive bay until it is seated 2.
Hardware Upgrades and Replacements 5. Hardware and Software Guide 7-15 To insert the replacement hard drive, tilt the connector edge of the hard drive 1 downward, and then lower the hard drive into the hard drive bay until it is seated 2.

Hardware-Software Guide
Page 130
b. Tighten the 2 hard drive security screws. 7-16 Hardware and Software Guide Hardware Upgrades and Replacements 6. Place the cover over the hard drive bay. Slide the cover 1 slightly toward the right side of the notebook until the cover is seated 2. 7. Replace the hard drive cover. a.
b. Tighten the 2 hard drive security screws. 7-16 Hardware and Software Guide Hardware Upgrades and Replacements 6. Place the cover over the hard drive bay. Slide the cover 1 slightly toward the right side of the notebook until the cover is seated 2. 7. Replace the hard drive cover. a.

Hardware-Software Guide
Page 131
... ■ To display both the amount of free space on your hard drive and the amount of RAM (random access memory) in the notebook by adding memory modules to vacant memory slots or by the hibernation file: Select Start > Control Panel > Performance and Maintenance > Power Options... > Hibernate tab. Hardware Upgrades and Replacements Memory The notebook has 2 memory slots. When RAM is recommended that you verify that your hard drive has enough free space for the hibernation file...
... ■ To display both the amount of free space on your hard drive and the amount of RAM (random access memory) in the notebook by adding memory modules to vacant memory slots or by the hibernation file: Select Start > Control Panel > Performance and Maintenance > Power Options... > Hibernate tab. Hardware Upgrades and Replacements Memory The notebook has 2 memory slots. When RAM is recommended that you verify that your hard drive has enough free space for the hibernation file...


