Using LightScribe (Select Models Only)
Page 5
... does not require your computer for other tasks while the label is burned? Some minor fading may occur over time. Creating Disc Labels on Your Notebook Using LightScribe ■ Can I use my PC for other things while I forget to flip the disk over. No, the LightScribe disc is safe to handle?
... does not require your computer for other tasks while the label is burned? Some minor fading may occur over time. Creating Disc Labels on Your Notebook Using LightScribe ■ Can I use my PC for other things while I forget to flip the disk over. No, the LightScribe disc is safe to handle?
Using LightScribe (Select Models Only)
Page 6
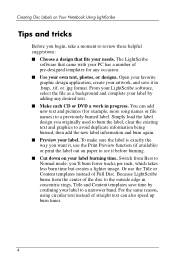
... Print Preview function (if available) or print the label out on paper to review these helpful suggestions: ■ Choose a design that came with your PC has a number of Full Disc. Switch from the center of straight text can add new text and pictures (for any desired text. ■ Make ...jpg format. To make sure the label is exactly the way you begin, take a moment to see it before burning. ■ Cut down on Your Notebook Using LightScribe Tips and tricks Before you want it in progress. Creating Disc Labels on your label burning time. Simply load the label design you...
... Print Preview function (if available) or print the label out on paper to review these helpful suggestions: ■ Choose a design that came with your PC has a number of Full Disc. Switch from the center of straight text can add new text and pictures (for any desired text. ■ Make ...jpg format. To make sure the label is exactly the way you begin, take a moment to see it before burning. ■ Cut down on Your Notebook Using LightScribe Tips and tricks Before you want it in progress. Creating Disc Labels on your label burning time. Simply load the label design you...
Using LightScribe (Select Models Only)
Page 7
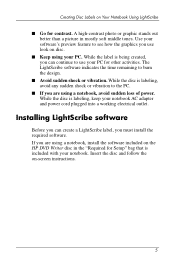
...Keep using your PC. While the disc is labeling, avoid any sudden shock or vibration to see how the graphics you are using a notebook, install the software included on Your Notebook Using LightScribe ...■ Go for contrast. While the disc is labeling, keep your notebook AC adapter and power cord... to use look on -screen instructions. 5 If you use your PC for Setup" bag that is included with your notebook. While the label is being created, you must install the required...
...Keep using your PC. While the disc is labeling, avoid any sudden shock or vibration to see how the graphics you are using a notebook, install the software included on Your Notebook Using LightScribe ...■ Go for contrast. While the disc is labeling, keep your notebook AC adapter and power cord... to use look on -screen instructions. 5 If you use your PC for Setup" bag that is included with your notebook. While the label is being created, you must install the required...
Using LightScribe (Select Models Only)
Page 10
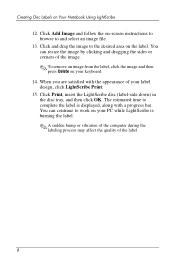
Click Add Image and follow the on Your Notebook Using LightScribe 12. You can resize the image by clicking and dragging the sides or corners of the image. ✎ To remove an image from ... complete the label is burning the label. ✎ A sudden bump or vibration of the computer during the labeling process may affect the quality of your PC while LightScribe is displayed, along with the appearance of the label. 8 The estimated time to the desired area on your label design, click LightScribe Print...
Click Add Image and follow the on Your Notebook Using LightScribe 12. You can resize the image by clicking and dragging the sides or corners of the image. ✎ To remove an image from ... complete the label is burning the label. ✎ A sudden bump or vibration of the computer during the labeling process may affect the quality of your PC while LightScribe is displayed, along with the appearance of the label. 8 The estimated time to the desired area on your label design, click LightScribe Print...
Using LightScribe (Select Models Only)
Page 11
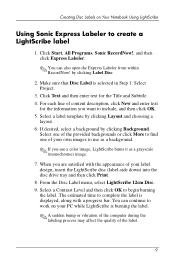
...within RecordNow! by clicking Layout and choosing a layout. 6. Make sure that Disc Label is displayed, along with the appearance of your PC while LightScribe is burning the label. ✎ A sudden bump or vibration of the computer during the labeling process may affect the quality... (monochrome) image. 7. Select a Contrast Level and then click OK to create a LightScribe label 1. The estimated time to work on Your Notebook Using LightScribe Using Sonic Express Labeler to begin burning the label. Creating Disc Labels on your label design, insert the LightScribe disc (label-side...
...within RecordNow! by clicking Layout and choosing a layout. 6. Make sure that Disc Label is displayed, along with the appearance of your PC while LightScribe is burning the label. ✎ A sudden bump or vibration of the computer during the labeling process may affect the quality... (monochrome) image. 7. Select a Contrast Level and then click OK to create a LightScribe label 1. The estimated time to work on Your Notebook Using LightScribe Using Sonic Express Labeler to begin burning the label. Creating Disc Labels on your label design, insert the LightScribe disc (label-side...
Using LightScribe (Select Models Only)
Page 13
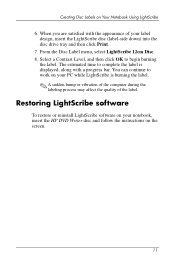
... or vibration of the computer during the labeling process may affect the quality of your notebook, insert the HP DVD Writer disc and follow the instructions on Your Notebook Using LightScribe 6. You can continue to work on your PC while LightScribe is displayed, along with the appearance of the label. The estimated time to...
... or vibration of the computer during the labeling process may affect the quality of your notebook, insert the HP DVD Writer disc and follow the instructions on Your Notebook Using LightScribe 6. You can continue to work on your PC while LightScribe is displayed, along with the appearance of the label. The estimated time to...
Getting Started - Enhanced for Accessibility
Page 22
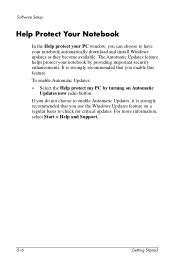
... Automatic Updates now radio button. If you do not choose to have your notebook automatically download and install Windows updates as they become available. The Automatic Updates feature helps protect your notebook by turning on a regular basis to check for critical updates. To enable ...Automatic Updates: » Select the Help protect my PC by providing important security enhancements. Software Setup Help Protect Your Notebook In the Help protect your PC window, you can choose to enable Automatic Updates, it is strongly recommended that you ...
... Automatic Updates now radio button. If you do not choose to have your notebook automatically download and install Windows updates as they become available. The Automatic Updates feature helps protect your notebook by turning on a regular basis to check for critical updates. To enable ...Automatic Updates: » Select the Help protect my PC by providing important security enhancements. Software Setup Help Protect Your Notebook In the Help protect your PC window, you can choose to enable Automatic Updates, it is strongly recommended that you ...
Getting Started - Enhanced for Accessibility
Page 51
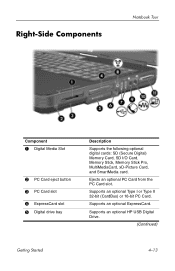
Right-Side Components Notebook Tour Component 1 Digital Media Slot 2 PC Card eject button 3 PC Card slot 4 ExpressCard slot 5 Digital drive bay Description Supports the following optional digital cards: SD (Secure Digital) Memory Card, SD I or Type II 32-bit (CardBus) or 16-bit PC Card. Ejects an optional PC Card from the PC Card slot. Supports an optional HP USB Digital Drive. (Continued) Getting Started 4-13 Supports an optional ExpressCard. Supports an optional Type I /O Card, Memory Stick, Memory Stick Pro, MultiMediaCard, xD-Picture Card, and SmartMedia card.
Right-Side Components Notebook Tour Component 1 Digital Media Slot 2 PC Card eject button 3 PC Card slot 4 ExpressCard slot 5 Digital drive bay Description Supports the following optional digital cards: SD (Secure Digital) Memory Card, SD I or Type II 32-bit (CardBus) or 16-bit PC Card. Ejects an optional PC Card from the PC Card slot. Supports an optional HP USB Digital Drive. (Continued) Getting Started 4-13 Supports an optional ExpressCard. Supports an optional Type I /O Card, Memory Stick, Memory Stick Pro, MultiMediaCard, xD-Picture Card, and SmartMedia card.

Getting Started - Enhanced for Accessibility
Page 64
... 2-7 num lock light 4-6 number, Product Key 4-20 O opening the notebook 1-8 operating system installing 2-1 Microsoft Certificate of Authenticity label 4-20 Product Key number 4-20 registration 2-8 optical drive release button 4-11 optical drives 4-11 P PC Card eject button 4-13 PC Card slot 4-13 ports 1394 4-14 expansion port 2 4-14 external monitor 4-9 USB 4-9, 4-11, 4-14 See...
... 2-7 num lock light 4-6 number, Product Key 4-20 O opening the notebook 1-8 operating system installing 2-1 Microsoft Certificate of Authenticity label 4-20 Product Key number 4-20 registration 2-8 optical drive release button 4-11 optical drives 4-11 P PC Card eject button 4-13 PC Card slot 4-13 ports 1394 4-14 expansion port 2 4-14 external monitor 4-9 USB 4-9, 4-11, 4-14 See...
Getting Started - Enhanced for Accessibility
Page 65
... security features 3-1 serial number 4-20 setting preferences 2-1 setting up hardware 1-1 setting up software 2-1 slots Digital Media 4-13 ExpressCard 4-13 PC Card 4-13 security cable 4-9 SmartMedia card 4-13 software restoration 4-21 software setup 2-1 speakers 4-8 Standby power/standby light 4-8 resuming from ... label 4-20 serial number 4-20 wireless certification label 4-20 troubleshooting 4-21 locked system 3-8, 4-5 notebook does not turn on 1-12 Troubleshooting guide 4-21 turning off notebook 3-8 turning on notebook 1-11 U USB ports 4-9, 4-11, 4-14 user accounts 2-9 V vents bottom 4-16 left...
... security features 3-1 serial number 4-20 setting preferences 2-1 setting up hardware 1-1 setting up software 2-1 slots Digital Media 4-13 ExpressCard 4-13 PC Card 4-13 security cable 4-9 SmartMedia card 4-13 software restoration 4-21 software setup 2-1 speakers 4-8 Standby power/standby light 4-8 resuming from ... label 4-20 serial number 4-20 wireless certification label 4-20 troubleshooting 4-21 locked system 3-8, 4-5 notebook does not turn on 1-12 Troubleshooting guide 4-21 turning off notebook 3-8 turning on notebook 1-11 U USB ports 4-9, 4-11, 4-14 user accounts 2-9 V vents bottom 4-16 left...


