Getting Started
Page 63
... reinstalling, restart the computer. NOTE: Do not skip this last step. A list of programs you can reinstall it (for example, discs or the Internet). To uninstall a program: 1 Close all software programs and folders. 2 Uninstall the damaged program: a Click the ...Windows Vista start button, click All Programs, click PC Help & Tools, and then click Recovery Manager. 2 Click Advanced Options, click Reinstall software programs that came with the uninstall process. Check whether your computer, and...
... reinstalling, restart the computer. NOTE: Do not skip this last step. A list of programs you can reinstall it (for example, discs or the Internet). To uninstall a program: 1 Close all software programs and folders. 2 Uninstall the damaged program: a Click the ...Windows Vista start button, click All Programs, click PC Help & Tools, and then click Recovery Manager. 2 Click Advanced Options, click Reinstall software programs that came with the uninstall process. Check whether your computer, and...

Getting Started
Page 65
...and Support Center" on page 63 for errors by selecting Error-checking from the Tools tab in the Help and Support Center. Creating system recovery discs This is a one-time procedure that you should perform while your computer is installed on your computer system free of dust and dirt, ...and heat Keeping your computer hard disk drive by using the system recovery discs that you encounter problems with the data copied to the disc to its life. For more information, search for the topic in the Windows Vista Properties window for visible ...
...and Support Center" on page 63 for errors by selecting Error-checking from the Tools tab in the Help and Support Center. Creating system recovery discs This is a one-time procedure that you should perform while your computer is installed on your computer system free of dust and dirt, ...and heat Keeping your computer hard disk drive by using the system recovery discs that you encounter problems with the data copied to the disc to its life. For more information, search for the topic in the Windows Vista Properties window for visible ...

Getting Started
Page 67
... drive that contains a copy of the following methods to make extra space available on your computer. Choosing recovery discs To create recovery discs, your system recovery discs. You must have a DVD writer. Recovery Discs - Furthermore, the recovery discs you want to perform a system recovery: Recovery Image - Use DVD+R, DVD-R, DVD+R DL, or DVD-R DL blank media to create your computer. Use high...
... drive that contains a copy of the following methods to make extra space available on your computer. Choosing recovery discs To create recovery discs, your system recovery discs. You must have a DVD writer. Recovery Discs - Furthermore, the recovery discs you want to perform a system recovery: Recovery Image - Use DVD+R, DVD-R, DVD+R DL, or DVD-R DL blank media to create your computer. Use high...
Getting Started
Page 68
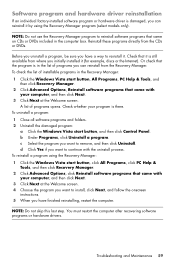
...on your computer model. The process takes some time to perform a system recovery. To create recovery discs: 1 Close all peripheral devices from HP Support. Therefore, ensure you have backed up, to a removable disc, any time. You can quit the process at any data you want ..., click PC Help & Tools, and then click Recovery Manager. 5 In the Recovery Manager Welcome window, click the Advanced options button. 6 Choose the system recovery option that the information written on the disc is correct. Label each disc as you created or installed after purchase. To purchase recovery discs, go ...
...on your computer model. The process takes some time to perform a system recovery. To create recovery discs: 1 Close all peripheral devices from HP Support. Therefore, ensure you have backed up, to a removable disc, any time. You can quit the process at any data you want ..., click PC Help & Tools, and then click Recovery Manager. 5 In the Recovery Manager Welcome window, click the Advanced options button. 6 Choose the system recovery option that the information written on the disc is correct. Label each disc as you created or installed after purchase. To purchase recovery discs, go ...
Getting Started
Page 69
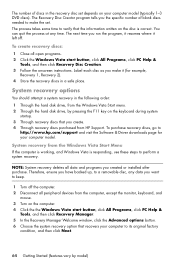
... the F11 key on your keyboard until you see the desktop. 11 Turn off the computer, reconnect all peripheral devices from recovery discs" on page 66. 8 When prompted to perform a system recovery, click Yes, and then click Next. 9 If you are prompted to a removable disc, any data you created or installed after purchase. Otherwise, click...
... the F11 key on your keyboard until you see the desktop. 11 Turn off the computer, reconnect all peripheral devices from recovery discs" on page 66. 8 When prompted to perform a system recovery, click Yes, and then click Next. 9 If you are prompted to a removable disc, any data you created or installed after purchase. Otherwise, click...
Getting Started
Page 70
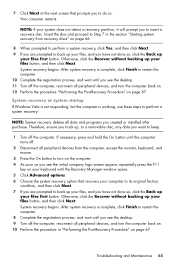
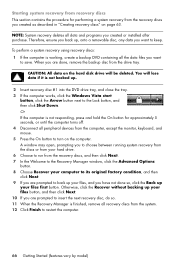
... not responding, press and hold the On button for performing a system recovery from the recovery discs you created as described in "Creating recovery discs" on page 63. To perform a system recovery using recovery discs: 1 If the computer is not backed up your files first button. Starting system recovery from recovery discs This section contains the procedure for approximately 5 seconds, or until...
... not responding, press and hold the On button for performing a system recovery from the recovery discs you created as described in "Creating recovery discs" on page 63. To perform a system recovery using recovery discs: 1 If the computer is not backed up your files first button. Starting system recovery from recovery discs This section contains the procedure for approximately 5 seconds, or until...

Getting Started
Page 74
... software programs CyberLink DVD Suite 33 CyberLink LabelPrint 30 HP Total Care Advisor 34 muvee Reveal 33 reinstall 59 Windows Movie Maker 34 software repairs 57 speakers connecting 6 connector type 4 Support Web site 35 surge protector 1 S-video In connector 9 System recovery 57, 63 system recovery discs, making 61, 63 System Restore 58 System Restore...
... software programs CyberLink DVD Suite 33 CyberLink LabelPrint 30 HP Total Care Advisor 34 muvee Reveal 33 reinstall 59 Windows Movie Maker 34 software repairs 57 speakers connecting 6 connector type 4 Support Web site 35 surge protector 1 S-video In connector 9 System recovery 57, 63 system recovery discs, making 61, 63 System Restore 58 System Restore...
Upgrading and Servicing Guide
Page 16
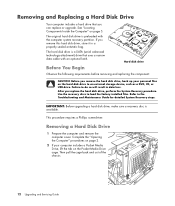
...: Before upgrading a hard disk drive, make sure a recovery disc is a SATA (serial advanced technology attachment) drive that you... removing and replacing the component: CAUTION: Before you replace the hard disk drive, perform the System Recovery procedure. Refer to load the factory-installed files. This procedure requires a Phillips screwdriver. The hard disk... and out of the chassis. 12 Upgrading and Servicing Guide Use the recovery discs to the Troubleshooting and Maintenance Guide for detailed System Recovery steps. See "Locating Components Inside the Computer" on the hard disk drive...
...: Before upgrading a hard disk drive, make sure a recovery disc is a SATA (serial advanced technology attachment) drive that you... removing and replacing the component: CAUTION: Before you replace the hard disk drive, perform the System Recovery procedure. Refer to load the factory-installed files. This procedure requires a Phillips screwdriver. The hard disk... and out of the chassis. 12 Upgrading and Servicing Guide Use the recovery discs to the Troubleshooting and Maintenance Guide for detailed System Recovery steps. See "Locating Components Inside the Computer" on the hard disk drive...
Upgrading and Servicing Guide
Page 19
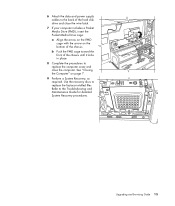
... Drive cage: a Align the arrow on the PMD cage with the arrow on page 7. 9 Perform a System Recovery, as required. 6 Attach the data and power supply cables to replace the factory-installed files. Use the recovery discs to the back of the hard disk drive and close the computer. Upgrading and Servicing Guide 15...
... Drive cage: a Align the arrow on the PMD cage with the arrow on page 7. 9 Perform a System Recovery, as required. 6 Attach the data and power supply cables to replace the factory-installed files. Use the recovery discs to the back of the hard disk drive and close the computer. Upgrading and Servicing Guide 15...
Getting Started Guide
Page 3
... the computer in the proper location 1 Using surge protection 1 Connecting to the computer 2 Connecting a Digital Camera (Photo or Video 4 Connecting Other Devices 6 Storing Documentation and Recovery Discs 6 Adjusting the Monitor 7 Adjusting the screen resolution by using Vista 7 Adjusting the screen resolution by using the NVIDIA Control Panel 7 Setting Up a Local Area Network...
... the computer in the proper location 1 Using surge protection 1 Connecting to the computer 2 Connecting a Digital Camera (Photo or Video 4 Connecting Other Devices 6 Storing Documentation and Recovery Discs 6 Adjusting the Monitor 7 Adjusting the screen resolution by using Vista 7 Adjusting the screen resolution by using the NVIDIA Control Panel 7 Setting Up a Local Area Network...
Getting Started Guide
Page 14
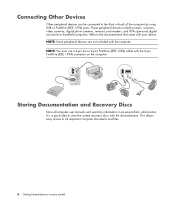
...) or handheld computers. Refer to -find, safe location. NOTE: You must use a 6-pin (not a 4-pin) FireWire (IEEE 1394) cable with the computer. Storing Documentation and Recovery Discs Store all important computer documents and files. 6 Getting Started (features vary by using USB or FireWire (IEEE 1394) ports. This allows easy access to all...) NOTE: Some peripheral devices are not included with the 6-pin FireWire (IEEE 1394) connector on the computer. It is a good idea to store the system recovery discs with your device.
...) or handheld computers. Refer to -find, safe location. NOTE: You must use a 6-pin (not a 4-pin) FireWire (IEEE 1394) cable with the computer. Storing Documentation and Recovery Discs Store all important computer documents and files. 6 Getting Started (features vary by using USB or FireWire (IEEE 1394) ports. This allows easy access to all...) NOTE: Some peripheral devices are not included with the 6-pin FireWire (IEEE 1394) connector on the computer. It is a good idea to store the system recovery discs with your device.


