
Safety and Regulatory Information Desktops, Thin Clients, and Personal Workstations
Page 28
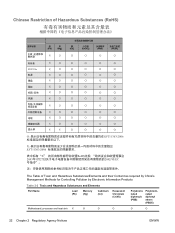
... 2-2 Toxic and Hazardous Substances and Elements Part Name Lead (Pb) Mercury (Hg) Cadmium (Cd) Hexavalent Chromium (Cr(VI)) Polybrominated biphenyls (PBB) Polybrominated diphenyl ethers (PBDE) Motherboard, processor and heat sink X O O O O O 22 Chapter 2 Regulatory Agency Notices ENWW
... 2-2 Toxic and Hazardous Substances and Elements Part Name Lead (Pb) Mercury (Hg) Cadmium (Cd) Hexavalent Chromium (Cr(VI)) Polybrominated biphenyls (PBB) Polybrominated diphenyl ethers (PBDE) Motherboard, processor and heat sink X O O O O O 22 Chapter 2 Regulatory Agency Notices ENWW

Upgrading and Servicing Guide
Page 15
... on the chassis. 8 Complete the procedures to replace the front panel, replace the side panel, and close the PC. C - See "Opening and Closing the PC" on page 1. 2 Release the HP Pocket Media Drive bay, diskette (floppy), or hard disk drive, by removing the two screws on page 1. Connect ... the HP Pocket Media Drive Bay, Diskette, or Hard Disk Drive 1 Complete the procedures to prepare the PC to remove the side panel and to a primary hard disk drive. Upgrading and Servicing Guide 11 A B MASTER C SLAVE To CPU A - Connect to remove the front panel. Connect to the PC motherboard. ...
... on the chassis. 8 Complete the procedures to replace the front panel, replace the side panel, and close the PC. C - See "Opening and Closing the PC" on page 1. 2 Release the HP Pocket Media Drive bay, diskette (floppy), or hard disk drive, by removing the two screws on page 1. Connect ... the HP Pocket Media Drive Bay, Diskette, or Hard Disk Drive 1 Complete the procedures to prepare the PC to remove the side panel and to a primary hard disk drive. Upgrading and Servicing Guide 11 A B MASTER C SLAVE To CPU A - Connect to remove the front panel. Connect to the PC motherboard. ...

Upgrading and Servicing Guide
Page 17
Upgrading and Servicing Guide 13 B - Connect to a secondary hard disk drive (select models only). C - Connect to the PC motherboard. A B MASTER C SLAVE To CPU A - 3 Connect the power and data cables to a primary hard disk drive. Connect to the back of the HP Pocket Media Drive bay, diskette (floppy), or hard disk drive.
Upgrading and Servicing Guide 13 B - Connect to a secondary hard disk drive (select models only). C - Connect to the PC motherboard. A B MASTER C SLAVE To CPU A - 3 Connect the power and data cables to a primary hard disk drive. Connect to the back of the HP Pocket Media Drive bay, diskette (floppy), or hard disk drive.

Upgrading and Servicing Guide
Page 25
5 Attach the hard disk drive cables. Connect to replace the front panel, replace the side panel, and close the PC. Connect to the PC motherboard. 6 Attach the two screws that secure the hard disk drive cage to the chassis. 7 Complete the procedures to a secondary hard disk drive (select models only). See "Opening and Closing the PC" on page 1. C - Upgrading and Servicing Guide 21 Connect to a primary hard disk drive. A B MASTER C SLAVE To CPU A - B -
5 Attach the hard disk drive cables. Connect to replace the front panel, replace the side panel, and close the PC. Connect to the PC motherboard. 6 Attach the two screws that secure the hard disk drive cage to the chassis. 7 Complete the procedures to a secondary hard disk drive (select models only). See "Opening and Closing the PC" on page 1. C - Upgrading and Servicing Guide 21 Connect to a primary hard disk drive. A B MASTER C SLAVE To CPU A - B -
Upgrading and Servicing Guide
Page 26
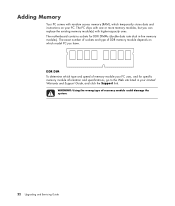
... exact number of sockets and type of memory module could damage the system. 22 Upgrading and Servicing Guide The PC ships with higher-capacity ones. The motherboard contains sockets for specific memory module information and specifications, go to the Web site listed in -line memory modules). WARNING: Using the wrong type of...
... exact number of sockets and type of memory module could damage the system. 22 Upgrading and Servicing Guide The PC ships with higher-capacity ones. The motherboard contains sockets for specific memory module information and specifications, go to the Web site listed in -line memory modules). WARNING: Using the wrong type of...

Upgrading and Servicing Guide
Page 27
Removing a Memory Module 1 Complete the procedures to prepare the PC and to touch any cabling out of the way, if necessary. 5 Push down the two retaining clips on the motherboard. Doing so may damage the module. 4 Move any of the contacts. WARNING: Do not pull the memory module out of the socket. ...panel. Use the retaining clips to remove the module. 6 Lift the memory module from the memory socket. See "Opening and Closing the PC" on page 1. 2 Gently lay the PC on its side. 3 Locate the memory sockets on the ends of the memory socket until the memory module pops out of the socket...
Removing a Memory Module 1 Complete the procedures to prepare the PC and to touch any cabling out of the way, if necessary. 5 Push down the two retaining clips on the motherboard. Doing so may damage the module. 4 Move any of the contacts. WARNING: Do not pull the memory module out of the socket. ...panel. Use the retaining clips to remove the module. 6 Lift the memory module from the memory socket. See "Opening and Closing the PC" on page 1. 2 Gently lay the PC on its side. 3 Locate the memory sockets on the ends of the memory socket until the memory module pops out of the socket...

Upgrading and Servicing Guide
Page 30
...-in card slot cover. 5 Remove any cabling to scrape the card against the other components. WARNING: Be careful of the sharp edges on the motherboard. 4 Inside the PC, locate the add-in card slots on the add-in card, close the open slot by inserting the metal slot cover into the opened...
...-in card slot cover. 5 Remove any cabling to scrape the card against the other components. WARNING: Be careful of the sharp edges on the motherboard. 4 Inside the PC, locate the add-in card slots on the add-in card, close the open slot by inserting the metal slot cover into the opened...
Upgrading and Servicing Guide
Page 32
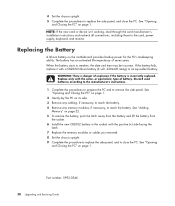
...with the same, or equivalent, type of battery. Discard used batteries according to the manufacturer's instructions. 1 Complete the procedures to prepare the PC and to the card, power supply, keyboard, and monitor. NOTE: If the new card or device isn't working, read through the ...manufacturer's installation instructions and recheck all connections, including those to remove the side panel. See "Opening and Closing the PC" on the motherboard provides backup power for the PC's timekeeping ability. 4 Set the chassis upright. 5 Complete the procedures to replace the side panel, and close the...
...with the same, or equivalent, type of battery. Discard used batteries according to the manufacturer's instructions. 1 Complete the procedures to prepare the PC and to the card, power supply, keyboard, and monitor. NOTE: If the new card or device isn't working, read through the ...manufacturer's installation instructions and recheck all connections, including those to remove the side panel. See "Opening and Closing the PC" on the motherboard provides backup power for the PC's timekeeping ability. 4 Set the chassis upright. 5 Complete the procedures to replace the side panel, and close the...

