
Notebook Tour Guide
Page 2
Contents 1 Components Top components 2 Keys 2 TouchPad 3 Buttons and switches 4 Lights 9 Front components 11 Rear components 12 Right-side components 14 Left-side components 15 Bottom components 17 Display components 19 Wireless antennae (select models only 20 Additional hardware components 21 Labels 22 2 Specifications Operating environment 23 Rated input power 24 Expansion port input/output signals 25 Index Notebook Tour ii
Contents 1 Components Top components 2 Keys 2 TouchPad 3 Buttons and switches 4 Lights 9 Front components 11 Rear components 12 Right-side components 14 Left-side components 15 Bottom components 17 Display components 19 Wireless antennae (select models only 20 Additional hardware components 21 Labels 22 2 Specifications Operating environment 23 Rated input power 24 Expansion port input/output signals 25 Index Notebook Tour ii

Notebook Tour Guide
Page 3
You can also add hardware or modify your device configurations using Device Manager. ✎ Components included with the computer may vary by region and by model. 1 Components This guide explains the hardware features of installed hardware on the computer: 1. Select Hardware tab > Device Manager. The illustrations in this guide identify the standard features included in the left pane, select View system information. 3. To see a list of the computer. Select Start > My Computer. 2. Notebook Tour 1 In the System Tasks window in most computer models.
You can also add hardware or modify your device configurations using Device Manager. ✎ Components included with the computer may vary by region and by model. 1 Components This guide explains the hardware features of installed hardware on the computer: 1. Select Hardware tab > Device Manager. The illustrations in this guide identify the standard features included in the left pane, select View system information. 3. To see a list of the computer. Select Start > My Computer. 2. Notebook Tour 1 In the System Tasks window in most computer models.

Notebook Tour Guide
Page 4
Notebook Tour 2 Displays a shortcut menu for items beneath the pointer. Displays the Microsoft Windows Start menu. Can be used system functions when pressed in combination with ...
Notebook Tour 2 Displays a shortcut menu for items beneath the pointer. Displays the Microsoft Windows Start menu. Can be used system functions when pressed in combination with ...

Notebook Tour Guide
Page 5
Notebook Tour 3 Can be set to perform other mouse functions, such as scrolling, selecting, and double-clicking. 2 Left TouchPad button* Functions like the left button on an external mouse. 3 Right TouchPad button* Functions like the right button on the screen. TouchPad Component Description 1 TouchPad* Moves the pointer and selects or activates items on an external mouse. 4 TouchPad scroll zone* Scrolls up or down. *This table describes default settings.
Notebook Tour 3 Can be set to perform other mouse functions, such as scrolling, selecting, and double-clicking. 2 Left TouchPad button* Functions like the left button on an external mouse. 3 Right TouchPad button* Functions like the right button on the screen. TouchPad Component Description 1 TouchPad* Moves the pointer and selects or activates items on an external mouse. 4 TouchPad scroll zone* Scrolls up or down. *This table describes default settings.

Notebook Tour Guide
Page 6
Buttons and switches Component 1 Display switch 2 Wireless button (select models only)* Description Initiates standby if the display is closed when the computer is on or off, but does not create a wireless connection. ✎ To establish a wireless connection, a wireless network must be set up. (Continued) Notebook Tour 4 Turns the wireless feature on .
Buttons and switches Component 1 Display switch 2 Wireless button (select models only)* Description Initiates standby if the display is closed when the computer is on or off, but does not create a wireless connection. ✎ To establish a wireless connection, a wireless network must be set up. (Continued) Notebook Tour 4 Turns the wireless feature on .

Notebook Tour Guide
Page 7
If the computer has stopped responding and Microsoft® Windows® shutdown procedures cannot be used, press and hold the power button for at least 5 seconds to turn on the computer. ■ On, press to enter hibernation. ■ In standby, briefly press to exit standby. ■ In hibernation, briefly press to turn off the computer. (Continued) Notebook Tour 5 Component 3 Power button* Description When the computer is ■ Off, press to exit hibernation.
If the computer has stopped responding and Microsoft® Windows® shutdown procedures cannot be used, press and hold the power button for at least 5 seconds to turn on the computer. ■ On, press to enter hibernation. ■ In standby, briefly press to exit standby. ■ In hibernation, briefly press to turn off the computer. (Continued) Notebook Tour 5 Component 3 Power button* Description When the computer is ■ Off, press to exit hibernation.

Notebook Tour Guide
Page 8
... into Windows. ✎ Refer to start a DVD in the optical drive. ■ Off, opens QuickPlay to the QuickPlay documentation for details on using QuickPlay. (Continued) Notebook Tour 6
... into Windows. ✎ Refer to start a DVD in the optical drive. ■ Off, opens QuickPlay to the QuickPlay documentation for details on using QuickPlay. (Continued) Notebook Tour 6

Notebook Tour Guide
Page 9
Mutes system sound. (Continued) Notebook Tour 7 If QuickPlay is installed (select models only) and the computer is ■ On, opens the music application or the Media menu, allowing you to ...
Mutes system sound. (Continued) Notebook Tour 7 If QuickPlay is installed (select models only) and the computer is ■ On, opens the music application or the Media menu, allowing you to ...

Notebook Tour Guide
Page 10
Notebook Tour 8 Component 8 Volume up button Description Increases system volume. 9 Calculator button Opens the Microsoft Windows calculator. ✎ To use the calculator, press either the software buttons or the buttons on the keyboard. *This table describes default settings.
Notebook Tour 8 Component 8 Volume up button Description Increases system volume. 9 Calculator button Opens the Microsoft Windows calculator. ✎ To use the calculator, press either the software buttons or the buttons on the keyboard. *This table describes default settings.

Notebook Tour Guide
Page 11
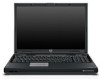
Off: The computer is on. On: The computer is off or in standby. Blinking: The computer is on . On: Caps lock is in hibernation. Lights Component 1 Wireless light (select models only) 2 Power lights* (2) 3 Caps lock light Description On: An integrated wireless device, such as a wireless local area network (LAN) device and/or a Bluetooth® device is turned on . (Continued) Notebook Tour 9
Off: The computer is on. On: The computer is off or in standby. Blinking: The computer is on . On: Caps lock is in hibernation. Lights Component 1 Wireless light (select models only) 2 Power lights* (2) 3 Caps lock light Description On: An integrated wireless device, such as a wireless local area network (LAN) device and/or a Bluetooth® device is turned on . (Continued) Notebook Tour 9

Notebook Tour Guide
Page 12
.... 6 Volume mute light On: Computer sound is turned off. 7 Num lock light On: Num lock is turned off until the battery reaches a low-battery condition. Notebook Tour 10 Off: If the computer is plugged into an external power source, the light stays off when all batteries in the computer are 2 power...
.... 6 Volume mute light On: Computer sound is turned off. 7 Num lock light On: Num lock is turned off until the battery reaches a low-battery condition. Notebook Tour 10 Off: If the computer is plugged into an external power source, the light stays off when all batteries in the computer are 2 power...

Notebook Tour Guide
Page 13
Produces system sound. Notebook Tour 11 Links the computer to an optional remote control. Front components Component 1 Display release latch 2 Infrared lens 3 Speaker Description Opens the computer.
Produces system sound. Notebook Tour 11 Links the computer to an optional remote control. Front components Component 1 Display release latch 2 Infrared lens 3 Speaker Description Opens the computer.

Notebook Tour Guide
Page 14
Connects a modem cable. (Continued) Notebook Tour 12 Rear components Component 1 Security cable slot 2 RJ-11 (modem) jack Description Attaches an optional security cable to the computer. ✎ The security cable is designed to act as a deterrent, but may not prevent the computer from being mishandled or stolen.
Connects a modem cable. (Continued) Notebook Tour 12 Rear components Component 1 Security cable slot 2 RJ-11 (modem) jack Description Attaches an optional security cable to the computer. ✎ The security cable is designed to act as a deterrent, but may not prevent the computer from being mishandled or stolen.
Notebook Tour Guide
Page 15
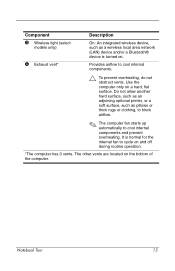
... block airflow. ✎ The computer fan starts up automatically to cool internal components. Ä To prevent overheating, do not obstruct vents. It is turned on. Notebook Tour 13 Use the computer only on the bottom of the computer. The other vents are located on a hard, flat surface.
... block airflow. ✎ The computer fan starts up automatically to cool internal components. Ä To prevent overheating, do not obstruct vents. It is turned on. Notebook Tour 13 Use the computer only on the bottom of the computer. The other vents are located on a hard, flat surface.

Notebook Tour Guide
Page 16
... slot 2 Audio-out (headphone) jack 3 Audio-in (microphone) jack 4 USB ports (2) 5 Optical drive 6 Optical drive button Description Supports optional ExpressCard/54 or ExpressCard/34 cards. Notebook Tour 14 Connects an optional headset microphone or a monaural microphone. Releases the media tray. Produces system stereo sound when connected to optional powered stereo speakers...
... slot 2 Audio-out (headphone) jack 3 Audio-in (microphone) jack 4 USB ports (2) 5 Optical drive 6 Optical drive button Description Supports optional ExpressCard/54 or ExpressCard/34 cards. Notebook Tour 14 Connects an optional headset microphone or a monaural microphone. Releases the media tray. Produces system stereo sound when connected to optional powered stereo speakers...

Notebook Tour Guide
Page 17
On: A card in the Digital Media Slot is being accessed. (Continued) Notebook Tour 15 Connects a network cable. Connects an external monitor. Connect an optional USB device. Connects an optional S-Video device such as a camcorder. Connects an optional ...
On: A card in the Digital Media Slot is being accessed. (Continued) Notebook Tour 15 Connects a network cable. Connects an external monitor. Connect an optional USB device. Connects an optional S-Video device such as a camcorder. Connects an optional ...

Notebook Tour Guide
Page 18
Ejects the PC Card from the PC Card slot. Supports optional Type I /O), MultiMediaCard, Memory Stick, Memory Stick Pro, SmartMedia card, and xD-Picture Card. Notebook Tour 16 Component 9 Digital Media Slot - PC Card slot q PC Card slot eject button Description Supports 7 optional digital card formats: Secure Digital (SD) Memory Card, Secure Digital Input/Output (SD I or Type II PC Cards.
Ejects the PC Card from the PC Card slot. Supports optional Type I /O), MultiMediaCard, Memory Stick, Memory Stick Pro, SmartMedia card, and xD-Picture Card. Notebook Tour 16 Component 9 Digital Media Slot - PC Card slot q PC Card slot eject button Description Supports 7 optional digital card formats: Secure Digital (SD) Memory Card, Secure Digital Input/Output (SD I or Type II PC Cards.

Notebook Tour Guide
Page 19
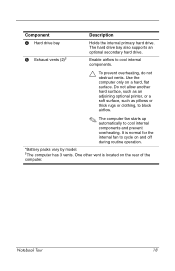
Bottom components Component Description 1 Battery bay* Holds the battery pack. 2 Primary battery pack release Releases the battery pack from the latch battery bay. 3 Memory module compartment Contains the memory module slots. (Continued) Notebook Tour 17
Bottom components Component Description 1 Battery bay* Holds the battery pack. 2 Primary battery pack release Releases the battery pack from the latch battery bay. 3 Memory module compartment Contains the memory module slots. (Continued) Notebook Tour 17
Notebook Tour Guide
Page 20
... rugs or clothing, to block airflow. ✎ The computer fan starts up automatically to cool internal components. Ä To prevent overheating, do not obstruct vents. Notebook Tour 18 The hard drive bay also supports an optional secondary hard drive. It is located on a hard, flat surface.
... rugs or clothing, to block airflow. ✎ The computer fan starts up automatically to cool internal components. Ä To prevent overheating, do not obstruct vents. Notebook Tour 18 The hard drive bay also supports an optional secondary hard drive. It is located on a hard, flat surface.

Notebook Tour Guide
Page 21
Display components Component 1 Display release latch Description Opens the computer. Notebook Tour 19
Display components Component 1 Display release latch Description Opens the computer. Notebook Tour 19


