
End User License Agreement
Page 1
...You may use on a single computer ("Your Computer"). e. You may load the Software ON THE CONDITION THAT YOU Product into the local memory or storage device of this EULA. GRANT OF LICENSE. Use. Copying. Freeware. You may copy the OTHERWISE USING THE SOFTWARE PRODUCT, YOU ...USER LICENSE AGREEMENT PLEASE READ CAREFULLY BEFORE USING THIS EQUIPMENT: This End-User license Agreement ("EULA") is a legal agreement between you and HP or its suppliers. The term "Software Product" means computer software and may contain a EULA in its online documentation. An amendment or...
...You may use on a single computer ("Your Computer"). e. You may load the Software ON THE CONDITION THAT YOU Product into the local memory or storage device of this EULA. GRANT OF LICENSE. Use. Copying. Freeware. You may copy the OTHERWISE USING THE SOFTWARE PRODUCT, YOU ...USER LICENSE AGREEMENT PLEASE READ CAREFULLY BEFORE USING THIS EQUIPMENT: This End-User license Agreement ("EULA") is a legal agreement between you and HP or its suppliers. The term "Software Product" means computer software and may contain a EULA in its online documentation. An amendment or...

HP USB Digital Drive
Page 2
An SD memory card 2 may not be used with any HP authorized reseller. User Guide 1 However, you will need an SD memory card to operate the Digital Drive. You can be included. The Digital Drive can purchase one (in various storage capacities) from any computer that is a pocket-sized SD (Secure Digital) memory drive for storing and transferring files such as digital pictures, music, video, and data. The HP USB Digital Drive 1 is running Microsoft Windows XP Home, Windows XP Pro, or Windows 2000.
An SD memory card 2 may not be used with any HP authorized reseller. User Guide 1 However, you will need an SD memory card to operate the Digital Drive. You can be included. The Digital Drive can purchase one (in various storage capacities) from any computer that is a pocket-sized SD (Secure Digital) memory drive for storing and transferring files such as digital pictures, music, video, and data. The HP USB Digital Drive 1 is running Microsoft Windows XP Home, Windows XP Pro, or Windows 2000.

HP USB Digital Drive
Page 3
If the SD memory card does not slide in properly, gently pull it out and reinsert it. 2 User Guide Remove the cap 1 of the Digital Drive. 2. Installing the SD Memory Card 1. Insert the SD memory card into the SD slot 2 with the notched corner positioned on the lower left as shown.
If the SD memory card does not slide in properly, gently pull it out and reinsert it. 2 User Guide Remove the cap 1 of the Digital Drive. 2. Installing the SD Memory Card 1. Insert the SD memory card into the SD slot 2 with the notched corner positioned on the lower left as shown.
HP USB Digital Drive
Page 10
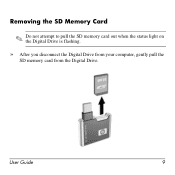
User Guide 9 Removing the SD Memory Card ✎ Do not attempt to pull the SD memory card out when the status light on the Digital Drive is flashing. » After you disconnect the Digital Drive from your computer, gently pull the SD memory card from the Digital Drive.
User Guide 9 Removing the SD Memory Card ✎ Do not attempt to pull the SD memory card out when the status light on the Digital Drive is flashing. » After you disconnect the Digital Drive from your computer, gently pull the SD memory card from the Digital Drive.

External Media Cards
Page 3
... storage and convenient data sharing. The Digital Media Slot supports the following digital card formats: ■ Secure Digital (SD) Memory Card ■ Secure Digital Input/Output (SD I/O) ■ MultiMediaCard ■ Memory Stick ■ Memory Stick Pro ■ SmartMedia Card ■ xD-Picture Card Ä CAUTION: To avoid damaging your digital card or the...
... storage and convenient data sharing. The Digital Media Slot supports the following digital card formats: ■ Secure Digital (SD) Memory Card ■ Secure Digital Input/Output (SD I/O) ■ MultiMediaCard ■ Memory Stick ■ Memory Stick Pro ■ SmartMedia Card ■ xD-Picture Card Ä CAUTION: To avoid damaging your digital card or the...

External Media Cards
Page 6
... Cards 4 2 PC Cards A PC Card is a credit card-sized accessory designed to conform to the standard specifications of the Personal Computer Memory Card International Association (PCMCIA). ■ The computer supports 32-bit (CardBus) and 16-bit PC Cards. ■ The computer is equipped with a PC Card slot and ...supports Type I and Type II PC Cards. ■ Zoomed video PC Cards are instructed by ...
... Cards 4 2 PC Cards A PC Card is a credit card-sized accessory designed to conform to the standard specifications of the Personal Computer Memory Card International Association (PCMCIA). ■ The computer supports 32-bit (CardBus) and 16-bit PC Cards. ■ The computer is equipped with a PC Card slot and ...supports Type I and Type II PC Cards. ■ Zoomed video PC Cards are instructed by ...

External Media Cards
Page 10
On models with a TV tuner ExpressCard, refer to the computer. External Media Cards 8 Like standard PC Cards, ExpressCards are designed to conform to the standard specifications of the Personal Computer Memory Card International Association (PCMCIA). ✎ An ExpressCard can add TV tuner functionality to the TV tuner or Media Center documentation for details. 3 ExpressCards An ExpressCard is a next-generation, high-performance PC Card, which must be inserted in the ExpressCard slot.
On models with a TV tuner ExpressCard, refer to the computer. External Media Cards 8 Like standard PC Cards, ExpressCards are designed to conform to the standard specifications of the Personal Computer Memory Card International Association (PCMCIA). ✎ An ExpressCard can add TV tuner functionality to the TV tuner or Media Center documentation for details. 3 ExpressCards An ExpressCard is a next-generation, high-performance PC Card, which must be inserted in the ExpressCard slot.

Memory Modules
Page 1
Memory Modules Document Part Number: 393521-001 October 2005 This guide explains how to replace and upgrade memory in the computer.
Memory Modules Document Part Number: 393521-001 October 2005 This guide explains how to replace and upgrade memory in the computer.

Memory Modules
Page 2
Contents 1 Adding or replacing memory modules 2 Effects of increasing memory 3 Video memory settings (select models only) Memory Modules ii
Contents 1 Adding or replacing memory modules 2 Effects of increasing memory 3 Video memory settings (select models only) Memory Modules ii

Memory Modules
Page 3
...battery packs before installing a memory module. Ä CAUTION: Electrostatic discharge (ESD) can be upgraded by adding a memory module to the vacant expansion memory module slot or by touching a grounded metal object. 1 Adding or replacing memory modules The computer has one memory module compartment, which is... located on the bottom of static electricity by upgrading the existing memory module in the primary memory module slot. Å WARNING: To reduce the risk...
...battery packs before installing a memory module. Ä CAUTION: Electrostatic discharge (ESD) can be upgraded by adding a memory module to the vacant expansion memory module slot or by touching a grounded metal object. 1 Adding or replacing memory modules The computer has one memory module compartment, which is... located on the bottom of static electricity by upgrading the existing memory module in the primary memory module slot. Å WARNING: To reduce the risk...

Memory Modules
Page 4
To add or replace a memory module: 1. Then shut down the computer. (If you are not sure whether the computer is off or in hibernation, turn the computer on by pressing the power button. Lift the memory module compartment cover 2 away from the computer. 6. Shut down the computer through the operating system.) 2. Disconnect the power cord. 4. Memory Modules 2 Turn the computer upside down. 5. Remove the battery pack from the computer. Loosen the memory module compartment cover screws 1. 7. Disconnect all external devices connected to the computer. 3.
To add or replace a memory module: 1. Then shut down the computer. (If you are not sure whether the computer is off or in hibernation, turn the computer on by pressing the power button. Lift the memory module compartment cover 2 away from the computer. 6. Shut down the computer through the operating system.) 2. Disconnect the power cord. 4. Memory Modules 2 Turn the computer upside down. 5. Remove the battery pack from the computer. Loosen the memory module compartment cover screws 1. 7. Disconnect all external devices connected to the computer. 3.

Memory Modules
Page 5
8. b. To protect a memory module after removal, place it in an electrostatic-safe container. Memory Modules 3 Pull away the retention clips 1 on each side of the memory slot. Grasp the edge of the memory module 2 and gently pull the module out of the memory module. The memory module tilts up. To remove a memory module: a.
8. b. To protect a memory module after removal, place it in an electrostatic-safe container. Memory Modules 3 Pull away the retention clips 1 on each side of the memory slot. Grasp the edge of the memory module 2 and gently pull the module out of the memory module. The memory module tilts up. To remove a memory module: a.

Memory Modules
Page 6
To insert a memory module: a. b. 9. With the memory module at a 45-degree angle from the surface of the memory module with the tab on the memory module slot. Memory Modules 4 Align the notched edge 1 of the memory module compartment, press the module 2 into the memory module slot until it is seated.
To insert a memory module: a. b. 9. With the memory module at a 45-degree angle from the surface of the memory module with the tab on the memory module slot. Memory Modules 4 Align the notched edge 1 of the memory module compartment, press the module 2 into the memory module slot until it is seated.

Memory Modules
Page 7
Press the memory module down until the retention clips snap into place. c. Memory Modules 5
Press the memory module down until the retention clips snap into place. c. Memory Modules 5

Memory Modules
Page 8
Align the tabs on the memory module compartment cover with the notches on the computer. Close the cover 1. 12. Replace the battery pack. 14. Memory Modules 6 Reconnect external power and external devices. 15. Tighten the memory module compartment cover screws 2. 13. Turn on the computer. 11. 10.
Align the tabs on the memory module compartment cover with the notches on the computer. Close the cover 1. 12. Replace the battery pack. 14. Memory Modules 6 Reconnect external power and external devices. 15. Tighten the memory module compartment cover screws 2. 13. Turn on the computer. 11. 10.

Memory Modules
Page 9
...hibernation file: » Select Start > Control Panel > Performance and Maintenance > Power Options > Hibernate tab. To display the amount of increasing memory When random access memory (RAM) increases, the operating system increases the hard drive space reserved for the hibernation file. Right-click the primary hard drive listing, and then... click Properties. 2 Effects of free space on the primary hard drive: 1. If you experience problems with hibernation after increasing memory, verify that the hard drive has enough free space to accommodate a larger hibernation file.
...hibernation file: » Select Start > Control Panel > Performance and Maintenance > Power Options > Hibernate tab. To display the amount of increasing memory When random access memory (RAM) increases, the operating system increases the hard drive space reserved for the hibernation file. Right-click the primary hard drive listing, and then... click Properties. 2 Effects of free space on the primary hard drive: 1. If you experience problems with hibernation after increasing memory, verify that the hard drive has enough free space to accommodate a larger hibernation file.

Memory Modules
Page 10
... of the screen. If you can be changed on . 3. Memory Modules 8 Press f10 while the "Press to enter Setup" message is restored from hibernation. 2. 3 Video memory settings (select models only) ✎ Video memory capacity and settings vary by changing the default shared video memory setting. The computer starts up or is displayed in hibernation...
... of the screen. If you can be changed on . 3. Memory Modules 8 Press f10 while the "Press to enter Setup" message is restored from hibernation. 2. 3 Video memory settings (select models only) ✎ Video memory capacity and settings vary by changing the default shared video memory setting. The computer starts up or is displayed in hibernation...

Memory Modules
Page 11
Memory information and settings are displayed. 5. Use the arrow keys to choose your preference and exit the Setup Utility, press f10 and then follow the instructions on the screen. Your preferences go into effect when the computer restarts. Memory Modules 9 To set your Shared Video Memory preference. 6. 4. To change the shared video memory setting, use the navigation and selection information at the bottom of the screen to select the Advanced menu.
Memory information and settings are displayed. 5. Use the arrow keys to choose your preference and exit the Setup Utility, press f10 and then follow the instructions on the screen. Your preferences go into effect when the computer restarts. Memory Modules 9 To set your Shared Video Memory preference. 6. 4. To change the shared video memory setting, use the navigation and selection information at the bottom of the screen to select the Advanced menu.

Memory Modules
Page 12
HP shall not be construed as constituting an additional warranty. Memory Modules First Edition October 2005 Document Part Number: 393521-001 Nothing herein should be liable for HP products and services are set forth in the express warranty statements accompanying such products and services. The only warranties for technical or editorial errors or omissions contained herein. The information contained herein is subject to change without notice. © Copyright 2005 Hewlett-Packard Development Company, L.P.
HP shall not be construed as constituting an additional warranty. Memory Modules First Edition October 2005 Document Part Number: 393521-001 Nothing herein should be liable for HP products and services are set forth in the express warranty statements accompanying such products and services. The only warranties for technical or editorial errors or omissions contained herein. The information contained herein is subject to change without notice. © Copyright 2005 Hewlett-Packard Development Company, L.P.

Notebook Tour Guide
Page 18
Component 9 Digital Media Slot - Supports optional Type I /O), MultiMediaCard, Memory Stick, Memory Stick Pro, SmartMedia card, and xD-Picture Card. Notebook Tour 16 PC Card slot q PC Card slot eject button Description Supports 7 optional digital card formats: Secure Digital (SD) Memory Card, Secure Digital Input/Output (SD I or Type II PC Cards. Ejects the PC Card from the PC Card slot.
Component 9 Digital Media Slot - Supports optional Type I /O), MultiMediaCard, Memory Stick, Memory Stick Pro, SmartMedia card, and xD-Picture Card. Notebook Tour 16 PC Card slot q PC Card slot eject button Description Supports 7 optional digital card formats: Secure Digital (SD) Memory Card, Secure Digital Input/Output (SD I or Type II PC Cards. Ejects the PC Card from the PC Card slot.


