Safety and Regulatory Information Desktops, Thin Clients, and Personal Workstations
Page 16
... any 30-minute period for compliance with Telecom's Telepermit requirements are made to different numbers, the equipment shall be set to go on the equipment (PC) associated with Telecom's Specifications: a. b. The equipment shall go on-hook for a period of not less than 5 seconds between the end of the next attempt. Some...
... any 30-minute period for compliance with Telecom's Telepermit requirements are made to different numbers, the equipment shall be set to go on the equipment (PC) associated with Telecom's Specifications: a. b. The equipment shall go on-hook for a period of not less than 5 seconds between the end of the next attempt. Some...
Safety and Regulatory Information Desktops, Thin Clients, and Personal Workstations
Page 27
...The computer's real-time clock battery may contain perchlorate and may contain the following material that might require special handling at http://www.hp.com/go/reach. See http://www.dtsc.ca.gov/hazardouswaste/perchlorate/. To verify the factory default power settings for this product can be... must also reset the ENERGY STAR settings (if applicable) after the restore. If it is not supported on Linux or FreeDOS Desktop PCs. For disposal or recycling information, please contact your computer, select Start > Control Panel, and then double-click Power Options. Mercury Statement This...
...The computer's real-time clock battery may contain perchlorate and may contain the following material that might require special handling at http://www.hp.com/go/reach. See http://www.dtsc.ca.gov/hazardouswaste/perchlorate/. To verify the factory default power settings for this product can be... must also reset the ENERGY STAR settings (if applicable) after the restore. If it is not supported on Linux or FreeDOS Desktop PCs. For disposal or recycling information, please contact your computer, select Start > Control Panel, and then double-click Power Options. Mercury Statement This...
Warranty
Page 11
...Software technical support for your End-User License Agreement (EULA). See "Contacting HP" for HP software. Software technical support does NOT include assistance with: • Non-HP software that doesn't ship with : • Installation, reinstallation questions and software...Applicable error messages • Add-on non-HP software. Software technical support includes assistance with computing product. • Installing HP software on non-HP computing products. • System optimization and customization. • Non-PC-based network configuration. • Advanced feature usage...
...Software technical support for your End-User License Agreement (EULA). See "Contacting HP" for HP software. Software technical support does NOT include assistance with: • Non-HP software that doesn't ship with : • Installation, reinstallation questions and software...Applicable error messages • Add-on non-HP software. Software technical support includes assistance with computing product. • Installing HP software on non-HP computing products. • System optimization and customization. • Non-PC-based network configuration. • Advanced feature usage...
Warranty
Page 25
... hours a day, seven days a week in English, Spanish (U.S. Click Start, All Programs, PC Help & Tools, and then click Hardware Diagnostic Tools. 4 HP Technical Support Web site. Go to: http://register.hp.com Where to Get Help Follow These Steps When You Need Help 1 Check the setup poster and... the Customer Care Center, run the hardware diagnostic tools that are preinstalled on your computer. Support Information Don't Forget to : http://www.hp.com/support for help with qualified support specialists. • Support phone numbers. 3 If you think you have your limited warranty period. 23...
... hours a day, seven days a week in English, Spanish (U.S. Click Start, All Programs, PC Help & Tools, and then click Hardware Diagnostic Tools. 4 HP Technical Support Web site. Go to: http://register.hp.com Where to Get Help Follow These Steps When You Need Help 1 Check the setup poster and... the Customer Care Center, run the hardware diagnostic tools that are preinstalled on your computer. Support Information Don't Forget to : http://www.hp.com/support for help with qualified support specialists. • Support phone numbers. 3 If you think you have your limited warranty period. 23...

Warranty
Page 28
..., L.P. 26 The BIOS menu displays. Confirming Total Memory The system BIOS displays the full 4GB of installed memory. 1 Turn on the PC. 2 Press the F1 key. HP will help you recycle your old product for system resources. Recycle - Visit our Web site to find out how easy it is to... is sensitive to the environment and has a program, Planet Partners, to change without notice. we take back all memory above 3GB is not an HP product; Note About Systems Configured with 4GB of Memory For computers with a 32-bit operating system, all makes and models. Confirm the Total Installed...
..., L.P. 26 The BIOS menu displays. Confirming Total Memory The system BIOS displays the full 4GB of installed memory. 1 Turn on the PC. 2 Press the F1 key. HP will help you recycle your old product for system resources. Recycle - Visit our Web site to find out how easy it is to... is sensitive to the environment and has a program, Planet Partners, to change without notice. we take back all memory above 3GB is not an HP product; Note About Systems Configured with 4GB of Memory For computers with a 32-bit operating system, all makes and models. Confirm the Total Installed...
Limited Warranty and Support Guide (Refurbished Desktops)
Page 14
...register your computer. • System information, including your computer product number, model number, and serial number. • E-mail support. • HP Real Time Chat with hardware and software questions. Telephone support is quick and easy, and it offers: • E-mail updates containing notifications about... run the hardware diagnostic tools that are on your computer. Click the Windows Start Button, All Programs, PC Help & Tools, and then click Hardware Diagnostic Tools. 4 HP Technical Support Web site. Registration is free during your model. Go to Register! Where Are My User...
...register your computer. • System information, including your computer product number, model number, and serial number. • E-mail support. • HP Real Time Chat with hardware and software questions. Telephone support is quick and easy, and it offers: • E-mail updates containing notifications about... run the hardware diagnostic tools that are on your computer. Click the Windows Start Button, All Programs, PC Help & Tools, and then click Hardware Diagnostic Tools. 4 HP Technical Support Web site. Registration is free during your model. Go to Register! Where Are My User...

Start Here Guide
Page 5
Getting Help 59 Finding Onscreen Guides 59 Finding Guides on the Web 59 Using the Onscreen Help and Support Center 60 Using the PC Help & Tools Folder 60 Using HP Connections or Compaq Connections 60 Getting messages 61 Turning off messages 61 Reactivating messages 62 Index...63 Table of Contents v
Getting Help 59 Finding Onscreen Guides 59 Finding Guides on the Web 59 Using the Onscreen Help and Support Center 60 Using the PC Help & Tools Folder 60 Using HP Connections or Compaq Connections 60 Getting messages 61 Turning off messages 61 Reactivating messages 62 Index...63 Table of Contents v
Start Here Guide
Page 66
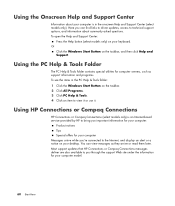
... and programs. To see the items in the onscreen Help and Support Center (select models only). Using HP Connections or Compaq Connections HP Connections or Compaq Connections (select models only) is an Internet-based service provided by HP to the Internet, and display an alert or a notice on your computer is in the...) on the taskbar, and then click Help and Support. You can find links to driver updates, access to technical support options, and information about your desktop. Using the PC Help & Tools Folder The PC Help & Tools folder contains special utilities for your keyboard.
... and programs. To see the items in the onscreen Help and Support Center (select models only). Using HP Connections or Compaq Connections HP Connections or Compaq Connections (select models only) is an Internet-based service provided by HP to the Internet, and display an alert or a notice on your computer is in the...) on the taskbar, and then click Help and Support. You can find links to driver updates, access to technical support options, and information about your desktop. Using the PC Help & Tools Folder The PC Help & Tools folder contains special utilities for your keyboard.

Start Here Guide
Page 67
... and view a list of messages that may have been received previously. If HP Connections or Compaq Connections has been activated on the taskbar. 2 Click All Programs. 3 Click PC Help & Tools. 4 Click HP Connections or Compaq Connections. To read a message, double-click the message title... or Compaq Connections has not been activated on the taskbar. 2 Click All Programs. 3 Click PC Help & Tools. 4 Click HP Connections or Compaq Connections. Turning off the HP Connections or Compaq Connections service: 1 Click the Windows Start Button on your computer, while the service is turned...
... and view a list of messages that may have been received previously. If HP Connections or Compaq Connections has been activated on the taskbar. 2 Click All Programs. 3 Click PC Help & Tools. 4 Click HP Connections or Compaq Connections. To read a message, double-click the message title... or Compaq Connections has not been activated on the taskbar. 2 Click All Programs. 3 Click PC Help & Tools. 4 Click HP Connections or Compaq Connections. Turning off the HP Connections or Compaq Connections service: 1 Click the Windows Start Button on your computer, while the service is turned...

Start Here Guide
Page 68
To turn on the service: 1 Click the Windows Start Button on the taskbar. 2 Click All Programs. 3 Click PC Help & Tools. 4 Click HP Connections or Compaq Connections. HP Connections or Compaq Connections displays. 5 Click Activate to the Internet, and you are connected to reactivate the service. 62 Start Here Reactivating messages When you reactivate the HP Connections or Compaq Connections service, the service runs whenever you automatically receive messages as they become available.
To turn on the service: 1 Click the Windows Start Button on the taskbar. 2 Click All Programs. 3 Click PC Help & Tools. 4 Click HP Connections or Compaq Connections. HP Connections or Compaq Connections displays. 5 Click Activate to the Internet, and you are connected to reactivate the service. 62 Start Here Reactivating messages When you reactivate the HP Connections or Compaq Connections service, the service runs whenever you automatically receive messages as they become available.

Upgrading and Servicing Guide
Page 3
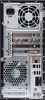
... the PC 2 Before Opening the PC 2 After Closing the PC 3 Removing the Side Panel 3 Replacing the Side Panel 4 Removing the Front Panel 5 Replacing the Front Panel 6 Locating Components Inside the Computer 7 Removing and Replacing Drives 8 Removing an Optical Drive 8 Adding or Replacing an Optical Drive 9 Removing the HP Pocket Media or Diskette or Hard...
... the PC 2 Before Opening the PC 2 After Closing the PC 3 Removing the Side Panel 3 Replacing the Side Panel 4 Removing the Front Panel 5 Replacing the Front Panel 6 Locating Components Inside the Computer 7 Removing and Replacing Drives 8 Removing an Optical Drive 8 Adding or Replacing an Optical Drive 9 Removing the HP Pocket Media or Diskette or Hard...
Upgrading and Servicing Guide
Page 5
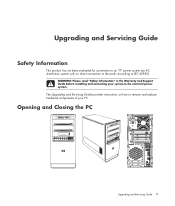
Opening and Closing the PC Upgrading and Servicing Guide 1 Upgrading and Servicing Guide Safety Information This product has not been evaluated for connection to an "IT" power system (an AC distribution system with no direct connection to the earth, according to the electrical power system. WARNING: Please read "Safety Information" in the Warranty and Support Guide before installing and connecting your PC. The Upgrading and Servicing Guide provides instructions on how to remove and replace hardware components of your system to IEC 60950).
Opening and Closing the PC Upgrading and Servicing Guide 1 Upgrading and Servicing Guide Safety Information This product has not been evaluated for connection to an "IT" power system (an AC distribution system with no direct connection to the earth, according to the electrical power system. WARNING: Please read "Safety Information" in the Warranty and Support Guide before installing and connecting your PC. The Upgrading and Servicing Guide provides instructions on how to remove and replace hardware components of your system to IEC 60950).

Upgrading and Servicing Guide
Page 6
... (such as the keyboard, mouse, and monitor). 6 Disconnect all installed options, and other information about the system. Before Opening the PC To avoid injury and equipment damage, always follow this procedure in personal injury or equipment damage. CAUTION: Static electricity can damage the electronic...3 Disconnect the modem/telephone cable, if present. WARNING: Always disconnect the modem cord from the telephone system, and then disconnect the PC from the power source before removing the front and side panels of personal injury from electrical shock or hot surfaces, disconnect the power ...
... (such as the keyboard, mouse, and monitor). 6 Disconnect all installed options, and other information about the system. Before Opening the PC To avoid injury and equipment damage, always follow this procedure in personal injury or equipment damage. CAUTION: Static electricity can damage the electronic...3 Disconnect the modem/telephone cable, if present. WARNING: Always disconnect the modem cord from the telephone system, and then disconnect the PC from the power source before removing the front and side panels of personal injury from electrical shock or hot surfaces, disconnect the power ...

Upgrading and Servicing Guide
Page 7
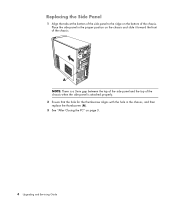
You may need to the PC chassis. A 3 Use the handle to the equipment, do not plug telecommunications or telephone connectors into the network ... all other cables (such as the monitor. 5 If you loosen the screw. Removing the Side Panel 1 See "Before Opening the PC" on the PC and all peripherals such as the keyboard, mouse, and monitor). 3 Reconnect external devices. 4 Turn on page 2. 2 Loosen the ... (2.5 centimeters), and then lift it off the chassis. Upgrading and Servicing Guide 3 After Closing the PC To avoid injury and equipment damage, always follow this order after closing the...
You may need to the PC chassis. A 3 Use the handle to the equipment, do not plug telecommunications or telephone connectors into the network ... all other cables (such as the monitor. 5 If you loosen the screw. Removing the Side Panel 1 See "Before Opening the PC" on the PC and all peripherals such as the keyboard, mouse, and monitor). 3 Reconnect external devices. 4 Turn on page 2. 2 Loosen the ... (2.5 centimeters), and then lift it off the chassis. Upgrading and Servicing Guide 3 After Closing the PC To avoid injury and equipment damage, always follow this order after closing the...
Upgrading and Servicing Guide
Page 8
A NOTE: There is attached properly. 2 Ensure that the hole for the thumbscrew aligns with the hole in the proper position on the chassis and slide it toward the front of the chassis. Replacing the Side Panel 1 Align the tabs at the bottom of the side panel to the ridge on the bottom of the chassis when the side panel is a 3mm gap between the top of the side panel and the top of the chassis. Place the side panel in the chassis, and then replace the thumbscrew (A). 3 See "After Closing the PC" on page 3. 4 Upgrading and Servicing Guide
A NOTE: There is attached properly. 2 Ensure that the hole for the thumbscrew aligns with the hole in the proper position on the chassis and slide it toward the front of the chassis. Replacing the Side Panel 1 Align the tabs at the bottom of the side panel to the ridge on the bottom of the chassis when the side panel is a 3mm gap between the top of the side panel and the top of the chassis. Place the side panel in the chassis, and then replace the thumbscrew (A). 3 See "After Closing the PC" on page 3. 4 Upgrading and Servicing Guide
Upgrading and Servicing Guide
Page 12
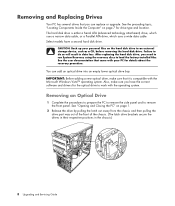
... device, such as a CD, before removing the hard disk drive. Also, make sure that came with the operating system. CAUTION: Back up your PC for drive type and location. See the user documentation that it is either a Serial ATA (advanced technology attachment) drive, which uses a narrow data cable...drives in their respective positions in data loss. You can replace or upgrade. Removing an Optical Drive 1 Complete the procedures to prepare the PC to remove the side panel and to remove the front panel. The hard disk drive is compatible with the Microsoft Windows Vista™ ...
... device, such as a CD, before removing the hard disk drive. Also, make sure that came with the operating system. CAUTION: Back up your PC for drive type and location. See the user documentation that it is either a Serial ATA (advanced technology attachment) drive, which uses a narrow data cable...drives in their respective positions in data loss. You can replace or upgrade. Removing an Optical Drive 1 Complete the procedures to prepare the PC to remove the side panel and to remove the front panel. The hard disk drive is compatible with the Microsoft Windows Vista™ ...
Upgrading and Servicing Guide
Page 15
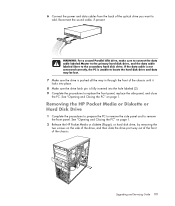
...HP Pocket Media or Diskette or Hard Disk Drive 1 Complete the procedures to prepare the PC to remove the side panel and to the secondary hard disk drive. Upgrading and Servicing Guide 11 If the data cable is not connected correctly, the PC...(2). 9 Complete the procedures to replace the front panel, replace the side panel, and close the PC. Reconnect the sound cable, if present. WARNING: For a second Parallel ATA drive, make sure ...remove the front panel. See "Opening and Closing the PC" on page 1. 2 Release the HP Pocket Media or diskette (floppy), or hard disk drive, by removing the two screws...
...HP Pocket Media or Diskette or Hard Disk Drive 1 Complete the procedures to prepare the PC to remove the side panel and to the secondary hard disk drive. Upgrading and Servicing Guide 11 If the data cable is not connected correctly, the PC...(2). 9 Complete the procedures to replace the front panel, replace the side panel, and close the PC. Reconnect the sound cable, if present. WARNING: For a second Parallel ATA drive, make sure ...remove the front panel. See "Opening and Closing the PC" on page 1. 2 Release the HP Pocket Media or diskette (floppy), or hard disk drive, by removing the two screws...
Upgrading and Servicing Guide
Page 18
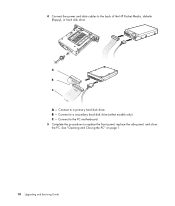
A B MASTER C SLAVE To CPU A - 4 Connect the power and data cables to replace the front panel, replace the side panel, and close the PC. B - Connect to the PC motherboard. 5 Complete the procedures to the back of the HP Pocket Media, diskette (floppy), or hard disk drive. Connect to a primary hard disk drive. See "Opening and Closing the PC" on page 1. 14 Upgrading and Servicing Guide Connect to a secondary hard disk drive (select models only). C -
A B MASTER C SLAVE To CPU A - 4 Connect the power and data cables to replace the front panel, replace the side panel, and close the PC. B - Connect to the PC motherboard. 5 Complete the procedures to the back of the HP Pocket Media, diskette (floppy), or hard disk drive. Connect to a primary hard disk drive. See "Opening and Closing the PC" on page 1. 14 Upgrading and Servicing Guide Connect to a secondary hard disk drive (select models only). C -
Upgrading and Servicing Guide
Page 19
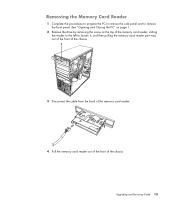
Removing the Memory Card Reader 1 Complete the procedures to prepare the PC to remove the side panel and to loosen it, and then pulling the memory card reader part way out of the front of the chassis. 3 Disconnect the cable from the back of the memory card reader. 4 Pull the memory card reader out of the front of the memory card reader, sliding the reader to the left to remove the front panel. Upgrading and Servicing Guide 15 See "Opening and Closing the PC" on page 1. 2 Release the drive by removing the screw on the top of the chassis.
Removing the Memory Card Reader 1 Complete the procedures to prepare the PC to remove the side panel and to loosen it, and then pulling the memory card reader part way out of the front of the chassis. 3 Disconnect the cable from the back of the memory card reader. 4 Pull the memory card reader out of the front of the memory card reader, sliding the reader to the left to remove the front panel. Upgrading and Servicing Guide 15 See "Opening and Closing the PC" on page 1. 2 Release the drive by removing the screw on the top of the chassis.

Upgrading and Servicing Guide
Page 20
See "Opening and Closing the PC" on the top of the memory card reader. 4 Push the memory card reader into the chassis until the screw hole on the chassis is aligned ... and Servicing Guide Adding or Replacing the Memory Card Reader 1 Complete the procedures to replace the front panel, replace the side panel, and close the PC. See "Removing the Memory Card Reader" on page 15. 2 Slide the memory card reader part way into the front of the chassis. 3 Attach the cable...
See "Opening and Closing the PC" on the top of the memory card reader. 4 Push the memory card reader into the chassis until the screw hole on the chassis is aligned ... and Servicing Guide Adding or Replacing the Memory Card Reader 1 Complete the procedures to replace the front panel, replace the side panel, and close the PC. See "Removing the Memory Card Reader" on page 15. 2 Slide the memory card reader part way into the front of the chassis. 3 Attach the cable...


