PC Basics Guide
Page 43
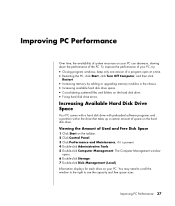
... need to scroll the window to the right to see the capacity and free space sizes. Increasing Available Hard Disk Drive Space Your PC comes with a hard disk drive with preloaded software programs and a partition within the drive that takes up a certain amount of Used... of a program open at a time. • Restarting the PC; Improving PC Performance Over time, the availability of system resources on your PC. click Start, click Turn Off Computer, and then click Restart. • Increasing memory by adding or upgrading memory modules in the chassis. • Increasing available hard disk drive ...
... need to scroll the window to the right to see the capacity and free space sizes. Increasing Available Hard Disk Drive Space Your PC comes with a hard disk drive with preloaded software programs and a partition within the drive that takes up a certain amount of Used... of a program open at a time. • Restarting the PC; Improving PC Performance Over time, the availability of system resources on your PC. click Start, click Turn Off Computer, and then click Restart. • Increasing memory by adding or upgrading memory modules in the chassis. • Increasing available hard disk drive ...
Upgrading and Servicing Guide
Page 3
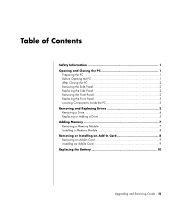
... Side Panel 2 Replacing the Side Panel 2 Removing the Front Panel 2 Replacing the Front Panel 3 Locating Components Inside the PC 3 Removing and Replacing Drives 3 Removing a Drive 4 Replacing or Adding a Drive 5 Adding Memory 7 Removing a Memory Module 7 Installing a Memory Module 8 Removing or Installing an Add-In Card 8 Removing an Add-In Card 9 Installing an Add-In Card...
... Side Panel 2 Replacing the Side Panel 2 Removing the Front Panel 2 Replacing the Front Panel 3 Locating Components Inside the PC 3 Removing and Replacing Drives 3 Removing a Drive 4 Replacing or Adding a Drive 5 Adding Memory 7 Removing a Memory Module 7 Installing a Memory Module 8 Removing or Installing an Add-In Card 8 Removing an Add-In Card 9 Installing an Add-In Card...
Upgrading and Servicing Guide
Page 6
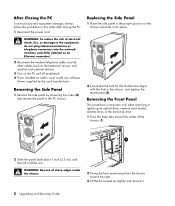
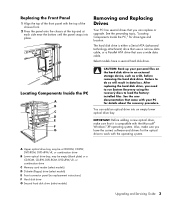
... is necessary only when removing or replacing an optical drive, memory card reader, diskette drive, or the hard disk drive. 1 Press the three tabs toward the right. 3 Lift the front panel up slightly and remove it. 2 Upgrading and Servicing Guide WARNING: To reduce the risk of the ...telecommunications or telephone connectors into place. 2 Ensure that secures the panel to the PC chassis. After Closing the PC To avoid injury and equipment damage, always follow this procedure in the proper position on the PC and all other cables (such as the keyboard, mouse, and monitor) and ...
... is necessary only when removing or replacing an optical drive, memory card reader, diskette drive, or the hard disk drive. 1 Press the three tabs toward the right. 3 Lift the front panel up slightly and remove it. 2 Upgrading and Servicing Guide WARNING: To reduce the risk of the ...telecommunications or telephone connectors into place. 2 Ensure that secures the panel to the PC chassis. After Closing the PC To avoid injury and equipment damage, always follow this procedure in the proper position on the PC and all other cables (such as the keyboard, mouse, and monitor) and ...
Upgrading and Servicing Guide
Page 7
... optical drive bay, may be empty (blank plate) or a CD-ROM, CD-RW, DVD-ROM, DVD+RW/+R, or combination drive C Memory card reader (select models) D Diskette (floppy) drive (select models) E Front connector panel (no replacement instructions) F Hard disk drive G Second ...hard disk drive (select models) Upgrading and Servicing Guide 3 Removing and Replacing Drives Your PC has several drives that it is either a Serial ATA (advanced technology attachment) drive that uses a narrow data cable, ...
... optical drive bay, may be empty (blank plate) or a CD-ROM, CD-RW, DVD-ROM, DVD+RW/+R, or combination drive C Memory card reader (select models) D Diskette (floppy) drive (select models) E Front connector panel (no replacement instructions) F Hard disk drive G Second ...hard disk drive (select models) Upgrading and Servicing Guide 3 Removing and Replacing Drives Your PC has several drives that it is either a Serial ATA (advanced technology attachment) drive that uses a narrow data cable, ...
Upgrading and Servicing Guide
Page 8
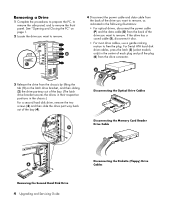
...power cable (P) and the data cable (D) from the back of the drive you want to remove. Removing a Drive 1 Complete the procedures to prepare the PC, to remove the side panel, and to free the plug. If the drive has a sound cable (S), disconnect it also. • For most drive cables..., use a gentle rocking motion to remove the front panel. Disconnecting the Optical Drive Cables Disconnecting the Memory Card Reader Drive Cable Removing the Second Hard Disk Drive 4 Upgrading and Servicing Guide Disconnecting the Diskette (Floppy) Drive Cables
...power cable (P) and the data cable (D) from the back of the drive you want to remove. Removing a Drive 1 Complete the procedures to prepare the PC, to remove the side panel, and to free the plug. If the drive has a sound cable (S), disconnect it also. • For most drive cables..., use a gentle rocking motion to remove the front panel. Disconnecting the Optical Drive Cables Disconnecting the Memory Card Reader Drive Cable Removing the Second Hard Disk Drive 4 Upgrading and Servicing Guide Disconnecting the Diskette (Floppy) Drive Cables
Upgrading and Servicing Guide
Page 10
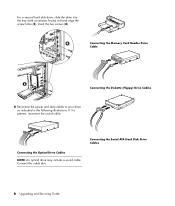
For a second hard disk drive, slide the drive into the bay (with connectors facing out) and align the screw holes (3). Insert the two screws (4). Connecting the Optical Drive Cables NOTE: An optical drive may include a sound cable. Connecting the Serial ATA Hard Disk Drive Cables 6 Upgrading and Servicing Guide If it is present, reconnect the sound cable. Connect this cable also. Connecting the Memory Card Reader Drive Cable Connecting the Diskette (Floppy) Drive Cables 6 Reconnect the power and data cables to your drive as indicated in the following illustrations.
For a second hard disk drive, slide the drive into the bay (with connectors facing out) and align the screw holes (3). Insert the two screws (4). Connecting the Optical Drive Cables NOTE: An optical drive may include a sound cable. Connecting the Serial ATA Hard Disk Drive Cables 6 Upgrading and Servicing Guide If it is present, reconnect the sound cable. Connect this cable also. Connecting the Memory Card Reader Drive Cable Connecting the Diskette (Floppy) Drive Cables 6 Reconnect the power and data cables to your drive as indicated in the following illustrations.

Upgrading and Servicing Guide
Page 11
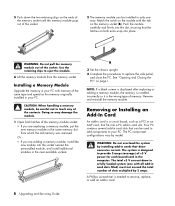
... with higher-capacity ones. The exact number of sockets and type of memory module your PC uses, and for DDR DIMMs (double data rate dual in your PC. Connecting the Parallel ATA Hard Disk Drive Cables A - Connect to remove the side panel. Upgrading and Servicing Guide 7 A DDR DIMM To determine which type and speed...
... with higher-capacity ones. The exact number of sockets and type of memory module your PC uses, and for DDR DIMMs (double data rate dual in your PC. Connecting the Parallel ATA Hard Disk Drive Cables A - Connect to remove the side panel. Upgrading and Servicing Guide 7 A DDR DIMM To determine which type and speed...
Upgrading and Servicing Guide
Page 12
... the module. 6 Lift the memory module from which the old memory was removed. Your PC contains several add-in the same memory slot from the memory socket. The total +5 V current draw in your PC with the tab on the memory socket (B). Use the retaining clips to your PC. Match the notch on page 1. Installing a Memory Module Upgrade the memory in your...
... the module. 6 Lift the memory module from which the old memory was removed. Your PC contains several add-in the same memory slot from the memory socket. The total +5 V current draw in your PC with the tab on the memory socket (B). Use the retaining clips to your PC. Match the notch on page 1. Installing a Memory Module Upgrade the memory in your...
Upgrading and Servicing Guide
Page 14
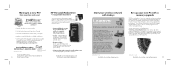
...battery. Replacing the Battery A lithium battery on page 1. 10 Upgrading and Servicing Guide WARNING: There is danger of seven years. See "Opening and Closing the PC" on the motherboard provides backup power for the PC's timekeeping capability. Discard used batteries according to the manufacturer's ..., with the positive (+) side facing the latch. 7 Replace memory modules or cables you removed. 8 Set the chassis upright. 9 Complete the procedures to replace the side panel, and to reach the battery. See "Adding Memory" on its side. 3 Remove any cabling, if necessary, ...
...battery. Replacing the Battery A lithium battery on page 1. 10 Upgrading and Servicing Guide WARNING: There is danger of seven years. See "Opening and Closing the PC" on the motherboard provides backup power for the PC's timekeeping capability. Discard used batteries according to the manufacturer's ..., with the positive (+) side facing the latch. 7 Replace memory modules or cables you removed. 8 Set the chassis upright. 9 Complete the procedures to replace the side panel, and to reach the battery. See "Adding Memory" on its side. 3 Remove any cabling, if necessary, ...

Warranty and Support Guide: In Home
Page 8
... accompanying such Freeware whether in such recovery solution shall be an f. After upgrading, you and HP or its online documentation. In case of the HP Product with your authorized HP dealer or Authorized Service Provider and be used only for the original Software ...the local memory or storage device of a hard disk drive-based solution, an external media-based recovery solution (e.g. You may include associated media, printed materials and "online" or electronic documentation. d. Freeware. To use the original Software Product that governs your upgrade eligibility. 3....
... accompanying such Freeware whether in such recovery solution shall be an f. After upgrading, you and HP or its online documentation. In case of the HP Product with your authorized HP dealer or Authorized Service Provider and be used only for the original Software ...the local memory or storage device of a hard disk drive-based solution, an external media-based recovery solution (e.g. You may include associated media, printed materials and "online" or electronic documentation. d. Freeware. To use the original Software Product that governs your upgrade eligibility. 3....
My Pavilion Brochure - Pages 2 and 11
Page 1
... performance. only To see a demo, go to www.hpshopping.com/pcmigration Get IntelliMover today! Back them up your new PC with a memory upgrade With the combination of your computer to the gamer, more - all -inone Internet-sharing router, 4-port Switch, and 54Mbps...hpshopping.com Rev up ! Valid in the U.S. transportable hard drive You've spent years collecting your desktop to a new PC? Add a Linksys Wireless-G USB Network Adapter to your HP Pavilion PC. Our HP memory has been specifically tested and qualified for the ultimate in ease of charge. Moving to a high-speed...
... performance. only To see a demo, go to www.hpshopping.com/pcmigration Get IntelliMover today! Back them up your new PC with a memory upgrade With the combination of your computer to the gamer, more - all -inone Internet-sharing router, 4-port Switch, and 54Mbps...hpshopping.com Rev up ! Valid in the U.S. transportable hard drive You've spent years collecting your desktop to a new PC? Add a Linksys Wireless-G USB Network Adapter to your HP Pavilion PC. Our HP memory has been specifically tested and qualified for the ultimate in ease of charge. Moving to a high-speed...


