Safety and Regulatory Information Desktops, Thin Clients, and Personal Workstations
Page 17
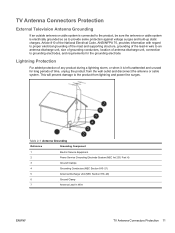
... or cable system. Table 2-1 Antenna Grounding Reference Grounding Component 1 Electric Service Equipment 2 Power Service Grounding Electrode System (NEC Art 250, Part H) 3 Ground Clamps 4 Grounding Conductors (NEC Section 810-21) 5 Antenna Discharge Unit (NEC Section 810-20) 6 Ground Clamp 7 Antenna Lead-in wire to an antenna-discharge unit, size of grounding conductors, location of antenna-discharge unit, connection to...
... or cable system. Table 2-1 Antenna Grounding Reference Grounding Component 1 Electric Service Equipment 2 Power Service Grounding Electrode System (NEC Art 250, Part H) 3 Ground Clamps 4 Grounding Conductors (NEC Section 810-21) 5 Antenna Discharge Unit (NEC Section 810-20) 6 Ground Clamp 7 Antenna Lead-in wire to an antenna-discharge unit, size of grounding conductors, location of antenna-discharge unit, connection to...
Upgrading and Servicing Guide
Page 5
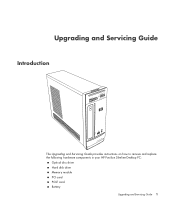
Upgrading and Servicing Guide Introduction The Upgrading and Servicing Guide provides instructions on how to remove and replace the following hardware components in your HP Pavilion Slimline Desktop PC: Optical disc drive Hard disk drive Memory module PCI card PCI-E card Battery Upgrading and Servicing Guide 1
Upgrading and Servicing Guide Introduction The Upgrading and Servicing Guide provides instructions on how to remove and replace the following hardware components in your HP Pavilion Slimline Desktop PC: Optical disc drive Hard disk drive Memory module PCI card PCI-E card Battery Upgrading and Servicing Guide 1
Upgrading and Servicing Guide
Page 9
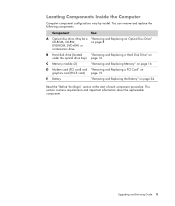
.... Upgrading and Servicing Guide 5 E Battery "Removing and Replacing the Battery" on page 16. You can remove and replace the following components: Component See: A Optical disc drive. This section contains requirements and important information about the replaceable component. C Memory module (2) "Removing and Replacing Memory" on page 24. May be a "Removing and Replacing an Optical Disc Drive" CD-ROM, CD-RW, on graphics card (PCI-E card) page 19. D Modem card (PCI card) and "Removing and Replacing a PCI Card" on page 8. DVD-ROM, DVD+RW, or combination drive B Hard disk...
.... Upgrading and Servicing Guide 5 E Battery "Removing and Replacing the Battery" on page 16. You can remove and replace the following components: Component See: A Optical disc drive. This section contains requirements and important information about the replaceable component. C Memory module (2) "Removing and Replacing Memory" on page 24. May be a "Removing and Replacing an Optical Disc Drive" CD-ROM, CD-RW, on graphics card (PCI-E card) page 19. D Modem card (PCI card) and "Removing and Replacing a PCI Card" on page 8. DVD-ROM, DVD+RW, or combination drive B Hard disk...
Upgrading and Servicing Guide
Page 25
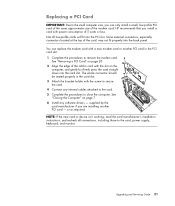
... to remove the modem card. See "Removing a PCI Card" on page 20. 2 Align the edge of the modem card. HP recommends that you can replace the modem card with the screw to secure the card. 4 Connect any software drivers - The whole connector should be seated properly in the card slot. 3 Attach the bracket holder with a new modem card or another PCI card - NOTE: If the new card or device isn't working, read the card manufacturer's installation instructions...
... to remove the modem card. See "Removing a PCI Card" on page 20. 2 Align the edge of the modem card. HP recommends that you can replace the modem card with the screw to secure the card. 4 Connect any software drivers - The whole connector should be seated properly in the card slot. 3 Attach the bracket holder with a new modem card or another PCI card - NOTE: If the new card or device isn't working, read the card manufacturer's installation instructions...

Upgrading and Servicing Guide
Page 27
.... Upgrading and Servicing Guide 23 Not all connections, including those to the card, power supply, keyboard, and monitor. NOTE: If the new card or device isn't working, read the card manufacturer's installation instructions, and recheck all low-profile cards will fit into the card slot. HP recommends that you install a card with power consumption of the graphics card. See "Closing the Computer" on page 7. 6 Install any internal cables attached to the card. 5 Complete the procedures to close the computer. Replacing a PCI-E Card...
.... Upgrading and Servicing Guide 23 Not all connections, including those to the card, power supply, keyboard, and monitor. NOTE: If the new card or device isn't working, read the card manufacturer's installation instructions, and recheck all low-profile cards will fit into the card slot. HP recommends that you install a card with power consumption of the graphics card. See "Closing the Computer" on page 7. 6 Install any internal cables attached to the card. 5 Complete the procedures to close the computer. Replacing a PCI-E Card...

Getting Started Guide
Page 3
... Support Center 2 Using the PC Help & Tools Folder 2 Using the hardware diagnostic tools 2 Using HP Total Care Advisor Software 3 Turning On the Computer for the First Time 5 Turning Off the Computer 6 Using Shut Down 6 Using Lock ...7 Using Sleep mode 7 Using Hibernate mode 8 Automatic Sleep, Hibernate, or Away mode 9 Restarting the Computer 9 Connecting to the Internet 10 Using the Computer with Safety and Comfort 11 Setting Up User Accounts 11 Protecting the Computer 12 Using passwords 13 Using antivirus software 14 Using...
... Support Center 2 Using the PC Help & Tools Folder 2 Using the hardware diagnostic tools 2 Using HP Total Care Advisor Software 3 Turning On the Computer for the First Time 5 Turning Off the Computer 6 Using Shut Down 6 Using Lock ...7 Using Sleep mode 7 Using Hibernate mode 8 Automatic Sleep, Hibernate, or Away mode 9 Restarting the Computer 9 Connecting to the Internet 10 Using the Computer with Safety and Comfort 11 Setting Up User Accounts 11 Protecting the Computer 12 Using passwords 13 Using antivirus software 14 Using...

Getting Started Guide
Page 16
... to wake quickly and resume your work where you left off. Sleep mode saves your work to memory, so you can perform tasks such as to make repairs, install new hardware or cards in the computer chassis, or change a battery. Turning Off the Computer For best results, when using Windows Vista, turn on the computer after a shut down: 1 Press the power button on the monitor. 2 Press the On button on the hard disk and then turns...
... to wake quickly and resume your work where you left off. Sleep mode saves your work to memory, so you can perform tasks such as to make repairs, install new hardware or cards in the computer chassis, or change a battery. Turning Off the Computer For best results, when using Windows Vista, turn on the computer after a shut down: 1 Press the power button on the monitor. 2 Press the On button on the hard disk and then turns...
Getting Started Guide
Page 20
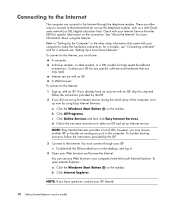
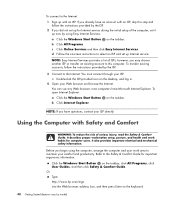
... follow the instructions provided by model) To connect to the Internet that do not use any specific software and hardware that came with an ISP. Internet service with your computer to "Setting Up the Computer" in . 4 Open your ISP. most computers have questions, contact your ISP for a network see "Setting Up a Local Area Network." To open Internet Explorer: a Click the Windows Start Button on the taskbar. There are other setup information...
... follow the instructions provided by model) To connect to the Internet that do not use any specific software and hardware that came with an ISP. Internet service with your computer to "Setting Up the Computer" in . 4 Open your ISP. most computers have questions, contact your ISP for a network see "Setting Up a Local Area Network." To open Internet Explorer: a Click the Windows Start Button on the taskbar. There are other setup information...
Getting Started Guide
Page 23
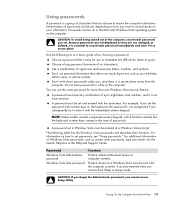
... each password you cannot access Setup Utility. NOTE: Select models include a separate numeric keypad, which functions exactly like the keyboard number keys, except in the Help and Support Center. Turning On the Computer for others can be entered at a Windows Vista prompt. Using passwords A password is not recognized if you subsequently try to enter it with the embedded numeric keypad. Passwords can easily figure out, such as screen saver passwords, type passwords into...
... each password you cannot access Setup Utility. NOTE: Select models include a separate numeric keypad, which functions exactly like the keyboard number keys, except in the Help and Support Center. Turning On the Computer for others can be entered at a Windows Vista prompt. Using passwords A password is not recognized if you subsequently try to enter it with the embedded numeric keypad. Passwords can easily figure out, such as screen saver passwords, type passwords into...
Getting Started Guide
Page 25
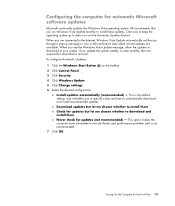
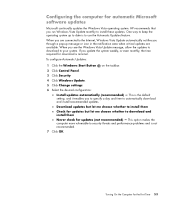
... software updates Microsoft continually updates the Windows Vista operating system. One way to keep the operating system up message or icon in the notification area when critical updates are available. This option makes the computer more vulnerable to security threats and performance problems and is to automatically download and install recommended updates. To configure Automatic Updates: 1 Click the Windows Start Button on the taskbar. 2 Click Control Panel. 3 Click Security. 4 Click Windows Update. 5 Click Change settings...
... software updates Microsoft continually updates the Windows Vista operating system. One way to keep the operating system up message or icon in the notification area when critical updates are available. This option makes the computer more vulnerable to security threats and performance problems and is to automatically download and install recommended updates. To configure Automatic Updates: 1 Click the Windows Start Button on the taskbar. 2 Click Control Panel. 3 Click Security. 4 Click Windows Update. 5 Click Change settings...

Getting Started Guide
Page 48
... X to close the window. Creative automatically detects the type of configuring and recording with the media software program. 38 Getting Started (features vary by model) Entertainment Mode is different for computers: NOTE: Three modes are connected to your media software program. Refer to the instructions that you have configured the audio card software, you have installed and connected the speakers, follow these steps to All Programs. 3 Click Creative, Sound Blaster X-Fi...
... X to close the window. Creative automatically detects the type of configuring and recording with the media software program. 38 Getting Started (features vary by model) Entertainment Mode is different for computers: NOTE: Three modes are connected to your media software program. Refer to the instructions that you have configured the audio card software, you have installed and connected the speakers, follow these steps to All Programs. 3 Click Creative, Sound Blaster X-Fi...

Getting Started Guide
Page 57
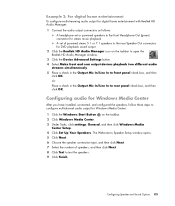
... to Speaker Setup window opens. 5 Click Next. 6 Choose the speaker connection type, and then click Next. 7 Select the number of powered stereo 5.1 or 7.1 speakers to the rear Speaker Out connectors for Windows Media Center: 1 Click the Windows Start Button on the taskbar to open the Realtek HD Audio Manager window. 3 Click the Device Advanced Settings button. 4 Select Make front and rear output devices playback two different audio streams simultaneously. 5 Place a check in the Output Mic In/Line In to rear panel check...
... to Speaker Setup window opens. 5 Click Next. 6 Choose the speaker connection type, and then click Next. 7 Select the number of powered stereo 5.1 or 7.1 speakers to the rear Speaker Out connectors for Windows Media Center: 1 Click the Windows Start Button on the taskbar to open the Realtek HD Audio Manager window. 3 Click the Device Advanced Settings button. 4 Select Make front and rear output devices playback two different audio streams simultaneously. 5 Place a check in the Output Mic In/Line In to rear panel check...

Getting Started
Page 25
... wireless antenna may include the term wireless, wireless LAN, or 802.11. Go to open the Network and Sharing Center window. 6 Click Connect to : http://www.hp.com/go/techcenter/wireless (English only). For more information about setting up a wireless network: Click the Windows Start Button on the taskbar. 2 Type Device Manager into the Start Search box, and then click Network and Sharing Center to open the Device Manager window. 3 Click Network adapters. To connect the wireless LAN antenna: 1 Screw the wireless LAN antenna cable...
... wireless antenna may include the term wireless, wireless LAN, or 802.11. Go to open the Network and Sharing Center window. 6 Click Connect to : http://www.hp.com/go/techcenter/wireless (English only). For more information about setting up a wireless network: Click the Windows Start Button on the taskbar. 2 Type Device Manager into the Start Search box, and then click Network and Sharing Center to open the Device Manager window. 3 Click Network adapters. To connect the wireless LAN antenna: 1 Screw the wireless LAN antenna cable...
Getting Started
Page 58
... Internet Services provides a list of the computer, set up Internet service. To open Internet Explorer: a Click the Windows Start Button on the taskbar, click All Programs, click User Guides, and then click Safety & Comfort Guide. It describes proper workstation setup, posture, and health and work area to maintain your Web browser and browse the Internet. Refer to the Safety & Comfort Guide for important ergonomic information: Click the Windows Start Button on...
... Internet Services provides a list of the computer, set up Internet service. To open Internet Explorer: a Click the Windows Start Button on the taskbar, click All Programs, click User Guides, and then click Safety & Comfort Guide. It describes proper workstation setup, posture, and health and work area to maintain your Web browser and browse the Internet. Refer to the Safety & Comfort Guide for important ergonomic information: Click the Windows Start Button on...

Getting Started
Page 59
... create individual user settings Ability to limit access to software for certain users Drawbacks to multiple user accounts: More memory (RAM) usage Multiple Temporary Internet Files folders to remove during Disk Cleanup More data to back up Longer time to complete virus scan Turning On the Computer for other user settings or passwords, or install software. A Limited account may not be able to change other users, change passwords, change account types for the...
... create individual user settings Ability to limit access to software for certain users Drawbacks to multiple user accounts: More memory (RAM) usage Multiple Temporary Internet Files folders to remove during Disk Cleanup More data to back up Longer time to complete virus scan Turning On the Computer for other user settings or passwords, or install software. A Limited account may not be able to change other users, change passwords, change account types for the...
Getting Started
Page 63
... for download is minimal. HP recommends that you through a pop-up to date is not recommended. 7 Click OK. To configure Automatic Updates: 1 Click the Windows Start Button on the taskbar. 2 Click Control Panel. 3 Click Security. 4 Click Windows Update. 5 Click Change settings. 6 Select the desired configuration: Install updates automatically (recommended) - When you update the system weekly, or even monthly, the time required for automatic Microsoft software updates Microsoft continually updates the Windows Vista operating...
... for download is minimal. HP recommends that you through a pop-up to date is not recommended. 7 Click OK. To configure Automatic Updates: 1 Click the Windows Start Button on the taskbar. 2 Click Control Panel. 3 Click Security. 4 Click Windows Update. 5 Click Change settings. 6 Select the desired configuration: Install updates automatically (recommended) - When you update the system weekly, or even monthly, the time required for automatic Microsoft software updates Microsoft continually updates the Windows Vista operating...
Getting Started
Page 86
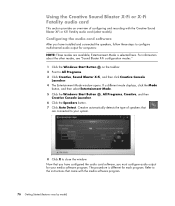
... X-Fi or X-Fi Fatality audio card (select models). Using the Creative Sound Blaster X-Fi or X-Fi Fatality audio card This section provides an overview of speakers that are available; Creative automatically detects the type of configuring and recording with the media software program. 76 Getting Started (features vary by model) If a different mode displays, click the Mode button, and then select Entertainment Mode. 5 Click the Windows Start Button , All Programs, Creative, and...
... X-Fi or X-Fi Fatality audio card (select models). Using the Creative Sound Blaster X-Fi or X-Fi Fatality audio card This section provides an overview of speakers that are available; Creative automatically detects the type of configuring and recording with the media software program. 76 Getting Started (features vary by model) If a different mode displays, click the Mode button, and then select Entertainment Mode. 5 Click the Windows Start Button , All Programs, Creative, and...
Getting Started
Page 95
... playback A set of speakers, and then click Next. 8 Click Test to test the speakers. 9 Click Finish. Configuring Speaker and Sound Options 85 The Welcome to Speaker Setup window opens. 5 Click Next. 6 Choose the speaker connection type, and then click Next. 7 Select the number of powered stereo 5.1 or 7.1 speakers to the rear Speaker Out connectors for Windows Media Center: 1 Click the Windows Start Button on the taskbar to open the Realtek HD Audio Manager window. 3 Click the Device Advanced Settings button. 4 Select Make front and rear output devices playback...
... playback A set of speakers, and then click Next. 8 Click Test to test the speakers. 9 Click Finish. Configuring Speaker and Sound Options 85 The Welcome to Speaker Setup window opens. 5 Click Next. 6 Choose the speaker connection type, and then click Next. 7 Select the number of powered stereo 5.1 or 7.1 speakers to the rear Speaker Out connectors for Windows Media Center: 1 Click the Windows Start Button on the taskbar to open the Realtek HD Audio Manager window. 3 Click the Device Advanced Settings button. 4 Select Make front and rear output devices playback...
Getting Started
Page 219
... HP Pocket Media Drive 125 HP Total Care Advisor 41 I IBM Microdrive 122 Internet security 52, 100 K keyboard connector 4 customizing buttons 62 shortcuts 63 types of buttons 57 using 57 L LAN (local area network) 12 antenna 15 checking wireless LAN device 15 connecting Ethernet LAN 5 connecting wireless LAN device 14 setting up 13 using Local Area Network 12 LightScribe, creating a LightScribe disc label 175 local area network (LAN) 12 M magicSpot 198 manuals storing 10 memory card reader 179 card types 119 in-use light 123 troubleshooting 124 using 119 memory card...
... HP Pocket Media Drive 125 HP Total Care Advisor 41 I IBM Microdrive 122 Internet security 52, 100 K keyboard connector 4 customizing buttons 62 shortcuts 63 types of buttons 57 using 57 L LAN (local area network) 12 antenna 15 checking wireless LAN device 15 connecting Ethernet LAN 5 connecting wireless LAN device 14 setting up 13 using Local Area Network 12 LightScribe, creating a LightScribe disc label 175 local area network (LAN) 12 M magicSpot 198 manuals storing 10 memory card reader 179 card types 119 in-use light 123 troubleshooting 124 using 119 memory card...
Warranty
Page 28
.... Easy to change without notice. But it left our factory. Next, try a little surfing! After thirty (30) days, there may wish to upgrade your computer to also check the updates from HP that you have two choices: • You can easily replace many of helpful information included with it , click the Windows Vista start button, then click Help and Support). The...
.... Easy to change without notice. But it left our factory. Next, try a little surfing! After thirty (30) days, there may wish to upgrade your computer to also check the updates from HP that you have two choices: • You can easily replace many of helpful information included with it , click the Windows Vista start button, then click Help and Support). The...


