Safety and Regulatory Information Desktops, Thin Clients, and Personal Workstations
Page 17
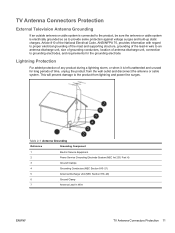
.... Article 810 of the National Electrical Code, ANSI/NFPA 70, provides information with regard to proper electrical grounding of the mast and supporting structure, grounding of the lead-in Wire ENWW TV Antenna Connectors Protection 11 TV Antenna Connectors Protection External Television Antenna Grounding If an outside antenna or cable system is connected to the product, be sure...
.... Article 810 of the National Electrical Code, ANSI/NFPA 70, provides information with regard to proper electrical grounding of the mast and supporting structure, grounding of the lead-in Wire ENWW TV Antenna Connectors Protection 11 TV Antenna Connectors Protection External Television Antenna Grounding If an outside antenna or cable system is connected to the product, be sure...
Upgrading and Servicing Guide
Page 5
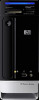
Upgrading and Servicing Guide Introduction The Upgrading and Servicing Guide provides instructions on how to remove and replace the following hardware components in your HP Pavilion Slimline Desktop PC: Optical disc drive Hard disk drive Memory module PCI card PCI-E card Battery Upgrading and Servicing Guide 1
Upgrading and Servicing Guide Introduction The Upgrading and Servicing Guide provides instructions on how to remove and replace the following hardware components in your HP Pavilion Slimline Desktop PC: Optical disc drive Hard disk drive Memory module PCI card PCI-E card Battery Upgrading and Servicing Guide 1
Upgrading and Servicing Guide
Page 9
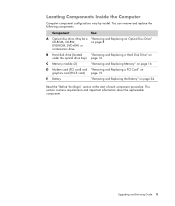
...Battery" on page 8. Upgrading and Servicing Guide 5 May be a "Removing and Replacing an Optical Disc Drive" CD-ROM, CD-RW, on page 24. C Memory module (2) "Removing and Replacing Memory" on graphics card (PCI-E card) page 19. D Modem card (PCI card) and "Removing and Replacing a PCI Card" on page 16. Read the "Before You Begin" section at the start of each component procedure. Locating Components Inside the Computer Computer component configurations vary by model. DVD-ROM, DVD+RW, or combination drive B Hard disk drive (located "Removing and Replacing a Hard Disk Drive...
...Battery" on page 8. Upgrading and Servicing Guide 5 May be a "Removing and Replacing an Optical Disc Drive" CD-ROM, CD-RW, on page 24. C Memory module (2) "Removing and Replacing Memory" on graphics card (PCI-E card) page 19. D Modem card (PCI card) and "Removing and Replacing a PCI Card" on page 16. Read the "Before You Begin" section at the start of each component procedure. Locating Components Inside the Computer Computer component configurations vary by model. DVD-ROM, DVD+RW, or combination drive B Hard disk drive (located "Removing and Replacing a Hard Disk Drive...
Upgrading and Servicing Guide
Page 25
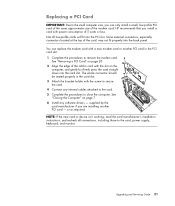
... the add-in the PCI card slot: 1 Complete the procedures to remove the modem card. Not all connections, including those to the card, power supply, keyboard, and monitor. See "Removing a PCI Card" on page 20. 2 Align the edge of 5 watts or less. Replacing a PCI Card IMPORTANT: Due to the small computer size, you can replace the modem card with a new modem card or another PCI card - NOTE: If the new card or device isn't working, read the card manufacturer's installation instructions...
... the add-in the PCI card slot: 1 Complete the procedures to remove the modem card. Not all connections, including those to the card, power supply, keyboard, and monitor. See "Removing a PCI Card" on page 20. 2 Align the edge of 5 watts or less. Replacing a PCI Card IMPORTANT: Due to the small computer size, you can replace the modem card with a new modem card or another PCI card - NOTE: If the new card or device isn't working, read the card manufacturer's installation instructions...

Upgrading and Servicing Guide
Page 27
... the card, power supply, keyboard, and monitor. The whole connector should be seated properly in the card slot. 3 Attach the bracket holder with a new graphics card or another PCI-E card - supplied by the card manufacturer if you can replace the graphics card with the screw to secure the card. 4 Connect any software drivers - Some external connectors, especially connectors located at the top of 25 watts or less. Upgrading and Servicing Guide 23 Replacing a PCI-E Card IMPORTANT: Due to remove the graphics card. Not all connections, including...
... the card, power supply, keyboard, and monitor. The whole connector should be seated properly in the card slot. 3 Attach the bracket holder with a new graphics card or another PCI-E card - supplied by the card manufacturer if you can replace the graphics card with the screw to secure the card. 4 Connect any software drivers - Some external connectors, especially connectors located at the top of 25 watts or less. Upgrading and Servicing Guide 23 Replacing a PCI-E Card IMPORTANT: Due to remove the graphics card. Not all connections, including...
Limited Warranty and Support Guide
Page 12
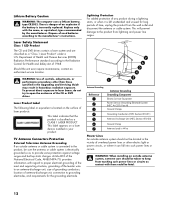
... from the wall outlet and disconnect the antenna or cable system. Should the unit ever require maintenance, contact an authorized service location. Lithium Battery Caution WARNING: The computer uses a lithium battery, type CR2032. Replace only with the same, or equivalent, type recommended by the manufacturer. Laser Product Label The following label or equivalent is located on a laser device installed in hazardous radiation exposure.
... from the wall outlet and disconnect the antenna or cable system. Should the unit ever require maintenance, contact an authorized service location. Lithium Battery Caution WARNING: The computer uses a lithium battery, type CR2032. Replace only with the same, or equivalent, type recommended by the manufacturer. Laser Product Label The following label or equivalent is located on a laser device installed in hazardous radiation exposure.
Limited Warranty and Support Guide
Page 14
... things you have completely set up your software vendor's Web site. For software not listed, the HP Customer Care Center provides 30-day limited support. During development, the computer must be done after you intend to make this computer. This must pass extensive quality tests to upgrade your specific needs. Click the Windows Start Button, All Programs, and then click User Guides. Any hardware upgrades that have made us...
... things you have completely set up your software vendor's Web site. For software not listed, the HP Customer Care Center provides 30-day limited support. During development, the computer must be done after you intend to make this computer. This must pass extensive quality tests to upgrade your specific needs. Click the Windows Start Button, All Programs, and then click User Guides. Any hardware upgrades that have made us...
Limited Warranty and Support Guide (Refurbished Desktops)
Page 5
... Period starts from the date of all repair, logistics and insurance costs in the warranty documents (HP Option Limited Warranty Period) that arrives with product specifications and supported configurations. On receiving the replacement unit you must: (a) have a representative present when HP provides warranty services at its reasonable security requirements, provide HP with sufficient, free, and safe access to and use of a Customer Self Repair (CSR) part...
... Period starts from the date of all repair, logistics and insurance costs in the warranty documents (HP Option Limited Warranty Period) that arrives with product specifications and supported configurations. On receiving the replacement unit you must: (a) have a representative present when HP provides warranty services at its reasonable security requirements, provide HP with sufficient, free, and safe access to and use of a Customer Self Repair (CSR) part...
Start Here Guide
Page 4
... Audio System 28 Y adapter cables 28 2.1 home stereo installation 29 5.1 home audio installation 30 5.1 home audio installation procedure 30 7.1 home audio installation 32 7.1 home audio installation procedure 33 Connecting Digital Audio 34 Connecting Speakers Using the Creative Sound Blaster X-Fi Sound Card 36 Connecting the speakers 36 Connecting the FlexiJack connector 37 Connecting the Television Signal and Video Cables 39 Using TV Cables 39 Audio and Video Cables 39 Connecting the TV Signal Source 41 Connecting a dual tuner 42 Connecting the Remote Sensor 43 Connecting...
... Audio System 28 Y adapter cables 28 2.1 home stereo installation 29 5.1 home audio installation 30 5.1 home audio installation procedure 30 7.1 home audio installation 32 7.1 home audio installation procedure 33 Connecting Digital Audio 34 Connecting Speakers Using the Creative Sound Blaster X-Fi Sound Card 36 Connecting the speakers 36 Connecting the FlexiJack connector 37 Connecting the Television Signal and Video Cables 39 Using TV Cables 39 Audio and Video Cables 39 Connecting the TV Signal Source 41 Connecting a dual tuner 42 Connecting the Remote Sensor 43 Connecting...
Start Here Guide
Page 20
... Protected Access Personal (WPA-Personal) and Wired Equivalent Privacy (WEP). For more information about setting up a wireless network: Click the Windows Start Button on the taskbar. 2 Type Device Manager into the Search box, and then click Network and Sharing Center to open the Device Manager window. 3 Click Network adapters. Change the default network name (SSID) and password. When setting up a network, you set up your wireless network, verify that the integrated WLAN device is not properly installed. 4 Click the Windows Start Button on...
... Protected Access Personal (WPA-Personal) and Wired Equivalent Privacy (WEP). For more information about setting up a wireless network: Click the Windows Start Button on the taskbar. 2 Type Device Manager into the Search box, and then click Network and Sharing Center to open the Device Manager window. 3 Click Network adapters. Change the default network name (SSID) and password. When setting up a network, you set up your wireless network, verify that the integrated WLAN device is not properly installed. 4 Click the Windows Start Button on...
Start Here Guide
Page 26
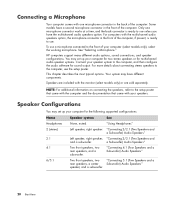
... "Connecting 5.1 (Five Speakers and a rear speakers, a center Subwoofer) Audio Speakers" speaker, and a subwoofer. 20 Start Here For more details about connecting stereo speakers to the setup poster that came with the computer and the documentation that came with the monitor (select models only) or are included with your computer (select models only), select the working microphone. a Subwoofer) Audio Speakers" Two front speakers, two rear speakers, and a subwoofer. HP computers support many different audio options, sound connections, and speaker configurations. Speakers...
... "Connecting 5.1 (Five Speakers and a rear speakers, a center Subwoofer) Audio Speakers" speaker, and a subwoofer. 20 Start Here For more details about connecting stereo speakers to the setup poster that came with the computer and the documentation that came with the monitor (select models only) or are included with your computer (select models only), select the working microphone. a Subwoofer) Audio Speakers" Two front speakers, two rear speakers, and a subwoofer. HP computers support many different audio options, sound connections, and speaker configurations. Speakers...
Start Here Guide
Page 42
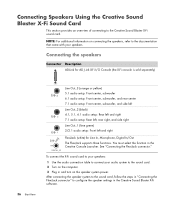
... sound card. Connecting Speakers Using the Creative Sound Blaster X-Fi Sound Card This section provides an overview of connecting to configure the speaker settings in the Creative Sound Blaster X-Fi software. Connecting the speakers Connector Description AD-Link for AD_Link X-Fi I/O Console (the X-Fi console is sold separately) 36 Start Here Line Out_3 (orange or yellow) 5.1 audio setup: Front center, subwoofer 6.1 audio setup: Front center, subwoofer, and rear center 7.1 audio setup: Front center, subwoofer, and side left Line Out_2 (black) 4.1, 5.1, 6.1 audio setup: Rear left...
... sound card. Connecting Speakers Using the Creative Sound Blaster X-Fi Sound Card This section provides an overview of connecting to configure the speaker settings in the Creative Sound Blaster X-Fi software. Connecting the speakers Connector Description AD-Link for AD_Link X-Fi I/O Console (the X-Fi console is sold separately) 36 Start Here Line Out_3 (orange or yellow) 5.1 audio setup: Front center, subwoofer 6.1 audio setup: Front center, subwoofer, and rear center 7.1 audio setup: Front center, subwoofer, and side left Line Out_2 (black) 4.1, 5.1, 6.1 audio setup: Rear left...
Getting Started Guide
Page 17
... discovered viruses, antivirus software must be entered when you cannot access Setup Utility. Do not store passwords in a secure place away from sleep or away mode. Antivirus software can disable the operating system, software programs, or utilities, or cause them to computer viruses. The following are provided within the program. To open and access Norton Internet Security: 1 Click the Windows Start Button on the computer. Password Windows Vista Administrator password Windows Vista User password Function Protects administrator...
... discovered viruses, antivirus software must be entered when you cannot access Setup Utility. Do not store passwords in a secure place away from sleep or away mode. Antivirus software can disable the operating system, software programs, or utilities, or cause them to computer viruses. The following are provided within the program. To open and access Norton Internet Security: 1 Click the Windows Start Button on the computer. Password Windows Vista Administrator password Windows Vista User password Function Protects administrator...
Getting Started Guide
Page 23
... and browse the Internet. A dial-up now by using Easy Internet Services. If you may need. You can connect to the Internet you have an account with an ISP. Turning On Your Computer for specific information on the desktop, and log in. 4 Open your ISP. d Follow the onscreen instructions to make the hardware connections: for a modem see "Setting Up a Local Area Network" of the computer, set up with...
... and browse the Internet. A dial-up now by using Easy Internet Services. If you may need. You can connect to the Internet you have an account with an ISP. Turning On Your Computer for specific information on the desktop, and log in. 4 Open your ISP. d Follow the onscreen instructions to make the hardware connections: for a modem see "Setting Up a Local Area Network" of the computer, set up with...
Getting Started Guide
Page 188
... 86 Internet connections 86 remote control and remote sensor 35 Shared Video folder 136 shortcuts keyboard 25 shutting down PC 10 sleep mode button 22 slide show displaying information about pictures 132 viewing pictures 132 viewing with music 132 software programs DVDPlay 46 Windows Movie Maker 48 sorting TV programs by category 172 by date 172 by name 172 Start menu Media Center 78 Support messages 2 SVCD 150 switching mouse button functions...
... 86 Internet connections 86 remote control and remote sensor 35 Shared Video folder 136 shortcuts keyboard 25 shutting down PC 10 sleep mode button 22 slide show displaying information about pictures 132 viewing pictures 132 viewing with music 132 software programs DVDPlay 46 Windows Movie Maker 48 sorting TV programs by category 172 by date 172 by name 172 Start menu Media Center 78 Support messages 2 SVCD 150 switching mouse button functions...
Troubleshooting and Maintenance Guide
Page 6
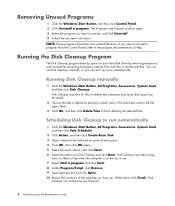
... is on your hard disk drive by placing a check mark in use. 7 Select Start a program and click Next. 8 Under Program/Script, click Browse. 9 Type cleanmgr.exe and click Open. 10 Review the summary of the schedule you cannot uninstall a program from the Control Panel, refer to run automatically. Removing Unused Programs 1 Click the Windows Start Button, and then click Control Panel. 2 Click Uninstall a program. Disk Cleanup searches for...
... is on your hard disk drive by placing a check mark in use. 7 Select Start a program and click Next. 8 Under Program/Script, click Browse. 9 Type cleanmgr.exe and click Open. 10 Review the summary of the schedule you cannot uninstall a program from the Control Panel, refer to run automatically. Removing Unused Programs 1 Click the Windows Start Button, and then click Control Panel. 2 Click Uninstall a program. Disk Cleanup searches for...
Troubleshooting and Maintenance Guide
Page 15
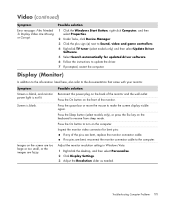
.... 2 Click Display Settings. 3 Adjust the Resolution slider as needed. Troubleshooting Computer Problems 11 Video (continued) Symptom Error message: Files Needed To Display Video Are Missing or Corrupt. Inspect the monitor video connector for updated driver software. 6 Follow the instructions to update the driver. 7 If prompted, restart the computer. Press the On button on the screen are too large or too small, or the images are bent, reconnect the monitor connector cable to Sound, video and game controllers. 4 Right...
.... 2 Click Display Settings. 3 Adjust the Resolution slider as needed. Troubleshooting Computer Problems 11 Video (continued) Symptom Error message: Files Needed To Display Video Are Missing or Corrupt. Inspect the monitor video connector for updated driver software. 6 Follow the instructions to update the driver. 7 If prompted, restart the computer. Press the On button on the screen are too large or too small, or the images are bent, reconnect the monitor connector cable to Sound, video and game controllers. 4 Right...
Troubleshooting and Maintenance Guide
Page 16
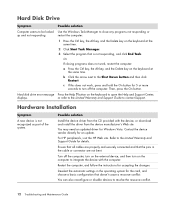
... configuration that is not recognized as part of the system. Hard disk drive error message Press the Help ? Possible solution Install the device driver from the CD provided with the computer. Contact the device vendor directly for Windows Vista. A Hardware Installation Symptom A new device is not responding, and click End Task. Deselect the automatic settings in the cable or connector are properly and securely connected and that the pins in the operating...
... configuration that is not recognized as part of the system. Hard disk drive error message Press the Help ? Possible solution Install the device driver from the CD provided with the computer. Contact the device vendor directly for Windows Vista. A Hardware Installation Symptom A new device is not responding, and click End Task. Deselect the automatic settings in the cable or connector are properly and securely connected and that the pins in the operating...

Troubleshooting and Maintenance Guide
Page 18
... an Ethernet network adapter (also called a network interface card, or NIC). Your computer may also load slowly if there is installed and set up connection. Do not plug a network cable into a telephone service line; Internet Access Symptom Possible solution I cannot automatically start the desired program. Verify that time. Verify Internet settings, or contact your ISP for the Web site at that the correct modem speed and COM port are using...
... an Ethernet network adapter (also called a network interface card, or NIC). Your computer may also load slowly if there is installed and set up connection. Do not plug a network cable into a telephone service line; Internet Access Symptom Possible solution I cannot automatically start the desired program. Verify that time. Verify Internet settings, or contact your ISP for the Web site at that the correct modem speed and COM port are using...

Troubleshooting and Maintenance Guide
Page 25
... the hard disk drive that you want to check, and then click Properties. 4 In the System Properties window, click the Tools tab. 5 Under Error-checking, click Check Now. 6 If desired, select the buttons next to Automatically fix file system errors and Scan for and attempt recovery of the USB cable on the remote sensor from the remote control (select models only). 1 Click the Windows Start Button, right...
... the hard disk drive that you want to check, and then click Properties. 4 In the System Properties window, click the Tools tab. 5 Under Error-checking, click Check Now. 6 If desired, select the buttons next to Automatically fix file system errors and Scan for and attempt recovery of the USB cable on the remote sensor from the remote control (select models only). 1 Click the Windows Start Button, right...


