Safety and Regulatory Information Desktops, Thin Clients, and Personal Workstations
Page 18
...the FCC Rules. If this equipment does cause harmful interference to radio or television reception, which provides guidelines for help. If you turn it on , the user is connected. ● Consult the dealer or an experienced radio or television technician for proper grounding and ...in particular, specify that the Coaxial cable shield shall be installed. These limits are not expressly approved by turning the equipment off and on . and region-specific nonwireless and wireless regulatory notices and compliance information for a Class B digital device, ...
...the FCC Rules. If this equipment does cause harmful interference to radio or television reception, which provides guidelines for help. If you turn it on , the user is connected. ● Consult the dealer or an experienced radio or television technician for proper grounding and ...in particular, specify that the Coaxial cable shield shall be installed. These limits are not expressly approved by turning the equipment off and on . and region-specific nonwireless and wireless regulatory notices and compliance information for a Class B digital device, ...

Warranty
Page 18
...initiate a low-power or "Sleep" mode after 30 minutes The computer exits Sleep when the power/Sleep button is operating on AC power: • Turn off the display after 15 minutes • Initiate Sleep after a period of the power management feature can be found on the EPA ENERGY STAR Power...Management Web site at http://www.energystar.gov/powermanagement Additional information on the EPA ENERGY STAR Web site at : http://www.hp.com/go/reach ENERGY STAR compliance HP computers marked with the ENERGY STAR® logo are compliant with the ENERGY STAR logo are available on the ENERGY STAR ...
...initiate a low-power or "Sleep" mode after 30 minutes The computer exits Sleep when the power/Sleep button is operating on AC power: • Turn off the display after 15 minutes • Initiate Sleep after a period of the power management feature can be found on the EPA ENERGY STAR Power...Management Web site at http://www.energystar.gov/powermanagement Additional information on the EPA ENERGY STAR Web site at : http://www.hp.com/go/reach ENERGY STAR compliance HP computers marked with the ENERGY STAR® logo are compliant with the ENERGY STAR logo are available on the ENERGY STAR ...
Warranty
Page 19
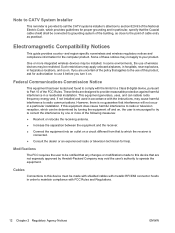
Changes or modifications not expressly approved by turning the equipment off and on a circuit different from the receiver. • Consult the dealer or an experienced radio/TV technician for help. These limits are ... to radio or television reception, which can radiate radio frequency energy and, if not installed and used in accordance with the instructions, may damage one HP product number includes a computer along with a headset or earphone, this combination is in compliance with EN 50332-1. • In general, audio line-out I/F is not...
Changes or modifications not expressly approved by turning the equipment off and on a circuit different from the receiver. • Consult the dealer or an experienced radio/TV technician for help. These limits are ... to radio or television reception, which can radiate radio frequency energy and, if not installed and used in accordance with the instructions, may damage one HP product number includes a computer along with a headset or earphone, this combination is in compliance with EN 50332-1. • In general, audio line-out I/F is not...
Warranty
Page 23
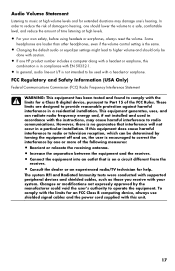
... TVs should continue to work as a "Class 1 Laser Product" under a U.S. Digital Television Transition Notice (United States Only) The nationwide switch to digital television broadcasting will turn off their analog signal and switch to digital-only broadcasting. Information about subsidized coupons for digital-to-analog converter boxes. 21 Watch your local television...
... TVs should continue to work as a "Class 1 Laser Product" under a U.S. Digital Television Transition Notice (United States Only) The nationwide switch to digital television broadcasting will turn off their analog signal and switch to digital-only broadcasting. Information about subsidized coupons for digital-to-analog converter boxes. 21 Watch your local television...

Warranty
Page 28
... find out how easy it is used for recycling. HP will help you recycle your old product for system resources. Visit our Web site to HP and Compaq systems. The memory above 3GB may not be available because of installed memory. 1 Turn on the PC. 2 Press the F1 key. we take back all... memory above 3GB is not an HP product; Confirming Total Memory The system BIOS displays the...
... find out how easy it is used for recycling. HP will help you recycle your old product for system resources. Visit our Web site to HP and Compaq systems. The memory above 3GB may not be available because of installed memory. 1 Turn on the PC. 2 Press the F1 key. we take back all... memory above 3GB is not an HP product; Confirming Total Memory The system BIOS displays the...
Upgrading and Servicing Guide
Page 7
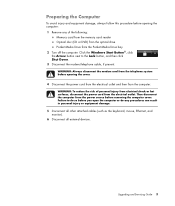
... damage, always follow this procedure before opening the cover. 4 Disconnect the power cord from the electrical outlet and then from the Pocket Media Drive bay 2 Turn off the computer.
... damage, always follow this procedure before opening the cover. 4 Disconnect the power cord from the electrical outlet and then from the Pocket Media Drive bay 2 Turn off the computer.

Upgrading and Servicing Guide
Page 11
Upgrading and Servicing Guide 7 1394 r Closing the Computer Replacing the Computer Cover 1 Place all peripherals, such as a printer. 3 Reconnect the power cord. 4 Turn on the computer cover with the computer case. Make sure the slots in this order after closing the computer: WARNING: To reduce the risk of ...
Upgrading and Servicing Guide 7 1394 r Closing the Computer Replacing the Computer Cover 1 Place all peripherals, such as a printer. 3 Reconnect the power cord. 4 Turn on the computer cover with the computer case. Make sure the slots in this order after closing the computer: WARNING: To reduce the risk of ...

Limited Warranty and Support Guide (Refurbished Desktops)
Page 10
...to provide reasonable protection against harmful interference in the batteries. For disposal or recycling information, contact your local authorities, HP Planet Partners (http://www.hp.com/recycle), or the Electronic Industries Alliance (EIA) (http://www.eiae.org). Changes or modifications not expressly approved ...the equipment. Bij dit product zijn batterijen geleverd. Disposal of this manner indicates that is encouraged to correct the interference by turning the equipment off in this material can radiate radio frequency energy and, if not installed and used in accordance with the...
...to provide reasonable protection against harmful interference in the batteries. For disposal or recycling information, contact your local authorities, HP Planet Partners (http://www.hp.com/recycle), or the Electronic Industries Alliance (EIA) (http://www.eiae.org). Changes or modifications not expressly approved ...the equipment. Bij dit product zijn batterijen geleverd. Disposal of this manner indicates that is encouraged to correct the interference by turning the equipment off in this material can radiate radio frequency energy and, if not installed and used in accordance with the...

Start Here Guide
Page 5
Getting Help 59 Finding Onscreen Guides 59 Finding Guides on the Web 59 Using the Onscreen Help and Support Center 60 Using the PC Help & Tools Folder 60 Using HP Connections or Compaq Connections 60 Getting messages 61 Turning off messages 61 Reactivating messages 62 Index...63 Table of Contents v
Getting Help 59 Finding Onscreen Guides 59 Finding Guides on the Web 59 Using the Onscreen Help and Support Center 60 Using the PC Help & Tools Folder 60 Using HP Connections or Compaq Connections 60 Getting messages 61 Turning off messages 61 Reactivating messages 62 Index...63 Table of Contents v
Start Here Guide
Page 14
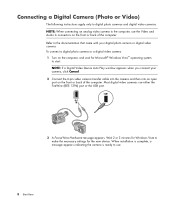
... digital video camera. When installation is complete, a message appears indicating the camera is ready to start. To connect a digital photo camera or a digital video camera: 1 Turn on the computer, and wait for Microsoft® Windows Vista™ operating system to use. 8 Start Here Most digital video cameras use the Video and...
... digital video camera. When installation is complete, a message appears indicating the camera is ready to start. To connect a digital photo camera or a digital video camera: 1 Turn on the computer, and wait for Microsoft® Windows Vista™ operating system to use. 8 Start Here Most digital video cameras use the Video and...
Start Here Guide
Page 18
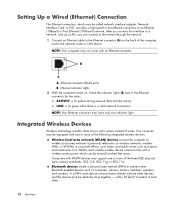
... , check the indicator lights (B) next to an Ethernet (10BaseT) or Fast Ethernet (100BaseT) network. A Ethernet connector (RJ-45 port) B Ethernet indicator lights 2 With the computer turned on the back of the following integrated wireless devices: Wireless local area network (WLAN) devices connect the computer to wireless local area networks (commonly referred...
... , check the indicator lights (B) next to an Ethernet (10BaseT) or Fast Ethernet (100BaseT) network. A Ethernet connector (RJ-45 port) B Ethernet indicator lights 2 With the computer turned on the back of the following integrated wireless devices: Wireless local area network (WLAN) devices connect the computer to wireless local area networks (commonly referred...
Start Here Guide
Page 28
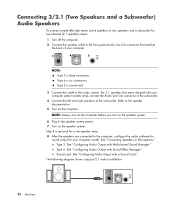
...8 After the speakers are connected to the computer, configure the audio software for sound output for two-channel (2.1 speaker) output: 1 Turn off the computer. 2 Connect the speaker cable to the lime green Audio Line Out connector that were shipped with Multichannel Sound Manager." Type...a typical 2.1 audio installation: OUT 22 Start Here NOTE: Always turn on the computer before you turn on the speaker system. 6 Plug in the speaker system power. 7 Turn on the computer. Refer to the speaker documentation. 5 Turn on the speaker system. Connecting 2/2.1 (Two Speakers and a Subwoofer...
...8 After the speakers are connected to the computer, configure the audio software for sound output for two-channel (2.1 speaker) output: 1 Turn off the computer. 2 Connect the speaker cable to the lime green Audio Line Out connector that were shipped with Multichannel Sound Manager." Type...a typical 2.1 audio installation: OUT 22 Start Here NOTE: Always turn on the computer before you turn on the speaker system. 6 Plug in the speaker system power. 7 Turn on the computer. Refer to the speaker documentation. 5 Turn on the speaker system. Connecting 2/2.1 (Two Speakers and a Subwoofer...
Start Here Guide
Page 29
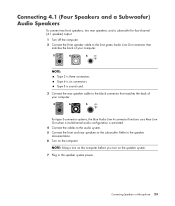
... the computer. Connecting 4.1 (Four Speakers and a Subwoofer) Audio Speakers To connect two front speakers, two rear speakers, and a subwoofer for four-channel (4.1 speaker) output: 1 Turn off the computer. 2 Connect the front speaker cable to the lime green Audio Line Out connector that matches the back of your computer. 3 6 S For type 3-...
... the computer. Connecting 4.1 (Four Speakers and a Subwoofer) Audio Speakers To connect two front speakers, two rear speakers, and a subwoofer for four-channel (4.1 speaker) output: 1 Turn off the computer. 2 Connect the front speaker cable to the lime green Audio Line Out connector that matches the back of your computer. 3 6 S For type 3-...
Start Here Guide
Page 30
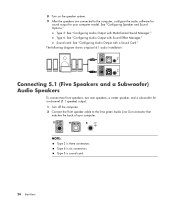
... speaker system. 9 After the speakers are connected to the computer, configure the audio software for sound output for six-channel (5.1 speaker) output: 1 Turn off the computer. 2 Connect the front speaker cable to the lime green Audio Line Out connector that matches the back of your computer model. The ...
... speaker system. 9 After the speakers are connected to the computer, configure the audio software for sound output for six-channel (5.1 speaker) output: 1 Turn off the computer. 2 Connect the front speaker cable to the lime green Audio Line Out connector that matches the back of your computer model. The ...
Start Here Guide
Page 31
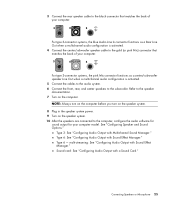
... Options." multi-streaming: See "Configuring Audio Output with a Sound Card." NOTE: Always turn on the computer before you turn on the speaker system. 8 Plug in the speaker system power. 9 Turn on the computer. Sound card: See "Configuring Audio Output with Sound Effect Manager." Type... 3: See "Configuring Audio Output with Sound Effect Manager." Refer to the speaker documentation. 7 Turn on the speaker system. 10 After the speakers are connected to the computer, configure the audio software for sound output for your computer....
... Options." multi-streaming: See "Configuring Audio Output with a Sound Card." NOTE: Always turn on the computer before you turn on the speaker system. 8 Plug in the speaker system power. 9 Turn on the computer. Sound card: See "Configuring Audio Output with Sound Effect Manager." Type... 3: See "Configuring Audio Output with Sound Effect Manager." Refer to the speaker documentation. 7 Turn on the speaker system. 10 After the speakers are connected to the computer, configure the audio software for sound output for your computer....
Start Here Guide
Page 32
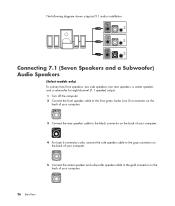
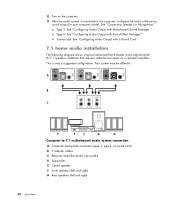
...) Audio Speakers (Select models only) To connect two front speakers, two side speakers, two rear speakers, a center speaker, and a subwoofer for eight-channel (7.1 speaker) output: 1 Turn off the computer. 2 Connect the front speaker cable to the lime green Audio Line Out connector on the back of your computer. 3 Connect the rear...
...) Audio Speakers (Select models only) To connect two front speakers, two side speakers, two rear speakers, a center speaker, and a subwoofer for eight-channel (7.1 speaker) output: 1 Turn off the computer. 2 Connect the front speaker cable to the lime green Audio Line Out connector on the back of your computer. 3 Connect the rear...
Start Here Guide
Page 33
Refer to the speaker documentation. 8 Turn on the speaker system. 11 After the speakers are connected to the subwoofer. Type 6: See "Configuring Audio Output with Realtek HD Sound Effect Manager." Type 6 - 6 ... 7.1 audio installation: Connecting Speakers or Microphone 27 See "Configuring Speaker and Sound Options." multi-streaming: See "Configuring Audio Output with Sound Effect Manager." NOTE: Always turn on the computer before you turn on the speaker system. 9 Plug in the speaker system power. 10...
Refer to the speaker documentation. 8 Turn on the speaker system. 11 After the speakers are connected to the subwoofer. Type 6: See "Configuring Audio Output with Realtek HD Sound Effect Manager." Type 6 - 6 ... 7.1 audio installation: Connecting Speakers or Microphone 27 See "Configuring Speaker and Sound Options." multi-streaming: See "Configuring Audio Output with Sound Effect Manager." NOTE: Always turn on the computer before you turn on the speaker system. 9 Plug in the speaker system power. 10...
Start Here Guide
Page 36
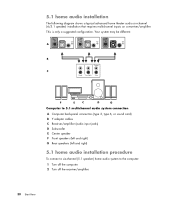
... (left and right) G Rear speakers (left and right) 5.1 home audio installation procedure To connect a six-channel (5.1 speaker) home audio system to the computer: 1 Turn off the computer. 2 Turn off the receiver/amplifier. 30 Start Here IN OUT 5.1 home audio installation The following diagram shows a typical advanced home theater audio six-channel (6/5.1 speaker...
... (left and right) G Rear speakers (left and right) 5.1 home audio installation procedure To connect a six-channel (5.1 speaker) home audio system to the computer: 1 Turn off the computer. 2 Turn off the receiver/amplifier. 30 Start Here IN OUT 5.1 home audio installation The following diagram shows a typical advanced home theater audio six-channel (6/5.1 speaker...
Start Here Guide
Page 37
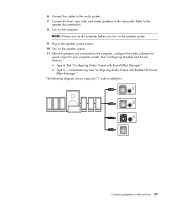
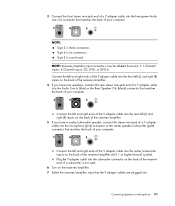
... the Y adapter cables are plugged into the lime green Audio Line Out connector that matches the back of your computer. 3 6 S NOTE: Type 3 is not used. 6 Turn on the back of the receiver/amplifier (6/5.1 or higher-channel system). Type 6 is sound card. NOTE: Receiver/amplifier input connectors may be labeled Surround, 5.1 Channel...
... the Y adapter cables are plugged into the lime green Audio Line Out connector that matches the back of your computer. 3 6 S NOTE: Type 3 is not used. 6 Turn on the back of the receiver/amplifier (6/5.1 or higher-channel system). Type 6 is sound card. NOTE: Receiver/amplifier input connectors may be labeled Surround, 5.1 Channel...
Start Here Guide
Page 38
... only a suggested configuration. A B Center C Front Surr. Back Sub IN OUT F E C D G Computer to the computer, configure the audio software for sound output for your computer model. 8 Turn on a receiver/amplifier. See "Connecting Speakers or Microphone."
... only a suggested configuration. A B Center C Front Surr. Back Sub IN OUT F E C D G Computer to the computer, configure the audio software for sound output for your computer model. 8 Turn on a receiver/amplifier. See "Connecting Speakers or Microphone."


