Upgrading and Servicing Guide
Page 5
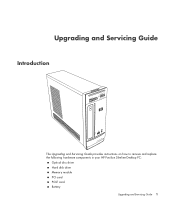
Upgrading and Servicing Guide Introduction The Upgrading and Servicing Guide provides instructions on how to remove and replace the following hardware components in your HP Pavilion Slimline Desktop PC: Optical disc drive Hard disk drive Memory module PCI card PCI-E card Battery Upgrading and Servicing Guide 1
Upgrading and Servicing Guide Introduction The Upgrading and Servicing Guide provides instructions on how to remove and replace the following hardware components in your HP Pavilion Slimline Desktop PC: Optical disc drive Hard disk drive Memory module PCI card PCI-E card Battery Upgrading and Servicing Guide 1
Upgrading and Servicing Guide
Page 7
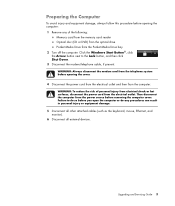
WARNING: To reduce the risk of the following: Memory card from the memory card reader Optical disc (CD or DVD) from the optical drive Pocket Media Drive from the electrical outlet. Click the Windows Start Button®, click ... the telephone system before removing the computer cover. Failure to the Lock button, and then click Shut Down. 3 Disconnect the modem/telephone cable, if present. Upgrading and Servicing Guide 3
WARNING: To reduce the risk of the following: Memory card from the memory card reader Optical disc (CD or DVD) from the optical drive Pocket Media Drive from the electrical outlet. Click the Windows Start Button®, click ... the telephone system before removing the computer cover. Failure to the Lock button, and then click Shut Down. 3 Disconnect the modem/telephone cable, if present. Upgrading and Servicing Guide 3
Upgrading and Servicing Guide
Page 9
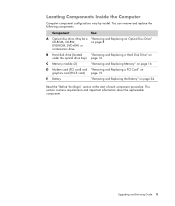
Locating Components Inside the Computer Computer component configurations vary by model. C Memory module (2) "Removing and Replacing Memory" on graphics card (PCI-E card) page 19. This section contains requirements and important information about the ...replaceable component. You can remove and replace the following components: Component See: A Optical disc drive. D Modem card (PCI card) and "Removing and Replacing a PCI Card" on page 16. Upgrading...
Locating Components Inside the Computer Computer component configurations vary by model. C Memory module (2) "Removing and Replacing Memory" on graphics card (PCI-E card) page 19. This section contains requirements and important information about the ...replaceable component. You can remove and replace the following components: Component See: A Optical disc drive. D Modem card (PCI card) and "Removing and Replacing a PCI Card" on page 16. Upgrading...

Upgrading and Servicing Guide
Page 20
...careful to http://www.hp.com/support in -line memory modules). Removing and Replacing Memory The motherboard contains one or two memory module sockets for specific memory module information and specifications: 1 Go to not touch any memory module contacts. WARNING: Handle the memory module with care. ... Memory module WARNING: Using the wrong type of your country/region and language. 3 From the Support and Drivers page, click See support and troubleshooting information, enter the model number of memory module could damage the system. Avoid touching the memory chips. 16 Upgrading ...
...careful to http://www.hp.com/support in -line memory modules). Removing and Replacing Memory The motherboard contains one or two memory module sockets for specific memory module information and specifications: 1 Go to not touch any memory module contacts. WARNING: Handle the memory module with care. ... Memory module WARNING: Using the wrong type of your country/region and language. 3 From the Support and Drivers page, click See support and troubleshooting information, enter the model number of memory module could damage the system. Avoid touching the memory chips. 16 Upgrading ...
Upgrading and Servicing Guide
Page 21
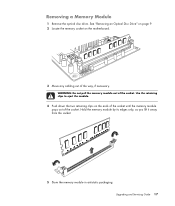
Hold the memory module by its edges only, as you lift it away from the socket. 5 Store the memory module in antistatic packaging. Upgrading and Servicing Guide 17 Removing a Memory Module 1 Remove the optical disc drive. Use the retaining clips to eject the module. 4 Push down the two retaining clips on the motherboard. 3 Move any cabling out of the socket. See "Removing an Optical Disc Drive" on page 9. 2 Locate the memory socket on the ends of the socket until the memory module pops out of the way, if necessary. WARNING: Do not pull the memory module out of the socket.
Hold the memory module by its edges only, as you lift it away from the socket. 5 Store the memory module in antistatic packaging. Upgrading and Servicing Guide 17 Removing a Memory Module 1 Remove the optical disc drive. Use the retaining clips to eject the module. 4 Push down the two retaining clips on the motherboard. 3 Move any cabling out of the socket. See "Removing an Optical Disc Drive" on page 9. 2 Locate the memory socket on the ends of the socket until the memory module pops out of the way, if necessary. WARNING: Do not pull the memory module out of the socket.
Upgrading and Servicing Guide
Page 22
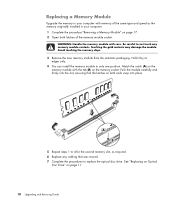
... Avoid touching the memory chips. 3 Remove the new memory module from the antistatic packaging. Match the notch (A) on the memory module with the tab (B) on page 11. 18 Upgrading and Servicing Guide A B 5 Repeat steps 1 to 4 for the second memory slot, as the memory originally installed in your... the memory socket. Be careful to replace the optical disc drive. Hold it by its edges only. 4 You can install the memory module in only one position. Replacing a Memory Module Upgrade the memory in your computer with memory of the memory module socket. WARNING: Handle the memory module ...
... Avoid touching the memory chips. 3 Remove the new memory module from the antistatic packaging. Match the notch (A) on the memory module with the tab (B) on page 11. 18 Upgrading and Servicing Guide A B 5 Repeat steps 1 to 4 for the second memory slot, as the memory originally installed in your... the memory socket. Be careful to replace the optical disc drive. Hold it by its edges only. 4 You can install the memory module in only one position. Replacing a Memory Module Upgrade the memory in your computer with memory of the memory module socket. WARNING: Handle the memory module ...
Limited Warranty and Support Guide (Refurbished Desktops)
Page 7
...Product. Third Party. The term "Software Product" means computer software and may copy the Software Product into Your Computer's temporary memory (RAM) for your HP Product, whether in the form of a discrete agreement, shrink wrap license or electronic license terms accepted at time of a hard.... You do not have the right to this EULA, and if applicable, the Certificate of the Software Product for the upgrade. c. Copying. You may accompany the HP Product. Reservation of this EULA, all component parts, media, printed materials, this EULA may make a one computer. Freeware...
...Product. Third Party. The term "Software Product" means computer software and may copy the Software Product into Your Computer's temporary memory (RAM) for your HP Product, whether in the form of a discrete agreement, shrink wrap license or electronic license terms accepted at time of a hard.... You do not have the right to this EULA, and if applicable, the Certificate of the Software Product for the upgrade. c. Copying. You may accompany the HP Product. Reservation of this EULA, all component parts, media, printed materials, this EULA may make a one computer. Freeware...
Getting Started Guide
Page 138
...Help and Support 36 home stereo system connecting to the PC 24 home videos 110, 118 HP Media Drive inserting a drive 96 HP Personal Media Drive 95 activity and power lights 96 automatic ...HP Pocket Media Drive 95 HP Total Care Advisor 51 I Internet security 42, 71 K keyboard customizing buttons 59 shortcuts 59 types of buttons 53 using 53 L LAN 6 LAN antenna 9 local area network (LAN) 6 M magicSpot 121 manuals storing 6 memory card reader card types 89 in-use light 93 troubleshooting 94 using 89 memory... duration of video 122 upgrading 127 using the magicMoments feature 120 130 Getting Started
...Help and Support 36 home stereo system connecting to the PC 24 home videos 110, 118 HP Media Drive inserting a drive 96 HP Personal Media Drive 95 activity and power lights 96 automatic ...HP Pocket Media Drive 95 HP Total Care Advisor 51 I Internet security 42, 71 K keyboard customizing buttons 59 shortcuts 59 types of buttons 53 using 53 L LAN 6 LAN antenna 9 local area network (LAN) 6 M magicSpot 121 manuals storing 6 memory card reader card types 89 in-use light 93 troubleshooting 94 using 89 memory... duration of video 122 upgrading 127 using the magicMoments feature 120 130 Getting Started
Limited Warranty and Support Guide
Page 6
...not otherwise subject to you via the Web at time of the Software Product which the recovery solution was originally licensed for the upgrade. Contacting HP If your product fails during the Limited Warranty Period and the suggestions in the product documentation do not have the following information ...FOR A REFUND SUBJECT TO THE REFUND POLICY OF YOUR PLACE OF PURCHASE. 1. You may copy the Software Product into Your Computer's temporary memory (RAM) for use the original Software Product that governs your use of any other form, may load the Software Product into the local...
...not otherwise subject to you via the Web at time of the Software Product which the recovery solution was originally licensed for the upgrade. Contacting HP If your product fails during the Limited Warranty Period and the suggestions in the product documentation do not have the following information ...FOR A REFUND SUBJECT TO THE REFUND POLICY OF YOUR PLACE OF PURCHASE. 1. You may copy the Software Product into Your Computer's temporary memory (RAM) for use the original Software Product that governs your use of any other form, may load the Software Product into the local...
PC Troubleshooting and Maintenance Guide
Page 22
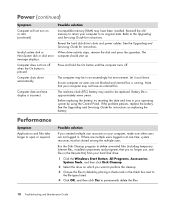
...the On button is approximately seven years. Ensure computer air vents are not logged in. Battery life is pressed. Reinstall the old memory to permanently delete the files. 18 Troubleshooting and Maintenance Guide Before replacing the battery, try resetting the date and time in the...Symptom Computer will not turn off . Computer shuts down . Computer date and time display is running. Refer to open or respond. See the Upgrading and Servicing Guide for instructions on or start up. When drive activity stops, remove the disk and press the spacebar. The computer should start...
...the On button is approximately seven years. Ensure computer air vents are not logged in. Battery life is pressed. Reinstall the old memory to permanently delete the files. 18 Troubleshooting and Maintenance Guide Before replacing the battery, try resetting the date and time in the...Symptom Computer will not turn off . Computer shuts down . Computer date and time display is running. Refer to open or respond. See the Upgrading and Servicing Guide for instructions on or start up. When drive activity stops, remove the disk and press the spacebar. The computer should start...


