Advanced Setup Guide
Page 10
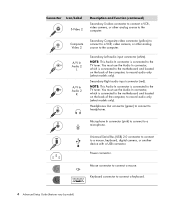
... computer. Universal Serial Bus (USB) 2.0 connector to connect to the TV tuner. NOTE: This Audio In connector is connected to the motherboard and located on the back of the computer, to record audio only (select models only). You must use the Audio In connector, which... is connected to a mouse, keyboard, digital camera, or another device with a USB connector. NOTE: This Audio In connector is connected to the motherboard and located on the back of the computer, to record audio only (select models only). Connector Icon/Label S-Video 2 Description and function (continued)...
... computer. Universal Serial Bus (USB) 2.0 connector to connect to the TV tuner. NOTE: This Audio In connector is connected to the motherboard and located on the back of the computer, to record audio only (select models only). You must use the Audio In connector, which... is connected to a mouse, keyboard, digital camera, or another device with a USB connector. NOTE: This Audio In connector is connected to the motherboard and located on the back of the computer, to record audio only (select models only). Connector Icon/Label S-Video 2 Description and function (continued)...
Advanced Setup Guide
Page 12
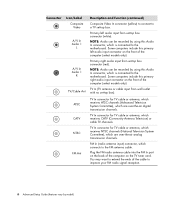
... which receives CATV (Community Antenna Television) or cable TV channels. FM In (radio antenna input) connector, which is connected to the motherboard. NOTE: Audio can be recorded by using this Audio In connector, which connects to improve your FM radio signal reception. 6 Advanced ... model) TV In connector for TV cable or antenna, which receives NTSC channels (National Television System Committee), which is connected to the motherboard. Primary left audio input connector on the front of the cable to the FM antenna cable. Connector Icon/Label Composite Video A/V In...
... which receives CATV (Community Antenna Television) or cable TV channels. FM In (radio antenna input) connector, which is connected to the motherboard. NOTE: Audio can be recorded by using this Audio In connector, which connects to improve your FM radio signal reception. 6 Advanced ... model) TV In connector for TV cable or antenna, which receives NTSC channels (National Television System Committee), which is connected to the motherboard. Primary left audio input connector on the front of the cable to the FM antenna cable. Connector Icon/Label Composite Video A/V In...
Upgrading and Servicing Guide
Page 13
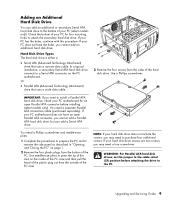
...jumper to remove the side panel as described in "Opening and Closing the PC" on the PC motherboard. Upgrading and Servicing Guide 9 Use needle-nose pliers to press the tip of the stud on the inside of the PC case and then pull the head of the plastic plug out from the sides... an open Parallel ATA connector, you want to install a Parallel ATA hard disk drive, check your PC for four mounting holes to the PC. Check the bottom of the PC case. NOTE: If your PC motherboard does not have the holes, you cannot add an additional hard disk drive. Or • Parallel ATA (...
...jumper to remove the side panel as described in "Opening and Closing the PC" on the PC motherboard. Upgrading and Servicing Guide 9 Use needle-nose pliers to press the tip of the stud on the inside of the PC case and then pull the head of the plastic plug out from the sides... an open Parallel ATA connector, you want to install a Parallel ATA hard disk drive, check your PC for four mounting holes to the PC. Check the bottom of the PC case. NOTE: If your PC motherboard does not have the holes, you cannot add an additional hard disk drive. Or • Parallel ATA (...
Upgrading and Servicing Guide
Page 15
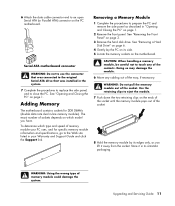
...cable connector end to close the PC. WARNING: Using the wrong type of sockets depends on the PC motherboard. Removing a Memory Module 1 Complete the procedures to prepare the PC and remove the side panel as you have. See "Opening and Closing the PC" on the motherboard. The exact number of memory... the Support link. See "Removing a Hard Disk Drive" on page 6. 4 Gently lay the PC on its edges only, as described in -line memory modules). Adding Memory The motherboard contains sockets for specific memory module information and specifications, go to touch any cabling out of the ...
...cable connector end to close the PC. WARNING: Using the wrong type of sockets depends on the PC motherboard. Removing a Memory Module 1 Complete the procedures to prepare the PC and remove the side panel as you have. See "Opening and Closing the PC" on the motherboard. The exact number of memory... the Support link. See "Removing a Hard Disk Drive" on page 6. 4 Gently lay the PC on its edges only, as described in -line memory modules). Adding Memory The motherboard contains sockets for specific memory module information and specifications, go to touch any cabling out of the ...
Upgrading and Servicing Guide
Page 17
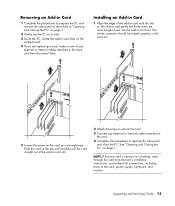
...manufacturer's installation instructions, and recheck all connections, including those to the card, power supply, keyboard, and monitor. See "Opening and Closing the PC" on the chassis and gently but firmly press the card straight down into the add-in card slot. The whole connector should be seated ...properly in the card slot. 5 Loosen the screw on the motherboard. 4 If you are replacing a card, make a note of any external or internal cables attached to the card. 4 Complete the procedures to ...
...manufacturer's installation instructions, and recheck all connections, including those to the card, power supply, keyboard, and monitor. See "Opening and Closing the PC" on the chassis and gently but firmly press the card straight down into the add-in card slot. The whole connector should be seated ...properly in the card slot. 5 Loosen the screw on the motherboard. 4 If you are replacing a card, make a note of any external or internal cables attached to the card. 4 Complete the procedures to ...
Upgrading and Servicing Guide
Page 18
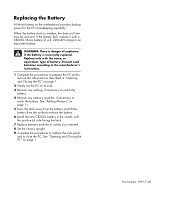
...A lithium battery on page 1. When the battery starts to close the PC. Replace only with the same, or equivalent, type of explosion if the... socket to release the battery. 6 Install the new CR2032 battery in "Opening and Closing the PC" on page 1. 2 Gently lay the PC on its side. 3 Remove any cabling, if necessary, to reach the battery. 4 Remove... to reach the battery. Discard used batteries according to the manufacturer's instructions. 1 Complete the procedures to prepare the PC and to remove the side panel as described in the socket, with a CR2032 lithium battery (3 volt, 220mAH rating)...
...A lithium battery on page 1. When the battery starts to close the PC. Replace only with the same, or equivalent, type of explosion if the... socket to release the battery. 6 Install the new CR2032 battery in "Opening and Closing the PC" on page 1. 2 Gently lay the PC on its side. 3 Remove any cabling, if necessary, to reach the battery. 4 Remove... to reach the battery. Discard used batteries according to the manufacturer's instructions. 1 Complete the procedures to prepare the PC and to remove the side panel as described in the socket, with a CR2032 lithium battery (3 volt, 220mAH rating)...

