
Upgrading and Servicing Guide
Page 13
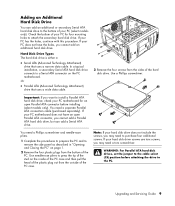
... attach the secondary hard disk drive. Or • Parallel ATA (Advanced Technology Attachment) drive that uses a narrow data cable. If your PC motherboard for four mounting holes to a Serial ATA connector on page 1. 2 Remove the four plastic plugs from the bottom of the.... Important: If you want to remove the side panel as described in "Opening and Closing the PC" on the PC motherboard. You need a separate Parallel ATA connection cable (purchased separately). If your PC (select models only). Adding an Additional Hard Disk Drive You can add a Serial ATA drive. You need a ...
... attach the secondary hard disk drive. Or • Parallel ATA (Advanced Technology Attachment) drive that uses a narrow data cable. If your PC motherboard for four mounting holes to a Serial ATA connector on page 1. 2 Remove the four plastic plugs from the bottom of the.... Important: If you want to remove the side panel as described in "Opening and Closing the PC" on the PC motherboard. You need a separate Parallel ATA connection cable (purchased separately). If your PC (select models only). Adding an Additional Hard Disk Drive You can add a Serial ATA drive. You need a ...
Upgrading and Servicing Guide
Page 15
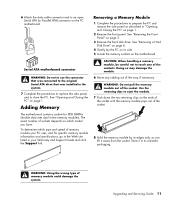
See "Removing the Front Panel" on the motherboard. See "Removing a Hard Disk Drive" on page 6. 4 Gently lay the PC on its side. 5 Locate the memory sockets on page 3. 3 Remove the hard disk drive. Adding Memory The motherboard contains sockets for specific memory module information and specifications,... go to the Web site listed in "Opening and Closing the PC" on page 1. CAUTION: When handling a memory module, be careful not to prepare the PC and remove the side panel as...
See "Removing the Front Panel" on the motherboard. See "Removing a Hard Disk Drive" on page 6. 4 Gently lay the PC on its side. 5 Locate the memory sockets on page 3. 3 Remove the hard disk drive. Adding Memory The motherboard contains sockets for specific memory module information and specifications,... go to the Web site listed in "Opening and Closing the PC" on page 1. CAUTION: When handling a memory module, be careful not to prepare the PC and remove the side panel as...
Upgrading and Servicing Guide
Page 17
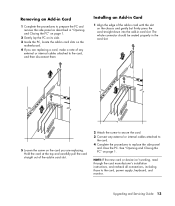
... any external or internal cables attached to the card. 4 Complete the procedures to replace the side panel and close the PC. Upgrading and Servicing Guide 13 See "Opening and Closing the PC" on the card you are replacing. NOTE: If the new card or device isn't working, read through the card ... the card, power supply, keyboard, and monitor. Installing an Add-in Card 1 Align the edge of the add-in card with the slot on the motherboard. 4 If you are replacing a card, make a note of the add-in card slot. 2 Attach the screw to secure the card. 3 Connect any external or internal...
... any external or internal cables attached to the card. 4 Complete the procedures to replace the side panel and close the PC. Upgrading and Servicing Guide 13 See "Opening and Closing the PC" on the card you are replacing. NOTE: If the new card or device isn't working, read through the card ... the card, power supply, keyboard, and monitor. Installing an Add-in Card 1 Align the edge of the add-in card with the slot on the motherboard. 4 If you are replacing a card, make a note of the add-in card slot. 2 Attach the screw to secure the card. 3 Connect any external or internal...
Upgrading and Servicing Guide
Page 18
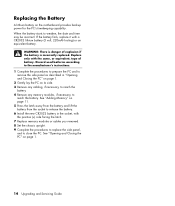
... the battery and lift the battery from the socket to release the battery. 6 Install the new CR2032 battery in "Opening and Closing the PC" on page 1. 2 Gently lay the PC on its side. 3 Remove any cabling, if necessary, to reach the battery. 4 Remove any memory modules, if necessary, to reach the battery... chassis upright. 9 Complete the procedures to replace the side panel, and to weaken, the date and time may be incorrect. See "Opening and Closing the PC" on the motherboard provides backup power for the...
... the battery and lift the battery from the socket to release the battery. 6 Install the new CR2032 battery in "Opening and Closing the PC" on page 1. 2 Gently lay the PC on its side. 3 Remove any cabling, if necessary, to reach the battery. 4 Remove any memory modules, if necessary, to reach the battery... chassis upright. 9 Complete the procedures to replace the side panel, and to weaken, the date and time may be incorrect. See "Opening and Closing the PC" on the motherboard provides backup power for the...

