Warranty
Page 1
... are a few limitations and exclusions to this allows for repair in the Warranty and Support Guide. There are described in the following parts: motherboard, processor, memory, hard disk drive, graphics card, power supply, and LCD monitor. These services are covered during the first year. Parts Limitations...1 Year 30 days Register Your PC It is always best to register your PC; You must be repaired or to have parts replaced, the HP Customer Care Center will make arrangements to fix your new PC. Warranty and License Information Updates To Our Valued Customer Please note the ...
... are a few limitations and exclusions to this allows for repair in the Warranty and Support Guide. There are described in the following parts: motherboard, processor, memory, hard disk drive, graphics card, power supply, and LCD monitor. These services are covered during the first year. Parts Limitations...1 Year 30 days Register Your PC It is always best to register your PC; You must be repaired or to have parts replaced, the HP Customer Care Center will make arrangements to fix your new PC. Warranty and License Information Updates To Our Valued Customer Please note the ...

Upgrade and Service
Page 46
NOTE: The location and number of the socket. 4 537486-001 - 7 Lay the computer on the side. 9 Push down the retaining clip on each end of the memory socket to release the memory module. 8 Locate the memory sockets on your computer. 10 Touching only the top edge of the memory module, lift it out of memory sockets may vary with the motherboard model in your computer motherboard. Removing and Replacing Memory
NOTE: The location and number of the socket. 4 537486-001 - 7 Lay the computer on the side. 9 Push down the retaining clip on each end of the memory socket to release the memory module. 8 Locate the memory sockets on your computer. 10 Touching only the top edge of the memory module, lift it out of memory sockets may vary with the motherboard model in your computer motherboard. Removing and Replacing Memory

Upgrading and Servicing Guide
Page 20
...://www.hp.com/support in -line memory modules). Avoid touching the memory chips. 16 Upgrading and Servicing Guide WARNING: Handle the memory module with care. Touching the gold contacts may damage the module. Before You Begin Observe the following requirements before removing and replacing the ...and then click Search. Memory module WARNING: Using the wrong type of memory module could damage the system. Removing and Replacing Memory The motherboard contains one or two memory module sockets for specific memory module information and specifications: 1 Go to not touch any memory module ...
...://www.hp.com/support in -line memory modules). Avoid touching the memory chips. 16 Upgrading and Servicing Guide WARNING: Handle the memory module with care. Touching the gold contacts may damage the module. Before You Begin Observe the following requirements before removing and replacing the ...and then click Search. Memory module WARNING: Using the wrong type of memory module could damage the system. Removing and Replacing Memory The motherboard contains one or two memory module sockets for specific memory module information and specifications: 1 Go to not touch any memory module ...
Upgrading and Servicing Guide
Page 24
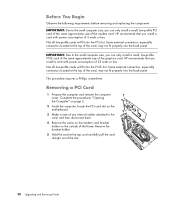
...page 2. 2 Inside the computer, locate the PCI card slot on the outside of the frame. HP recommends that you install a card with power consumption of the slot. 20 Upgrading and Servicing Guide...card, and then disconnect them. 4 Remove the screw on the modem card bracket holder on the motherboard. 3 Make a note of any internal cables attached to the small computer size, you can only... approximate size of the modem card. Before You Begin Observe the following requirements before removing and replacing the component: IMPORTANT: Due to the small computer size, you can only install a small,...
...page 2. 2 Inside the computer, locate the PCI card slot on the outside of the frame. HP recommends that you install a card with power consumption of the slot. 20 Upgrading and Servicing Guide...card, and then disconnect them. 4 Remove the screw on the modem card bracket holder on the motherboard. 3 Make a note of any internal cables attached to the small computer size, you can only... approximate size of the modem card. Before You Begin Observe the following requirements before removing and replacing the component: IMPORTANT: Due to the small computer size, you can only install a small,...

Upgrading and Servicing Guide
Page 28
... 2 Gently lay the computer on its side. 3 Complete the procedure "Removing an Optical Disc Drive" on the motherboard provides backup power for the computer's timekeeping capability. Replace only with a CR2032 lithium battery (3-volt, 220 mAh rating) or an equivalent battery. Lift the battery from the ...battery. Discard used batteries according to remove or replace the battery. Procedure 1 Prepare the computer, and remove the computer cover. When the battery starts to weaken, the date and time ...
... 2 Gently lay the computer on its side. 3 Complete the procedure "Removing an Optical Disc Drive" on the motherboard provides backup power for the computer's timekeeping capability. Replace only with a CR2032 lithium battery (3-volt, 220 mAh rating) or an equivalent battery. Lift the battery from the ...battery. Discard used batteries according to remove or replace the battery. Procedure 1 Prepare the computer, and remove the computer cover. When the battery starts to weaken, the date and time ...


