Windows XP Comparison Guide
Page 2
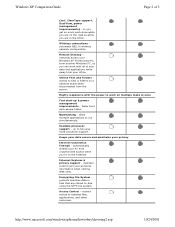
Remote Desktop - Highly responsive with the power to work with all of 3 (incl. allow multiple applications to selected files, applications, and other resources. Internet Explorer 6 privacy support - remotely access your Windows XP Professional PC, from your PC from the server. maintain control over your privacy ... and resume times. Access Control - Windows XP Comparison Guide Page 2 of your data and applications while away from another Windows PC, so you can work on multiple tasks at once Fast start -up to two-way multi -processor support. automatically shields your...
Remote Desktop - Highly responsive with the power to work with all of 3 (incl. allow multiple applications to selected files, applications, and other resources. Internet Explorer 6 privacy support - remotely access your Windows XP Professional PC, from your PC from the server. maintain control over your privacy ... and resume times. Access Control - Windows XP Comparison Guide Page 2 of your data and applications while away from another Windows PC, so you can work on multiple tasks at once Fast start -up to two-way multi -processor support. automatically shields your...

Windows XP Comparison Guide
Page 3
... on change the user interface language to get localized dialog boxes, menus, help files, dictionaries, and proofing tools etc. simplifies the administration of groups of powerful management and security tools. Windows XP Comparison Guide Page 3 of 3 Designed to work with others around the world Single Worldwide Binary enter text in any...
... on change the user interface language to get localized dialog boxes, menus, help files, dictionaries, and proofing tools etc. simplifies the administration of groups of powerful management and security tools. Windows XP Comparison Guide Page 3 of 3 Designed to work with others around the world Single Worldwide Binary enter text in any...
HP Omnibook Notebook PC XE3-GF - Reference Guide
Page 7
... Computer 11 Taking Inventory ...12 To buy accessories 12 To find more information 13 Identifying Parts of the Notebook 14 Top and right side view 14 Front view ...15 Rear and left side view 16 Bottom view...17... ...18 Multimedia buttons 19 Status panel ...20 Setting Up the Computer 21 To install the battery 21 To connect AC power 22 To connect a phone line 23 To turn on the computer 24 To set up Windows 24 To register your ... 40 To attach a security cable 42 To use virus-protection software 43 Working in Comfort with a Notebook PC 44 Caring for Your Computer 46 Reference Guide 7
... Computer 11 Taking Inventory ...12 To buy accessories 12 To find more information 13 Identifying Parts of the Notebook 14 Top and right side view 14 Front view ...15 Rear and left side view 16 Bottom view...17... ...18 Multimedia buttons 19 Status panel ...20 Setting Up the Computer 21 To install the battery 21 To connect AC power 22 To connect a phone line 23 To turn on the computer 24 To set up Windows 24 To register your ... 40 To attach a security cable 42 To use virus-protection software 43 Working in Comfort with a Notebook PC 44 Caring for Your Computer 46 Reference Guide 7

HP Omnibook Notebook PC XE3-GF - Reference Guide
Page 8
...get the most from your batteries 48 To clean your computer 48 Traveling with Your Computer 49 Managing Power Consumption 50 To use automated power management 50 To use manual power management 53 Using Battery Power 56 To check the battery status 56 To respond to a low-battery warning 57 To optimize ... 98 66 To send and receive faxes (Windows 2000 67 To send and receive faxes (Windows XP 68 Connecting to a LAN 69 Connecting PC Cards 70 Connecting External Components 72 To identify the ports 72 To connect a printer or another parallel device 74 To connect an external keyboard or...
...get the most from your batteries 48 To clean your computer 48 Traveling with Your Computer 49 Managing Power Consumption 50 To use automated power management 50 To use manual power management 53 Using Battery Power 56 To check the battery status 56 To respond to a low-battery warning 57 To optimize ... 98 66 To send and receive faxes (Windows 2000 67 To send and receive faxes (Windows XP 68 Connecting to a LAN 69 Connecting PC Cards 70 Connecting External Components 72 To identify the ports 72 To connect a printer or another parallel device 74 To connect an external keyboard or...

HP Omnibook Notebook PC XE3-GF - Reference Guide
Page 9
... and Support ...91 Hewlett-Packard Limited Warranty Statement 92 Getting Support for Your HP Notebook PC 94 To use the Reference Guide 94 To get help from the HP notebook web site 94 To call HP for service and support 95 Obtaining Repair Service 98 To receive warranty repair service... Memory problems 110 Modem problems 111 One-Touch button problems 115 Parallel and USB problems 116 PC card (PCMCIA) problems 116 Performance problems 117 Port replicator problems 118 Power and battery problems 118 Printing problems 121 Startup problems 121 Standby and resume problems 122 Testing ...
... and Support ...91 Hewlett-Packard Limited Warranty Statement 92 Getting Support for Your HP Notebook PC 94 To use the Reference Guide 94 To get help from the HP notebook web site 94 To call HP for service and support 95 Obtaining Repair Service 98 To receive warranty repair service... Memory problems 110 Modem problems 111 One-Touch button problems 115 Parallel and USB problems 116 PC card (PCMCIA) problems 116 Performance problems 117 Port replicator problems 118 Power and battery problems 118 Printing problems 121 Startup problems 121 Standby and resume problems 122 Testing ...
HP Omnibook Notebook PC XE3-GF - Reference Guide
Page 10
...125 To recover the factory installation of your hard disk 125 To replace a damaged Recovery CD 126 To update the HP notebook BIOS 126 To recover an application 127 Specifications and Regulatory Information 129 Hardware and Software Specifications 130 BIOS Setup utility ...specifications 133 Modem Reference Information 135 AT commands (Ambit 135 S-registers (Ambit 140 Selected result codes (Ambit 141 Safety Information ...142 Power cords...142 Battery safety ...143 Laser safety ...144 LED safety ...144 Regulatory Information 145 U.S.A...145 Canada...146 European Union 147 Japan ...
...125 To recover the factory installation of your hard disk 125 To replace a damaged Recovery CD 126 To update the HP notebook BIOS 126 To recover an application 127 Specifications and Regulatory Information 129 Hardware and Software Specifications 130 BIOS Setup utility ...specifications 133 Modem Reference Information 135 AT commands (Ambit 135 S-registers (Ambit 140 Selected result codes (Ambit 141 Safety Information ...142 Power cords...142 Battery safety ...143 Laser safety ...144 LED safety ...144 Regulatory Information 145 U.S.A...145 Canada...146 European Union 147 Japan ...

HP Omnibook Notebook PC XE3-GF - Reference Guide
Page 12
... mouse and keyboard • additional RAM 12 Reference Guide Introducing Your Computer Taking Inventory Taking Inventory Your HP notebook PC is shipped with these items: • battery • AC adapter and power cord • Quick Start sheet • HP notebook PC Startup Guide • Recovery CD (or CDs), used to restore Windows and all software included with...
... mouse and keyboard • additional RAM 12 Reference Guide Introducing Your Computer Taking Inventory Taking Inventory Your HP notebook PC is shipped with these items: • battery • AC adapter and power cord • Quick Start sheet • HP notebook PC Startup Guide • Recovery CD (or CDs), used to restore Windows and all software included with...
HP Omnibook Notebook PC XE3-GF - Reference Guide
Page 14
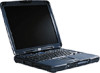
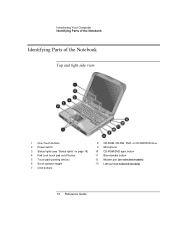
Introducing Your Computer Identifying Parts of the Notebook Identifying Parts of the Notebook Top and right side view 1 One-Touch buttons 2 Power switch 3 Status lights (see "Status lights" on page 18) 4 Pad Lock touch pad on/off button 5 Touch pad (pointing device) 6 Scroll up/down toggle 7 Click buttons 8 CD-ROM, CD-RW, DVD, or CD-RW/DVD drive 9 Microphone 10 CD-ROM/DVD eject button 11 Blue standby button 12 Modem port (on selected models) 13 LAN port (on selected models) 14 Reference Guide
Introducing Your Computer Identifying Parts of the Notebook Identifying Parts of the Notebook Top and right side view 1 One-Touch buttons 2 Power switch 3 Status lights (see "Status lights" on page 18) 4 Pad Lock touch pad on/off button 5 Touch pad (pointing device) 6 Scroll up/down toggle 7 Click buttons 8 CD-ROM, CD-RW, DVD, or CD-RW/DVD drive 9 Microphone 10 CD-ROM/DVD eject button 11 Blue standby button 12 Modem port (on selected models) 13 LAN port (on selected models) 14 Reference Guide
HP Omnibook Notebook PC XE3-GF - Reference Guide
Page 16
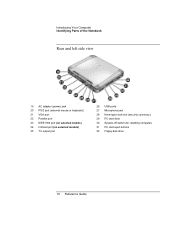
Introducing Your Computer Identifying Parts of the Notebook Rear and left side view 19 AC adapter (power) jack 20 PS/2 port (external mouse or keyboard) 21 VGA port 22 Parallel port 23 IEEE1394 port (on selected models) 24 Infrared port (on selected models) 25 TV output port 26 USB ports 27 Microphone jack 28 Kensington lock slot (security connector) 29 PC card slots 30 System-off switch (for resetting computer) 31 PC card eject buttons 32 Floppy disk drive 16 Reference Guide
Introducing Your Computer Identifying Parts of the Notebook Rear and left side view 19 AC adapter (power) jack 20 PS/2 port (external mouse or keyboard) 21 VGA port 22 Parallel port 23 IEEE1394 port (on selected models) 24 Infrared port (on selected models) 25 TV output port 26 USB ports 27 Microphone jack 28 Kensington lock slot (security connector) 29 PC card slots 30 System-off switch (for resetting computer) 31 PC card eject buttons 32 Floppy disk drive 16 Reference Guide

HP Omnibook Notebook PC XE3-GF - Reference Guide
Page 18
Introducing Your Computer Identifying Parts of the Notebook Status lights 1 Power 2 Battery 3 Caps lock (capital letters) 4 Num lock (numeric keypad) 5 Scroll lock 6 Floppy disk drive access 7 Hard disk drive access 8 CD-ROM, CD-RW, DVD, or CD-RW/DVD drive access 18 Reference Guide
Introducing Your Computer Identifying Parts of the Notebook Status lights 1 Power 2 Battery 3 Caps lock (capital letters) 4 Num lock (numeric keypad) 5 Scroll lock 6 Floppy disk drive access 7 Hard disk drive access 8 CD-ROM, CD-RW, DVD, or CD-RW/DVD drive access 18 Reference Guide
HP Omnibook Notebook PC XE3-GF - Reference Guide
Page 19
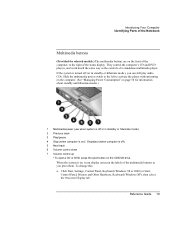
...(Windows XP), then select the Onscreen Display tab. Reference Guide 19 Introducing Your Computer Identifying Parts of the Notebook Multimedia buttons (Provided for information about standby and hibernate modes.) 1 Multimedia power (use when system is off or in standby or hibernate mode) 2 Previous track 3 Play/pause 4 Stop... CD or DVD, press the eject button on the CD/DVD drive. Slide the multimedia power switch to the left to activate the player without turning on the computer. (See "Managing Power Consumption" on page 50 for selected models.) The multimedia buttons are on , it can still...
...(Windows XP), then select the Onscreen Display tab. Reference Guide 19 Introducing Your Computer Identifying Parts of the Notebook Multimedia buttons (Provided for information about standby and hibernate modes.) 1 Multimedia power (use when system is off or in standby or hibernate mode) 2 Previous track 3 Play/pause 4 Stop... CD or DVD, press the eject button on the CD/DVD drive. Slide the multimedia power switch to the left to activate the player without turning on the computer. (See "Managing Power Consumption" on page 50 for selected models.) The multimedia buttons are on , it can still...
HP Omnibook Notebook PC XE3-GF - Reference Guide
Page 20
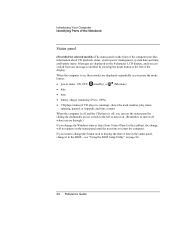
..., system date and time, and battery status. When the computer is on, these modes are displayed sequentially as you press the mode button: • power status: ON, OFF, (standby), or (hibernate) • date • time • battery charge remaining (0% to 100%) • CD player status (if CD player is running): ...), and time counter When the computer is off and the CD player is off, you start the computer. Introducing Your Computer Identifying Parts of the Notebook Status panel (Provided for selected models.) The status panel on the front of the display.
..., system date and time, and battery status. When the computer is on, these modes are displayed sequentially as you press the mode button: • power status: ON, OFF, (standby), or (hibernate) • date • time • battery charge remaining (0% to 100%) • CD player status (if CD player is running): ...), and time counter When the computer is off and the CD player is off, you start the computer. Introducing Your Computer Identifying Parts of the Notebook Status panel (Provided for selected models.) The status panel on the front of the display.

HP Omnibook Notebook PC XE3-GF - Reference Guide
Page 22
Refer to the rear of the computer. The battery starts charging. CAUTION Use only an HP AC adapter intended for your warranty. Introducing Your Computer Setting Up the Computer To connect AC power Plug in the AC adapter, then connect the AC adapter to the warranty statement for this product, either the adapter that came with the computer or another authorized HP adapter. Using an unauthorized AC adapter can damage the computer and may void your product. 22 Reference Guide
Refer to the rear of the computer. The battery starts charging. CAUTION Use only an HP AC adapter intended for your warranty. Introducing Your Computer Setting Up the Computer To connect AC power Plug in the AC adapter, then connect the AC adapter to the warranty statement for this product, either the adapter that came with the computer or another authorized HP adapter. Using an unauthorized AC adapter can damage the computer and may void your product. 22 Reference Guide
HP Omnibook Notebook PC XE3-GF - Reference Guide
Page 24
...24 Reference Guide Plug in hibernate mode See "Managing Power Consumption" on your computer, a Windows Setup program will automatically run so that you begin, connect the AC adapter to your notebook, since your setup. To set up Windows Your HP notebook has Microsoft Windows-either Windows 98, Windows 2000, or...below. Follow the instructions as they appear on the hard disk drive. Follow the instructions on page 23. 1. Also, be sure to connect the notebook to a phone line-see "Status lights" on page 18) reports the following: • steady green light: computer is off or in the...
...24 Reference Guide Plug in hibernate mode See "Managing Power Consumption" on your computer, a Windows Setup program will automatically run so that you begin, connect the AC adapter to your notebook, since your setup. To set up Windows Your HP notebook has Microsoft Windows-either Windows 98, Windows 2000, or...below. Follow the instructions as they appear on the hard disk drive. Follow the instructions on page 23. 1. Also, be sure to connect the notebook to a phone line-see "Status lights" on page 18) reports the following: • steady green light: computer is off or in the...

HP Omnibook Notebook PC XE3-GF - Reference Guide
Page 28
... the computer still does not shut down , press the blue standby button to turn the computer on the left side of the computer, underneath the PC card eject buttons. 4. Press CTRL+ALT+DEL, then click Shut Down. 2. After the computer shuts down , insert a pin or straightened paper clip into... system-off switch on again. 28 Reference Guide If possible, shut down Windows: click Start, Shut Down, Shut down , slide and hold the power switch for five seconds, then release it. 3. Introducing Your Computer Setting Up the Computer To reset your computer If Windows or your computer stops responding...
... the computer still does not shut down , press the blue standby button to turn the computer on the left side of the computer, underneath the PC card eject buttons. 4. Press CTRL+ALT+DEL, then click Shut Down. 2. After the computer shuts down , insert a pin or straightened paper clip into... system-off switch on again. 28 Reference Guide If possible, shut down Windows: click Start, Shut Down, Shut down , slide and hold the power switch for five seconds, then release it. 3. Introducing Your Computer Setting Up the Computer To reset your computer If Windows or your computer stops responding...

HP Omnibook Notebook PC XE3-GF - Reference Guide
Page 33
... maximize your screen when using battery power, the display dims automatically to use HP Desktop Zoom. • Click Start, Programs (or All Programs), Hewlett-Packard, Notebook, HP Desktop Zoom, HP Desktop Zoom. If you change the resolution except to conserve power. You normally won't change the ..., press Fn+F1. • To increase the brightness, press Fn+F2. • Click Start, Programs, HP Display Settings, HP Display Settings (Windows 98 or 2000), or Start, All Programs, Hewlett-Packard, Notebook, HP Display Settings, HP Display Settings (Windows XP). Reference Guide 33
... maximize your screen when using battery power, the display dims automatically to use HP Desktop Zoom. • Click Start, Programs (or All Programs), Hewlett-Packard, Notebook, HP Desktop Zoom, HP Desktop Zoom. If you change the resolution except to conserve power. You normally won't change the ..., press Fn+F1. • To increase the brightness, press Fn+F2. • Click Start, Programs, HP Display Settings, HP Display Settings (Windows 98 or 2000), or Start, All Programs, Hewlett-Packard, Notebook, HP Display Settings, HP Display Settings (Windows XP). Reference Guide 33

HP Omnibook Notebook PC XE3-GF - Reference Guide
Page 38
... recessed hole on the front of the DVD player program can vary.) If you need to install the DVD player software, click Start, Run, type C:\HP\PROGRAMS\DVD\SETUP.EXE, and press Enter. Otherwise, the computer could lose data. 1. Please note that may be permanent. Click Start, Programs (Windows ...98 or 2000) or Start, All Programs, Multimedia, DVD Player (Windows XP). (The name of the drive. If your computer loses power, you can manually open the drive by inserting a straightened paper clip into the module to close it on the spindle, making sure that the CD...
... recessed hole on the front of the DVD player program can vary.) If you need to install the DVD player software, click Start, Run, type C:\HP\PROGRAMS\DVD\SETUP.EXE, and press Enter. Otherwise, the computer could lose data. 1. Please note that may be permanent. Click Start, Programs (Windows ...98 or 2000) or Start, All Programs, Multimedia, DVD Player (Windows XP). (The name of the drive. If your computer loses power, you can manually open the drive by inserting a straightened paper clip into the module to close it on the spindle, making sure that the CD...

HP Omnibook Notebook PC XE3-GF - Reference Guide
Page 40
... set up password protection, which is available either through Windows (software) or through the BIOS Setup utility (hardware). To set up virus protection. Double-click Power Management. 4. You can protect your data. Enter your new password twice. 7. Click OK. 40 Reference Guide
... set up password protection, which is available either through Windows (software) or through the BIOS Setup utility (hardware). To set up virus protection. Double-click Power Management. 4. You can protect your data. Enter your new password twice. 7. Click OK. 40 Reference Guide

HP Omnibook Notebook PC XE3-GF - Reference Guide
Page 41
... OK. Enter your files and folders private. Check that you forget your old Windows password, if you want to use as described above. 2. Double-click Power Options. 4. Enter a word or phrase to set up a Windows password, as a reminder in case you have set up password protection for a non-Administrator account, see...
... OK. Enter your files and folders private. Check that you forget your old Windows password, if you want to use as described above. 2. Double-click Power Options. 4. Enter a word or phrase to set up a Windows password, as a reminder in case you have set up password protection for a non-Administrator account, see...

HP Omnibook Notebook PC XE3-GF - Reference Guide
Page 42
... sure it can't slip off standby. 5. Check that allows you have set up a Windows password, as a table leg. 2. Click Start, Control Panel, Performance and Maintenance, Power Options. 3. Check the option to create a slipknot around a stationary object, such as described above. 2. Insert the lock into the computer's security connector and release the...
... sure it can't slip off standby. 5. Check that allows you have set up a Windows password, as a table leg. 2. Click Start, Control Panel, Performance and Maintenance, Power Options. 3. Check the option to create a slipknot around a stationary object, such as described above. 2. Insert the lock into the computer's security connector and release the...


