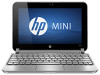

Getting Started - Windows 7
Page 5
...your computer ...4 Top ...5 TouchPad ...5 Lights ...6 Keys ...7 Front ...8 Right side ...9 Left side ...11 Display ...12 Bottom ...13 3 HP QuickWeb ...14 Enabling HP QuickWeb ...15 Starting HP QuickWeb ...16 Identifying the QuickWeb LaunchBar 17 Identifying the QuickWeb control icons 17 Identifying the QuickWeb LaunchBar icons 17 ...Identifying the QuickWeb notification icons 18 Configuring the network ...20 Starting Microsoft Windows ...21 Turning HP QuickWeb on and off ...22 4 Networking ...23 Using an Internet service provider (ISP 24 Connecting to a wireless...
...your computer ...4 Top ...5 TouchPad ...5 Lights ...6 Keys ...7 Front ...8 Right side ...9 Left side ...11 Display ...12 Bottom ...13 3 HP QuickWeb ...14 Enabling HP QuickWeb ...15 Starting HP QuickWeb ...16 Identifying the QuickWeb LaunchBar 17 Identifying the QuickWeb control icons 17 Identifying the QuickWeb LaunchBar icons 17 ...Identifying the QuickWeb notification icons 18 Configuring the network ...20 Starting Microsoft Windows ...21 Turning HP QuickWeb on and off ...22 4 Networking ...23 Using an Internet service provider (ISP 24 Connecting to a wireless...
Getting Started - Windows 7
Page 6
... ...42 Removing the hard drive ...42 Installing a hard drive ...42 Replacing the memory module ...44 Updating programs and drivers ...46 Routine care ...46 Cleaning the display ...46 Cleaning the TouchPad and keyboard 46 7 Backup and recovery ...47 Recovery discs ...48 Performing a system recovery ...48 Recovery using the dedicated recovery partition 49...
... ...42 Removing the hard drive ...42 Installing a hard drive ...42 Replacing the memory module ...44 Updating programs and drivers ...46 Routine care ...46 Cleaning the display ...46 Cleaning the TouchPad and keyboard 46 7 Backup and recovery ...47 Recovery discs ...48 Performing a system recovery ...48 Recovery using the dedicated recovery partition 49...
Getting Started - Windows 7
Page 15
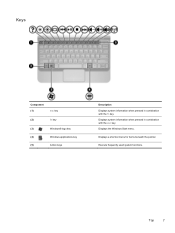
Keys Component (1) esc key (2) fn key (3) Windows® logo key (4) Windows applications key (5) Action keys Description Displays system information when pressed in combination with the fn key. Displays the Windows Start menu. Displays a shortcut menu for items beneath the pointer. Execute frequently used system functions. Top 7 Displays system information when pressed in combination with the esc key.
Keys Component (1) esc key (2) fn key (3) Windows® logo key (4) Windows applications key (5) Action keys Description Displays system information when pressed in combination with the fn key. Displays the Windows Start menu. Displays a shortcut menu for items beneath the pointer. Execute frequently used system functions. Top 7 Displays system information when pressed in combination with the esc key.
Getting Started - Windows 7
Page 20
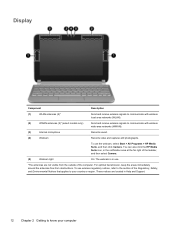
Display Component Description (1) WLAN antennas (2)* Send and receive wireless signals to communicate with wireless local area networks (WLAN). (2) WWAN antennas (2)* (select models only) Send and receive ... know your country or region. To use . *The antennas are located in use the webcam, select Start > All Programs > HP Media Suite, and then click Camera. You can also click the HP Media Suite icon, in the notification area at the far right of the taskbar, and then select Camera. (5) Webcam light...
Display Component Description (1) WLAN antennas (2)* Send and receive wireless signals to communicate with wireless local area networks (WLAN). (2) WWAN antennas (2)* (select models only) Send and receive ... know your country or region. To use . *The antennas are located in use the webcam, select Start > All Programs > HP Media Suite, and then click Camera. You can also click the HP Media Suite icon, in the notification area at the far right of the taskbar, and then select Camera. (5) Webcam light...

Getting Started - Windows 7
Page 24
Turn on the QuickWeb timer and changing the timer settings, refer to launch an application. For more information on the computer. Starting HP QuickWeb 1. The HP QuickWeb Home screen appears. 2. NOTE: When the HP QuickWeb Home screen first appears, it displays an automatic timer above the Start Windows icon. If you do not move your mouse, or press a key within 15 seconds, the computer starts Microsoft Windows. Click an icon on the QuickWeb Home screen to the HP QuickWeb software Help. 16 Chapter 3 HP QuickWeb
Turn on the QuickWeb timer and changing the timer settings, refer to launch an application. For more information on the computer. Starting HP QuickWeb 1. The HP QuickWeb Home screen appears. 2. NOTE: When the HP QuickWeb Home screen first appears, it displays an automatic timer above the Start Windows icon. If you do not move your mouse, or press a key within 15 seconds, the computer starts Microsoft Windows. Click an icon on the QuickWeb Home screen to the HP QuickWeb software Help. 16 Chapter 3 HP QuickWeb

Getting Started - Windows 7
Page 30
Select Start > All Programs > HP QuickWeb > HP QuickWeb Configuration Tool. Click OK. 22 Chapter 3 HP QuickWeb Turning HP QuickWeb on or turn off 1. Select the Status tab. 3. Select the Enable or Disable check box to turn on and off QuickWeb. 4. The QuickWeb dialog box is displayed. 2.
Select Start > All Programs > HP QuickWeb > HP QuickWeb Configuration Tool. Click OK. 22 Chapter 3 HP QuickWeb Turning HP QuickWeb on or turn off 1. Select the Status tab. 3. Select the Enable or Disable check box to turn on and off QuickWeb. 4. The QuickWeb dialog box is displayed. 2.

Getting Started - Windows 7
Page 32
...the ISP has provided you must establish an ISP account. The following wireless devices: ● Wireless local area network (WLAN) device ● HP Mobile Broadband Module, a wireless wide area network (WWAN) device ● Bluetooth device For more of wires. NOTE: If you a user ID... account: ● Internet Services & Offers (available in some locations)-These icons may be displayed either individually on wireless technology and connecting to a wireless network, refer to the HP Notebook Reference Guide and information and Web site links provided in the Search box. The ISP...
...the ISP has provided you must establish an ISP account. The following wireless devices: ● Wireless local area network (WLAN) device ● HP Mobile Broadband Module, a wireless wide area network (WWAN) device ● Bluetooth device For more of wires. NOTE: If you a user ID... account: ● Internet Services & Offers (available in some locations)-These icons may be displayed either individually on wireless technology and connecting to a wireless network, refer to the HP Notebook Reference Guide and information and Web site links provided in the Search box. The ISP...

Getting Started - Windows 7
Page 37
Using the keyboard Identifying the hotkey A hotkey is a combination of the fn key (1) and the esc key (2). Using the keyboard 29 Hotkey fn+esc Description Displays information about system hardware components and the system BIOS version number.
Using the keyboard Identifying the hotkey A hotkey is a combination of the fn key (1) and the esc key (2). Using the keyboard 29 Hotkey fn+esc Description Displays information about system hardware components and the system BIOS version number.

Getting Started - Windows 7
Page 38
... top of a DVD. Switches the screen image among other devices that are receiving video information from computer display to monitor display to simultaneous display on or off. The f4 action key can also alternate images among display devices connected to questions, and product updates. Plays the next track of an audio CD or the...
... top of a DVD. Switches the screen image among other devices that are receiving video information from computer display to monitor display to simultaneous display on or off. The f4 action key can also alternate images among display devices connected to questions, and product updates. Plays the next track of an audio CD or the...

Getting Started - Windows 7
Page 46
Unplug the power cord from the AC outlet. 4. Save your work and shut down on a flat surface with the battery bay toward you. 5. With the display closed, position the computer upside down the computer. 2. Insert the battery (1) into the battery bay. 38 Chapter 6 Maintenance Replacing the battery Inserting the battery To insert the battery: 1. Disconnect all external devices connected to lock the battery into the battery bay until the battery release latch (2) clicks. 6. Slide the battery locking latch (3) to the right to the computer. 3.
Unplug the power cord from the AC outlet. 4. Save your work and shut down on a flat surface with the battery bay toward you. 5. With the display closed, position the computer upside down the computer. 2. Insert the battery (1) into the battery bay. 38 Chapter 6 Maintenance Replacing the battery Inserting the battery To insert the battery: 1. Disconnect all external devices connected to lock the battery into the battery bay until the battery release latch (2) clicks. 6. Slide the battery locking latch (3) to the right to the computer. 3.

Getting Started - Windows 7
Page 47
... appears in the latch. 6. Replacing the battery 39 Save your work and shut down on a flat surface with the battery bay toward you. 5. With the display closed, position the computer upside down the computer. 2.
... appears in the latch. 6. Replacing the battery 39 Save your work and shut down on a flat surface with the battery bay toward you. 5. With the display closed, position the computer upside down the computer. 2.

Getting Started - Windows 7
Page 54
... fluids, or chemicals on the keyboard surface. WARNING! To remove smudges and lint, frequently clean the display with the latest versions. A vacuum cleaner can deposit household debris on the display. A can of electric shock or damage to loosen and remove debris. 46 Chapter 6 Maintenance Cleaning the... risk of compressed air with a straw extension can be used to download the latest versions. Updating programs and drivers HP recommends that can become available. Go to http://www.hp.com/support to blow air around on a regular basis with a soft damp, lint-free cloth.
... fluids, or chemicals on the keyboard surface. WARNING! To remove smudges and lint, frequently clean the display with the latest versions. A vacuum cleaner can deposit household debris on the display. A can of electric shock or damage to loosen and remove debris. 46 Chapter 6 Maintenance Cleaning the... risk of compressed air with a straw extension can be used to download the latest versions. Updating programs and drivers HP recommends that can become available. Go to http://www.hp.com/support to blow air around on a regular basis with a soft damp, lint-free cloth.
Getting Started - Windows 7
Page 57
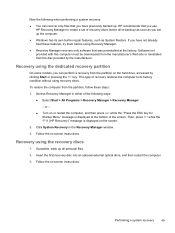
...Recovery Manager. - This type of recovery discs (entire drive backup) as soon as System Restore. Then, press f11 while the "F11 (HP Recovery)" message is displayed at the factory. Follow the on the screen. 2. Recovery using recovery discs. Follow the on or restart the computer, and then press ...esc while the "Press the ESC key for Startup Menu" message is displayed on -screen instructions. If you have previously backed up all personal files. 2. or - ● Turn on -screen instructions. Click System ...
...Recovery Manager. - This type of recovery discs (entire drive backup) as soon as System Restore. Then, press f11 while the "F11 (HP Recovery)" message is displayed at the factory. Follow the on the screen. 2. Recovery using recovery discs. Follow the on or restart the computer, and then press ...esc while the "Press the ESC key for Startup Menu" message is displayed on -screen instructions. If you have previously backed up all personal files. 2. or - ● Turn on -screen instructions. Click System ...
Getting Started - Windows 7
Page 66
...light, identifying 6 care of the computer 46 Certificate of Authenticity label 54 components bottom 13 display 12 front 8 left side 11 right side 9 top 5 customer support 52 D Digital Media Slot, identifying 9 display image, switching 30 drive light 11 drivers and programs, updating 46 E esc key, ...keyboard hotkey, identifying 29 keyboard, using 29 keys action 7 esc 7 fn 7 Windows applications 7 Windows logo 7 L labels Bluetooth 54 HP Mobile Broadband Module 54 Microsoft Certificate of Authenticity 54 regulatory 54 serial number 54 SIM 54 wireless certification 54 WLAN 54 latch, battery locking...
...light, identifying 6 care of the computer 46 Certificate of Authenticity label 54 components bottom 13 display 12 front 8 left side 11 right side 9 top 5 customer support 52 D Digital Media Slot, identifying 9 display image, switching 30 drive light 11 drivers and programs, updating 46 E esc key, ...keyboard hotkey, identifying 29 keyboard, using 29 keys action 7 esc 7 fn 7 Windows applications 7 Windows logo 7 L labels Bluetooth 54 HP Mobile Broadband Module 54 Microsoft Certificate of Authenticity 54 regulatory 54 serial number 54 SIM 54 wireless certification 54 WLAN 54 latch, battery locking...
HP Mini 210 - Maintenance and Service Guide
Page 3
... been added in the following locations: Computer major components on page 15, Sequential part number listing on page 22, Display assembly on page 57. An HP Mini sleeve was added in the following locations: Computer major components on page 15, Sequential part number listing on page 22... Miscellaneous parts on page 21, Sequential part number listing on page 22. MSG revision history Revision A Publication date October 2010 Description Display panels have been added in the following locations: Product description on page 1, Computer major components on page 15, Sequential part number listing...
... been added in the following locations: Computer major components on page 15, Sequential part number listing on page 22, Display assembly on page 57. An HP Mini sleeve was added in the following locations: Computer major components on page 15, Sequential part number listing on page 22... Miscellaneous parts on page 21, Sequential part number listing on page 22. MSG revision history Revision A Publication date October 2010 Description Display panels have been added in the following locations: Product description on page 1, Computer major components on page 15, Sequential part number listing...

HP Mini 210 - Maintenance and Service Guide
Page 7
Table of contents 1 Product description ...1 2 External component identification ...5 Identifying the hardware ...5 Top ...6 TouchPad ...6 Lights ...7 Keys ...8 Front ...8 Right side ...9 Left side ...10 Display ...11 Bottom ...13 3 Illustrated parts catalog ...14 Service tag ...14 Computer major components ...15 Mass storage device ...20 Miscellaneous parts ...21 Sequential part number listing ......
Table of contents 1 Product description ...1 2 External component identification ...5 Identifying the hardware ...5 Top ...6 TouchPad ...6 Lights ...7 Keys ...8 Front ...8 Right side ...9 Left side ...10 Display ...11 Bottom ...13 3 Illustrated parts catalog ...14 Service tag ...14 Computer major components ...15 Mass storage device ...20 Miscellaneous parts ...21 Sequential part number listing ......

HP Mini 210 - Maintenance and Service Guide
Page 8
...GPS modules (select models only 42 WLAN module ...44 Memory module ...46 RTC battery ...47 Keyboard ...48 Top cover ...51 Speakers ...55 Display assembly ...57 Fan/heat sink assembly ...61 System board ...63 Power connector cable and DC bracket 66 RJ-45 cover ...67 5 Setup Utility......69 Starting Setup Utility ...69 Using Setup Utility ...70 Changing the language of Setup Utility 70 Navigating and selecting in Setup Utility 71 Displaying system information ...72 Restoring default settings in Setup Utility 73 Exiting Setup Utility ...74 Setup Utility Menus ...75 Main Menu ...75 Security Menu...
...GPS modules (select models only 42 WLAN module ...44 Memory module ...46 RTC battery ...47 Keyboard ...48 Top cover ...51 Speakers ...55 Display assembly ...57 Fan/heat sink assembly ...61 System board ...63 Power connector cable and DC bracket 66 RJ-45 cover ...67 5 Setup Utility......69 Starting Setup Utility ...69 Using Setup Utility ...70 Changing the language of Setup Utility 70 Navigating and selecting in Setup Utility 71 Displaying system information ...72 Restoring default settings in Setup Utility 73 Exiting Setup Utility ...74 Setup Utility Menus ...75 Main Menu ...75 Security Menu...
HP Mini 210 - Maintenance and Service Guide
Page 9
... points ...84 When to create restore points 84 Creating a system restore point 84 Restoring to a previous date and time 84 Backing up and recovering using HP Recovery Manager 85 Backing up your information 85 Creating a set of recovery discs 86 Performing a recovery ...87 Recovering using the recovery discs 87 Recovering using... (select models only 88 8 Power cord set requirements ...89 Requirements for all countries ...89 Requirements for specific countries and regions 90 9 Recycling ...91 Battery ...91 Display ...91 Index ...97 ix
... points ...84 When to create restore points 84 Creating a system restore point 84 Restoring to a previous date and time 84 Backing up and recovering using HP Recovery Manager 85 Backing up your information 85 Creating a set of recovery discs 86 Performing a recovery ...87 Recovering using the recovery discs 87 Recovering using... (select models only 88 8 Power cord set requirements ...89 Requirements for all countries ...89 Requirements for specific countries and regions 90 9 Recycling ...91 Battery ...91 Display ...91 Index ...97 ix
HP Mini 210 - Maintenance and Service Guide
Page 11
... includes 1 webcam, 1 microphone, 1 speaker box, and 2 wireless local-area network (WLAN) antenna transceivers/cables; 1 Product description Category Product name Processor Chipset Graphics Display Memory Description HP Mini 210 Netbook PC Intel® Atom™ N455 single-core, 1.66-GHz processor, 512-KB level 2 cache, 667-MHz front-side bus (FSB), 6.5 W, UMA/UMA HD ...
... includes 1 webcam, 1 microphone, 1 speaker box, and 2 wireless local-area network (WLAN) antenna transceivers/cables; 1 Product description Category Product name Processor Chipset Graphics Display Memory Description HP Mini 210 Netbook PC Intel® Atom™ N455 single-core, 1.66-GHz processor, 512-KB level 2 cache, 667-MHz front-side bus (FSB), 6.5 W, UMA/UMA HD ...
HP Mini 210 - Maintenance and Service Guide
Page 12
... 3.0 and high-speed ready) ● Atheros AR9285 802.11.b/g/n 1x1 WiFi Adapter 2 WWAN antennas built into display assembly (select models only) 2 WLAN antennas built into display assembly WWAN by way of: ● Ericcson F3307 HSPA Mini Card (select models only) ● Qualcomm Gobi 2000 3G module (select models only) GPS by way of...
... 3.0 and high-speed ready) ● Atheros AR9285 802.11.b/g/n 1x1 WiFi Adapter 2 WWAN antennas built into display assembly (select models only) 2 WLAN antennas built into display assembly WWAN by way of: ● Ericcson F3307 HSPA Mini Card (select models only) ● Qualcomm Gobi 2000 3G module (select models only) GPS by way of...


