Getting Started - Windows 7
Page 10
...; Software, driver, and BIOS updates Support. ● Troubleshooting tools NOTE: For country- or region-specific support, go to http://www.hp.com/ support. ● Support information ● Ordering parts and finding additional help you perform various tasks. Regulatory, Safety, and Environmental...For information about Quick Setup poster ● How to set up the computer ● Help to identify computer components HP Notebook Reference Guide ● Power management features To access this guide, select Start > Help and Support > User Guides. ● How to ...
...; Software, driver, and BIOS updates Support. ● Troubleshooting tools NOTE: For country- or region-specific support, go to http://www.hp.com/ support. ● Support information ● Ordering parts and finding additional help you perform various tasks. Regulatory, Safety, and Environmental...For information about Quick Setup poster ● How to set up the computer ● Help to identify computer components HP Notebook Reference Guide ● Power management features To access this guide, select Start > Help and Support > User Guides. ● How to ...
Getting Started - Windows 7
Page 17
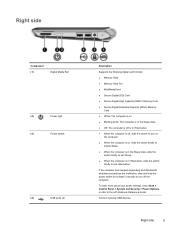
If the computer has stopped responding and Windows® shutdown procedures are ineffective, slide and hold the power switch for at least 5 seconds to turn on the computer. ● When the computer is on . ● Blinking white...computer is off the computer. To learn more about your power settings, select Start > Control Panel > System and Security > Power Options, or refer to the HP Notebook Reference Guide. Connect optional USB devices. Right side Component (1) Digital Media Slot (2) Power light (3) Power switch (4) USB ports (2) Description Supports the following digital ...
If the computer has stopped responding and Windows® shutdown procedures are ineffective, slide and hold the power switch for at least 5 seconds to turn on the computer. ● When the computer is on . ● Blinking white...computer is off the computer. To learn more about your power settings, select Start > Control Panel > System and Security > Power Options, or refer to the HP Notebook Reference Guide. Connect optional USB devices. Right side Component (1) Digital Media Slot (2) Power light (3) Power switch (4) USB ports (2) Description Supports the following digital ...
Getting Started - Windows 7
Page 19
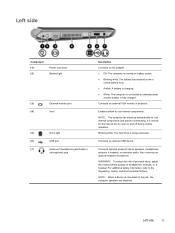
... The computer fan starts up automatically to cool internal components. NOTE: When a device is fully charged. Left side Component (1) (2) Power connector Battery light (3) External monitor port (4) Vent (5) Drive light (6) USB port (7) Audio-out (headphone) jack/Audio-in (microphone...) jack Description Connects an AC adapter. ● Off: The computer is running on battery power. ● Blinking white: The battery has reached a low or critical battery level. ● Amber: A battery is charging. ● White: ...
... The computer fan starts up automatically to cool internal components. NOTE: When a device is fully charged. Left side Component (1) (2) Power connector Battery light (3) External monitor port (4) Vent (5) Drive light (6) USB port (7) Audio-out (headphone) jack/Audio-in (microphone...) jack Description Connects an AC adapter. ● Off: The computer is running on battery power. ● Blinking white: The battery has reached a low or critical battery level. ● Amber: A battery is charging. ● White: ...
Getting Started - Windows 7
Page 26
... the network icon to modify the following QuickWeb settings: ● Set date and time ● Configure network connections ● Manage power settings ● Manage QuickWeb applications ● Restore QuickWeb 18 Chapter 3 HP QuickWeb Select and play music stored on your hard drive, external drives, or external media. Supports .mp3, .aac (MPEG-4), and...
... the network icon to modify the following QuickWeb settings: ● Set date and time ● Configure network connections ● Manage power settings ● Manage QuickWeb applications ● Restore QuickWeb 18 Chapter 3 HP QuickWeb Select and play music stored on your hard drive, external drives, or external media. Supports .mp3, .aac (MPEG-4), and...

Getting Started - Windows 7
Page 27
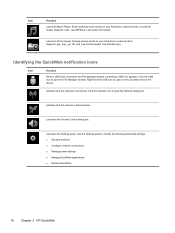
Identifying the QuickWeb LaunchBar 19 The state of charge is running on battery power, the icon appears as only a battery. Icon Function Launches the Power Control dialog box to see information about battery capacity: ● When the computer is connected to AC power, the icon appears with an AC power cord. ● When the computer is indicated by the color of the battery icon: ● Green: charged ● Yellow: low ● Red: critically low Launches the QuickWeb software Help.
Identifying the QuickWeb LaunchBar 19 The state of charge is running on battery power, the icon appears as only a battery. Icon Function Launches the Power Control dialog box to see information about battery capacity: ● When the computer is connected to AC power, the icon appears with an AC power cord. ● When the computer is indicated by the color of the battery icon: ● Green: charged ● Yellow: low ● Red: critically low Launches the QuickWeb software Help.

Getting Started - Windows 7
Page 29
... after 15 seconds, or click the Start Windows icon in this dialog box turns off on page 22. NOTE: Clicking Make Windows your default Power On experience in the QuickWeb Home screen. For more information on the computer. To turn on your mouse, or press a key for 15 ...far left of the QuickWeb Home screen. Turn on the QuickWeb timer and changing the timer settings, refer to the HP QuickWeb software Help. 1. Starting Microsoft Windows 21 Click Yes. The HP QuickWeb Home screen appears. 2. Do not move your computer. Starting Microsoft Windows NOTE: If QuickWeb has been activated...
... after 15 seconds, or click the Start Windows icon in this dialog box turns off on page 22. NOTE: Clicking Make Windows your default Power On experience in the QuickWeb Home screen. For more information on the computer. To turn on your mouse, or press a key for 15 ...far left of the QuickWeb Home screen. Turn on the QuickWeb timer and changing the timer settings, refer to the HP QuickWeb software Help. 1. Starting Microsoft Windows 21 Click Yes. The HP QuickWeb Home screen appears. 2. Do not move your computer. Starting Microsoft Windows NOTE: If QuickWeb has been activated...

Getting Started - Windows 7
Page 46
Disconnect all external devices connected to lock the battery into the battery bay until the battery release latch (2) clicks. 6. Slide the battery locking latch (3) to the right to the computer. 3. Replacing the battery Inserting the battery To insert the battery: 1. With the display closed, position the computer upside down the computer. 2. Save your work and shut down on a flat surface with the battery bay toward you. 5. Unplug the power cord from the AC outlet. 4. Insert the battery (1) into the battery bay. 38 Chapter 6 Maintenance
Disconnect all external devices connected to lock the battery into the battery bay until the battery release latch (2) clicks. 6. Slide the battery locking latch (3) to the right to the computer. 3. Replacing the battery Inserting the battery To insert the battery: 1. With the display closed, position the computer upside down the computer. 2. Save your work and shut down on a flat surface with the battery bay toward you. 5. Unplug the power cord from the AC outlet. 4. Insert the battery (1) into the battery bay. 38 Chapter 6 Maintenance

Getting Started - Windows 7
Page 47
... connected to unlock the battery. NOTE: You can identify when the battery locking latch is unlocked by the red icon that is the sole power source for the computer can cause loss of information, save your work and initiate Hibernation or shut down the computer through Windows before removing the... battery. 1. Save your work and shut down on a flat surface with the battery bay toward you. 5. Unplug the power cord from the battery bay. Replacing the battery 39 With the display closed, position the computer upside down the computer. 2.
... connected to unlock the battery. NOTE: You can identify when the battery locking latch is unlocked by the red icon that is the sole power source for the computer can cause loss of information, save your work and initiate Hibernation or shut down the computer through Windows before removing the... battery. 1. Save your work and shut down on a flat surface with the battery bay toward you. 5. Unplug the power cord from the battery bay. Replacing the battery 39 With the display closed, position the computer upside down the computer. 2.

Getting Started - Windows 7
Page 48
... in Hibernation, turn the computer on the front edge of the vanity cover into place. 40 Chapter 6 Maintenance Insert the 4 tabs on by pressing the power button. To replace the vanity cover: 1. To remove the vanity cover: 1. Then shut down the computer before adding or replacing a memory module, hard drive, or...
... in Hibernation, turn the computer on the front edge of the vanity cover into place. 40 Chapter 6 Maintenance Insert the 4 tabs on by pressing the power button. To replace the vanity cover: 1. To remove the vanity cover: 1. Then shut down the computer before adding or replacing a memory module, hard drive, or...
Getting Started - Windows 7
Page 50
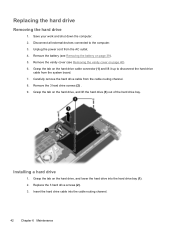
...). 6. Grasp the tab on the hard drive, and lower the hard drive into the cable routing channel. 42 Chapter 6 Maintenance Installing a hard drive 1. Unplug the power cord from the cable routing channel. 8. Remove the 3 hard drive screws (2) . 9. Grasp the tab on the hard drive cable connector (1) and lift it up to...
...). 6. Grasp the tab on the hard drive, and lower the hard drive into the cable routing channel. 42 Chapter 6 Maintenance Installing a hard drive 1. Unplug the power cord from the cable routing channel. 8. Remove the 3 hard drive screws (2) . 9. Grasp the tab on the hard drive cable connector (1) and lift it up to...

Getting Started - Windows 7
Page 51
Reconnect external power and external devices. 8. Turn on the hard drive cable connector (3), and then carefully press the hard drive cable connector onto the system board until it snaps into place. 5. Replace the battery (see Replacing the vanity cover on page 38). 7. Replacing the hard drive 43 4. Replace the vanity cover (see Inserting the battery on page 40). 6. Grasp the tab on the computer.
Reconnect external power and external devices. 8. Turn on the hard drive cable connector (3), and then carefully press the hard drive cable connector onto the system board until it snaps into place. 5. Replace the battery (see Replacing the vanity cover on page 38). 7. Replacing the hard drive 43 4. Replace the vanity cover (see Inserting the battery on page 40). 6. Grasp the tab on the computer.

Getting Started - Windows 7
Page 52
... the vanity cover (see Removing the battery on the memory module. Remove the existing memory module: a. CAUTION: To prevent damage to the equipment, unplug the power cord and remove all batteries before installing a memory module. The capacity of the memory module slot.
... the vanity cover (see Removing the battery on the memory module. Remove the existing memory module: a. CAUTION: To prevent damage to the equipment, unplug the power cord and remove all batteries before installing a memory module. The capacity of the memory module slot.

Getting Started - Windows 7
Page 53
... seated. Replace the battery (see Replacing the vanity cover on page 38). 7. c. Replace the vanity cover (see Inserting the battery on page 40). 6. Reconnect external power and external devices. 8. CAUTION: To prevent damage to the memory module, hold the memory module by the edges only. Replacing the memory module 45 Turn...
... seated. Replace the battery (see Replacing the vanity cover on page 38). 7. c. Replace the vanity cover (see Inserting the battery on page 40). 6. Reconnect external power and external devices. 8. CAUTION: To prevent damage to the memory module, hold the memory module by the edges only. Replacing the memory module 45 Turn...
Getting Started - Windows 7
Page 56
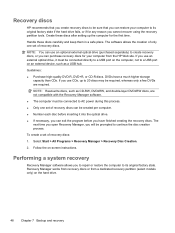
...external optical drive, it into the optical drive. ● If necessary, you can exit the program before inserting it must be connected to AC power during this process. ● Only one set of recovery discs: 1. If you use an optional external optical drive (purchased separately) to create... be sure that you can purchase recovery discs for the first time. Recovery Manager works from recovery discs or from the HP Web site. Recovery discs HP recommends that you create recovery discs to be required, whereas only a few DVDs are not compatible with the Recovery Manager software...
...external optical drive, it into the optical drive. ● If necessary, you can exit the program before inserting it must be connected to AC power during this process. ● Only one set of recovery discs: 1. If you use an optional external optical drive (purchased separately) to create... be sure that you can purchase recovery discs for the first time. Recovery Manager works from recovery discs or from the HP Web site. Recovery discs HP recommends that you create recovery discs to be required, whereas only a few DVDs are not compatible with the Recovery Manager software...
Getting Started - Windows 7
Page 58
... drive, or discs. To create a backup: 1. Backing up your information You should back up your information periodically. ● Before the computer is connected to AC power before you have to reset your preferences. Back up your system at the following times: ● At regularly scheduled times NOTE: Set reminders to back...
... drive, or discs. To create a backup: 1. Backing up your information You should back up your information periodically. ● Before the computer is connected to AC power before you have to reset your preferences. Back up your system at the following times: ● At regularly scheduled times NOTE: Set reminders to back...
Getting Started - Windows 7
Page 64
Although the computer can operate on DC power within the following specifications. The AC power source must be supplied by HP for IT power systems in this computer. The computer can be powered from a standalone DC power source, it should be powered only with this section may be helpful if you plan to -phase voltage not exceeding 240...
Although the computer can operate on DC power within the following specifications. The AC power source must be supplied by HP for IT power systems in this computer. The computer can be powered from a standalone DC power source, it should be powered only with this section may be helpful if you plan to -phase voltage not exceeding 240...
Getting Started - Windows 7
Page 66
... 42 removing 42 hard drive, replacing 42 headphone (audio-out) jack 11 Help and Support action key 30 hotkey description 29 I input power 56 integrated webcam light, identifying 12 internal microphones, identifying 12 Internet connection setup 26 ISP, using 24 J jacks audio-in (microphone) ... K keyboard hotkey, identifying 29 keyboard, using 29 keys action 7 esc 7 fn 7 Windows applications 7 Windows logo 7 L labels Bluetooth 54 HP Mobile Broadband Module 54 Microsoft Certificate of Authenticity 54 regulatory 54 serial number 54 SIM 54 wireless certification 54 WLAN 54 latch, battery locking 13...
... 42 removing 42 hard drive, replacing 42 headphone (audio-out) jack 11 Help and Support action key 30 hotkey description 29 I input power 56 integrated webcam light, identifying 12 internal microphones, identifying 12 Internet connection setup 26 ISP, using 24 J jacks audio-in (microphone) ... K keyboard hotkey, identifying 29 keyboard, using 29 keys action 7 esc 7 fn 7 Windows applications 7 Windows logo 7 L labels Bluetooth 54 HP Mobile Broadband Module 54 Microsoft Certificate of Authenticity 54 regulatory 54 serial number 54 SIM 54 wireless certification 54 WLAN 54 latch, battery locking 13...
Getting Started - Windows 7
Page 67
... operating system Microsoft Certificate of Authenticity label 54 Product Key 54 P pinching TouchPad gesture 35 pointing devices, setting preferences 32 ports USB 9, 11 power connector, identifying 11 power light, identifying 9 power switch, identifying 9 Product Key 54 product name and number, computer 54 programs and drivers, updating 46 turn off 22 turn on 22...
... operating system Microsoft Certificate of Authenticity label 54 Product Key 54 P pinching TouchPad gesture 35 pointing devices, setting preferences 32 ports USB 9, 11 power connector, identifying 11 power light, identifying 9 power switch, identifying 9 Product Key 54 product name and number, computer 54 programs and drivers, updating 46 turn off 22 turn on 22...
HP Mini 210 - Maintenance and Service Guide
Page 3
Power connector cable and DC bracket on page 66 Service access covers have been added in the following location: Sequential part number listing on page 22. iii An HP Mini sleeve was added in the following locations: Computer major components on page 15, Sequential part number listing on page 22, Service access cover on...
Power connector cable and DC bracket on page 66 Service access covers have been added in the following location: Sequential part number listing on page 22. iii An HP Mini sleeve was added in the following locations: Computer major components on page 15, Sequential part number listing on page 22, Service access cover on...

HP Mini 210 - Maintenance and Service Guide
Page 8
... ...44 Memory module ...46 RTC battery ...47 Keyboard ...48 Top cover ...51 Speakers ...55 Display assembly ...57 Fan/heat sink assembly ...61 System board ...63 Power connector cable and DC bracket 66 RJ-45 cover ...67 5 Setup Utility ...69 Starting Setup Utility ...69 Using Setup Utility ...70 Changing the language of...
... ...44 Memory module ...46 RTC battery ...47 Keyboard ...48 Top cover ...51 Speakers ...55 Display assembly ...57 Fan/heat sink assembly ...61 System board ...63 Power connector cable and DC bracket 66 RJ-45 cover ...67 5 Setup Utility ...69 Starting Setup Utility ...69 Using Setup Utility ...70 Changing the language of...


