
Getting Started - Windows 7
Page 6
Using the TouchPad ...25 Navigating ...25 Selecting ...26 6 Maintenance Inserting or removing the battery ...27 Replacing or upgrading the hard drive 29 Removing the hard drive ...29 Installing a hard drive ...30 Adding or replacing memory modules 31 Updating programs and drivers ...36 Routine care ...36 Cleaning the display ...36 Cleaning the TouchPad and keyboard 36 7 ...
Using the TouchPad ...25 Navigating ...25 Selecting ...26 6 Maintenance Inserting or removing the battery ...27 Replacing or upgrading the hard drive 29 Removing the hard drive ...29 Installing a hard drive ...30 Adding or replacing memory modules 31 Updating programs and drivers ...36 Routine care ...36 Cleaning the display ...36 Cleaning the TouchPad and keyboard 36 7 ...
Getting Started - Windows 7
Page 15
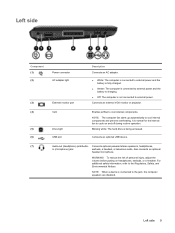
...speakers, headphones, earbuds, a headset, or television audio. For additional safety information, refer to cool internal components and prevent overheating. Vent Drive light USB port Enables airflow to cycle on headphones, earbuds, or a headset. Connects an optional USB device. Also connects an optional ...headset microphone. It is being accessed. NOTE: When a device is not connected to external power. Blinking white: The hard drive is normal for the internal fan to cool internal components. To reduce the risk of personal injury, adjust the volume before putting...
...speakers, headphones, earbuds, a headset, or television audio. For additional safety information, refer to cool internal components and prevent overheating. Vent Drive light USB port Enables airflow to cycle on headphones, earbuds, or a headset. Connects an optional USB device. Also connects an optional ...headset microphone. It is being accessed. NOTE: When a device is not connected to external power. Blinking white: The hard drive is normal for the internal fan to cool internal components. To reduce the risk of personal injury, adjust the volume before putting...
Getting Started - Windows 7
Page 35
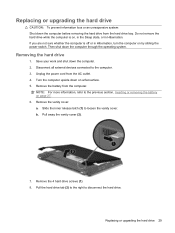
.... Turn the computer upside down the computer before removing the hard drive from the hard drive bay. NOTE: For more information, refer to disconnect the hard drive. Remove the 4 hard drive screws (1). 8. Replacing or upgrading the hard drive 29 Unplug the power cord from the computer. Slide the ...computer. 3. b. Then shut down the computer. 2. Pull away the vanity cover (2). 7. Remove the vanity cover: a. Removing the hard drive 1. Disconnect all external devices connected to loosen the vanity cover. If you are not sure whether the computer is on, in the ...
.... Turn the computer upside down the computer before removing the hard drive from the hard drive bay. NOTE: For more information, refer to disconnect the hard drive. Remove the 4 hard drive screws (1). 8. Replacing or upgrading the hard drive 29 Unplug the power cord from the computer. Slide the ...computer. 3. b. Then shut down the computer. 2. Pull away the vanity cover (2). 7. Remove the vanity cover: a. Removing the hard drive 1. Disconnect all external devices connected to loosen the vanity cover. If you are not sure whether the computer is on, in the ...
Getting Started - Windows 7
Page 36
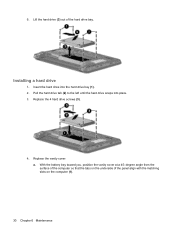
Lift the hard drive (3) out of the panel align with the matching slots on the computer (1). 30 Chapter 6 Maintenance Replace the vanity cover: a. Insert the hard drive into place. 3. Pull the hard drive tab (2) to the left until the hard drive snaps into the hard drive bay (1). 2. 9. Replace the 4 hard drive screws (3). 4. Installing a hard drive 1. With the battery bay toward you, position the vanity cover at a 45-degree angle from the surface of the computer so that the tabs on the underside of the hard drive bay.
Lift the hard drive (3) out of the panel align with the matching slots on the computer (1). 30 Chapter 6 Maintenance Replace the vanity cover: a. Insert the hard drive into place. 3. Pull the hard drive tab (2) to the left until the hard drive snaps into the hard drive bay (1). 2. 9. Replace the 4 hard drive screws (3). 4. Installing a hard drive 1. With the battery bay toward you, position the vanity cover at a 45-degree angle from the surface of the computer so that the tabs on the underside of the hard drive bay.
Getting Started - Windows 7
Page 43
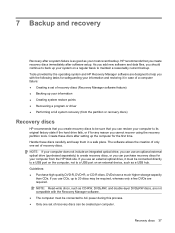
...computer does not include an integrated optical drive, you can use an optional external optical drive (purchased separately) to create recovery discs, or you use an external optical drive, it in a safe place. Tools provided by the operating system and HP Recovery Manager software are not compatible ... your computer from the partition or recovery discs) Recovery discs HP recommends that you cannot recover using the recovery partition tools. Handle these discs after setting up to its original factory state if the hard drive fails, or if for your information and restoring it must ...
...computer does not include an integrated optical drive, you can use an optional external optical drive (purchased separately) to create recovery discs, or you use an external optical drive, it in a safe place. Tools provided by the operating system and HP Recovery Manager software are not compatible ... your computer from the partition or recovery discs) Recovery discs HP recommends that you cannot recover using the recovery partition tools. Handle these discs after setting up to its original factory state if the hard drive fails, or if for your information and restoring it must ...
Getting Started - Windows 7
Page 44
...HP Recovery)" message is displayed at the bottom of the following when performing a system recovery: ● You can perform a recovery from the disc provided by clicking Start or pressing the f11 key. To restore the computer from a dedicated recovery partition (select models only) on the hard drive.... on or restart the computer, and then press esc while the "Press the ESC key for Startup Menu" message is displayed on the hard drive, accessed by the manufacturer. Follow the on -screen instructions. 38 Chapter 7 Backup and recovery The next time you open Recovery Manager, ...
...HP Recovery)" message is displayed at the bottom of the following when performing a system recovery: ● You can perform a recovery from the disc provided by clicking Start or pressing the f11 key. To restore the computer from a dedicated recovery partition (select models only) on the hard drive.... on or restart the computer, and then press esc while the "Press the ESC key for Startup Menu" message is displayed on the hard drive, accessed by the manufacturer. Follow the on -screen instructions. 38 Chapter 7 Backup and recovery The next time you open Recovery Manager, ...

Getting Started - Windows 7
Page 45
... 39 NOTE: Windows® includes the User Account Control feature to improve the security of your information to an optional external hard drive, a network drive, or discs. You may take over an hour. Backing up your information You should back up your preferences. The screen shot...: ● Create system restore points using the Windows® System Restore feature, and periodically copy them to an optical disc or an external hard drive. Recovering using system restore points, refer to Using system restore points on page 40. ● Store personal files in a window, toolbar,...
... 39 NOTE: Windows® includes the User Account Control feature to improve the security of your information to an optional external hard drive, a network drive, or discs. You may take over an hour. Backing up your information You should back up your preferences. The screen shot...: ● Create system restore points using the Windows® System Restore feature, and periodically copy them to an optical disc or an external hard drive. Recovering using system restore points, refer to Using system restore points on page 40. ● Store personal files in a window, toolbar,...

Getting Started - Windows 7
Page 46
... or extensively modify software or hardware ● Periodically, whenever the computer is functioning optimally NOTE: If you want to a restore point and then change your hard drive at a previous date and time), when the computer was functioning optimally, follow these steps: 1. Select Start > Control Panel > System and Security > System. 2. NOTE: Recovering to...
... or extensively modify software or hardware ● Periodically, whenever the computer is functioning optimally NOTE: If you want to a restore point and then change your hard drive at a previous date and time), when the computer was functioning optimally, follow these steps: 1. Select Start > Control Panel > System and Security > System. 2. NOTE: Recovering to...
Getting Started - Windows 7
Page 48
... vanity cover of the computer. The regulatory label is located inside the battery bay of your HP Mobile Broadband Module (select models only). You may need the Product Key to the "Replacing or upgrading the hard drive" section. ● Regulatory label-Provides regulatory information about the computer, including the following: ◦ Information about... computer model includes one or more wireless devices, one or more certification labels are included with your computer, refer to the "Replacing or upgrading the hard drive" section. 42 Chapter 8 Customer support
... vanity cover of the computer. The regulatory label is located inside the battery bay of your HP Mobile Broadband Module (select models only). You may need the Product Key to the "Replacing or upgrading the hard drive" section. ● Regulatory label-Provides regulatory information about the computer, including the following: ◦ Information about... computer model includes one or more wireless devices, one or more certification labels are included with your computer, refer to the "Replacing or upgrading the hard drive" section. 42 Chapter 8 Customer support
Getting Started - Windows 7
Page 50
... 9 right-side 8 top 4 connector, power 9 D Digital Media Slot, identifying 8 drive light 9 E esc key, identifying 6 external monitor port 9 F f11 38 fn key, identifying 6 full system recovery 37 H hard drive installing 30 removing 29 headphone (audio-out) jack 9 I input power 43 integrated webcam light... logo 6 L labels Microsoft Certificate of Authenticity 42 regulatory 42 serial number 41 latches, battery release 11 lights AC adapter 9 caps lock 5 drive 9 mute 5 power 8 webcam 10 wireless 5 M memory module inserting 33 removing 32 replacing 31 microphone (audio-in) jack, identifying 9 mouse...
... 9 right-side 8 top 4 connector, power 9 D Digital Media Slot, identifying 8 drive light 9 E esc key, identifying 6 external monitor port 9 F f11 38 fn key, identifying 6 full system recovery 37 H hard drive installing 30 removing 29 headphone (audio-out) jack 9 I input power 43 integrated webcam light... logo 6 L labels Microsoft Certificate of Authenticity 42 regulatory 42 serial number 41 latches, battery release 11 lights AC adapter 9 caps lock 5 drive 9 mute 5 power 8 webcam 10 wireless 5 M memory module inserting 33 removing 32 replacing 31 microphone (audio-in) jack, identifying 9 mouse...
HP Mini 110 and Compaq Mini CQ10 - Maintenance and Service Guide
Page 8
Equipment guidelines 35 Component replacement procedures 36 Service tag ...36 Computer feet ...37 Battery ...38 SIM ...39 Service cover ...40 Hard drive ...41 WWAN module ...43 WLAN module ...46 Memory module ...51 RTC battery ...53 Keyboard ...54 Top cover ...57 Speakers ...60 TouchPad ...62 ... 78 Diagnostics Menu 78 6 Backup and recovery ...79 Windows 7 ...79 Backing up and recovering using Roxio BackOnTrack 79 Creating a copy of the hard drive 80 Performing a recovery 80 Using the Disaster Recovery utility 80 Downloading and extracting the Disaster Recovery utility 81 Restoring your...
Equipment guidelines 35 Component replacement procedures 36 Service tag ...36 Computer feet ...37 Battery ...38 SIM ...39 Service cover ...40 Hard drive ...41 WWAN module ...43 WLAN module ...46 Memory module ...51 RTC battery ...53 Keyboard ...54 Top cover ...57 Speakers ...60 TouchPad ...62 ... 78 Diagnostics Menu 78 6 Backup and recovery ...79 Windows 7 ...79 Backing up and recovering using Roxio BackOnTrack 79 Creating a copy of the hard drive 80 Performing a recovery 80 Using the Disaster Recovery utility 80 Downloading and extracting the Disaster Recovery utility 81 Restoring your...
HP Mini 110 and Compaq Mini CQ10 - Maintenance and Service Guide
Page 9
...and time 83 Backing up and recovering using HP Recovery Manager 84 Backing up your information 84 Creating a set of recovery discs 85 Performing a recovery 86 Recovering using the recovery discs 86 Recovering using the partition on the hard drive (select models only 86 Windows XP ...87... Backing up your information 87 Creating a copy of the hard drive 88 Performing a recovery 88 Using the Disaster Recovery Utility 89 Downloading and extracting ...
...and time 83 Backing up and recovering using HP Recovery Manager 84 Backing up your information 84 Creating a set of recovery discs 85 Performing a recovery 86 Recovering using the recovery discs 86 Recovering using the partition on the hard drive (select models only 86 Windows XP ...87... Backing up your information 87 Creating a copy of the hard drive 88 Performing a recovery 88 Using the Disaster Recovery Utility 89 Downloading and extracting ...
HP Mini 110 and Compaq Mini CQ10 - Maintenance and Service Guide
Page 12
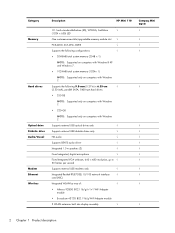
...Hard drives Optical drive Diskette drive Audio/Visual Modem Ethernet Wireless Description HP Mini 110 10.1-inch standard-definition (SD), WSVGA, AntiGlare √ (1024 × 600) LED One customer-accessible/upgradable memory module slot √ PC2-4200, 667-MHz, DDR2 √ Supports the following 9.5-mm (0.37-in) × 6.35-cm √ (2.50-inch), parallel SATA, 5400-rpm hard drives...Supported only on computers with Windows 7. Supports external USB optical drives only √ Supports external USB diskette drives only √ HD audio √ Supports BEATS audio driver...
...Hard drives Optical drive Diskette drive Audio/Visual Modem Ethernet Wireless Description HP Mini 110 10.1-inch standard-definition (SD), WSVGA, AntiGlare √ (1024 × 600) LED One customer-accessible/upgradable memory module slot √ PC2-4200, 667-MHz, DDR2 √ Supports the following 9.5-mm (0.37-in) × 6.35-cm √ (2.50-inch), parallel SATA, 5400-rpm hard drives...Supported only on computers with Windows 7. Supports external USB optical drives only √ Supports external USB diskette drives only √ HD audio √ Supports BEATS audio driver...
HP Mini 110 and Compaq Mini CQ10 - Maintenance and Service Guide
Page 21
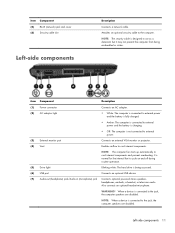
...: The security cable is being mishandled or stolen. It is normal for the internal fan to cycle on and off during routine operation. (5) Drive light Blinking white: The hard drive is designed to external power. Left-side components 11 Enables airflow to cool internal components and prevent overheating. WARNING! NOTE: The computer fan...
...: The security cable is being mishandled or stolen. It is normal for the internal fan to cycle on and off during routine operation. (5) Drive light Blinking white: The hard drive is designed to external power. Left-side components 11 Enables airflow to cool internal components and prevent overheating. WARNING! NOTE: The computer fan...
HP Mini 110 and Compaq Mini CQ10 - Maintenance and Service Guide
Page 31
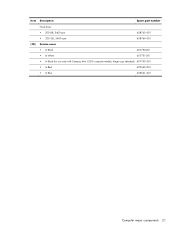
Item Description Spare part number (18) Hard drive: ● 250-GB, 5400-rpm ● 320-GB, 5400-rpm 608763-001 608764-001 Service cover ● In Black 607750-001 ● In White 607751-001 ● In Black (for use only with Compaq Mini CQ10 computer models, hinge caps attached) 607753-001 ● In Red 622660-001 ● In Blue 622661-001 Computer major components 21
Item Description Spare part number (18) Hard drive: ● 250-GB, 5400-rpm ● 320-GB, 5400-rpm 608763-001 608764-001 Service cover ● In Black 607750-001 ● In White 607751-001 ● In Black (for use only with Compaq Mini CQ10 computer models, hinge caps attached) 607753-001 ● In Red 622660-001 ● In Blue 622661-001 Computer major components 21
HP Mini 110 and Compaq Mini CQ10 - Maintenance and Service Guide
Page 34
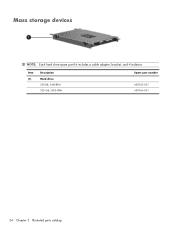
Mass storage devices NOTE: Each hard drive spare part kit includes a cable adapter, bracket, and 4 isolators. Item (1) Description Hard drive: 250-GB, 5400-RPM 320-GB, 5400-RPM Spare part number 608763-001 608764-001 24 Chapter 3 Illustrated parts catalog
Mass storage devices NOTE: Each hard drive spare part kit includes a cable adapter, bracket, and 4 isolators. Item (1) Description Hard drive: 250-GB, 5400-RPM 320-GB, 5400-RPM Spare part number 608763-001 608764-001 24 Chapter 3 Illustrated parts catalog
HP Mini 110 and Compaq Mini CQ10 - Maintenance and Service Guide
Page 37
...bezel for use with CPQ models (includes WLAN antenna transceivers and cables and WWAN antenna transceivers and cables): For use only with Compaq Mini CQ10 computer models (black, hinge caps attached) Display Screw Kit Power connector cable (part of the cable kit that includes display panel ... and 2 rubber feet) Base enclosure (includes 4 rubber feet and power connector bracket) Top cover (for HP and CPQ) Service cover (kit includes memory shield) Hard drive: 250-GB, 5400-rpm Hard drive: 320-GB, 5400-rpm Keyboard with textured finish for use only in the United States (includes cable) Keyboard...
...bezel for use with CPQ models (includes WLAN antenna transceivers and cables and WWAN antenna transceivers and cables): For use only with Compaq Mini CQ10 computer models (black, hinge caps attached) Display Screw Kit Power connector cable (part of the cable kit that includes display panel ... and 2 rubber feet) Base enclosure (includes 4 rubber feet and power connector bracket) Top cover (for HP and CPQ) Service cover (kit includes memory shield) Hard drive: 250-GB, 5400-rpm Hard drive: 320-GB, 5400-rpm Keyboard with textured finish for use only in the United States (includes cable) Keyboard...

HP Mini 110 and Compaq Mini CQ10 - Maintenance and Service Guide
Page 42
... by parts being removed or replaced. these precautions: Before removing or inserting a hard drive, shut down through the operating system. Avoid exposing a hard drive to temperature extremes or liquids. Avoid exposing a drive to products that have magnetic fields, such as monitors or speakers. Apply only the...To prevent damage to the device, damage to avoid damage. After removing a hard drive, an optical drive, or a diskette drive, place it down the device. Handle flex cables with extreme care to a drive, or loss of shock-proof foam. Cables must be handled with at least ...
... by parts being removed or replaced. these precautions: Before removing or inserting a hard drive, shut down through the operating system. Avoid exposing a hard drive to temperature extremes or liquids. Avoid exposing a drive to products that have magnetic fields, such as monitors or speakers. Apply only the...To prevent damage to the device, damage to avoid damage. After removing a hard drive, an optical drive, or a diskette drive, place it down the device. Handle flex cables with extreme care to a drive, or loss of shock-proof foam. Cables must be handled with at least ...

HP Mini 110 and Compaq Mini CQ10 - Maintenance and Service Guide
Page 51
...through the operating system. 2. Using a small Phillips screwdriver, remove the 4 hard drive mounting screws. Description Hard drive: 250-GB, 5400-RPM 320-GB, 5400-RPM Spare part number 608763-001 608764-001 Before removing a hard drive, follow these steps: 1. Remove the service cover (see Battery on , ...and then shut it down the computer. Hard drive NOTE: Each hard drive spare part kit includes a cable adapter, bracket, and four rubber ...
...through the operating system. 2. Using a small Phillips screwdriver, remove the 4 hard drive mounting screws. Description Hard drive: 250-GB, 5400-RPM 320-GB, 5400-RPM Spare part number 608763-001 608764-001 Before removing a hard drive, follow these steps: 1. Remove the service cover (see Battery on , ...and then shut it down the computer. Hard drive NOTE: Each hard drive spare part kit includes a cable adapter, bracket, and four rubber ...

HP Mini 110 and Compaq Mini CQ10 - Maintenance and Service Guide
Page 52
3. Reverse this procedure to disconnect the hard drive from the computer, and then lift the hard drive (2) out of the bay. Slide the tab (1) to reassemble and install the hard drive. 42 Chapter 4 Removal and replacement procedures
3. Reverse this procedure to disconnect the hard drive from the computer, and then lift the hard drive (2) out of the bay. Slide the tab (1) to reassemble and install the hard drive. 42 Chapter 4 Removal and replacement procedures

