Getting Started - Windows 7
Page 8
...; Troubleshooting tools NOTE: For country- Worldwide Telephone Numbers booklet HP support telephone numbers This booklet is provided with several resources to access technical support region, and follow the on-screen instructions. or - Resources For information about Quick Setup poster... ● How to set up the computer ● Help to identify computer components HP Notebook Reference Guide ● Power management features...
...; Troubleshooting tools NOTE: For country- Worldwide Telephone Numbers booklet HP support telephone numbers This booklet is provided with several resources to access technical support region, and follow the on-screen instructions. or - Resources For information about Quick Setup poster... ● How to set up the computer ● Help to identify computer components HP Notebook Reference Guide ● Power management features...

Getting Started - Windows 7
Page 10
Functions like the right button on an external mouse. Functions like the left button on an external mouse. 4 Chapter 2 Getting to know your computer Top TouchPad Component (1) TouchPad zone (2) Left TouchPad button (3) Right TouchPad button Description Moves the pointer and selects or activates items on the screen. 2 Getting to know your computer
Functions like the right button on an external mouse. Functions like the left button on an external mouse. 4 Chapter 2 Getting to know your computer Top TouchPad Component (1) TouchPad zone (2) Left TouchPad button (3) Right TouchPad button Description Moves the pointer and selects or activates items on the screen. 2 Getting to know your computer

Getting Started - Windows 7
Page 18
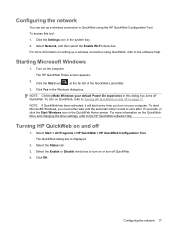
... setup the first time you turn on the computer. HP QuickWeb is separate from the main operating system. Enabling HP QuickWeb Follow the on the computer, the QuickWeb setup screen appears. After you have enabled QuickWeb, the QuickWeb Home screen appears whenever you turn on -screen instructions to the QuickWeb software Help. QuickWeb allows you...
... setup the first time you turn on the computer. HP QuickWeb is separate from the main operating system. Enabling HP QuickWeb Follow the on the computer, the QuickWeb setup screen appears. After you have enabled QuickWeb, the QuickWeb Home screen appears whenever you turn on -screen instructions to the QuickWeb software Help. QuickWeb allows you...
Getting Started - Windows 7
Page 19
Click an icon on the QuickWeb Home screen to the HP QuickWeb software Help. Starting HP QuickWeb 1. The HP QuickWeb Home screen appears. 2. For more information on the computer. NOTE: When the HP QuickWeb Home screen first appears, it displays an automatic timer above the Start Windows icon. Turn on the QuickWeb timer and changing the timer settings, refer to launch an application. Starting HP QuickWeb 13 If you do not move your mouse, or press a key for 15 seconds, the computer starts Microsoft Windows.
Click an icon on the QuickWeb Home screen to the HP QuickWeb software Help. Starting HP QuickWeb 1. The HP QuickWeb Home screen appears. 2. For more information on the computer. NOTE: When the HP QuickWeb Home screen first appears, it displays an automatic timer above the Start Windows icon. Turn on the QuickWeb timer and changing the timer settings, refer to launch an application. Starting HP QuickWeb 13 If you do not move your mouse, or press a key for 15 seconds, the computer starts Microsoft Windows.
Getting Started - Windows 7
Page 20
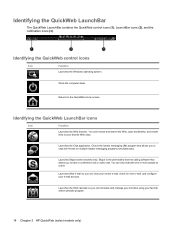
... you can schedule and manage your activities using your e-mail account. Launches Skype (select models only). Launches Web e-mail so you to the QuickWeb Home screen. Launches the Chat application. Identifying the QuickWeb control icons Icon Function Launches the Windows operating system. You can also chat with friends on multiple instant... instant messaging (IM) program that allows you can view your recent e-mail, check for new e-mail, and configure your favorite online calendar program. 14 Chapter 3 HP QuickWeb (select models only)
... you can schedule and manage your activities using your e-mail account. Launches Skype (select models only). Launches Web e-mail so you to the QuickWeb Home screen. Launches the Chat application. Identifying the QuickWeb control icons Icon Function Launches the Windows operating system. You can also chat with friends on multiple instant... instant messaging (IM) program that allows you can view your recent e-mail, check for new e-mail, and configure your favorite online calendar program. 14 Chapter 3 HP QuickWeb (select models only)
Getting Started - Windows 7
Page 23
... 1. Select the Status tab. 3. To access this dialog box turns off QuickWeb. 4. Select Network, and then select the Enable Wi-Fi check box. The HP QuickWeb Home screen appears. 2. Configuring the network 17 For more information on the computer. Click the Start icon , at the far left of the QuickWeb LaunchBar. 3. Select...
... 1. Select the Status tab. 3. To access this dialog box turns off QuickWeb. 4. Select Network, and then select the Enable Wi-Fi check box. The HP QuickWeb Home screen appears. 2. Configuring the network 17 For more information on the computer. Click the Start icon , at the far left of the QuickWeb LaunchBar. 3. Select...
Getting Started - Windows 7
Page 25
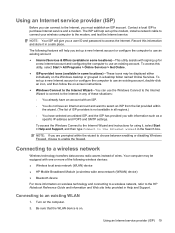
...up a new Internet account or configure the computer to use an existing account, double-click an icon, and then follow the on-screen instructions. ● Windows Connect to the Internet Wizard-You can connect to an existing WLAN 1. Your computer may be equipped with one...Internet Services & Offers (available in the Search box. Turn on . The following wireless devices: ● Wireless local area network (WLAN) device ● HP Mobile Broadband Module (a wireless wide area network (WWAN) device) ● Bluetooth device For more of ISP providers is on the computer. 2. NOTE: If...
...up a new Internet account or configure the computer to use an existing account, double-click an icon, and then follow the on-screen instructions. ● Windows Connect to the Internet Wizard-You can connect to an existing WLAN 1. Your computer may be equipped with one...Internet Services & Offers (available in the Search box. Turn on . The following wireless devices: ● Wireless local area network (WLAN) device ● HP Mobile Broadband Module (a wireless wide area network (WWAN) device) ● Bluetooth device For more of ISP providers is on the computer. 2. NOTE: If...
Getting Started - Windows 7
Page 28
... a new network. To use the Windows tools to set up your WLAN, refer to the HP Notebook Reference Guide. 22 Chapter 4 Networking Protecting your WLAN When you set up a new wireless network. Then follow the on-screen instructions. Configuring a wireless router For help you set up a WLAN or access an existing WLAN...
... a new network. To use the Windows tools to set up your WLAN, refer to the HP Notebook Reference Guide. 22 Chapter 4 Networking Protecting your WLAN When you set up a new wireless network. Then follow the on-screen instructions. Configuring a wireless router For help you set up a WLAN or access an existing WLAN...
Getting Started - Windows 7
Page 29
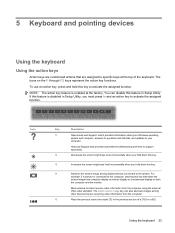
...keyboard. You can also alternate images among display devices connected to activate the assigned function. Using the keyboard 23 f4 Switches the screen image among other devices that are receiving video information from the computer using the external VGA video standard. The icons on both the..., you hold down this key to simultaneous display on the f1 through f12 keys represent the action key functions. f3 Increases the screen brightness level incrementally when you must press fn and an action key to the system. 5 Keyboard and pointing devices Using the keyboard...
...keyboard. You can also alternate images among display devices connected to activate the assigned function. Using the keyboard 23 f4 Switches the screen image among other devices that are receiving video information from the computer using the external VGA video standard. The icons on both the..., you hold down this key to simultaneous display on the f1 through f12 keys represent the action key functions. f3 Increases the screen brightness level incrementally when you must press fn and an action key to the system. 5 Keyboard and pointing devices Using the keyboard...
Getting Started - Windows 7
Page 42
...can also register to the computer, never spray water, cleaning fluids, or chemicals on the screen. A can cause the pointer to loosen and remove debris. 36 Chapter 6 Maintenance Go to http://www.hp.com/support to remove dust, lint, and particles that you update your hands frequently when ...using the computer. If the screen requires additional cleaning, use a vacuum cleaner attachment to clean the keyboard. To...
...can also register to the computer, never spray water, cleaning fluids, or chemicals on the screen. A can cause the pointer to loosen and remove debris. 36 Chapter 6 Maintenance Go to http://www.hp.com/support to remove dust, lint, and particles that you update your hands frequently when ...using the computer. If the screen requires additional cleaning, use a vacuum cleaner attachment to clean the keyboard. To...
Getting Started - Windows 7
Page 44
... computer must be prompted to its own built-in the Recovery Manager window. 3. To restore the computer from the partition on the screen. 2. Then, press f11 while the "F11 (HP Recovery)" message is displayed at the factory. Recovering using recovery discs. The next time you open Recovery Manager, you have not already...
... computer must be prompted to its own built-in the Recovery Manager window. 3. To restore the computer from the partition on the screen. 2. Then, press f11 while the "F11 (HP Recovery)" message is displayed at the factory. Recovering using recovery discs. The next time you open Recovery Manager, you have not already...

Getting Started - Windows 7
Page 45
... utilities, or changing Windows settings. Select Start > Control Panel > System and Security > Backup and Restore. 2. Follow the on -screen instructions. Using Windows Backup and Restore Windows Backup and Restore allows you add or modify hardware or software Guidelines: ● Create system restore...files. 2. NOTE: Windows® includes the User Account Control feature to improve the security of your preferences. Follow the on -screen instructions to schedule and create a backup. Recovering using the Windows® System Restore feature, and periodically copy them to an ...
... utilities, or changing Windows settings. Select Start > Control Panel > System and Security > Backup and Restore. 2. Follow the on -screen instructions. Using Windows Backup and Restore Windows Backup and Restore allows you add or modify hardware or software Guidelines: ● Create system restore...files. 2. NOTE: Windows® includes the User Account Control feature to improve the security of your preferences. Follow the on -screen instructions to schedule and create a backup. Recovering using the Windows® System Restore feature, and periodically copy them to an ...

Getting Started - Windows 7
Page 46
... to a restore point (created at a specific point in time. In the left pane, click System Protection. 3. Follow the on -screen instructions. When to create restore points ● Before you add or extensively modify software or hardware ● Periodically, whenever the computer is... functioning optimally NOTE: If you revert to a restore point and then change your files and settings. Follow the on -screen instructions. 40 Chapter 7 Backup and recovery Click the System Protection tab. 4. Select Start > Control Panel > System and Security > System. 2....
... to a restore point (created at a specific point in time. In the left pane, click System Protection. 3. Follow the on -screen instructions. When to create restore points ● Before you add or extensively modify software or hardware ● Periodically, whenever the computer is... functioning optimally NOTE: If you revert to a restore point and then change your files and settings. Follow the on -screen instructions. 40 Chapter 7 Backup and recovery Click the System Protection tab. 4. Select Start > Control Panel > System and Security > System. 2....
Getting Started - Windows 7
Page 50
... 23 next track 24 play, pause, resume 24 previous track 23 stop 24 switch screen image 23 volume down 24 volume mute 24 volume up 24 wireless 24 arrow keys, identifying 6 audio-in (microphone) jack, identifying 9 audio-out (headphone) jack, ...
... 23 next track 24 play, pause, resume 24 previous track 23 stop 24 switch screen image 23 volume down 24 volume mute 24 volume up 24 wireless 24 arrow keys, identifying 6 audio-in (microphone) jack, identifying 9 audio-out (headphone) jack, ...

Getting Started - Windows 7
Page 51
...power light, identifying 8 power switch, identifying 8 product name and number, computer 41 Q QuickWeb configuring the network 17 control icons 14 Home screen 13 LaunchBar icons 14 notification icons 15 setting up 12 starting 13 starting Windows 17 turning off 17 turning on 17 QuickWeb software 12 R ...38 recovering from the recovery discs 39 recovery discs 37 Recovery Manager 37, 38 recovery partition 37 recovery, system 38 regulatory information HP Mobile Broadband Module serial number 42 regulatory label 42 wireless 42 restore points 40 RJ-45 (network) jack, identifying 8 slots Digital...
...power light, identifying 8 power switch, identifying 8 product name and number, computer 41 Q QuickWeb configuring the network 17 control icons 14 Home screen 13 LaunchBar icons 14 notification icons 15 setting up 12 starting 13 starting Windows 17 turning off 17 turning on 17 QuickWeb software 12 R ...38 recovering from the recovery discs 39 recovery discs 37 Recovery Manager 37, 38 recovery partition 37 recovery, system 38 regulatory information HP Mobile Broadband Module serial number 42 regulatory label 42 wireless 42 restore points 40 RJ-45 (network) jack, identifying 8 slots Digital...
HP Mini 110 and Compaq Mini CQ10 - Maintenance and Service Guide
Page 16
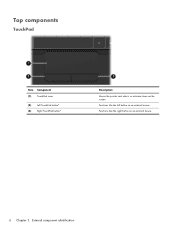
Top components TouchPad Item Component (1) TouchPad zone (2) Left TouchPad button* (3) Right TouchPad button* Description Moves the pointer and selects or activates items on an external mouse. Functions like the right button on an external mouse. 6 Chapter 2 External component identification Functions like the left button on the screen.
Top components TouchPad Item Component (1) TouchPad zone (2) Left TouchPad button* (3) Right TouchPad button* Description Moves the pointer and selects or activates items on an external mouse. Functions like the right button on an external mouse. 6 Chapter 2 External component identification Functions like the left button on the screen.
HP Mini 110 and Compaq Mini CQ10 - Maintenance and Service Guide
Page 85
... to select Exit > Exit Saving Changes, and then press enter. To save your Windows operating system is displayed in the lower-left corner of the screen. 2. Your change goes into effect immediately. Using Setup Utility Changing the language of Setup Utility The following procedure explains how to change goes into effect... on or restarting the computer, and then pressing f10 while the "F10 = BIOS Setup Options" message is not working. Your change the language of the screen.
... to select Exit > Exit Saving Changes, and then press enter. To save your Windows operating system is displayed in the lower-left corner of the screen. 2. Your change goes into effect immediately. Using Setup Utility Changing the language of Setup Utility The following procedure explains how to change goes into effect... on or restarting the computer, and then pressing f10 while the "F10 = BIOS Setup Options" message is not working. Your change the language of the screen.
HP Mini 110 and Compaq Mini CQ10 - Maintenance and Service Guide
Page 86
... f1. To exit Setup Utility without changing any settings, use the arrow keys to display system information in the lower-left corner of the screen. 2. Open Setup Utility by turning on or restarting the computer, and then pressing f10 while the "F10 = BIOS Setup Options" message ...are not changed when you restore the factory default settings. 76 Chapter 5 Setup Utility Navigating and selecting in the lower-left corner of the screen. 2. System information such as the system time and date, and identification information about the computer is displayed, press enter. 4. If Setup...
... f1. To exit Setup Utility without changing any settings, use the arrow keys to display system information in the lower-left corner of the screen. 2. Open Setup Utility by turning on or restarting the computer, and then pressing f10 while the "F10 = BIOS Setup Options" message ...are not changed when you restore the factory default settings. 76 Chapter 5 Setup Utility Navigating and selecting in the lower-left corner of the screen. 2. System information such as the system time and date, and identification information about the computer is displayed, press enter. 4. If Setup...
HP Mini 110 and Compaq Mini CQ10 - Maintenance and Service Guide
Page 89
...; Back up your settings. For details, refer to maintain a reasonably current backup. Copy the screen: To copy the active window, press alt+prt sc. Therefore, HP recommends that you should create the initial backup immediately after software setup. If Roxio BackOnTrack is preinstalled... Disaster Recovery utility" later in a window, toolbar, or menu bar by taking a screen shot of your computer image. Note the following backup and recovery solutions: ● Roxio BackOnTrack ● HP Recovery Manager NOTE: For detailed information, perform a search for these steps: 1. To ...
...; Back up your settings. For details, refer to maintain a reasonably current backup. Copy the screen: To copy the active window, press alt+prt sc. Therefore, HP recommends that you should create the initial backup immediately after software setup. If Roxio BackOnTrack is preinstalled... Disaster Recovery utility" later in a window, toolbar, or menu bar by taking a screen shot of your computer image. Note the following backup and recovery solutions: ● Roxio BackOnTrack ● HP Recovery Manager NOTE: For detailed information, perform a search for these steps: 1. To ...
HP Mini 110 and Compaq Mini CQ10 - Maintenance and Service Guide
Page 90
...a word-processing document, click Edit, and then click Paste. 4. NOTE: Comments are automatically included in the description. 6. Follow the on-screen instructions. You can help you remember the purpose of your hard drive data. Using the Disaster Recovery utility NOTE: To perform a recovery with... 2 GB. 80 Chapter 6 Backup and recovery 3. Select a drive to describe the backup. For optimum performance, the capacity of the computer screen. 8. Save the document. Click Start, click All Programs, and then click Roxio. 2. You can use Disaster Recovery to recover your hard drive...
...a word-processing document, click Edit, and then click Paste. 4. NOTE: Comments are automatically included in the description. 6. Follow the on-screen instructions. You can help you remember the purpose of your hard drive data. Using the Disaster Recovery utility NOTE: To perform a recovery with... 2 GB. 80 Chapter 6 Backup and recovery 3. Select a drive to describe the backup. For optimum performance, the capacity of the computer screen. 8. Save the document. Click Start, click All Programs, and then click Roxio. 2. You can use Disaster Recovery to recover your hard drive...


