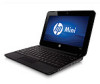
Resolving Start Up and No Boot Problems Checklist
Page 1
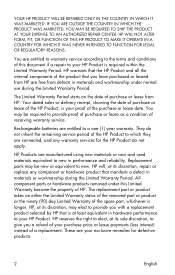
.... Perform a Hard Reset 1. If computer does not start If LEDs do hard reset If memory or hard drive components were replaced, reinstall original components Remove memory modules and replace one-at-a-time If possible, boot to BIOS mode (f10) and run Memory Test and Hard Drive Test If all other ... resolve problems when computer does not startup or boot properly. Connect an external monitor to check display Remove all USB devices and media cards. 2. HP Notebook PCs - Disconnect the AC power adapter, remove the battery, and then press and hold the power button for at the notebook, contact...
.... Perform a Hard Reset 1. If computer does not start If LEDs do hard reset If memory or hard drive components were replaced, reinstall original components Remove memory modules and replace one-at-a-time If possible, boot to BIOS mode (f10) and run Memory Test and Hard Drive Test If all other ... resolve problems when computer does not startup or boot properly. Connect an external monitor to check display Remove all USB devices and media cards. 2. HP Notebook PCs - Disconnect the AC power adapter, remove the battery, and then press and hold the power button for at the notebook, contact...
Limited warranty and technical support - (1 Year)
Page 4
...or lease date. Rechargeable batteries are your proof of the HP Product, is longer. HP warrants that the HP Product and all the internal components of the product that is required within the Limited Warranty Period. HP will, at its sole discretion, to new. The replacement part or product takes...under normal use during the Limited Warranty Period. You are free from HP. Replacement parts may be new or equivalent to give you with a replacement product selected by HP that you have purchased or leased from HP are entitled to warranty service according to the terms and conditions of...
...or lease date. Rechargeable batteries are your proof of the HP Product, is longer. HP warrants that the HP Product and all the internal components of the product that is required within the Limited Warranty Period. HP will, at its sole discretion, to new. The replacement part or product takes...under normal use during the Limited Warranty Period. You are free from HP. Replacement parts may be new or equivalent to give you with a replacement product selected by HP that you have purchased or leased from HP are entitled to warranty service according to the terms and conditions of...
Limited warranty and technical support - (1 Year)
Page 5
...iii) your own installation of enduser replaceable HP or HP approved parts, if available for damage that occurs as a result of HP. or (d) by modification or service by an authorized representative of your product in failure. Your battery is made in the HP Product will vary depending on product ...warranty agreement between you and HP regarding the HP Product you by HP; No change to the conditions of the battery included in connection with the HP Product. To determine whether your purchase or lease of HP-that may have purchased or leased. HP IS NOT RESPONSIBLE FOR DAMAGE...
...iii) your own installation of enduser replaceable HP or HP approved parts, if available for damage that occurs as a result of HP. or (d) by modification or service by an authorized representative of your product in failure. Your battery is made in the HP Product will vary depending on product ...warranty agreement between you and HP regarding the HP Product you by HP; No change to the conditions of the battery included in connection with the HP Product. To determine whether your purchase or lease of HP-that may have purchased or leased. HP IS NOT RESPONSIBLE FOR DAMAGE...

Getting Started - Windows 7
Page 6
Using the TouchPad ...25 Navigating ...25 Selecting ...26 6 Maintenance Inserting or removing the battery ...27 Replacing or upgrading the hard drive 29 Removing the hard drive ...29 Installing a hard drive ...30 Adding or replacing memory modules 31 Updating programs and drivers ...36 Routine care ...36 Cleaning the display ...36 Cleaning the TouchPad and keyboard...
Using the TouchPad ...25 Navigating ...25 Selecting ...26 6 Maintenance Inserting or removing the battery ...27 Replacing or upgrading the hard drive 29 Removing the hard drive ...29 Installing a hard drive ...30 Adding or replacing memory modules 31 Updating programs and drivers ...36 Routine care ...36 Cleaning the display ...36 Cleaning the TouchPad and keyboard...
Getting Started - Windows 7
Page 35
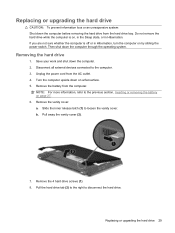
..., or in Hibernation, turn the computer on by sliding the power switch. Pull away the vanity cover (2). 7. Remove the battery from the AC outlet. 4. b. Replacing or upgrading the hard drive 29 Turn the computer upside down the computer before removing the hard drive from the hard drive bay.... Removing the hard drive 1. Remove the vanity cover: a. Replacing or upgrading the hard drive CAUTION: To prevent information loss or an unresponsive system: Shut down on a flat surface. 5. NOTE: For more ...
..., or in Hibernation, turn the computer on by sliding the power switch. Pull away the vanity cover (2). 7. Remove the battery from the AC outlet. 4. b. Replacing or upgrading the hard drive 29 Turn the computer upside down the computer before removing the hard drive from the hard drive bay.... Removing the hard drive 1. Remove the vanity cover: a. Replacing or upgrading the hard drive CAUTION: To prevent information loss or an unresponsive system: Shut down on a flat surface. 5. NOTE: For more ...
Getting Started - Windows 7
Page 36
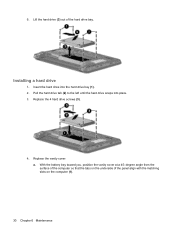
Replace the 4 hard drive screws (3). 4. Installing a hard drive 1. Replace the vanity cover: a. Insert the hard drive into place. 3. With the battery bay toward you, position the vanity cover at a 45-degree angle from the surface of the computer so that the tabs on the underside of the hard drive bay. Lift the hard drive (3) out of the panel align with the matching slots on the computer (1). 30 Chapter 6 Maintenance 9. Pull the hard drive tab (2) to the left until the hard drive snaps into the hard drive bay (1). 2.
Replace the 4 hard drive screws (3). 4. Installing a hard drive 1. Replace the vanity cover: a. Insert the hard drive into place. 3. With the battery bay toward you, position the vanity cover at a 45-degree angle from the surface of the computer so that the tabs on the underside of the hard drive bay. Lift the hard drive (3) out of the panel align with the matching slots on the computer (1). 30 Chapter 6 Maintenance 9. Pull the hard drive tab (2) to the left until the hard drive snaps into the hard drive bay (1). 2.
Getting Started - Windows 7
Page 37
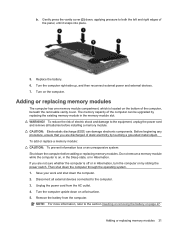
... sure whether the computer is off or in the memory module slot. Turn the computer upside down on the computer. Replace the battery. 6. Disconnect all batteries before adding or replacing memory modules. Remove the battery from the AC outlet. 4. b. Save your work and shut down the computer through the operating system. 1. The memory capacity of...
... sure whether the computer is off or in the memory module slot. Turn the computer upside down on the computer. Replace the battery. 6. Disconnect all batteries before adding or replacing memory modules. Remove the battery from the AC outlet. 4. b. Save your work and shut down the computer through the operating system. 1. The memory capacity of...

Getting Started - Windows 7
Page 40
Tighten the 2 memory bracket screws (2). 13. Replace the vanity cover: a. 11. Replace the memory bracket (1). 12. With the battery bay toward you, position the vanity cover at a 45-degree angle from the surface of the computer so that the tabs on the underside of the panel align with the matching slots on the computer (1). 34 Chapter 6 Maintenance
Tighten the 2 memory bracket screws (2). 13. Replace the vanity cover: a. 11. Replace the memory bracket (1). 12. With the battery bay toward you, position the vanity cover at a 45-degree angle from the surface of the computer so that the tabs on the underside of the panel align with the matching slots on the computer (1). 34 Chapter 6 Maintenance
Getting Started - Windows 7
Page 41
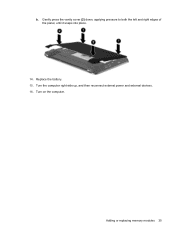
Replace the battery. 15. Turn on the computer. Gently press the vanity cover (2) down, applying pressure to both the left and right edges of the panel, until it snaps into place. 14. Adding or replacing memory modules 35 b. Turn the computer right-side up, and then reconnect external power and external devices. 16.
Replace the battery. 15. Turn on the computer. Gently press the vanity cover (2) down, applying pressure to both the left and right edges of the panel, until it snaps into place. 14. Adding or replacing memory modules 35 b. Turn the computer right-side up, and then reconnect external power and external devices. 16.
Getting Started - Windows 7
Page 48
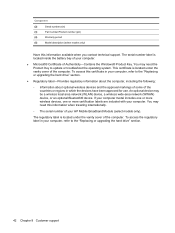
... of the computer. An optional device may need the Product Key to the "Replacing or upgrading the hard drive" section. 42 Chapter 8 Customer support If your computer... model includes one or more wireless devices, one or more certification labels are included with your HP Mobile Broadband Module (select models only). Component (2) Serial number (s/n) (3) Part number/Product number (p/n)...◦ The serial number of your computer. The regulatory label is located inside the battery bay of your computer. ● Microsoft® Certificate of the computer. The serial ...
... of the computer. An optional device may need the Product Key to the "Replacing or upgrading the hard drive" section. 42 Chapter 8 Customer support If your computer... model includes one or more wireless devices, one or more certification labels are included with your HP Mobile Broadband Module (select models only). Component (2) Serial number (s/n) (3) Part number/Product number (p/n)...◦ The serial number of your computer. The regulatory label is located inside the battery bay of your computer. ● Microsoft® Certificate of the computer. The serial ...
Getting Started - Windows 7
Page 50
...-out (headphone) jack, identifying 9 B backing up customized window, toolbar, and menu bar settings 39 personal files 39 battery bay 11 battery release latches 11 battery, replacing 27 buttons left TouchPad 4 right TouchPad 4 C caps lock light, identifying 5 components bottom 11 display 10 front 7 left... Microsoft Certificate of Authenticity 42 regulatory 42 serial number 41 latches, battery release 11 lights AC adapter 9 caps lock 5 drive 9 mute 5 power 8 webcam 10 wireless 5 M memory module inserting 33 removing 32 replacing 31 microphone (audio-in) jack, identifying 9 mouse, external setting...
...-out (headphone) jack, identifying 9 B backing up customized window, toolbar, and menu bar settings 39 personal files 39 battery bay 11 battery release latches 11 battery, replacing 27 buttons left TouchPad 4 right TouchPad 4 C caps lock light, identifying 5 components bottom 11 display 10 front 7 left... Microsoft Certificate of Authenticity 42 regulatory 42 serial number 41 latches, battery release 11 lights AC adapter 9 caps lock 5 drive 9 mute 5 power 8 webcam 10 wireless 5 M memory module inserting 33 removing 32 replacing 31 microphone (audio-in) jack, identifying 9 mouse, external setting...
HP Mini 110 and Compaq Mini CQ10 - Maintenance and Service Guide
Page 8
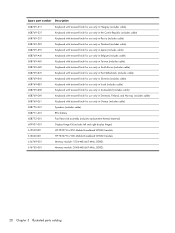
Equipment guidelines 35 Component replacement procedures 36 Service tag ...36 Computer feet ...37 Battery ...38 SIM ...39 Service cover ...40 Hard drive ...41 WWAN module ...43 WLAN module ...46 Memory module ...51 RTC battery ...53 Keyboard ...54 Top cover ...57 Speakers ...60 TouchPad ...62 Display assembly ...64 System board ...68 Fan/heat sink assembly...
Equipment guidelines 35 Component replacement procedures 36 Service tag ...36 Computer feet ...37 Battery ...38 SIM ...39 Service cover ...40 Hard drive ...41 WWAN module ...43 WLAN module ...46 Memory module ...51 RTC battery ...53 Keyboard ...54 Top cover ...57 Speakers ...60 TouchPad ...62 Display assembly ...64 System board ...68 Fan/heat sink assembly...
HP Mini 110 and Compaq Mini CQ10 - Maintenance and Service Guide
Page 27
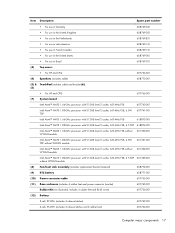
...B31 608769-161 608769-121 608769-001 608769-201 (3) Top cover: ● For HP and CPQ 607766-001 (4) Speakers (includes cable) 608770-001 (5) & TouchPad (includes cable and bracket (6)): (6) ● For HP and CPQ 607766-001 (7) System board : Intel Atom™ N450 1.66-GHz ...with 512-KB level 2 cache, 667-MHz FSB, 6.5 TDP 621303-001 without WWAN module (8) Fan/heat sink assembly (includes replacement thermal material) 608772-001 (9) RTC battery 608771-001 (10) Power connector cable 607755-001 (11) Base enclosure (includes 4 rubber feet and power connector bracket) 607765...
...B31 608769-161 608769-121 608769-001 608769-201 (3) Top cover: ● For HP and CPQ 607766-001 (4) Speakers (includes cable) 608770-001 (5) & TouchPad (includes cable and bracket (6)): (6) ● For HP and CPQ 607766-001 (7) System board : Intel Atom™ N450 1.66-GHz ...with 512-KB level 2 cache, 667-MHz FSB, 6.5 TDP 621303-001 without WWAN module (8) Fan/heat sink assembly (includes replacement thermal material) 608772-001 (9) RTC battery 608771-001 (10) Power connector cable 607755-001 (11) Base enclosure (includes 4 rubber feet and power connector bracket) 607765...
HP Mini 110 and Compaq Mini CQ10 - Maintenance and Service Guide
Page 38
... textured finish for use only in Greece (includes cable) Speakers (includes cable) RTC battery Fan/heat sink assembly (includes replacement thermal material) Display Hinge Kit (includes left and right display hinges) HP F3307 Pris 850 Mobile Broadband WWAN module HP F3307 Pris 900 Mobile Broadband WWAN module Memory module: 1024-MB (667-MHz, DDR2...
... textured finish for use only in Greece (includes cable) Speakers (includes cable) RTC battery Fan/heat sink assembly (includes replacement thermal material) Display Hinge Kit (includes left and right display hinges) HP F3307 Pris 850 Mobile Broadband WWAN module HP F3307 Pris 900 Mobile Broadband WWAN module Memory module: 1024-MB (667-MHz, DDR2...
HP Mini 110 and Compaq Mini CQ10 - Maintenance and Service Guide
Page 46
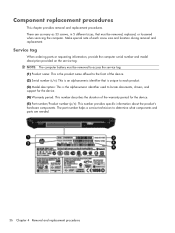
... tag When ordering parts or requesting information, provide the computer serial number and model description provided on the service tag: NOTE: The computer battery must be removed to access the service tag. (1) Product name: This is the product name affixed to the front of the device. ...(2) Serial number (s/n): This is an alphanumeric identifier that must be removed, replaced, or loosened when servicing the computer. Make special note of the warranty period for the device. (4) Warranty period: This number describes the ...
... tag When ordering parts or requesting information, provide the computer serial number and model description provided on the service tag: NOTE: The computer battery must be removed to access the service tag. (1) Product name: This is the product name affixed to the front of the device. ...(2) Serial number (s/n): This is an alphanumeric identifier that must be removed, replaced, or loosened when servicing the computer. Make special note of the warranty period for the device. (4) Warranty period: This number describes the ...
HP Mini 110 and Compaq Mini CQ10 - Maintenance and Service Guide
Page 48
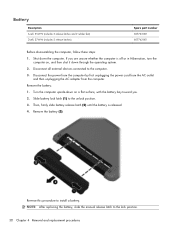
... Disconnect the power from the computer by first unplugging the power cord from the AC outlet and then unplugging the AC adapter from the computer. Battery Description 6-cell, 55-WHr (includes 2 release latches and 2 rubber feet) 3-cell, 27-WHr (includes 2 release latches) Spare part number... Hibernation, turn the computer on, and then shut it down the computer. Reverse this procedure to the unlock position. 3. NOTE: After replacing the battery, slide the manual release latch to the computer. 3. Shut down through the operating system. 2. Disconnect all external devices connected to the ...
... Disconnect the power from the computer by first unplugging the power cord from the AC outlet and then unplugging the AC adapter from the computer. Battery Description 6-cell, 55-WHr (includes 2 release latches and 2 rubber feet) 3-cell, 27-WHr (includes 2 release latches) Spare part number... Hibernation, turn the computer on, and then shut it down the computer. Reverse this procedure to the unlock position. 3. NOTE: After replacing the battery, slide the manual release latch to the computer. 3. Shut down through the operating system. 2. Disconnect all external devices connected to the ...
HP Mini 110 and Compaq Mini CQ10 - Maintenance and Service Guide
Page 49
Shut down through the operating system. 2. Remove the SIM: 1. If you hear a click. Remove the battery (see Battery on , and then shut it into the SIM slot until you are unsure whether the computer is off or in on the SIM (1) to the ..., turn the computer on page 38). Disconnect all external devices connected to release it from the SIM slot. 2. Remove the SIM (2) from the computer. 4. Component replacement procedures 39 SIM Before removing the SIM, follow these steps: 1. Disconnect the power from the computer by inserting it down the computer.
Shut down through the operating system. 2. Remove the SIM: 1. If you hear a click. Remove the battery (see Battery on , and then shut it into the SIM slot until you are unsure whether the computer is off or in on the SIM (1) to the ..., turn the computer on page 38). Disconnect all external devices connected to release it from the SIM slot. 2. Remove the SIM (2) from the computer. 4. Component replacement procedures 39 SIM Before removing the SIM, follow these steps: 1. Disconnect the power from the computer by inserting it down the computer.
HP Mini 110 and Compaq Mini CQ10 - Maintenance and Service Guide
Page 50
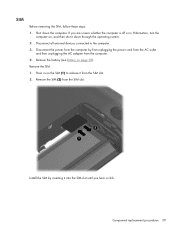
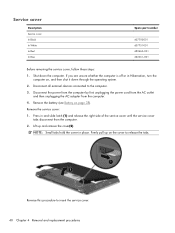
..., turn the computer on, and then shut it down the computer. NOTE: Small tabs hold the cover in place. Remove the battery (see Battery on the cover to the computer. 3. Firmly pull up and remove the cover(2). Disconnect the power from the computer by first unplugging... the power cord from the AC outlet and then unplugging the AC adapter from the computer. 2. Reverse this procedure to insert the service cover. 40 Chapter 4 Removal and replacement...
..., turn the computer on, and then shut it down the computer. NOTE: Small tabs hold the cover in place. Remove the battery (see Battery on the cover to the computer. 3. Firmly pull up and remove the cover(2). Disconnect the power from the computer by first unplugging... the power cord from the AC outlet and then unplugging the AC adapter from the computer. 2. Reverse this procedure to insert the service cover. 40 Chapter 4 Removal and replacement...

HP Mini 110 and Compaq Mini CQ10 - Maintenance and Service Guide
Page 51
... first unplugging the power cord from the AC outlet and then unplugging the AC adapter from the computer. 4. Remove the service cover (see Battery on page 38). 5. Component replacement procedures 41 Hard drive NOTE: Each hard drive spare part kit includes a cable adapter, bracket, and four rubber isolators. Description Hard drive: 250...
... first unplugging the power cord from the AC outlet and then unplugging the AC adapter from the computer. 4. Remove the service cover (see Battery on page 38). 5. Component replacement procedures 41 Hard drive NOTE: Each hard drive spare part kit includes a cable adapter, bracket, and four rubber isolators. Description Hard drive: 250...

HP Mini 110 and Compaq Mini CQ10 - Maintenance and Service Guide
Page 53
... device functionality, and then contact technical support. Remove the service cover (see Battery on , and then shut it down the computer. Shut down through the operating system. 2. If you replace the module and then receive a warning message, remove the module to the computer... 1. Component replacement procedures 43 If you are not interchangeable. WWAN module Description HP un2400 Mobile Broadband WWAN module HP F3607 SDG 850 Mobile Broadband WWAN module HP Mobile Broadband WWAN module HP Mobile Broadband WWAN module HP F3307 Pris 850 Mobile Broadband WWAN module HP F3307 Pris ...
... device functionality, and then contact technical support. Remove the service cover (see Battery on , and then shut it down the computer. Shut down through the operating system. 2. If you replace the module and then receive a warning message, remove the module to the computer... 1. Component replacement procedures 43 If you are not interchangeable. WWAN module Description HP un2400 Mobile Broadband WWAN module HP F3607 SDG 850 Mobile Broadband WWAN module HP Mobile Broadband WWAN module HP Mobile Broadband WWAN module HP F3307 Pris 850 Mobile Broadband WWAN module HP F3307 Pris ...


