
User Guide
Page 5
... the serial number and product number ...5 Setting up the monitor ...6 Attaching the monitor stand ...6 Routing the cables ...7 Connecting the cables...7 Adjusting the monitor...9 Installing a security cable ...10 Turning on the monitor...10 HP watermark and image retention policy...11 2 Using the monitor ...12 Downloading software and utilities ...12 The Information file ...12 The Image Color Matching file ...12 Using the OSD menu ...12 Using the OSD function buttons ...13 Reassigning the function buttons ...14 Changing the Power Mode setting (select products only 14 Using Auto-Sleep Mode...
... the serial number and product number ...5 Setting up the monitor ...6 Attaching the monitor stand ...6 Routing the cables ...7 Connecting the cables...7 Adjusting the monitor...9 Installing a security cable ...10 Turning on the monitor...10 HP watermark and image retention policy...11 2 Using the monitor ...12 Downloading software and utilities ...12 The Information file ...12 The Image Color Matching file ...12 Using the OSD menu ...12 Using the OSD function buttons ...13 Reassigning the function buttons ...14 Changing the Power Mode setting (select products only 14 Using Auto-Sleep Mode...
User Guide
Page 7
... such as having this chapter to learn about the correct power cord set to properly support your user guides. Not all power cords for this monitor. When unplugging the power cord from the AC outlet, grasp the cord by unplugging the power cord from the screen. Use the appropriate and correctly sized furniture designed to use only a power source and connection appropriate for the computer and its peripheral devices (such as...
... such as having this chapter to learn about the correct power cord set to properly support your user guides. Not all power cords for this monitor. When unplugging the power cord from the AC outlet, grasp the cord by unplugging the power cord from the screen. Use the appropriate and correctly sized furniture designed to use only a power source and connection appropriate for the computer and its peripheral devices (such as...
User Guide
Page 8
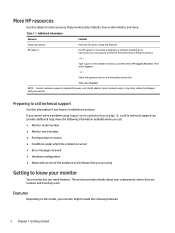
... they are using Support and troubleshooting on page 16, a call . ● Monitor model number ● Monitor serial number ● Purchase date on the model, your monitor might include the following information available when you are located, and how they work. More HP resources Use this information if you cannot solve a problem using Getting to know your monitor Your monitor has top-rated features. Table 1-1 Additional information Resource Contents Setup Instructions HP support Overview...
... they are using Support and troubleshooting on page 16, a call . ● Monitor model number ● Monitor serial number ● Purchase date on the model, your monitor might include the following information available when you are located, and how they work. More HP resources Use this information if you cannot solve a problem using Getting to know your monitor Your monitor has top-rated features. Table 1-1 Additional information Resource Contents Setup Instructions HP support Overview...
User Guide
Page 9
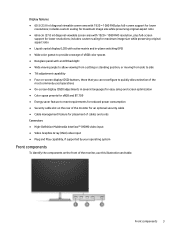
... switching (IPS) ● Wide color gamut to provide coverage of sRGB color spaces ● Nonglare panel with an LED backlight ● Wide viewing angle to allow viewing from a sitting or standing position, or moving from side to side ● Tilt adjustment capability ● Four on-screen display (OSD) buttons, three that you can reconfigure to quickly allow selection of the most commonly used operations ● On-screen display (OSD) adjustments in several languages for easy setup...
... switching (IPS) ● Wide color gamut to provide coverage of sRGB color spaces ● Nonglare panel with an LED backlight ● Wide viewing angle to allow viewing from a sitting or standing position, or moving from side to side ● Tilt adjustment capability ● Four on-screen display (OSD) buttons, three that you can reconfigure to quickly allow selection of the most commonly used operations ● On-screen display (OSD) adjustments in several languages for easy setup...
User Guide
Page 10
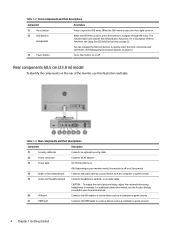
... monitor, use this illustration and table. The function light icons indicate the default button functions. For a description of personal injury, adjust the volume before using headphones or earbuds. You can reassign the function buttons to a source device such as a computer or game console. (7) HDMI port Connects the HDMI cable to quickly select the most commonly used operations. When the OSD menu is open, the Menu light turns on. (2) OSD buttons (assignable) When the OSD menu is open the OSD menu...
... monitor, use this illustration and table. The function light icons indicate the default button functions. For a description of personal injury, adjust the volume before using headphones or earbuds. You can reassign the function buttons to a source device such as a computer or game console. (7) HDMI port Connects the HDMI cable to quickly select the most commonly used operations. When the OSD menu is open, the Menu light turns on. (2) OSD buttons (assignable) When the OSD menu is open the OSD menu...
User Guide
Page 11
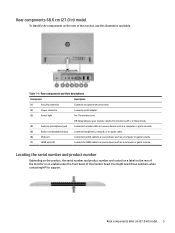
... (1) Security cable slot Connects an optional security cable. (2) Power connector Connects an AC adapter. (3) Power light On: The monitor is off or in Sleep mode. (4) Audio-in ) model 5 Rear components 68.6 cm (27.0 in (microphone) jack Connects the audio cable to a source device such as a computer or game console. (5) Audio-out (headphone) jack Connects headphones, earbuds, or an audio cable. (6) VGA port Connects the VGA cable to a source device such as a computer or game console. (7) HDMI ports (2) Connect the HDMI cable to a source device...
... (1) Security cable slot Connects an optional security cable. (2) Power connector Connects an AC adapter. (3) Power light On: The monitor is off or in Sleep mode. (4) Audio-in ) model 5 Rear components 68.6 cm (27.0 in (microphone) jack Connects the audio cable to a source device such as a computer or game console. (5) Audio-out (headphone) jack Connects headphones, earbuds, or an audio cable. (6) VGA port Connects the VGA cable to a source device such as a computer or game console. (7) HDMI ports (2) Connect the HDMI cable to a source device...
User Guide
Page 12
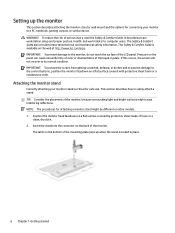
... & Comfort Guide. Position the monitor head facedown on a flat surface covered by protective sheet made of the monitor, because surrounding light and bright surfaces might be different on the bottom of the mounting plate pops up the monitor This section describes attaching the monitor stand or wall mount and the options for connecting your monitor stand is critical for computer users. WARNING! Setting up when the stand is locked in place...
... & Comfort Guide. Position the monitor head facedown on a flat surface covered by protective sheet made of the monitor, because surrounding light and bright surfaces might be different on the bottom of the mounting plate pops up the monitor This section describes attaching the monitor stand or wall mount and the options for connecting your monitor stand is critical for computer users. WARNING! Setting up when the stand is locked in place...

User Guide
Page 13
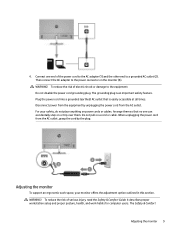
... cables. Replace the cover on the model, the monitor might be capable of the monitor (2). 3. Not all cables shown in a convenient, well-ventilated location near the computer. 2. Connect a video cable. Connecting the cables In addition to details about how to connect a cable, this section are included with select cables. You can use to organize through the OSD menu. Attach the base to the appropriate connectors on the rear of supporting VGA or HDMI inputs...
... cables. Replace the cover on the model, the monitor might be capable of the monitor (2). 3. Not all cables shown in a convenient, well-ventilated location near the computer. 2. Connect a video cable. Connecting the cables In addition to details about how to connect a cable, this section are included with select cables. You can use to organize through the OSD menu. Attach the base to the appropriate connectors on the rear of supporting VGA or HDMI inputs...
User Guide
Page 15
... Adjusting the monitor 9 4. Connect one can accidentally step on power cords or cables. Adjusting the monitor To support an ergonomic work habits for computer users. Do not pull on the monitor (3). WARNING! For your monitor offers the adjustment option outlined in this section. When unplugging the power cord from the AC outlet, grasp the cord by unplugging the power cord from the equipment by the plug. It describes proper workstation setup...
... Adjusting the monitor 9 4. Connect one can accidentally step on power cords or cables. Adjusting the monitor To support an ergonomic work habits for computer users. Do not pull on the monitor (3). WARNING! For your monitor offers the adjustment option outlined in this section. When unplugging the power cord from the AC outlet, grasp the cord by unplugging the power cord from the equipment by the plug. It describes proper workstation setup...
User Guide
Page 16
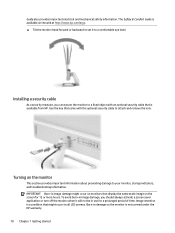
... period of time. Installing a security cable As a security measure, you should always activate a screen saver application or turn off the monitor when it to set it will not be in damage on monitors that came with an optional security cable that is not covered under the HP warranty. 10 Chapter 1 Getting started Use the key that display the same static image on the web...
... period of time. Installing a security cable As a security measure, you should always activate a screen saver application or turn off the monitor when it to set it will not be in damage on monitors that came with an optional security cable that is not covered under the HP warranty. 10 Chapter 1 Getting started Use the key that display the same static image on the web...
User Guide
Page 17
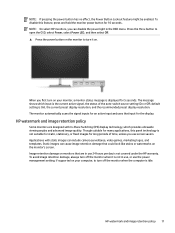
... preset display resolution. HP watermark and image retention policy 11 To disable this panel technology is not suitable for static, stationary, or fixed images for long periods of the auto-switch source setting (On or Off; Press the Menu button to open the OSD, select Power, select Power LED, and then select Off. ▲ Press the power button on the monitor to turn off the monitor when the computer is not in the OSD menu. Image retention...
... preset display resolution. HP watermark and image retention policy 11 To disable this panel technology is not suitable for static, stationary, or fixed images for long periods of the auto-switch source setting (On or Off; Press the Menu button to open the OSD, select Power, select Power LED, and then select Off. ▲ Press the power button on the monitor to turn off the monitor when the computer is not in the OSD menu. Image retention...
User Guide
Page 18
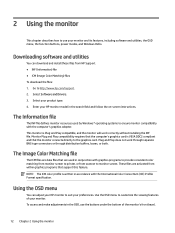
... color profile is Plug and Play compatible, and the monitor will work through separate BNC-type connectors or through distribution buffers, boxes, or both. Select Software and Drivers. 3. The Image Color Matching file The ICM files are data files that are activated from HP Support. ● INF (Information) file ● ICM (Image Color Matching) files To download the files: 1. To access and make adjustments in the OSD, use your HP monitor model...
... color profile is Plug and Play compatible, and the monitor will work through separate BNC-type connectors or through distribution buffers, boxes, or both. Select Software and Drivers. 3. The Image Color Matching file The ICM files are data files that are activated from HP Support. ● INF (Information) file ● ICM (Image Color Matching) files To download the files: 1. To access and make adjustments in the OSD, use your HP monitor model...
User Guide
Page 19
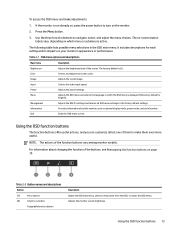
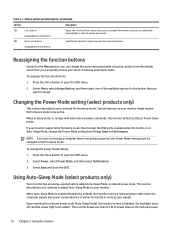
... changing the function of the screen. NOTE: The actions of them even more useful. For information about the monitor, such as optimal display mode, power mode, and serial number. Use the three function buttons to the factory default settings. Adjusts the DDC/CI settings and returns all but one of the function buttons vary among monitor models. To access the OSD menu and make them to turn on page 14. If the monitor is English). The on-screen button...
... changing the function of the screen. NOTE: The actions of them even more useful. For information about the monitor, such as optimal display mode, power mode, and serial number. Use the three function buttons to the factory default settings. Adjusts the DDC/CI settings and returns all but one of the function buttons vary among monitor models. To access the OSD menu and make them to turn on page 14. If the monitor is English). The on-screen button...
User Guide
Page 20
... your monitor supports Performance mode, then to keep the USB ports enabled when the monitor is Power Saver mode. Using Auto-Sleep Mode (select products only) Your monitor has an energy-saving feature called Auto-Sleep Mode, a reduced power state. Certain features on your monitor might require Performance mode to Performance. The monitor draws less than 0.5 W of power when in Sleep state, to open the OSD menu. 2. Select Menu, select Assign Buttons, and then select one of either horizontal or vertical sync signal...
... your monitor supports Performance mode, then to keep the USB ports enabled when the monitor is Power Saver mode. Using Auto-Sleep Mode (select products only) Your monitor has an energy-saving feature called Auto-Sleep Mode, a reduced power state. Certain features on your monitor might require Performance mode to Performance. The monitor draws less than 0.5 W of power when in Sleep state, to open the OSD menu. 2. Select Menu, select Assign Buttons, and then select one of either horizontal or vertical sync signal...
User Guide
Page 22
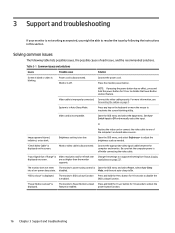
... 23). The monitor's OSD Lockout function is improperly connected. "Power Button Lockout" is disconnected. Connect the power cord. Power cord is displayed. Change the settings to one of each issue, and the recommended solutions. Set Auto Switch Input to disable the OSD Lockout function. Press and hold the power button for 10 seconds to On. 3 Support and troubleshooting If your monitor is not working as needed. Solving common issues The following the instructions in Auto-Sleep Mode. "Check Video Cable" is displayed on -board video sources.
... 23). The monitor's OSD Lockout function is improperly connected. "Power Button Lockout" is disconnected. Connect the power cord. Power cord is displayed. Change the settings to one of each issue, and the recommended solutions. Set Auto Switch Input to disable the OSD Lockout function. Press and hold the power button for 10 seconds to On. 3 Support and troubleshooting If your monitor is not working as needed. Solving common issues The following the instructions in Auto-Sleep Mode. "Check Video Cable" is displayed on -board video sources.

User Guide
Page 23
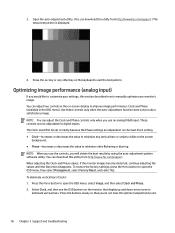
...; Monitor setup ● Factory reset of the computer ● Changing monitor resolution You can re-enable the button by holding it down the power button or Menu button for 10 seconds. Button lockouts The button lockout function is available only when the monitor is on , and then wait for the VGA (analog) input at any time from http://www.hp.com/support. Do not use the auto-adjustment feature: 1. Turn the monitor on , an active signal...
...; Monitor setup ● Factory reset of the computer ● Changing monitor resolution You can re-enable the button by holding it down the power button or Menu button for 10 seconds. Button lockouts The button lockout function is available only when the monitor is on , and then wait for the VGA (analog) input at any time from http://www.hp.com/support. Do not use the auto-adjustment feature: 1. Turn the monitor on , an active signal...
User Guide
Page 24
...://www.hp.com/support.) The setup test pattern is displayed. 4. Use these controls only when the auto-adjustment function does not provide a satisfactory image. To restore the factory settings, press the Menu button to open the OSD menu, then select Management, select Factory Reset, and select Yes. Press the esc key or any vertical bars or stripes visible on the monitor that you will obtain the best results by using the auto-adjustment pattern software...
...://www.hp.com/support.) The setup test pattern is displayed. 4. Use these controls only when the auto-adjustment function does not provide a satisfactory image. To restore the factory settings, press the Menu button to open the OSD menu, then select Management, select Factory Reset, and select Yes. Press the esc key or any vertical bars or stripes visible on the monitor that you will obtain the best results by using the auto-adjustment pattern software...
User Guide
Page 26
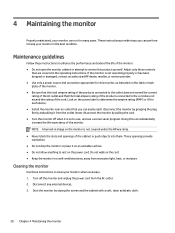
... instructions to determine the ampere rating (AMPS or A) for each device. ● Install the monitor near an outlet that are covered in image on the monitor is not operating properly or has been dropped or damaged, contact an authorized HP dealer, reseller, or service provider. ● Use only a power source and connection appropriate for many years. Never disconnect the monitor by pulling the cord. ● Turn...
... instructions to determine the ampere rating (AMPS or A) for each device. ● Install the monitor near an outlet that are covered in image on the monitor is not operating properly or has been dropped or damaged, contact an authorized HP dealer, reseller, or service provider. ● Use only a power source and connection appropriate for many years. Never disconnect the monitor by pulling the cord. ● Turn...
User Guide
Page 29
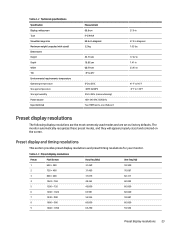
... × 900 60.000 60.000 9 1680 × 1050 65.290 59.954 Preset display resolutions 23 Table A-2 Technical specifications Specification Display, widescreen Type Viewable image size Maximum weight (unpacked with stand) Dimensions Height Depth Width Tilt Environmental requirements temperature Operating temperature Storage temperature Storage humidity Power source Input terminal Measurement 68.6 cm IPS/AHVA 68.6 cm diagonal 3.2 kg 43.73 cm 18...
... × 900 60.000 60.000 9 1680 × 1050 65.290 59.954 Preset display resolutions 23 Table A-2 Technical specifications Specification Display, widescreen Type Viewable image size Maximum weight (unpacked with stand) Dimensions Height Depth Width Tilt Environmental requirements temperature Operating temperature Storage temperature Storage humidity Power source Input terminal Measurement 68.6 cm IPS/AHVA 68.6 cm diagonal 3.2 kg 43.73 cm 18...
User Guide
Page 30
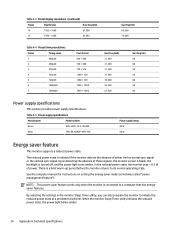
...-3 19540E Delta TPN-DA16/ADP-45FE FBC Power supply rating 40 W 45 W Energy saver feature This monitor supports a reduced power state. The reduced power state is connected to initiate the reduced power state at a predetermined time. When the monitor Sleep Timer utility initiates the reduced power state, the power light blinks amber. 24 Appendix A Technical specifications In the reduced power state, the monitor uses < 0.5 W of either the horizontal sync signal or the vertical sync signal.
...-3 19540E Delta TPN-DA16/ADP-45FE FBC Power supply rating 40 W 45 W Energy saver feature This monitor supports a reduced power state. The reduced power state is connected to initiate the reduced power state at a predetermined time. When the monitor Sleep Timer utility initiates the reduced power state, the power light blinks amber. 24 Appendix A Technical specifications In the reduced power state, the monitor uses < 0.5 W of either the horizontal sync signal or the vertical sync signal.


