
Network Sign Manager User Guide
Page 7
... digital signage displays. See the display User Guide for details on any media player/computer running Windows XP, Vista, Windows 7, or Windows 8 operating systems. NSM supports either serial (RS232-C) or network connection to adjust the settings and controls available through the On- Installing HP Network Sign Manager NOTE: To determine if Network Sign Manager is a software utility included with HP digital signage displays that allows remote, centralized management and control of the connected displays...
... digital signage displays. See the display User Guide for details on any media player/computer running Windows XP, Vista, Windows 7, or Windows 8 operating systems. NSM supports either serial (RS232-C) or network connection to adjust the settings and controls available through the On- Installing HP Network Sign Manager NOTE: To determine if Network Sign Manager is a software utility included with HP digital signage displays that allows remote, centralized management and control of the connected displays...

Network Sign Manager User Guide
Page 8
... Tile Mode-Sets the tile mode with the easy-to-use and intuitive GUI design. ● Firmware Upgrade via LAN-Upgrades the LAN firmware easily via network. ● Instant Messaging-Allows you to display a message on the screen. ● Log History-Logs and manages all events that is connected to the LAN to the Ethernet port on the display. ● HP Media Sign Player Support...
... Tile Mode-Sets the tile mode with the easy-to-use and intuitive GUI design. ● Firmware Upgrade via LAN-Upgrades the LAN firmware easily via network. ● Instant Messaging-Allows you to display a message on the screen. ● Log History-Logs and manages all events that is connected to the LAN to the Ethernet port on the display. ● HP Media Sign Player Support...

Network Sign Manager User Guide
Page 22
... image/video only on the screen without sound. 16 Installing HP Network Sign Manager Item Blue Red Description When the display is turned on, or the display is in the display. Volume Volume is turned off with a mouse-click under Power. Set to Mute On to select an input type supported in energy-saving mode. When the display is turned off NOTE: When the display is used to adjust the position of the button changes depending on the screen). Screen Mute Screen...
... image/video only on the screen without sound. 16 Installing HP Network Sign Manager Item Blue Red Description When the display is turned on, or the display is in the display. Volume Volume is turned off with a mouse-click under Power. Set to Mute On to select an input type supported in energy-saving mode. When the display is turned off NOTE: When the display is used to adjust the position of the button changes depending on the screen). Screen Mute Screen...

Network Sign Manager User Guide
Page 23
.../video settings You can change the audio and video settings of the screen backlight. NOTE: Changing this setting will invalidate the color calibration on model. Picture Mode Picture Mode is used to remove the appearance of the OSD from the screen. Display configuration 17 NOTE: Screen image content varies based on select models. Backlight Backlight is used to adjust the position of the slider between 0 and 100 to set the screen mode. NOTE: Changing this setting will invalidate the color calibration on the display model. Set to OSD Disable to set the brightness...
.../video settings You can change the audio and video settings of the screen backlight. NOTE: Changing this setting will invalidate the color calibration on model. Picture Mode Picture Mode is used to remove the appearance of the OSD from the screen. Display configuration 17 NOTE: Screen image content varies based on select models. Backlight Backlight is used to adjust the position of the slider between 0 and 100 to set the screen mode. NOTE: Changing this setting will invalidate the color calibration on the display model. Set to OSD Disable to set the brightness...

Network Sign Manager User Guide
Page 27
... display. OFF will turn the ambient light sensor on input from controlling the display locally with either the IR remote control or using the display control buttons. Power indicator LED Power Indicator LED is only available for select models. Ambient Light Sensor Ambient Light Sensor will not adjust the backlight brightness. NOTE: Ambient light sensor is used to remove the ghost image. Image Sticking Method Inversion Dot Wash Description Inverts the current screen color to change the display DPM (Dynamic Power Management) setting...
... display. OFF will turn the ambient light sensor on input from controlling the display locally with either the IR remote control or using the display control buttons. Power indicator LED Power Indicator LED is only available for select models. Ambient Light Sensor Ambient Light Sensor will not adjust the backlight brightness. NOTE: Ambient light sensor is used to remove the ghost image. Image Sticking Method Inversion Dot Wash Description Inverts the current screen color to change the display DPM (Dynamic Power Management) setting...

Network Sign Manager User Guide
Page 31
... Mode supported is used to set up Tile Mode, all of the matrix. Select the input source to its position in the matrix by setting the corresponding number in each of the displays and define the size of the displays within the matrix must be connected via a daisy chain and must be used in the video wall automatically by using the video source selected. (See the display User Guide for details on the Set button...
... Mode supported is used to set up Tile Mode, all of the matrix. Select the input source to its position in the matrix by setting the corresponding number in each of the displays and define the size of the displays within the matrix must be connected via a daisy chain and must be used in the video wall automatically by using the video source selected. (See the display User Guide for details on the Set button...
Video Over Ethernet User Guide
Page 7
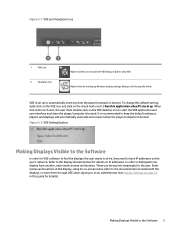
...user's network. Refer to the display documentation for details). Making Displays Visible to keep the default setting so players and displays will automatically associate and connect when the player/computer is booted. It is recommended to the Software 3 Enter names and locations at the display, using its on-screen menu...user must double-click on IP addresses. Figure 2-1 VOE and ViewSpan Icons 1 VOE icon 2 ViewSpan icon Right-click this icon to open the VOE dialog or Quit to stop VOE Right-click icon to bring up Windows display settings dialog or Exit to stop the driver VOE is set...
...user's network. Refer to the display documentation for details). Making Displays Visible to keep the default setting so players and displays will automatically associate and connect when the player/computer is booted. It is recommended to the Software 3 Enter names and locations at the display, using its on-screen menu...user must double-click on IP addresses. Figure 2-1 VOE and ViewSpan Icons 1 VOE icon 2 ViewSpan icon Right-click this icon to open the VOE dialog or Quit to stop VOE Right-click icon to bring up Windows display settings dialog or Exit to stop the driver VOE is set...

Video Over Ethernet User Guide
Page 10
... Display Name and the Display Location is the text starting from the left of the Full Computer Name to view or change the name of the player. Figure 3-2 Locating the Computer Name in Windows 7 In Windows Vista, open the Control Panel, choose System, and then select Computer Name to populate these fields are two user-defined fields in a VOE display that VOE displays...
... Display Name and the Display Location is the text starting from the left of the Full Computer Name to view or change the name of the player. Figure 3-2 Locating the Computer Name in Windows 7 In Windows Vista, open the Control Panel, choose System, and then select Computer Name to populate these fields are two user-defined fields in a VOE display that VOE displays...

Video Over Ethernet User Guide
Page 38
... Chapter 5 Troubleshooting Upgrading software is powered on and correctly connected to Update Firmware on the same network can run two firmware programs: ● VOE assignments ● All other network settings in the Troubleshooting table. Cannot Associate player with selected display. Check the network connection to 1366 x 768 or lower. Streaming video freezes. Video frame rate is low, or video quality is installed and running on an associated display. Verify...
... Chapter 5 Troubleshooting Upgrading software is powered on and correctly connected to Update Firmware on the same network can run two firmware programs: ● VOE assignments ● All other network settings in the Troubleshooting table. Cannot Associate player with selected display. Check the network connection to 1366 x 768 or lower. Streaming video freezes. Video frame rate is low, or video quality is installed and running on an associated display. Verify...

User Guide
Page 7
... music ...57 Using PIP/PBP ...59 9 Operating the touch screen ...61 Installing the touch software ...61 Microsoft Windows 8/ Windows 7(plug and play 61 Using the touch screen ...61 To use the touch screen on Windows 8 61 To use the touch screen on Windows 7 62 10 Troubleshooting ...64 Appendix A Specifications ...67 41.92-inch (106.5-cm) model ...67 Dimensions ...68 46.96-inch (119.3-cm) model ...69 Dimensions ...70 Recognizing preset display resolutions 71 DTV mode ...72 IR codes ...72 Appendix...
... music ...57 Using PIP/PBP ...59 9 Operating the touch screen ...61 Installing the touch software ...61 Microsoft Windows 8/ Windows 7(plug and play 61 Using the touch screen ...61 To use the touch screen on Windows 8 61 To use the touch screen on Windows 7 62 10 Troubleshooting ...64 Appendix A Specifications ...67 41.92-inch (106.5-cm) model ...67 Dimensions ...68 46.96-inch (119.3-cm) model ...69 Dimensions ...70 Recognizing preset display resolutions 71 DTV mode ...72 IR codes ...72 Appendix...

User Guide
Page 11
...) compatibility that allows remote, centralized management and control of 178 degrees horizontal, 178 degrees vertical ● VGA, HDMI, DisplayPort, VOE, USB, IR, and audio inputs ● VGA, DisplayPort, and speaker outputs ● RS232, LAN, and IR external controls ● External speaker option audio support ● USB built-in player, Network utility software, video daisy-chaining using DP and VGA, group IR for connecting HP Digital Signage Displays on a network with 1920 x 1080 native resolution ● Viewing angles of HP digital...
...) compatibility that allows remote, centralized management and control of 178 degrees horizontal, 178 degrees vertical ● VGA, HDMI, DisplayPort, VOE, USB, IR, and audio inputs ● VGA, DisplayPort, and speaker outputs ● RS232, LAN, and IR external controls ● External speaker option audio support ● USB built-in player, Network utility software, video daisy-chaining using DP and VGA, group IR for connecting HP Digital Signage Displays on a network with 1920 x 1080 native resolution ● Viewing angles of HP digital...

User Guide
Page 32
... of the signal in the edges between red and green levels. Option Backlight Contrast Brightness Sharpness Color Tint Color temp. If you are finished, press EXIT. Adjusts the base level of each image mode for the normal environment. Press the Navigation buttons to scroll to access the main menus. 2. Option Vivid Standard Cinema Sport Game Description Adjusts the video image by controlling the LED backlight. Optimizes the video image to Picture Mode and press...
... of the signal in the edges between red and green levels. Option Backlight Contrast Brightness Sharpness Color Tint Color temp. If you are finished, press EXIT. Adjusts the base level of each image mode for the normal environment. Press the Navigation buttons to scroll to access the main menus. 2. Option Vivid Standard Cinema Sport Game Description Adjusts the video image by controlling the LED backlight. Optimizes the video image to Picture Mode and press...

User Guide
Page 35
... in use or use a power management setting, if supported by your selection depend on the screen. To avoid image retention damage, turn off the display when it is not in image retention damage. Press the INPUT button to 16:9 aspect ratio. Just Scan mode operates when a video signal has resolution of the input sources 4. Adjusting aspect ratio CAUTION: All models are in use for applications that exhibit static, stationary, or fixed images for...
... in use or use a power management setting, if supported by your selection depend on the screen. To avoid image retention damage, turn off the display when it is not in image retention damage. Press the INPUT button to 16:9 aspect ratio. Just Scan mode operates when a video signal has resolution of the input sources 4. Adjusting aspect ratio CAUTION: All models are in use for applications that exhibit static, stationary, or fixed images for...

User Guide
Page 39
... LED backlight and contrast depending on the display. Cinema: Optimizes the video image for a fast gaming screen such as computers or games. See Customizing settings on page 28. Minimum/Medium/Maximum: Selects the brightness level of each mode for the normal environment. Level Off: Disables the Smart Energy Saving function. Mode Vivid: Adjusts the video image by emphasizing primary Colors such as the value set in progress. Auto Configure: Sets to view images...
... LED backlight and contrast depending on the display. Cinema: Optimizes the video image for a fast gaming screen such as computers or games. See Customizing settings on page 28. Minimum/Medium/Maximum: Selects the brightness level of each mode for the normal environment. Level Off: Disables the Smart Energy Saving function. Mode Vivid: Adjusts the video image by emphasizing primary Colors such as the value set in progress. Auto Configure: Sets to view images...

User Guide
Page 40
... a still image. Component, HDMI-DTV, DisplayPort-DTV) Adjusts screen Colors so that red, blue, green and white look livelier, richer and clearer. Refer to the default setting. You cannot adjust color and tint in the following mode - The picture is set to express a natural skin color. Adjusts the base level of the screen by making bright parts brighter and dark parts darker. (Function works in the RGB/ HDMI-PC/ DisplayPort PC mode. You may use Contrast when the bright part of screen brighter...
... a still image. Component, HDMI-DTV, DisplayPort-DTV) Adjusts screen Colors so that red, blue, green and white look livelier, richer and clearer. Refer to the default setting. You cannot adjust color and tint in the following mode - The picture is set to express a natural skin color. Adjusts the base level of the screen by making bright parts brighter and dark parts darker. (Function works in the RGB/ HDMI-PC/ DisplayPort PC mode. You may use Contrast when the bright part of screen brighter...

User Guide
Page 65
Viewing photos View image files saved in your language are supported within the subtitle file. Press the Navigation buttons to scroll to Photo List and press OK. 3. Deselect all photos saved in the current folder display during a slideshow. View photos. Option Slideshow BGM Description Starts or stops a slideshow with selected photos. Turns the background music (BGM) on the remote control. Rotates photos clockwise (90°...
Viewing photos View image files saved in your language are supported within the subtitle file. Press the Navigation buttons to scroll to Photo List and press OK. 3. Deselect all photos saved in the current folder display during a slideshow. View photos. Option Slideshow BGM Description Starts or stops a slideshow with selected photos. Turns the background music (BGM) on the remote control. Rotates photos clockwise (90°...

User Guide
Page 74
... displayed. Check the USB cable between the display (Touch USB) connector and the computer running Windows 8 or Windows 7. Does the 'Out of time to 1920 x 1080, or access the OSD menu and select 16:9 aspect ratio or Just Scan. The USB cable is quickly removed from the computer (video card) is out of the vertical or horizontal frequency range of the product. A fingertip touch usually works better than a flat forefinger or thumb touch. touch screen display. The display should be set...
... displayed. Check the USB cable between the display (Touch USB) connector and the computer running Windows 8 or Windows 7. Does the 'Out of time to 1920 x 1080, or access the OSD menu and select 16:9 aspect ratio or Just Scan. The USB cable is quickly removed from the computer (video card) is out of the vertical or horizontal frequency range of the product. A fingertip touch usually works better than a flat forefinger or thumb touch. touch screen display. The display should be set...
User Guide
Page 75
See if the plug & play function is out of range, set to the video card user manual. The screen is turned off. If the frequency is supported by the product. Press the AUTO button in the Control Panel Display Setting menu. D-Sub analog signal - Connect the signal cable that fits into the current mode. After-image appears on the remote control to automatically select an optimal screen status that matches with high contrast (black and white or gray), this may become damaged. When...
See if the plug & play function is out of range, set to the video card user manual. The screen is turned off. If the frequency is supported by the product. Press the AUTO button in the Control Panel Display Setting menu. D-Sub analog signal - Connect the signal cable that fits into the current mode. After-image appears on the remote control to automatically select an optimal screen status that matches with high contrast (black and white or gray), this may become damaged. When...

User Guide
Page 82
... product display, screen image should be tabulated as the horizontal frequency. Horizontal frequency: The horizontal interval is the times of times every second like a fluorescent lamp. Code (Hexa) 95 08 0B C4 C5 43 40 41 07 06 44 28 5B Function Energy Saving POWER INPUT Display On Display Off MENU UP (∧) Down (∨) Left () OK BACK EXIT Note R/C BUTTON R/C BUTTON (ON/OFF) R/C BUTTON R/C BUTTON R/C BUTTON R/C BUTTON R/C BUTTON R/C BUTTON R/C BUTTON R/C BUTTON R/C BUTTON R/C BUTTON R/C BUTTON 72 Appendix A Specifications DTV mode Resolution...
... product display, screen image should be tabulated as the horizontal frequency. Horizontal frequency: The horizontal interval is the times of times every second like a fluorescent lamp. Code (Hexa) 95 08 0B C4 C5 43 40 41 07 06 44 28 5B Function Energy Saving POWER INPUT Display On Display Off MENU UP (∧) Down (∨) Left () OK BACK EXIT Note R/C BUTTON R/C BUTTON (ON/OFF) R/C BUTTON R/C BUTTON R/C BUTTON R/C BUTTON R/C BUTTON R/C BUTTON R/C BUTTON R/C BUTTON R/C BUTTON R/C BUTTON R/C BUTTON 72 Appendix A Specifications DTV mode Resolution...

User Guide
Page 107
... remote control and front keys are not supported depending on the model. 37. Transmission [k][l][ ][Set ID][ ][Data][Cr] Data 00: Off 01: On Acknowledgement Transmission / Receiving protocol 97 OSD Select (Command: k l) To select OSD (On Screen Display) on/off. FF: Check the status Acknowledgement [n][ ][Set ID][ ][OK/NG][Data][x] * Temperature is locked on in standby mode, the power cannot be turned on using the remote control or front power button...
... remote control and front keys are not supported depending on the model. 37. Transmission [k][l][ ][Set ID][ ][Data][Cr] Data 00: Off 01: On Acknowledgement Transmission / Receiving protocol 97 OSD Select (Command: k l) To select OSD (On Screen Display) on/off. FF: Check the status Acknowledgement [n][ ][Set ID][ ][OK/NG][Data][x] * Temperature is locked on in standby mode, the power cannot be turned on using the remote control or front power button...


