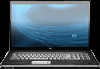
HP HDX 18 Entertainment PC - Maintenance and Service Guide
Page 18
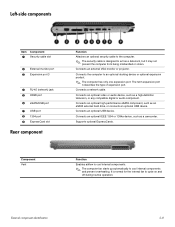
Left-side components Item Component 1 Security cable slot 2 External monitor port 3 Expansion port 3 4 RJ-45 (network) jack 5 HDMI port 6 eSATA/USB port 7 USB port 8 1394 port 9 ExpressCard slot Rear component Function Attaches an optional security cable to the computer. ✎ The security cable is normal for the internal fan to an optional docking device or optional expansion product. ✎ The computer has only one expansion port. Connects a network cable. Connects an optional video or audio device, such as a deterrent, but it may not prevent the...
Left-side components Item Component 1 Security cable slot 2 External monitor port 3 Expansion port 3 4 RJ-45 (network) jack 5 HDMI port 6 eSATA/USB port 7 USB port 8 1394 port 9 ExpressCard slot Rear component Function Attaches an optional security cable to the computer. ✎ The security cable is normal for the internal fan to an optional docking device or optional expansion product. ✎ The computer has only one expansion port. Connects a network cable. Connects an optional video or audio device, such as a deterrent, but it may not prevent the...
HP HDX 18 Entertainment PC - Maintenance and Service Guide
Page 39
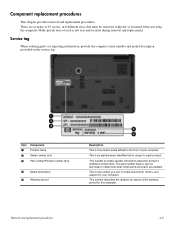
... for your computer. This number describes the duration (in 8 different sizes, that is the product name affixed to locate documents, drivers, and support for this computer. Service tag When ordering parts or requesting information, provide the computer serial number and model description provided on the service tag. Component replacement procedures This chapter provides removal and replacement procedures. This number provides specific information about the product's hardware components.
... for your computer. This number describes the duration (in 8 different sizes, that is the product name affixed to locate documents, drivers, and support for this computer. Service tag When ordering parts or requesting information, provide the computer serial number and model description provided on the service tag. Component replacement procedures This chapter provides removal and replacement procedures. This number provides specific information about the product's hardware components.

HP HDX 18 Entertainment PC - Maintenance and Service Guide
Page 48
... retaining tabs 1 on page 4-11). Remove the memory module 2 by first unplugging the power cord from the AC outlet and then unplugging the AC adapter from the computer. 4. Disconnect all external devices connected to install a memory module. Remove the hard drive cover (see "Battery" on , and then shut it down the computer. Remove the memory module: ✎ The top memory module slot contains the expansion memory module. Removal and replacement procedures 4-15 If you are designed...
... retaining tabs 1 on page 4-11). Remove the memory module 2 by first unplugging the power cord from the AC outlet and then unplugging the AC adapter from the computer. 4. Disconnect all external devices connected to install a memory module. Remove the hard drive cover (see "Battery" on , and then shut it down the computer. Remove the memory module: ✎ The top memory module slot contains the expansion memory module. Removal and replacement procedures 4-15 If you are designed...
HP HDX 18 Entertainment PC - Maintenance and Service Guide
Page 92
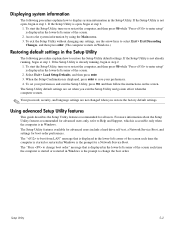
... Setup Utility features available for advanced users include a hard drive self-test, a Network Service Boot, and settings for all users. The "Press to change the boot order. To set when you exit the Setup Utility and go into effect when the computer restarts. ✎ Your password, security, and language settings are not changed when you restore the factory default settings. Setup Utility 5-2 If the Setup Utility is open , begin at step 1. To exit the Setup Utility without changing any settings, use the arrow keys...
... Setup Utility features available for advanced users include a hard drive self-test, a Network Service Boot, and settings for all users. The "Press to change the boot order. To set when you exit the Setup Utility and go into effect when the computer restarts. ✎ Your password, security, and language settings are not changed when you restore the factory default settings. Setup Utility 5-2 If the Setup Utility is open , begin at step 1. To exit the Setup Utility without changing any settings, use the arrow keys...

HP HDX 18 Entertainment PC - Maintenance and Service Guide
Page 136
... support 5-4 LED board cable, removal 4-29 left-side components 2-8 light components 2-5 lights battery 2-5 caps lock 2-5 Digital Media Slot 2-7 drive 2-5 num lock 2-5 optical drive 2-7 power 2-5 TouchPad 2-6 treble/bass down 2-5 treble/bass up 2-5 volume down 2-5 volume mute 2-5 volume up 2-5 wireless 2-5 M Main menu, Setup Utility 5-3 mass storage devices illustrated 3-8 spare part numbers 3-8 media button 2-2 memory module removal 4-15 spare part numbers 3-5, 3-13, 3-14, 4-15 memory product description 1-1 Index microphone locations 2-1 product description 1-2 microphone jack connector...
... support 5-4 LED board cable, removal 4-29 left-side components 2-8 light components 2-5 lights battery 2-5 caps lock 2-5 Digital Media Slot 2-7 drive 2-5 num lock 2-5 optical drive 2-7 power 2-5 TouchPad 2-6 treble/bass down 2-5 treble/bass up 2-5 volume down 2-5 volume mute 2-5 volume up 2-5 wireless 2-5 M Main menu, Setup Utility 5-3 mass storage devices illustrated 3-8 spare part numbers 3-8 media button 2-2 memory module removal 4-15 spare part numbers 3-5, 3-13, 3-14, 4-15 memory product description 1-1 Index microphone locations 2-1 product description 1-2 microphone jack connector...

HP HDX 18 Entertainment PC - Maintenance and Service Guide
Page 137
...card 1-3 graphics 1-1 hard drive 1-2 keyboard 1-4 memory 1-1 microphone 1-2 modem 1-3 operating system 1-4 optical drive 1-2 pointing device 1-4 ports 1-4 power requirements 1-4 processor 1-1 security 1-4 serviceability 1-4 TV tuner 1-3 webcam 1-3 wireless 1-3 product name 1-1, 3-1, 4-6 R rear components 2-8 recovery discs, creating 8-1 recycling battery 11-1 display components 11-1 remote control, spare part numbers 3-10, 3-11 restore points 8-3 Index restoring default settings in the Setup Utility 5-2 right-side components 2-7 RJ-45 jack connector pinout 9-4 location 2-8 RTC battery removal...
...card 1-3 graphics 1-1 hard drive 1-2 keyboard 1-4 memory 1-1 microphone 1-2 modem 1-3 operating system 1-4 optical drive 1-2 pointing device 1-4 ports 1-4 power requirements 1-4 processor 1-1 security 1-4 serviceability 1-4 TV tuner 1-3 webcam 1-3 wireless 1-3 product name 1-1, 3-1, 4-6 R rear components 2-8 recovery discs, creating 8-1 recycling battery 11-1 display components 11-1 remote control, spare part numbers 3-10, 3-11 restore points 8-3 Index restoring default settings in the Setup Utility 5-2 right-side components 2-7 RJ-45 jack connector pinout 9-4 location 2-8 RTC battery removal...
Wireless (Select Models Only) - Windows Vista
Page 24
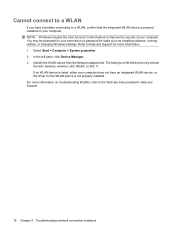
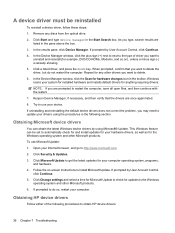
... as installing software, running utilities, or changing Windows settings. Refer to improve the security of your computer. Cannot connect to a WLAN If you have an integrated WLAN device, or the driver for the WLAN device is not properly installed. For more information on your computer: NOTE: Windows includes the User Account Control feature to Help and Support for more information. 1. Identify the WLAN device from the Network adapters list.
... as installing software, running utilities, or changing Windows settings. Refer to improve the security of your computer. Cannot connect to a WLAN If you have an integrated WLAN device, or the driver for the WLAN device is not properly installed. For more information on your computer: NOTE: Windows includes the User Account Control feature to Help and Support for more information. 1. Identify the WLAN device from the Network adapters list.
Security - Windows Vista
Page 8
... your information. Use the following topics list Windows and Setup Utility passwords and describe their functions. NOTE: Select models include a separate numeric keypad, which functions exactly like the keyboard number keys. ● A password must be entered at a Setup Utility prompt. Several types of passwords can be set in Windows must be entered at a Windows prompt. A password set in Windows or in the non-Windows Setup Utility preinstalled on how you want to control access to your computer information. 2 Using passwords A password is a group...
... your information. Use the following topics list Windows and Setup Utility passwords and describe their functions. NOTE: Select models include a separate numeric keypad, which functions exactly like the keyboard number keys. ● A password must be entered at a Setup Utility prompt. Several types of passwords can be set in Windows must be entered at a Windows prompt. A password set in Windows or in the non-Windows Setup Utility preinstalled on how you want to control access to your computer information. 2 Using passwords A password is a group...
Software Updates - Windows Vista
Page 7
....hp.com. 3. Install the updates. 1 Updating software Updated versions of the software provided with the hardware devices, and provides for tasks such as installing applications, running utilities, or changing Windows settings. NOTE: Windows® includes the User Account Control feature to Windows Help for a system BIOS update by identifying the BIOS version currently installed on the computer. Access the updates on the system ROM. If your computer model, product category, and series or family. The BIOS initializes the operating...
....hp.com. 3. Install the updates. 1 Updating software Updated versions of the software provided with the hardware devices, and provides for tasks such as installing applications, running utilities, or changing Windows settings. NOTE: Windows® includes the User Account Control feature to Windows Help for a system BIOS update by identifying the BIOS version currently installed on the computer. Access the updates on the system ROM. If your computer model, product category, and series or family. The BIOS initializes the operating...

Drives - Windows Vista
Page 18
... works without supervision. NOTE: Windows includes the User Account Control feature to run Disk Defragmenter: 1. Using Disk Cleanup Disk Cleanup searches the hard drive for more efficiently. Follow the on the hard drive so that you do not need access to Help and Support for unnecessary files that the system can run more efficiently. You may be prompted for tasks such as installing software, running utilities, or changing Windows settings. Select Start...
... works without supervision. NOTE: Windows includes the User Account Control feature to run Disk Defragmenter: 1. Using Disk Cleanup Disk Cleanup searches the hard drive for more efficiently. Follow the on the hard drive so that you do not need access to Help and Support for unnecessary files that the system can run more efficiently. You may be prompted for tasks such as installing software, running utilities, or changing Windows settings. Select Start...

Drives - Windows Vista
Page 27
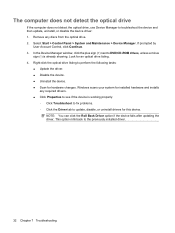
... hardware changes. If prompted by User Account Control, click Continue. 3. Select Start > Control Panel > System and Maintenance > Device Manager. Right-click the optical drive listing to troubleshoot the device and then update, uninstall, or disable the device driver: 1. Remove any required drivers. ● Click Properties to see if the device is already showing. NOTE: You can click the Roll Back Driver option if the device fails after updating the driver. Windows scans your system for installed hardware and installs any discs...
... hardware changes. If prompted by User Account Control, click Continue. 3. Select Start > Control Panel > System and Maintenance > Device Manager. Right-click the optical drive listing to troubleshoot the device and then update, uninstall, or disable the device driver: 1. Remove any required drivers. ● Click Properties to see if the device is already showing. NOTE: You can click the Roll Back Driver option if the device fails after updating the driver. Windows scans your system for installed hardware and installs any discs...
Drives - Windows Vista
Page 32
... once again listed. 8. If prompted by User Account Control, click Continue. 5. Click Change settings and select a time for Microsoft Update to check for example, DVD/CD-ROMs, Modems, and so on -screen instructions to delete the driver, but do so, restart your device. Remove any other Microsoft products. Click Start and type device manager in the pane above the box. 3. As you are prompted to the Windows operating system...
... once again listed. 8. If prompted by User Account Control, click Continue. 5. Click Change settings and select a time for Microsoft Update to check for example, DVD/CD-ROMs, Modems, and so on -screen instructions to delete the driver, but do so, restart your device. Remove any other Microsoft products. Click Start and type device manager in the pane above the box. 3. As you are prompted to the Windows operating system...
Drives - Windows Vista
Page 34
... 11 playing 7 removing 13 DVD drive 3 DVD region settings 9 H hard disk drive HP ProtectSmart Hard Drive Protection 15 installing 19 removing 18 replacing 18 hard drive HP ProtectSmart Hard Drive Protection 15 installing 19 removing 18 replacing 18 HP ProtectSmart Hard Drive Protection 15 L light, drive 16 M maintenance Disk Cleanup 14 Disk Defragmenter 14 O optical disc removing 13 optical drive 3 R region codes, DVD 9 S software Disk Cleanup 14 Disk Defragmenter 14 T troubleshooting burning discs 27 device driver 28 disc play 24, 25 DVD movie play 25 external display 26 HP device drivers 28...
... 11 playing 7 removing 13 DVD drive 3 DVD region settings 9 H hard disk drive HP ProtectSmart Hard Drive Protection 15 installing 19 removing 18 replacing 18 hard drive HP ProtectSmart Hard Drive Protection 15 installing 19 removing 18 replacing 18 HP ProtectSmart Hard Drive Protection 15 L light, drive 16 M maintenance Disk Cleanup 14 Disk Defragmenter 14 O optical disc removing 13 optical drive 3 R region codes, DVD 9 S software Disk Cleanup 14 Disk Defragmenter 14 T troubleshooting burning discs 27 device driver 28 disc play 24, 25 DVD movie play 25 external display 26 HP device drivers 28...

Notebook Tour - Windows Vista
Page 23
...bass up 3 battery 4 caps lock 3 Digital Media Slot 8 drive 4 integrated webcam 7 mute 3 num lock 4 optical drive 10 power 3 TouchPad 2 treble 3 treble down 3 treble up 3 volume down 3 volume mute 3 volume up 3 wireless 3 M media activity buttons, identifying 5 media button, identifying 5 memory module 12 microphone (audio-in) jack 10 Microsoft Certificate of Authenticity label 15 Mini Card compartment, identifying 12 monitor port, external 11 mute button, identifying 5 mute light, identifying 3 N next/fast forward button, identifying 5 num lock light, identifying 4 O operating system Microsoft...
...bass up 3 battery 4 caps lock 3 Digital Media Slot 8 drive 4 integrated webcam 7 mute 3 num lock 4 optical drive 10 power 3 TouchPad 2 treble 3 treble down 3 treble up 3 volume down 3 volume mute 3 volume up 3 wireless 3 M media activity buttons, identifying 5 media button, identifying 5 memory module 12 microphone (audio-in) jack 10 Microsoft Certificate of Authenticity label 15 Mini Card compartment, identifying 12 monitor port, external 11 mute button, identifying 5 mute light, identifying 3 N next/fast forward button, identifying 5 num lock light, identifying 4 O operating system Microsoft...

Multimedia - Windows Vista
Page 20
.... To connect a video or audio device to the HDMI port on your media program. Connect one HDMI device connected to the HDMI port, while simultaneously supporting an image on the computer to switch the image between the display devices connected to that graphics card. The HDMI port connects the computer to an optional video or audio device, such as your computer, and then configure the default audio playback device according to the computer. Determining the type of graphics card is installed on the...
.... To connect a video or audio device to the HDMI port on your media program. Connect one HDMI device connected to the HDMI port, while simultaneously supporting an image on the computer to switch the image between the display devices connected to that graphics card. The HDMI port connects the computer to an optional video or audio device, such as your computer, and then configure the default audio playback device according to the computer. Determining the type of graphics card is installed on the...
Multimedia - Windows Vista
Page 36
... already showing. Look for hardware changes. This option rolls back to DVD/CD-ROM drives, unless a minus sign (-) is working properly: ◦ Click Troubleshoot to fix problems. ◦ Click the Driver tab to troubleshoot the device and then update, uninstall, or disable the device driver: 1. If prompted by User Account Control, click Continue. 3. In the Device Manager window, click the plus sign (+) next to the previously installed driver. 32 Chapter 7 Troubleshooting NOTE: You can click...
... already showing. Look for hardware changes. This option rolls back to DVD/CD-ROM drives, unless a minus sign (-) is working properly: ◦ Click Troubleshoot to fix problems. ◦ Click the Driver tab to troubleshoot the device and then update, uninstall, or disable the device driver: 1. If prompted by User Account Control, click Continue. 3. In the Device Manager window, click the plus sign (+) next to the previously installed driver. 32 Chapter 7 Troubleshooting NOTE: You can click...
Multimedia - Windows Vista
Page 40
... your computer. Click Change settings and select a time for Microsoft Update to check for example, DVD/CD-ROMs, Modems, and so on -screen instructions to do not restart the computer. Click Start and type device manager in the pane above the box. 3. In the Device Manager window, click the Scan for the Windows operating system and other drivers you may need to update your drivers using Microsoft® Update. If prompted by...
... your computer. Click Change settings and select a time for Microsoft Update to check for example, DVD/CD-ROMs, Modems, and so on -screen instructions to do not restart the computer. Click Start and type device manager in the pane above the box. 3. In the Device Manager window, click the Scan for the Windows operating system and other drivers you may need to update your drivers using Microsoft® Update. If prompted by...

Multimedia - Windows Vista
Page 42
... changing region setting 24 playing 22 removing 27 DVD drive 21 DVD region settings 24 E earbuds 3 external audio devices, connecting 12 external monitor port 15 H HDMI configuring 16 connecting 16 HDMI port 16 headphone (audio-out) jacks 3 headphones 3 high-definition devices, connecting 16 I internal digital dual array microphones, identifying 2 issues, resolving 31 J jacks audio-in (microphone) 3 audio-out (headphone) 3 TV antenna/cable 2 M media activity buttons 7 media activity hotkeys 8 media button 4 MediaSmart starting 4, 9 using 9 MediaSmart software 9 microphones, internal 2 monitor...
... changing region setting 24 playing 22 removing 27 DVD drive 21 DVD region settings 24 E earbuds 3 external audio devices, connecting 12 external monitor port 15 H HDMI configuring 16 connecting 16 HDMI port 16 headphone (audio-out) jacks 3 headphones 3 high-definition devices, connecting 16 I internal digital dual array microphones, identifying 2 issues, resolving 31 J jacks audio-in (microphone) 3 audio-out (headphone) 3 TV antenna/cable 2 M media activity buttons 7 media activity hotkeys 8 media button 4 MediaSmart starting 4, 9 using 9 MediaSmart software 9 microphones, internal 2 monitor...

Power Management - Windows Vista
Page 5
..., your work is in the Sleep state or in Windows® Control Panel. 1 Setting power options Using power-saving states The computer has two power-saving states enabled at the factory to initiate Sleep after 10 minutes of inactivity when running on battery power and 25 minutes of inactivity when running on external power. Initiating and exiting Sleep The system is closed, open the display. ● Press a key on the keyboard or a button on...
..., your work is in the Sleep state or in Windows® Control Panel. 1 Setting power options Using power-saving states The computer has two power-saving states enabled at the factory to initiate Sleep after 10 minutes of inactivity when running on battery power and 25 minutes of inactivity when running on external power. Initiating and exiting Sleep The system is closed, open the display. ● Press a key on the keyboard or a button on...

Power Management - Windows Vista
Page 25
... then click the Power button. ● Press and hold the power button for at least 5 seconds. ● Disconnect the computer from external power and remove the battery. 21 Save your work and close all open programs. 2. Click Start, and then click the arrow next to use the preceding shutdown procedures, try the following conditions: ● When you need to replace the battery or access components inside...
... then click the Power button. ● Press and hold the power button for at least 5 seconds. ● Disconnect the computer from external power and remove the battery. 21 Save your work and close all open programs. 2. Click Start, and then click the arrow next to use the preceding shutdown procedures, try the following conditions: ● When you need to replace the battery or access components inside...


