G72 b60US Replacement Battery - HP
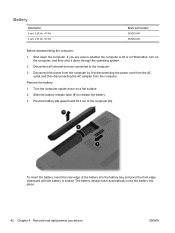
G72 b60US Replacement Battery
Related Manual Pages


Similar Questions

Is It Possible To Replace Battery Release Latch On Hp 3115m?
(Posted by Anonymous-132190 10 years ago)

Does This Laptop Have A Replaceable Battery?
(Posted by bobbyholcomb99 10 years ago)

Hp Pavilion Dv7-1243cl Entertainment Notebook Pc Rtc Battery.
Mine is not a stanard CR2032 battery although it is a labeled as such. Mine has a black and red wire...
Mine is not a stanard CR2032 battery although it is a labeled as such. Mine has a black and red wire...
(Posted by oilcan 11 years ago)