Notebook Essentials - Windows 7
Page 10
... may be caused by an uncertain power supply or an electrical storm, observe these guidelines: ■ Keep the operating system and software updated. To optimize the computers privacy protection features, follow these practices: ■ Plug the computer power cord into an optional, high-quality surge... protector. Chapter 2: What's next? Protecting your location, provide surge protection on battery power or shut down the computer and unplug the power cord. ■ If applicable to your privacy When you use the computer for e-mail, network, or Internet access...
... may be caused by an uncertain power supply or an electrical storm, observe these guidelines: ■ Keep the operating system and software updated. To optimize the computers privacy protection features, follow these practices: ■ Plug the computer power cord into an optional, high-quality surge... protector. Chapter 2: What's next? Protecting your location, provide surge protection on battery power or shut down the computer and unplug the power cord. ■ If applicable to your privacy When you use the computer for e-mail, network, or Internet access...
Notebook Essentials - Windows 7
Page 11
... Guides disc included with a 3-pin attachment plug on the Web at all times. ■ Disconnect power from the computer by unplugging the power cord from the AC outlet (not by unplugging the power cord from HP. Do not disable the power cord grounding pin, for Safety of electric shock or damage to the Regulatory, Safety and Environmental Notices...
... Guides disc included with a 3-pin attachment plug on the Web at all times. ■ Disconnect power from the computer by unplugging the power cord from the AC outlet (not by unplugging the power cord from HP. Do not disable the power cord grounding pin, for Safety of electric shock or damage to the Regulatory, Safety and Environmental Notices...

Notebook Essentials - Windows 7
Page 19
Quick troubleshooting The computer is unable to start up If the computer does not turn on battery power or is resolved: ■ Refer to be sure that the power cord and AC adapter connections are secure. Notebook Essentials 13 Chapter 3: Troubleshooting Troubleshooting resources If you experience computer problems,... an AC outlet using the AC adapter. Be sure that the outlet is providing adequate power. ✎ Use only the AC adapter provided with the computer or one approved by HP for this chapter. ■ Access Web site links and additional information about the computer ...
Quick troubleshooting The computer is unable to start up If the computer does not turn on battery power or is resolved: ■ Refer to be sure that the power cord and AC adapter connections are secure. Notebook Essentials 13 Chapter 3: Troubleshooting Troubleshooting resources If you experience computer problems,... an AC outlet using the AC adapter. Be sure that the outlet is providing adequate power. ✎ Use only the AC adapter provided with the computer or one approved by HP for this chapter. ■ Access Web site links and additional information about the computer ...
Notebook Essentials - Windows 7
Page 21
... the computer air vents. Then be sure to keep all vents free from obstructions. ■ Be sure that the cable or DSL modem and its power cord are properly connected and that the lights are on. ■ Be sure that the wireless router or access point is properly connected to its...the device according to the manufacturer's instructions. ■ Be sure that all device connections are secure. ■ Be sure that the device is receiving electrical power. ■ Be sure that the device, especially if it is older, is overheating, allow the computer to cool to block airflow. If the light is...
... the computer air vents. Then be sure to keep all vents free from obstructions. ■ Be sure that the cable or DSL modem and its power cord are properly connected and that the lights are on. ■ Be sure that the wireless router or access point is properly connected to its...the device according to the manufacturer's instructions. ■ Be sure that all device connections are secure. ■ Be sure that the device is receiving electrical power. ■ Be sure that the device, especially if it is older, is overheating, allow the computer to cool to block airflow. If the light is...
Notebook Essentials - Windows 7
Page 32
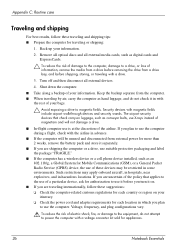
... more than 2 weeks, remove the battery pack and store it in with the rest of your itinerary. ❏ Check the power cord and adapter requirements for each location in which you are shipping the computer or a drive, use suitable protective packaging and label the package "...from a drive before removing the drive from the computer. ■ When traveling by air, carry the computer as hand luggage, and do not attempt to power the computer with a drive. 3. Voltage, frequency, and plug configurations vary. Å To reduce the risk of your information. 2. Back up your information....
... more than 2 weeks, remove the battery pack and store it in with the rest of your itinerary. ❏ Check the power cord and adapter requirements for each location in which you are shipping the computer or a drive, use suitable protective packaging and label the package "...from a drive before removing the drive from the computer. ■ When traveling by air, carry the computer as hand luggage, and do not attempt to power the computer with a drive. 3. Voltage, frequency, and plug configurations vary. Å To reduce the risk of your information. 2. Back up your information....

Notebook Essentials - Windows 7
Page 34
Index O operating environment specifications 23 overheating, computer 14 P performing a recovery 21 posture 5 power cord 5 power options 14 power specifications 23 power surges 4 power, turning on computer 13 privacy, protecting 4 R recovering a program or driver 17 recovering from the ...2 installing 11 safeguarding information 17 troubleshooting 14 updating 11 solid-state drive (SSD) 21, 22 specifications altitude 23 humidity 23 input power 23 operating environment 23 temperature 23 28 startup problems, troubleshooting 13 surge protection 4 system recovery 17, 21 system restore points 17...
Index O operating environment specifications 23 overheating, computer 14 P performing a recovery 21 posture 5 power cord 5 power options 14 power specifications 23 power surges 4 power, turning on computer 13 privacy, protecting 4 R recovering a program or driver 17 recovering from the ...2 installing 11 safeguarding information 17 troubleshooting 14 updating 11 solid-state drive (SSD) 21, 22 specifications altitude 23 humidity 23 input power 23 operating environment 23 temperature 23 28 startup problems, troubleshooting 13 surge protection 4 system recovery 17, 21 system restore points 17...
Notebook PC User Guide - Windows 7
Page 21
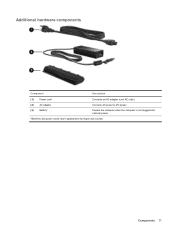
Components 11 Additional hardware components Component Description (1) Power cord* Connects an AC adapter to an AC outlet. (2) AC adapter Converts AC power to DC power. (3) Battery* Powers the computer when the computer is not plugged into external power. *Batteries and power cords vary in appearance by region and country.
Components 11 Additional hardware components Component Description (1) Power cord* Connects an AC adapter to an AC outlet. (2) AC adapter Converts AC power to DC power. (3) Battery* Powers the computer when the computer is not plugged into external power. *Batteries and power cords vary in appearance by region and country.

Notebook PC User Guide - Windows 7
Page 61
... a 3-pin attachment plug on the computer. 2. To connect the computer to the equipment: Plug the power cord into an AC outlet (3). Do not disable the power cord grounding pin, for example, by unplugging the power cord from the computer). Plug the power cord into a grounded (earthed) 3pin outlet. Plug the other end of electric shock or damage to...
... a 3-pin attachment plug on the computer. 2. To connect the computer to the equipment: Plug the power cord into an AC outlet (3). Do not disable the power cord grounding pin, for example, by unplugging the power cord from the computer). Plug the power cord into a grounded (earthed) 3pin outlet. Plug the other end of electric shock or damage to...
Notebook PC User Guide - Windows 7
Page 88
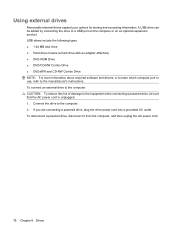
A USB drive can be sure that the AC power cord is unplugged. 1. If you are connecting a powered drive, plug the drive power cord into a grounded AC outlet. Connect the drive to the manufacturer's instructions. USB drives include the following types: ● 1.44 MB disk ...software and drivers, or to learn which computer port to use, refer to the computer. 2. To disconnect a powered drive, disconnect it from the computer, and then unplug the AC power cord. 78 Chapter 6 Drives Using external drives Removable external drives expand your options for storing and accessing information. To...
A USB drive can be sure that the AC power cord is unplugged. 1. If you are connecting a powered drive, plug the drive power cord into a grounded AC outlet. Connect the drive to the manufacturer's instructions. USB drives include the following types: ● 1.44 MB disk ...software and drivers, or to learn which computer port to use, refer to the computer. 2. To disconnect a powered drive, disconnect it from the computer, and then unplug the AC power cord. 78 Chapter 6 Drives Using external drives Removable external drives expand your options for storing and accessing information. To...

Notebook PC User Guide - Windows 7
Page 90
... the computer is on, in the Sleep state, or in Hibernation, turn the computer on a flat surface. 6. Save your work. 2. Unplug the power cord from the computer. 7. Disconnect all external devices connected to the computer. 4. To remove the hard drive: 1. Lift the hard drive cover away from... the hard drive bay. Turn the computer upside down on by pressing the power button. Replacing the hard drive CAUTION: To prevent information loss or an unresponsive system: Shut down the computer before removing the hard drive ...
... the computer is on, in the Sleep state, or in Hibernation, turn the computer on a flat surface. 6. Save your work. 2. Unplug the power cord from the computer. 7. Disconnect all external devices connected to the computer. 4. To remove the hard drive: 1. Lift the hard drive cover away from... the hard drive bay. Turn the computer upside down on by pressing the power button. Replacing the hard drive CAUTION: To prevent information loss or an unresponsive system: Shut down the computer before removing the hard drive ...

Notebook PC User Guide - Windows 7
Page 98
...by adding a memory module to the computer. 4. Remove the battery from the AC outlet. 5. To add or replace a memory module: 1. Unplug the power cord from the computer. 7. WARNING! CAUTION: Electrostatic discharge (ESD) can be sure that you are the same size. Then shut down on a flat surface.... modules are not sure whether the computer is located on the bottom of electric shock and damage to the equipment, unplug the power cord and remove all external devices connected to the vacant expansion memory module slot or by touching a grounded metal object. Disconnect all ...
...by adding a memory module to the computer. 4. Remove the battery from the AC outlet. 5. To add or replace a memory module: 1. Unplug the power cord from the computer. 7. WARNING! CAUTION: Electrostatic discharge (ESD) can be sure that you are the same size. Then shut down on a flat surface.... modules are not sure whether the computer is located on the bottom of electric shock and damage to the equipment, unplug the power cord and remove all external devices connected to the vacant expansion memory module slot or by touching a grounded metal object. Disconnect all ...
Notebook PC User Guide - Windows 7
Page 114
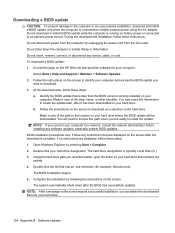
...click your hard drive where the BIOS update will need this path when you want to download. 3. Complete the installation by unplugging the power cord from the AC outlet. The system automatically shuts down the computer or initiate Sleep or Hibernation. Double-click the file that contains the ... Software updates Do not shut down after it has been downloaded to your selection to the hard drive. Access the page on the HP Web site that is connected to the location on your hard drive designation. Identify the BIOS update that provides software for example, filename....
...click your hard drive where the BIOS update will need this path when you want to download. 3. Complete the installation by unplugging the power cord from the AC outlet. The system automatically shuts down the computer or initiate Sleep or Hibernation. Double-click the file that contains the ... Software updates Do not shut down after it has been downloaded to your selection to the hard drive. Access the page on the HP Web site that is connected to the location on your hard drive designation. Identify the BIOS update that provides software for example, filename....
Service Guide
Page 9
... Audio-out (headphone) ...115 Audio-in (microphone) ...115 External monitor ...116 RJ-11 (modem) ...117 RJ-45 (network) ...117 HDMI ...118 Universal Serial Bus ...119 9 Power cord set requirements ...121 Requirements for all countries or regions 121 Requirements for specific countries or regions 122 ENWW ix
... Audio-out (headphone) ...115 Audio-in (microphone) ...115 External monitor ...116 RJ-11 (modem) ...117 RJ-45 (network) ...117 HDMI ...118 Universal Serial Bus ...119 9 Power cord set requirements ...121 Requirements for all countries or regions 121 Requirements for specific countries or regions 122 ENWW ix

Service Guide
Page 27
Additional hardware components Component (1) Power cord* (2) AC adapter (3) Battery* *Power cords vary in appearance by country or region. Description Connects an AC adapter to DC power. Powers the computer when the computer is not plugged into external power. Converts AC power to an AC outlet. ENWW Additional hardware components 17
Additional hardware components Component (1) Power cord* (2) AC adapter (3) Battery* *Power cords vary in appearance by country or region. Description Connects an AC adapter to DC power. Powers the computer when the computer is not plugged into external power. Converts AC power to an AC outlet. ENWW Additional hardware components 17
Service Guide
Page 42
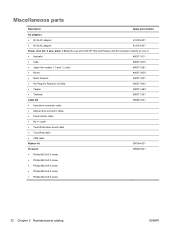
... parts Description Spare part number AC adapters ● 65-W AC adapter 613152-001 ● 90-W AC adapter 613153-001 Power cord, AC, 3 wire, black, 1.83-m (for use with both HP G62 and Presario CQ 62 computer models) for use in: ● Australia 490371-011 ● India 490371-D61 ●... 490371-AB1 ● Thailand 490371-201 Cable Kit 595201-001 ● Hard drive connector cable ● Optical drive connector cable ● Power button cable ● RJ-11 cable ● TouchPad button board cable ● TouchPad cable ● USB cable Rubber kit 600184-001 ...
... parts Description Spare part number AC adapters ● 65-W AC adapter 613152-001 ● 90-W AC adapter 613153-001 Power cord, AC, 3 wire, black, 1.83-m (for use with both HP G62 and Presario CQ 62 computer models) for use in: ● Australia 490371-011 ● India 490371-D61 ●... 490371-AB1 ● Thailand 490371-201 Cable Kit 595201-001 ● Hard drive connector cable ● Optical drive connector cable ● Power button cable ● RJ-11 cable ● TouchPad button board cable ● TouchPad cable ● USB cable Rubber kit 600184-001 ...
Service Guide
Page 43
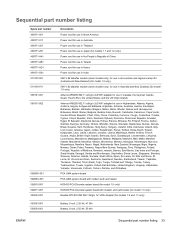
... 592810-001 592811-001 593533-001 Description Power cord for use in North America Power cord for use in Australia Power cord for use in Thailand Power cord for use in Japan (for models 1.1 and 1.2 only) Power cord for use in the People's Republic of China Power cord for use in Taiwan Power cord for use in Korea Power cord for use in India 56K V.92...
... 592810-001 592811-001 593533-001 Description Power cord for use in North America Power cord for use in Australia Power cord for use in Thailand Power cord for use in Japan (for models 1.1 and 1.2 only) Power cord for use in the People's Republic of China Power cord for use in Taiwan Power cord for use in Korea Power cord for use in India 56K V.92...

Service Guide
Page 56
...-Ah, 47 Wh 6 cell, 2.55-Ah, 55 Wh Spare part number 593553-001 593554-001 Before disassembling the computer: 1. Disconnect the power from the computer by first disconnecting the power cord from the AC outlet and then disconnecting the AC adapter from the computer. Pivot the battery (2) upward and lift it down through...
...-Ah, 47 Wh 6 cell, 2.55-Ah, 55 Wh Spare part number 593553-001 593554-001 Before disassembling the computer: 1. Disconnect the power from the computer by first disconnecting the power cord from the AC outlet and then disconnecting the AC adapter from the computer. Pivot the battery (2) upward and lift it down through...
Service Guide
Page 57
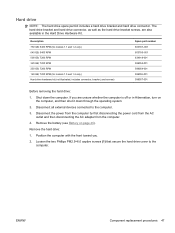
Remove the hard drive: 1. Disconnect all external devices connected to the computer. Disconnect the power from the computer by first disconnecting the power cord from the AC outlet and then disconnecting the AC adapter from the computer. 4. Loosen the two Phillips PM2.5×6.0 captive screws (1) that secure the hard ...
Remove the hard drive: 1. Disconnect all external devices connected to the computer. Disconnect the power from the computer by first disconnecting the power cord from the AC outlet and then disconnecting the AC adapter from the computer. 4. Loosen the two Phillips PM2.5×6.0 captive screws (1) that secure the hard ...

Service Guide
Page 60
... are unsure whether the computer is off or in the hard drive bay. 50 Chapter 4 Removal and replacement procedures ENWW Disconnect the power from the computer by first disconnecting the power cord from the AC outlet and then disconnecting the AC adapter from the computer. 4. Insert a thin tool, such as a screw driver (1), into...
... are unsure whether the computer is off or in the hard drive bay. 50 Chapter 4 Removal and replacement procedures ENWW Disconnect the power from the computer by first disconnecting the power cord from the AC outlet and then disconnecting the AC adapter from the computer. 4. Insert a thin tool, such as a screw driver (1), into...

Service Guide
Page 62
... connected to the computer. 3. Loosen the three Phillips PM2.5×6.0 captive screws (1) that secure the mini-card compartment cover. 3. Disconnect the power from the computer by first disconnecting the power cord from the AC outlet and then disconnecting the AC adapter from the computer. 4. Remove the WLAN module: 1. WLAN module Description Spare part...
... connected to the computer. 3. Loosen the three Phillips PM2.5×6.0 captive screws (1) that secure the mini-card compartment cover. 3. Disconnect the power from the computer by first disconnecting the power cord from the AC outlet and then disconnecting the AC adapter from the computer. 4. Remove the WLAN module: 1. WLAN module Description Spare part...

